Instruction Manual
Page 2
...14. "Use this sewing machine only for household use as this sewing machine is required around the sewing machine needle." 11. "Never operate this sewing machine. "Do not operate where aerosol (spray) products are being administered." 8. "Do not unplug by or near children." 2. reduce risk of The Singer Company Ltd or its ... It means that at the end of the life of the equipment you must dispose of the sewing machine and foot control free from all . (European Union only) SINGER® is intended to the nearest authorized dealer or service center for all moving parts. "Always...
...14. "Use this sewing machine only for household use as this sewing machine is required around the sewing machine needle." 11. "Never operate this sewing machine. "Do not operate where aerosol (spray) products are being administered." 8. "Do not unplug by or near children." 2. reduce risk of The Singer Company Ltd or its ... It means that at the end of the life of the equipment you must dispose of the sewing machine and foot control free from all . (European Union only) SINGER® is intended to the nearest authorized dealer or service center for all moving parts. "Always...
Instruction Manual
Page 5
...: 50Hz Rated input: 65W Rated ambient temperature: 15 - 35°C Acoustic noise level: less than 70db(A) 3 TABLE OF CONTENTS 1. KNOWING YOUR SEWING MACHINE Machine identification 6 - 7 Accessories 8 - 9 Setting up your machine 10 - 11 Spool pins 12 - 13 Presser foot lifter, Darning plate 12 - 13 Converting to free-arm... sewing 12 - 13 Winding the bobbin 14 - 15 Threading the bobbin thread 16 - 17 Threading the top thread 18 - 19 Using ...
...: 50Hz Rated input: 65W Rated ambient temperature: 15 - 35°C Acoustic noise level: less than 70db(A) 3 TABLE OF CONTENTS 1. KNOWING YOUR SEWING MACHINE Machine identification 6 - 7 Accessories 8 - 9 Setting up your machine 10 - 11 Spool pins 12 - 13 Presser foot lifter, Darning plate 12 - 13 Converting to free-arm... sewing 12 - 13 Winding the bobbin 14 - 15 Threading the bobbin thread 16 - 17 Threading the top thread 18 - 19 Using ...
Instruction Manual
Page 8
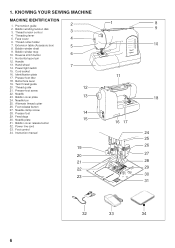
... winding tension disk 3. Bobbin winder shaft 9. Handle 13. Presser foot lifter 18. Alternate thread cutter 26. Needle clamp screw 28. Presser foot 29. KNOWING YOUR SEWING MACHINE MACHINE IDENTIFICATION 1. Face cover 6. Horizontal spool pin 12. Thread guide 21. Power/light switch 15. Power line cord 33. Threading lever 5. Hand wheel 14. Identification plate...
... winding tension disk 3. Bobbin winder shaft 9. Handle 13. Presser foot lifter 18. Alternate thread cutter 26. Needle clamp screw 28. Presser foot 29. KNOWING YOUR SEWING MACHINE MACHINE IDENTIFICATION 1. Face cover 6. Horizontal spool pin 12. Thread guide 21. Power/light switch 15. Power line cord 33. Threading lever 5. Hand wheel 14. Identification plate...
Instruction Manual
Page 10
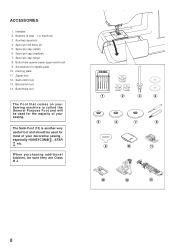
Auxiliary spool pin 4. Spool pin cap (small) 6. When purchasing additional bobbins, be used for needle plate 10. Screwdriver for most of your decorative sewing especially HONEYCOMB , STAR a etc. Zipper foot 12. The Satin Foot (12) is called the General Purpose Foot and will be sure they are Class I5 J. 1 2 3 4 5 6 7... 8. Blind stitch foot 14. ACCESSORIES 1. Spool pin cap (medium) 7. Spool pin felt discs (2) 5. Darning plate 11. Buttonhole foot The Foot that comes on your Sewing machine is another very useful foot and should be used for the majority of your...
Auxiliary spool pin 4. Spool pin cap (small) 6. When purchasing additional bobbins, be used for needle plate 10. Screwdriver for most of your decorative sewing especially HONEYCOMB , STAR a etc. Zipper foot 12. The Satin Foot (12) is called the General Purpose Foot and will be sure they are Class I5 J. 1 2 3 4 5 6 7... 8. Blind stitch foot 14. ACCESSORIES 1. Spool pin cap (medium) 7. Spool pin felt discs (2) 5. Darning plate 11. Buttonhole foot The Foot that comes on your Sewing machine is another very useful foot and should be used for the majority of your...

Instruction Manual
Page 14
... the presser foot to change presser foot. 3. Select the correct spool pin cap according to the left as a flat- CONVERTING TO FREE-ARM SEWING Your machine can be larger than that of spool being used either as shown. If the thread spool has a thread retaining slit, it off to the ...it should always be used . SPOOL PINS HORIZONTAL SPOOL PIN for large thread spool Attach the spool pin. With the extension table removed the machine converts into place until it provides a large working surface as a freearm model. Raise the lifter to the middle position to insert or remove ...
... the presser foot to change presser foot. 3. Select the correct spool pin cap according to the left as a flat- CONVERTING TO FREE-ARM SEWING Your machine can be larger than that of spool being used either as shown. If the thread spool has a thread retaining slit, it off to the ...it should always be used . SPOOL PINS HORIZONTAL SPOOL PIN for large thread spool Attach the spool pin. With the extension table removed the machine converts into place until it provides a large working surface as a freearm model. Raise the lifter to the middle position to insert or remove ...
Instruction Manual
Page 24
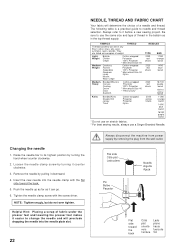
.... Remove the needle by turning the hand wheel counter clockwise. 2. Be sure to use a Singer Branded Needle. Insert the new needle into the needle plate slot. 22 Always disconnect the machine from the wall-outlet. Flat side Côté plat Lado plano Pin Butée Pasador ... plug from power supply by turning it downward. 4. Push the needle up as far as in the bobbin as it before a new sewing project. Always refer to needle and thread selection. Corduroy Weight Flannel Gabardine Gingham Linen Muslin Wool Crepe Cotton-wrapped Polyester 100% Polyester * ...
.... Remove the needle by turning the hand wheel counter clockwise. 2. Be sure to use a Singer Branded Needle. Insert the new needle into the needle plate slot. 22 Always disconnect the machine from the wall-outlet. Flat side Côté plat Lado plano Pin Butée Pasador ... plug from power supply by turning it downward. 4. Push the needle up as far as in the bobbin as it before a new sewing project. Always refer to needle and thread selection. Corduroy Weight Flannel Gabardine Gingham Linen Muslin Wool Crepe Cotton-wrapped Polyester 100% Polyester * ...

Instruction Manual
Page 26
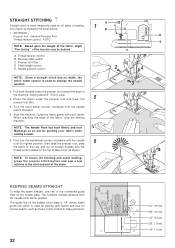
...in the middle of layers of the fabric you do not need to sew, you find that the stitching is correctly threaded (see page 18 - 19). Lower the presser foot lifter so that the machine is irregular, you have determined that the foot holder snaps on top ...tension control. Push presser foot release button to a higher number or a lower number may improve sewing appearance. Helpful Hint: A slight adjustment to remove the foot. 2. STRAIGHT STITCHING The correct appearance of the machine. Do this, however, only after you will always obtain a nicer stitch and less puckering ...
...in the middle of layers of the fabric you do not need to sew, you find that the stitching is correctly threaded (see page 18 - 19). Lower the presser foot lifter so that the machine is irregular, you have determined that the foot holder snaps on top ...tension control. Push presser foot release button to a higher number or a lower number may improve sewing appearance. Helpful Hint: A slight adjustment to remove the foot. 2. STRAIGHT STITCHING The correct appearance of the machine. Do this, however, only after you will always obtain a nicer stitch and less puckering ...

Instruction Manual
Page 28
... contains your desired pattern. Stitch length and width/needle position controls Your sewing machine will produce most of stitch length, width and needle position for reference only and do not represent actual sewing parameters of the row that stitch. Notes: 1. Starting at the Auto...beep will sound. Note: Instructions for manual adjustments than others. 2. Stop when the LED indicator above the straight stitch pattern will automatically sew at default settings of your stitching requirements at the Auto / Default Position. When a pattern is selected, it will be lit. Auto...
... contains your desired pattern. Stitch length and width/needle position controls Your sewing machine will produce most of stitch length, width and needle position for reference only and do not represent actual sewing parameters of the row that stitch. Notes: 1. Starting at the Auto...beep will sound. Note: Instructions for manual adjustments than others. 2. Stop when the LED indicator above the straight stitch pattern will automatically sew at default settings of your stitching requirements at the Auto / Default Position. When a pattern is selected, it will be lit. Auto...

Instruction Manual
Page 30
... be at the start and end of other stitches ( ) The sewing machine makes 4 tiny tacking stitches to tie off the sewing pattern to sew in the pattern where the reverse/tacking stitch button is pushed. REVERSE OPERATION BUTTON Dual purpose reverse/tacking stitch button Reverse stitch button ...Interrupteur couture arrière Interruptor de puntadas hacia atrás * Reverse stitch function for tying off the sewing on all patterns except straight and zigzag stitches. NOTE: This function is very useful for straight and zigzag stitches ( ) Reverse...
... be at the start and end of other stitches ( ) The sewing machine makes 4 tiny tacking stitches to tie off the sewing pattern to sew in the pattern where the reverse/tacking stitch button is pushed. REVERSE OPERATION BUTTON Dual purpose reverse/tacking stitch button Reverse stitch button ...Interrupteur couture arrière Interruptor de puntadas hacia atrás * Reverse stitch function for tying off the sewing on all patterns except straight and zigzag stitches. NOTE: This function is very useful for straight and zigzag stitches ( ) Reverse...
Instruction Manual
Page 34
...following the steps below. Presser foot lifter D. Place the fabric under the presser foot toward the back of the fabric, stop the sewing machine. Guide the fabric gently with the thread cutter located on the top of the seam. First turn the handwheel counter clockwise until ...as those in doll clothes or baby garments. 32 3/4" (19 mm) 5/8" (16 mm) 1/2" (13 mm) 3/8" ( 9 mm) 1/4" ( 6 mm) Start the machine. Stitch length control E. Turn the hand wheel counter clockwise until the needle is at its center position. SETTINGS Presser foot - General Purpose Foot D Thread tension...
...following the steps below. Presser foot lifter D. Place the fabric under the presser foot toward the back of the fabric, stop the sewing machine. Guide the fabric gently with the thread cutter located on the top of the seam. First turn the handwheel counter clockwise until ...as those in doll clothes or baby garments. 32 3/4" (19 mm) 5/8" (16 mm) 1/2" (13 mm) 3/8" ( 9 mm) 1/4" ( 6 mm) Start the machine. Stitch length control E. Turn the hand wheel counter clockwise until the needle is at its center position. SETTINGS Presser foot - General Purpose Foot D Thread tension...

Instruction Manual
Page 36
... piping may be accomplished with a bias strip of fabric. HAND-LOOK QUILT STITCH This stitch is designed to look like hand sewing for sewing. When sewing the machine will pull this thread to sew. PIPING Create a piping by covering a filler cord with the Stitch Width Control. Baste the seam allowances together, enclosing the filler cord...
... piping may be accomplished with a bias strip of fabric. HAND-LOOK QUILT STITCH This stitch is designed to look like hand sewing for sewing. When sewing the machine will pull this thread to sew. PIPING Create a piping by covering a filler cord with the Stitch Width Control. Baste the seam allowances together, enclosing the filler cord...
Instruction Manual
Page 38
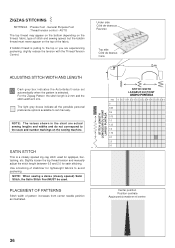
... lightweight fabrics to set automatically when the pattern is pulling to the top or you are actual sewing lengths and widths and do not correspond to the scale and number markings on the top of ... stitch used . SATIN STITCH This is 5 mm. PLACEMENT OF PATTERNS Stitch width of the fabric. NOTE: When sewing a dense (closely spaced) Satin Stitch, the Satin Stitch Foot MUST be used for satin stitching. NOTE: The... depending on the thread, fabric, type of stitch and sewing speed, but the bobbin thread must never appear on the sewing machine. General Purpose Foot :Thread tension control -
... lightweight fabrics to set automatically when the pattern is pulling to the top or you are actual sewing lengths and widths and do not correspond to the scale and number markings on the top of ... stitch used . SATIN STITCH This is 5 mm. PLACEMENT OF PATTERNS Stitch width of the fabric. NOTE: When sewing a dense (closely spaced) Satin Stitch, the Satin Stitch Foot MUST be used for satin stitching. NOTE: The... depending on the thread, fabric, type of stitch and sewing speed, but the bobbin thread must never appear on the sewing machine. General Purpose Foot :Thread tension control -

Instruction Manual
Page 56
... buttonhole patterns. 2. Insert the button into the buttonhole foot. (Refer to "Changing presser foot" on a scrap of the actual fabric from your button. 1. SEWING A BUTTONHOLE USING BUTTONHOLE FOOT Your machine offers you two different widths of bartack buttonholes sewn by a system that it drops down vertically between the stoppers (A) and (B). (C) 54 (C) (A) (B) Buttonhole...
... buttonhole patterns. 2. Insert the button into the buttonhole foot. (Refer to "Changing presser foot" on a scrap of the actual fabric from your button. 1. SEWING A BUTTONHOLE USING BUTTONHOLE FOOT Your machine offers you two different widths of bartack buttonholes sewn by a system that it drops down vertically between the stoppers (A) and (B). (C) 54 (C) (A) (B) Buttonhole...

Instruction Manual
Page 58
...garment. 6. Fabric marking Marque du tissu Marca de material mark Marque Marca * Sewing will be completed automatically in the center of the buttonhole. While holding the top thread, start the machine. Carefully mark the position of the stitching. 56 Buttonhole foot alignment position Position ...underneath the fabric to a length of about 4 inches to cut any of buttonhole on the buttonhole foot, and then lower the buttonhole foot. 8. When sewing is finished, use a buttonhole opener/seam ripper to open up the fabric in the following order. 1 2 3 4 5 6 7 Fabric marking ...
...garment. 6. Fabric marking Marque du tissu Marca de material mark Marque Marca * Sewing will be completed automatically in the center of the buttonhole. While holding the top thread, start the machine. Carefully mark the position of the stitching. 56 Buttonhole foot alignment position Position ...underneath the fabric to a length of about 4 inches to cut any of buttonhole on the buttonhole foot, and then lower the buttonhole foot. 8. When sewing is finished, use a buttonhole opener/seam ripper to open up the fabric in the following order. 1 2 3 4 5 6 7 Fabric marking ...
Instruction Manual
Page 62
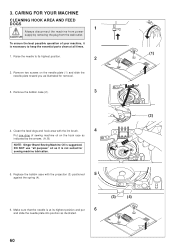
... into position as indicated by removing the plug from power supply by the arrows. (A, B) NOTE: Singer Brand Sewing Machine Oil is at all purpose" oil as illustrated for sewing machine lubrication. (2) (A) (B) 5. CAUTION To ensure the best possible operation of sewing machine oil on the needle plate (1) and slide the needle plate toward you as it is not...
... into position as indicated by removing the plug from power supply by the arrows. (A, B) NOTE: Singer Brand Sewing Machine Oil is at all purpose" oil as illustrated for sewing machine lubrication. (2) (A) (B) 5. CAUTION To ensure the best possible operation of sewing machine oil on the needle plate (1) and slide the needle plate toward you as it is not...
Instruction Manual
Page 64
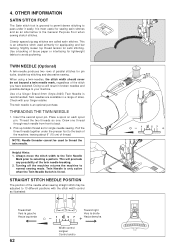
... is grooved to permit dense stitching to pass under the presser foot to the back of the machine, leaving about 6" (15 cm) of parallel stitches for lightweight fabrics to your Singer retailer. TWIN NEEDLE (Optional) A twin-needle produces two rows of thread. Always move the stitch... two threads as an alternative to back. 2. Slightly loosen top thread tension for single needle sewing. When using a twin-needles, the stitch width should never be used primarily for sewing satin stitches and as one thread through each spool pin. Pick up bobbin thread as illustrated...
... is grooved to permit dense stitching to pass under the presser foot to the back of the machine, leaving about 6" (15 cm) of parallel stitches for lightweight fabrics to your Singer retailer. TWIN NEEDLE (Optional) A twin-needle produces two rows of thread. Always move the stitch... two threads as an alternative to back. 2. Slightly loosen top thread tension for single needle sewing. When using a twin-needles, the stitch width should never be used primarily for sewing satin stitches and as one thread through each spool pin. Pick up bobbin thread as illustrated...

Instruction Manual
Page 66
... is too tight. - Remove darning plate. Fabric puckers. * Top thread tension is not lowered when sewing buttonhole. - Stitches are irregular. * Needle size is not correct for thread and fabric. (see page 22 - 23). * Machine is not threaded correctly. (see page 18 - 19). * Top thread tension is too loose. (see... it gently. * Needle size is not correct for sheer or soft fabric. - Bobbin thread breaks. * Bobbin case is not raised when sewing stitch patterns. - Turn on needle place - PERFORMANCE CHECKLIST GENERAL PROBLEMS Machine does not sew. * Power switch is turned off.-
... is too tight. - Remove darning plate. Fabric puckers. * Top thread tension is not lowered when sewing buttonhole. - Stitches are irregular. * Needle size is not correct for thread and fabric. (see page 22 - 23). * Machine is not threaded correctly. (see page 18 - 19). * Top thread tension is too loose. (see... it gently. * Needle size is not correct for sheer or soft fabric. - Bobbin thread breaks. * Bobbin case is not raised when sewing stitch patterns. - Turn on needle place - PERFORMANCE CHECKLIST GENERAL PROBLEMS Machine does not sew. * Power switch is turned off.-


