
Instruction Manual
Page 3
... any adjustments in the needle area, such as contained in . 2. Always use by the manufacturer as threading needle, changing needle, threading bobbin, changing presser foot or changing the light. 10. DANGER -To reduce the risk of lint, dust, and loose cloth. 5. Never operate the appliance with the appliance. Keep fingers away from accumulation of electrical shock: 1. Always unplug this sewing machine. Do not use outdoors. 13. Always unplug sewing machine from...
... any adjustments in the needle area, such as contained in . 2. Always use by the manufacturer as threading needle, changing needle, threading bobbin, changing presser foot or changing the light. 10. DANGER -To reduce the risk of lint, dust, and loose cloth. 5. Never operate the appliance with the appliance. Keep fingers away from accumulation of electrical shock: 1. Always unplug this sewing machine. Do not use outdoors. 13. Always unplug sewing machine from...
Instruction Manual
Page 4
... 6-7 ACCESSORIES 8 CONNECTING THE MACHINE TO THE POWER SOURCE 9 Connecting the machine 9 WINDING THE BOBBIN 10-11 Bobbin winding 10-11 INSERTING THE BOBBIN 12 THREADING THE UPPER THREAD 13-14 USING THE NEEDLE THREADER 15 DRAWING UP THE LOWER THREAD 16 CUTTING THE THREAD 16 TWO-STEP PRESSER FOOT LIFTER 17 STARTING SEWING 18 Start/stop button 18 Foot control 18 THREAD TENSION 19 CHANGING THE PRESSER FOOT 20 PRESSER FOOT CHART 21 MATCHING NEEDLE/ FABRIC/ THREAD 22 REPLACING THE NEEDLE 23 RAISE OR LOWER FEED DOGS 23 OPERATION BUTTONS 24-25 Start/stop button 24 Reverse button...
... 6-7 ACCESSORIES 8 CONNECTING THE MACHINE TO THE POWER SOURCE 9 Connecting the machine 9 WINDING THE BOBBIN 10-11 Bobbin winding 10-11 INSERTING THE BOBBIN 12 THREADING THE UPPER THREAD 13-14 USING THE NEEDLE THREADER 15 DRAWING UP THE LOWER THREAD 16 CUTTING THE THREAD 16 TWO-STEP PRESSER FOOT LIFTER 17 STARTING SEWING 18 Start/stop button 18 Foot control 18 THREAD TENSION 19 CHANGING THE PRESSER FOOT 20 PRESSER FOOT CHART 21 MATCHING NEEDLE/ FABRIC/ THREAD 22 REPLACING THE NEEDLE 23 RAISE OR LOWER FEED DOGS 23 OPERATION BUTTONS 24-25 Start/stop button 24 Reverse button...
Instruction Manual
Page 5
... stretch fabrics 41 BAR TACK STITCH 42 EYELET STITCH 43 DARNING STITCH 44-45 ZIPPER INSERTION 46-47 Inserting a centered zipper 46 Inserting a lapped zipper 47 NARROW HEMMING 48 CORDING 49 Single cording 49 Triple cording 49 SATIN STITCH SEWING 50 EDGE/QUILTING GUIDE 51 GATHERING 52 SMOCKING 53 FREE MOTION SEWING 54-55 Darning 54 Embroidery 55 Monogramming 55 WALKING FOOT 56 FAGOTING 57 DECORATIVE TOPSTITCHING 57 SCALLOP STITCH 58 Scallop hem 58 Scallop edging 58 ELONGATION 59 MIRROR IMAGE 60 USING THE TWIN NEEDLE...
... stretch fabrics 41 BAR TACK STITCH 42 EYELET STITCH 43 DARNING STITCH 44-45 ZIPPER INSERTION 46-47 Inserting a centered zipper 46 Inserting a lapped zipper 47 NARROW HEMMING 48 CORDING 49 Single cording 49 Triple cording 49 SATIN STITCH SEWING 50 EDGE/QUILTING GUIDE 51 GATHERING 52 SMOCKING 53 FREE MOTION SEWING 54-55 Darning 54 Embroidery 55 Monogramming 55 WALKING FOOT 56 FAGOTING 57 DECORATIVE TOPSTITCHING 57 SCALLOP STITCH 58 Scallop hem 58 Scallop edging 58 ELONGATION 59 MIRROR IMAGE 60 USING THE TWIN NEEDLE...

Instruction Manual
Page 6
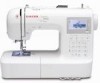
PRINCIPAL PARTS OF THE MACHINE Tension dial Face plate Operation buttons A Thread cutter Buttonhole lever Auto needle threader Needle plate cover Sewing table and accessory box Hole for second spool pin Handwheel Main power switch Power cord socket Foot controller connector 1 Bobbin winder spindle Speed limiting adjustment lever LCD screen B Function buttons C Selection buttons B Function buttons Pattern plates Horizontal spool pin Handle Presser foot lifter Drop feed lever
PRINCIPAL PARTS OF THE MACHINE Tension dial Face plate Operation buttons A Thread cutter Buttonhole lever Auto needle threader Needle plate cover Sewing table and accessory box Hole for second spool pin Handwheel Main power switch Power cord socket Foot controller connector 1 Bobbin winder spindle Speed limiting adjustment lever LCD screen B Function buttons C Selection buttons B Function buttons Pattern plates Horizontal spool pin Handle Presser foot lifter Drop feed lever
Instruction Manual
Page 8
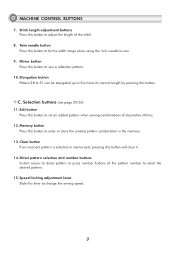
... the stitch. 8. Edit button Press this button to set an added pattern when sewing combinations of the pattern number to sew. 9. Direct pattern selection and number buttons Instant access to direct pattern or press number buttons of decorative stitches. 12. Elongation button Pattern 28 to 51 can be elongated up to five times its normal length by pressing this button to fix the width range when using the twin needle to select the desired pattern. 15. Twin needle button Press this button. MACHINE CONTROL BUTTONS 7.
... the stitch. 8. Edit button Press this button to set an added pattern when sewing combinations of the pattern number to sew. 9. Direct pattern selection and number buttons Instant access to direct pattern or press number buttons of decorative stitches. 12. Elongation button Pattern 28 to 51 can be elongated up to five times its normal length by pressing this button to fix the width range when using the twin needle to select the desired pattern. 15. Twin needle button Press this button. MACHINE CONTROL BUTTONS 7.

Instruction Manual
Page 13
... foot F 006904008 Satin stitch foot A 006172008 Button sewing foot 006914008 Brush/ Seam ripper 006099008 Spool holders (L & S) R12373209(L) TA10943209(S) Edge/quilting guide 006008001 Bobbin (3x) 006084009 Screwdriver (L & S) 006012008 Pack of needles 006014148 Spool pin felt 006015009 Second spool pin R60033209 Sewing machine dust cover 020L008000 Extension table H1A1464209 Optional Cording foot M 006813008 Rolled hem foot K 006900008 Quilting foot P 006916008 Darning/ Embroidery foot 006016008 Gathering foot 006917008 SINGER style 2025 twin needle 006020008 Walking foot...
... foot F 006904008 Satin stitch foot A 006172008 Button sewing foot 006914008 Brush/ Seam ripper 006099008 Spool holders (L & S) R12373209(L) TA10943209(S) Edge/quilting guide 006008001 Bobbin (3x) 006084009 Screwdriver (L & S) 006012008 Pack of needles 006014148 Spool pin felt 006015009 Second spool pin R60033209 Sewing machine dust cover 020L008000 Extension table H1A1464209 Optional Cording foot M 006813008 Rolled hem foot K 006900008 Quilting foot P 006916008 Darning/ Embroidery foot 006016008 Gathering foot 006917008 SINGER style 2025 twin needle 006020008 Walking foot...
Instruction Manual
Page 21
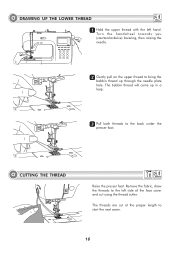
Turn the handwheel towards you (counterclockwise) lowering, then raising the needle. 1 22 Gently pull on the upper thread to start the next seam. 16 Remove the fabric, draw the threads to the back under the presser foot. 3 CUTTING THE THREAD Raise the presser foot. The threads are cut using the thread cutter. DRAWING UP THE LOWER THREAD 11 Hold the upper thread with the left side of the face cover and cut at the proper length to bring the bobbin thread up in a loop. 2 33 Pull both threads to the left hand. The bobbin thread will come up through the needle plate hole.
Turn the handwheel towards you (counterclockwise) lowering, then raising the needle. 1 22 Gently pull on the upper thread to start the next seam. 16 Remove the fabric, draw the threads to the back under the presser foot. 3 CUTTING THE THREAD Raise the presser foot. The threads are cut using the thread cutter. DRAWING UP THE LOWER THREAD 11 Hold the upper thread with the left side of the face cover and cut at the proper length to bring the bobbin thread up in a loop. 2 33 Pull both threads to the left hand. The bobbin thread will come up through the needle plate hole.
Instruction Manual
Page 26
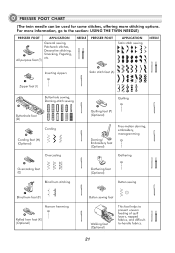
...Satin stitch sewing NEEDLE Inserting zippers Satin stitch foot (A) Zipper foot (I) Buttonhole sewing, Darning-stitch sewing Buttonhole foot (D) Cording Cording foot (M) (Optional) Overcasting Quilting Quilting foot (P) (Optional) Darning/ Embroidery foot (Optional) Free-motion darning, embroidery, monogramming Gathering Overcasting foot (E) Blind hem stitching Gathering foot (Optional) Button sewing Blind hem foot (F) Narrow hemming Rolled hem foot (K) (Optional) Button sewing foot Walking foot (Optional) This foot helps to the section: USING THE TWIN NEEDLE) PRESSER FOOT...
...Satin stitch sewing NEEDLE Inserting zippers Satin stitch foot (A) Zipper foot (I) Buttonhole sewing, Darning-stitch sewing Buttonhole foot (D) Cording Cording foot (M) (Optional) Overcasting Quilting Quilting foot (P) (Optional) Darning/ Embroidery foot (Optional) Free-motion darning, embroidery, monogramming Gathering Overcasting foot (E) Blind hem stitching Gathering foot (Optional) Button sewing Blind hem foot (F) Narrow hemming Rolled hem foot (K) (Optional) Button sewing foot Walking foot (Optional) This foot helps to the section: USING THE TWIN NEEDLE) PRESSER FOOT...

Instruction Manual
Page 36
Lower the presser foot and resume sewing. Use the needle as pant hems and cuffs. 31 Reverse stitching is convenient for sewing tubular areas such as a pivot and turn the fabric. 5. Free-arm sewing is used to secure the threads at the beginning and at the end of a seam. The machine will sew forward when the button is released. Press the reverse button and sew 4-5 stitches. Lower the needle into the fabric 5 manually or by pressing the needle up/ down...
Lower the presser foot and resume sewing. Use the needle as pant hems and cuffs. 31 Reverse stitching is convenient for sewing tubular areas such as a pivot and turn the fabric. 5. Free-arm sewing is used to secure the threads at the beginning and at the end of a seam. The machine will sew forward when the button is released. Press the reverse button and sew 4-5 stitches. Lower the needle into the fabric 5 manually or by pressing the needle up/ down...
Instruction Manual
Page 40
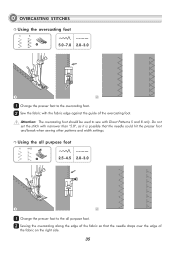
Do not set the stitch with Direct Patterns 5 and 8 only. OVERCASTING STITCHES Using the overcasting foot E 5.0~7.0 2.0~3.0 1 2 11 Change the presser foot to the overcasting foot. 22 Sew the fabric with the fabric edge against the guide of the fabric on the right side. 35 Using the all purpose foot A-02 T 2.5~4.5 2.0~3.0 1 2 11 Change the presser foot to sew with narrower than "5.0", as it is possible that the needle drops over the edge of the overcasting foot. Attention...
Do not set the stitch with Direct Patterns 5 and 8 only. OVERCASTING STITCHES Using the overcasting foot E 5.0~7.0 2.0~3.0 1 2 11 Change the presser foot to the overcasting foot. 22 Sew the fabric with the fabric edge against the guide of the fabric on the right side. 35 Using the all purpose foot A-02 T 2.5~4.5 2.0~3.0 1 2 11 Change the presser foot to sew with narrower than "5.0", as it is possible that the needle drops over the edge of the overcasting foot. Attention...
Instruction Manual
Page 49
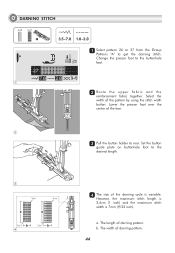
... Group Patterns "A" to the buttonhole foot. 1 22 B a s t e t h e u p p e r f a b r i c a n d t h e reinforcement fabric together. Change the presser foot to get the darning stitch. Select the width of the darning cycle is 7mm (9/32 inch). The size of the pattern by using the stitch width button. a. The length of the tear. Set the button guide plate on buttonhole foot to rear. Lower the presser foot over the center of darning pattern. b. NOTE Make no gap here 2 33. The width of darning pattern. 44 Pull the button holder...
... Group Patterns "A" to the buttonhole foot. 1 22 B a s t e t h e u p p e r f a b r i c a n d t h e reinforcement fabric together. Change the presser foot to get the darning stitch. Select the width of the darning cycle is 7mm (9/32 inch). The size of the pattern by using the stitch width button. a. The length of the tear. Set the button guide plate on buttonhole foot to rear. Lower the presser foot over the center of darning pattern. b. NOTE Make no gap here 2 33. The width of darning pattern. 44 Pull the button holder...

Instruction Manual
Page 59
... of the hole to coordinate sewing speed and movement of stitching. 54 Press the darning foot on firmly from behind the needle clamp screw (b). Darning Please Note: Free motion darning is filled, turn the work and cover the area with your index finger and tighten the screw (c). It is necessary to secure the threads. " to lower the Remove the presser foot holder, and attach the darning foot to " feed dogs. Move the drop feed lever to the presser foot holder bar. The lever (a) should be...
... of the hole to coordinate sewing speed and movement of stitching. 54 Press the darning foot on firmly from behind the needle clamp screw (b). Darning Please Note: Free motion darning is filled, turn the work and cover the area with your index finger and tighten the screw (c). It is necessary to secure the threads. " to lower the Remove the presser foot holder, and attach the darning foot to " feed dogs. Move the drop feed lever to the presser foot holder bar. The lever (a) should be...
Instruction Manual
Page 66
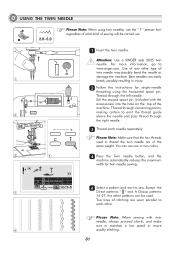
... instructions for single-needle threading using twin needles, use one or two colors. 44 Press the Twin needle button, and the machine automatically reduces the maximum width for twin needle sewing. 66 Select a pattern and start to sew. Except the 5 Direct patterns " " and A Group patterns 14-27, the other type of the machine. Please Note: When sewing with the accessories) into the hole on the top of twin needle may possibly bend the needle or damage the machine. T 2.0~5.0 1 2 3 4 11 Insert the twin needle. Thread...
... instructions for single-needle threading using twin needles, use one or two colors. 44 Press the Twin needle button, and the machine automatically reduces the maximum width for twin needle sewing. 66 Select a pattern and start to sew. Except the 5 Direct patterns " " and A Group patterns 14-27, the other type of the machine. Please Note: When sewing with the accessories) into the hole on the top of twin needle may possibly bend the needle or damage the machine. T 2.0~5.0 1 2 3 4 11 Insert the twin needle. Thread...

Instruction Manual
Page 71
... sewing machine is experiencing a problem The animation message means that the thread is winding the bobbin. Lower the buttonhole lever When you to lower the buttonhole lever. 66 Instruction animation message display Bobbin winding The bobbin winder is twisted or jammed and the hand wheel axle cannot move. After the problem has been solved, the machine will be demonstrated the figure " ", it is to remind you select any buttonhole or darning stitch...
... sewing machine is experiencing a problem The animation message means that the thread is winding the bobbin. Lower the buttonhole lever When you to lower the buttonhole lever. 66 Instruction animation message display Bobbin winding The bobbin winder is twisted or jammed and the hand wheel axle cannot move. After the problem has been solved, the machine will be demonstrated the figure " ", it is to remind you select any buttonhole or darning stitch...
Instruction Manual
Page 75
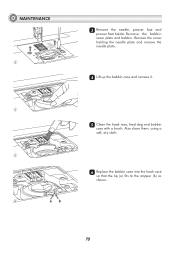
Also clean them, using a soft, dry cloth. 5 66 Replace the bobbin case into the hook race so that the tip (a) fits to the stopper (b) as shown. 6 ab 70 Remove the screw holding the needle plate and remove the needle plate. 44 Lift up the bobbin case and remove it. 4 55 Clean the hook race, feed dog and bobbin case with a brush. Remove the bobbin cover plate and bobbin. MAINTENANCE 3 33 Remove the needle, presser foot and presser foot holder.
Also clean them, using a soft, dry cloth. 5 66 Replace the bobbin case into the hook race so that the tip (a) fits to the stopper (b) as shown. 6 ab 70 Remove the screw holding the needle plate and remove the needle plate. 44 Lift up the bobbin case and remove it. 4 55 Clean the hook race, feed dog and bobbin case with a brush. Remove the bobbin cover plate and bobbin. MAINTENANCE 3 33 Remove the needle, presser foot and presser foot holder.

Instruction Manual
Page 76
... the spool holder pin. 2.Reduce the thread tension (lower number). 3.Select a larger needle. 4.Remove and reinsert the needle (flat side towards the back). 3.Choose a needle to suit the thread and fabric. 4.Select the correct foot. 5.Use the screwdriver to firmly tighten the screw. 6.The presser foot that is used . 3.Choose a needle to sew. 7.The upper thread tension is too tight. 7.Loosen the upper thread tension. 1.The machine is not inserted correctly. 1.Remove and reinsert the bobbin case and pull on the thread. Upper thread breaks 2.The thread tension...
... the spool holder pin. 2.Reduce the thread tension (lower number). 3.Select a larger needle. 4.Remove and reinsert the needle (flat side towards the back). 3.Choose a needle to suit the thread and fabric. 4.Select the correct foot. 5.Use the screwdriver to firmly tighten the screw. 6.The presser foot that is used . 3.Choose a needle to sew. 7.The upper thread tension is too tight. 7.Loosen the upper thread tension. 1.The machine is not inserted correctly. 1.Remove and reinsert the bobbin case and pull on the thread. Upper thread breaks 2.The thread tension...

Instruction Manual
Page 77
... the machine. 1.Turn on the hook or 1.Clean the hook and feed dog as needle bar. TROUBLE SHOOTING GUIDE Problem Cause Correction Reference Seam puckering Patterns are distorted 1.The needle thread tension is too tight. 1.Loosen the thread tension. 2.The needle thread is not suitable for the 3.Make stitch adjustment. The machine jams The machine is noisy 1.Thread is caught in the hook. 2.The feed dogs are packed with lint. Remove the upper thread and bobbin case. Remove the upper thread and bobbin case. The sewing machine doesn't operate 4.The Start/stop button was...
... the machine. 1.Turn on the hook or 1.Clean the hook and feed dog as needle bar. TROUBLE SHOOTING GUIDE Problem Cause Correction Reference Seam puckering Patterns are distorted 1.The needle thread tension is too tight. 1.Loosen the thread tension. 2.The needle thread is not suitable for the 3.Make stitch adjustment. The machine jams The machine is noisy 1.Thread is caught in the hook. 2.The feed dogs are packed with lint. Remove the upper thread and bobbin case. Remove the upper thread and bobbin case. The sewing machine doesn't operate 4.The Start/stop button was...
Instruction Manual 2
Page 16
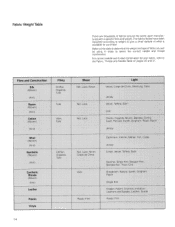
... Light Ve.vet. For correct needle and thread combination for purchase. f aide Jersey Velvet, Taffeta, Satin Cire Challis, Organdy, Muslin, Bastiste, Dimity, Lawn, Percale, Eyelet, Gingham, Piqué, Poplin Jersey Cashmere, Flannel, Mohair, Felt, Crepe Jersey Crepe, Velvet, Taffeta, Satin ...fabrics below have been classified according to weight to give a small sample of what is available for your fabric, refer to determine the weight and type of fabrics around the world, each manufactured with a specific fibre and weight. Refer to this table to the Fabric, Thread and Needle Table...
... Light Ve.vet. For correct needle and thread combination for purchase. f aide Jersey Velvet, Taffeta, Satin Cire Challis, Organdy, Muslin, Bastiste, Dimity, Lawn, Percale, Eyelet, Gingham, Piqué, Poplin Jersey Cashmere, Flannel, Mohair, Felt, Crepe Jersey Crepe, Velvet, Taffeta, Satin ...fabrics below have been classified according to weight to give a small sample of what is available for your fabric, refer to determine the weight and type of fabrics around the world, each manufactured with a specific fibre and weight. Refer to this table to the Fabric, Thread and Needle Table...

Instruction Manual 2
Page 108
...; bobbin case area is free from spool. ® thread spool is raised. Machine Does Not Sew Needle does not move roperly under presser foot Make sure . . . ® machine is threaded correctly. ® line of stitching is started in winding position. ® thread passes under pres- o threads are undamaged. O bobbin rim is held securely by thumb screw spring at start of lint and loose threads (see page 28). ® correct presser foot and needle plate are using the machine correctly. Loose stitches on underside cf fabric Make...
...; bobbin case area is free from spool. ® thread spool is raised. Machine Does Not Sew Needle does not move roperly under presser foot Make sure . . . ® machine is threaded correctly. ® line of stitching is started in winding position. ® thread passes under pres- o threads are undamaged. O bobbin rim is held securely by thumb screw spring at start of lint and loose threads (see page 28). ® correct presser foot and needle plate are using the machine correctly. Loose stitches on underside cf fabric Make...

Instruction Manual 2
Page 111
... Thread from Bobbin Replacing a Wound Bobbin Replacing an Empty Bobbin Winding Border Designs Buttonholes Adjusting Cutting Space Changing Stitch Density Cutting Button Opening Length Stitching a Series Buttons Caring for Your Machine Chainstitching Cleaning the Machine Connecting Machine Construction Stitches Darning Decorative Stitches Detachable Spool Pin Edge Finishes Embroidery Even Feed Foot Fabric, Thread and Needle Table Fabric Weight Table Fagotting (Featherstitch) Fine Tuning Finishes for Hems and Facings Flexi-Stitch Patterns Free-Arm Sewing Fringed Edges Functional Stitches Guiding...
... Thread from Bobbin Replacing a Wound Bobbin Replacing an Empty Bobbin Winding Border Designs Buttonholes Adjusting Cutting Space Changing Stitch Density Cutting Button Opening Length Stitching a Series Buttons Caring for Your Machine Chainstitching Cleaning the Machine Connecting Machine Construction Stitches Darning Decorative Stitches Detachable Spool Pin Edge Finishes Embroidery Even Feed Foot Fabric, Thread and Needle Table Fabric Weight Table Fagotting (Featherstitch) Fine Tuning Finishes for Hems and Facings Flexi-Stitch Patterns Free-Arm Sewing Fringed Edges Functional Stitches Guiding...


