
Instruction Manual
Page 2
... making any adjustments in the needle area, such as threading needle, changing needle, threading bobbin, or changing presser foot, and the like. 10.Always unplug sewing machine from the electrical outlet when removing covers, lubricating, or when making any other user servicing adjustments mentioned in this sewing machine. Always use as described in . 2. Keep fingers away from outlet. 15.Do not unplug by the manufacturer as contained in the instruction manual. 11.Never drop or insert any...
... making any adjustments in the needle area, such as threading needle, changing needle, threading bobbin, or changing presser foot, and the like. 10.Always unplug sewing machine from the electrical outlet when removing covers, lubricating, or when making any other user servicing adjustments mentioned in this sewing machine. Always use as described in . 2. Keep fingers away from outlet. 15.Do not unplug by the manufacturer as contained in the instruction manual. 11.Never drop or insert any...
Instruction Manual
Page 6
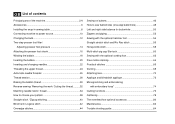
... 2/4 Accessories 6 Installing the snap-in sewing table 8 Connecting machine to power source 10 Changing the bulb 12 Two-step presser foot lifter/ Adjusting presser foot pressure 14 Attaching the presser foot shank 16 Winding the bobbin 18 Inserting the bobbin 20 Inserting and changing needles 22 Threading the upper thread 24 Automatic needle threader 26 Thread tension 28 Raising the bobbin thread 30 Reverse sewing/ Removing the work/ Cutting the thread ..........32 Matching needle/ fabric/ thread 34 How to choose your pattern 38 Straight stitch / Zigzag stitching 40 Blind hem...
... 2/4 Accessories 6 Installing the snap-in sewing table 8 Connecting machine to power source 10 Changing the bulb 12 Two-step presser foot lifter/ Adjusting presser foot pressure 14 Attaching the presser foot shank 16 Winding the bobbin 18 Inserting the bobbin 20 Inserting and changing needles 22 Threading the upper thread 24 Automatic needle threader 26 Thread tension 28 Raising the bobbin thread 30 Reverse sewing/ Removing the work/ Cutting the thread ..........32 Matching needle/ fabric/ thread 34 How to choose your pattern 38 Straight stitch / Zigzag stitching 40 Blind hem...

Instruction Manual
Page 9
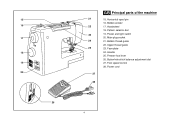
Thread tension dial 9 2. Presser foot pressure adjustment 2 3. Presser foot 11 6. Drop feed control 6 13. Thread take-up lever 10 4. Needle plate 7. One step buttonhole lever 14. Stitch length dial 11. Pattern indicator window 12. Thread cutter 3 5. GB Principal parts of the machine 8 1 1. Reverse sewing lever 9. Automatic threader 7 13 14 12 PUSH 2 Bobbin stopper 5 10. Removable sewing table/ accessory storage 4 8.
Thread tension dial 9 2. Presser foot pressure adjustment 2 3. Presser foot 11 6. Drop feed control 6 13. Thread take-up lever 10 4. Needle plate 7. One step buttonhole lever 14. Stitch length dial 11. Pattern indicator window 12. Thread cutter 3 5. GB Principal parts of the machine 8 1 1. Reverse sewing lever 9. Automatic threader 7 13 14 12 PUSH 2 Bobbin stopper 5 10. Removable sewing table/ accessory storage 4 8.
Instruction Manual
Page 11
Foot speed control 28. Upper thread guide 23. Buttonhole stitch balance adjustment slot 27. Bobbin thread guide 22. Power cord 4 Pattern selector dial 19. Face plate 24. Handle 25. Handwheel 18. Power and light switch 20. Presser foot lever 26. 15 16 17 18 19 20 26 21 22 23 24 25 27 28 GB Principal parts of the machine 15. Horizontal spool pin 16. Main plug socket 21. Bobbin winder 17.
Foot speed control 28. Upper thread guide 23. Buttonhole stitch balance adjustment slot 27. Bobbin thread guide 22. Power cord 4 Pattern selector dial 19. Face plate 24. Handle 25. Handwheel 18. Power and light switch 20. Presser foot lever 26. 15 16 17 18 19 20 26 21 22 23 24 25 27 28 GB Principal parts of the machine 15. Horizontal spool pin 16. Main plug socket 21. Bobbin winder 17.

Instruction Manual
Page 13
... Seam guide g. Hemmer foot o. Gathering foot s. Button sewing foot e. Second spool pin l. Buttonhole foot d. Blind hem foot q. they are not supplied with this machine; Cording foot p. Quilting foot t. Evenfeed foot Spool holder i . All purpose foot b. Seam ripper/ brush f. L-screwdriver 2 k l m n o 006804008 006803008 006800008 006810008 p q r s t 006812008 006016008 006917008 006916008 006815008 6 Optional accessories (2) (These 10 accessories are however available as special accessories from your local dealer.) k. Bobbin (3x) j. Satin stitch...
... Seam guide g. Hemmer foot o. Gathering foot s. Button sewing foot e. Second spool pin l. Buttonhole foot d. Blind hem foot q. they are not supplied with this machine; Cording foot p. Quilting foot t. Evenfeed foot Spool holder i . All purpose foot b. Seam ripper/ brush f. L-screwdriver 2 k l m n o 006804008 006803008 006800008 006810008 p q r s t 006812008 006016008 006917008 006916008 006815008 6 Optional accessories (2) (These 10 accessories are however available as special accessories from your local dealer.) k. Bobbin (3x) j. Satin stitch...
Instruction Manual
Page 25
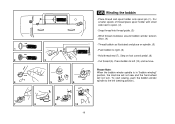
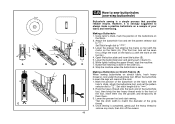
... bobbin winder spindle is in "bobbin winding" position, the machine will not sew and the hand wheel will not turn. 1 2 3 GB Winding the bobbin - Snap thread into thread guide. (3) - Cut thread (9). Press bobbin to right. (6) - To start sewing, push the bobbin winder 4 5 6 spindle to spool. (2) - Step on spindle. (5) - Place thread and spool holder onto spool pin (1). For smaller spools of thread place spool holder with small side next to the left (10) and remove. Thread bobbin as illustrated and place on foot control pedal...
... bobbin winder spindle is in "bobbin winding" position, the machine will not sew and the hand wheel will not turn. 1 2 3 GB Winding the bobbin - Snap thread into thread guide. (3) - Cut thread (9). Press bobbin to right. (6) - To start sewing, push the bobbin winder 4 5 6 spindle to spool. (2) - Step on spindle. (5) - Place thread and spool holder onto spool pin (1). For smaller spools of thread place spool holder with small side next to the left (10) and remove. Thread bobbin as illustrated and place on foot control pedal...
Instruction Manual
Page 31
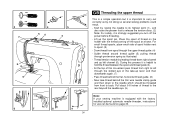
... the needle eye. (9) Note: If your sewing machine is equipped with the thread coming off the power before threading. - Now take -up the spool pin. 3 7 68 9 6 4 54 5 3 2 7 8 9 GB Threading the upper thread This is a simple operation but it is helpful to hold the thread between the spool and thread guide (4). - During this movement pass thread from spool through pre-tension spring as shown. Start by not doing so several sewing problems could result. - For small thread spools, place...
... the needle eye. (9) Note: If your sewing machine is equipped with the thread coming off the power before threading. - Now take -up the spool pin. 3 7 68 9 6 4 54 5 3 2 7 8 9 GB Threading the upper thread This is a simple operation but it is helpful to hold the thread between the spool and thread guide (4). - During this movement pass thread from spool through pre-tension spring as shown. Start by not doing so several sewing problems could result. - For small thread spools, place...

Instruction Manual
Page 35
... sewing you will drop too much. B. To adjust, turn the dial to the next number up. A balanced tension (identical stitches both top and bottom) is too tight, it once or twice. For zig zag and decorative sewing stitch functions, thread tension should generally be between "3" and "5". - GB Thread tension 4 Upper thread tension Basic thread tension setting: "4" To increase the tension, turn the small screw on the side of fabric. 1 2 Lower thread tension To test the bobbin thread tension, remove the bobbin case and bobbin...
... sewing you will drop too much. B. To adjust, turn the dial to the next number up. A balanced tension (identical stitches both top and bottom) is too tight, it once or twice. For zig zag and decorative sewing stitch functions, thread tension should generally be between "3" and "5". - GB Thread tension 4 Upper thread tension Basic thread tension setting: "4" To increase the tension, turn the small screw on the side of fabric. 1 2 Lower thread tension To test the bobbin thread tension, remove the bobbin case and bobbin...

Instruction Manual
Page 39
Release the lever and the machine will sew forwards again. (1) Removing the work behind the needle and presser foot. (2) Cutting the thread Pull the threads behind the presser foot. Guide the threads to its highest position, raise the presser foot and remove work Turn the handwheel counterclockwise to bring the thread take up lever to the side of a seam, press down to cut. (3) 32 Pull threads down the reverse sewing lever (A). Sew a few reverse stitches. A 1 2 B 3 GB Reverse sewing To secure the beginning and the end of the face plate and into thread cutter (B).
Release the lever and the machine will sew forwards again. (1) Removing the work behind the needle and presser foot. (2) Cutting the thread Pull the threads behind the presser foot. Guide the threads to its highest position, raise the presser foot and remove work Turn the handwheel counterclockwise to bring the thread take up lever to the side of a seam, press down to cut. (3) 32 Pull threads down the reverse sewing lever (A). Sew a few reverse stitches. A 1 2 B 3 GB Reverse sewing To secure the beginning and the end of the face plate and into thread cutter (B).

Instruction Manual
Page 41
... knits, Lycra, swimsuit fabric, elastic. Not recommended for these fabrics and needle sizes. Always use genuine SINGER needles. 4. Sizes range thin to large. 9 (70) to 18 (110). SINGER 2032 Leather needles. 12 (80) to 18 (110) Leather, vinyl, upholstery. (Leaves smaller hole than "3". 3. NEEDLE, FABRIC SELECTION NEEDLES EXPLANATION TYPE OF FABRIC SINGER 2020 Standard sharp needles. When sewing with twin needles, the stitch width dial should be purchased for best results. Replace needle often (approximately every...
... knits, Lycra, swimsuit fabric, elastic. Not recommended for these fabrics and needle sizes. Always use genuine SINGER needles. 4. Sizes range thin to large. 9 (70) to 18 (110). SINGER 2032 Leather needles. 12 (80) to 18 (110) Leather, vinyl, upholstery. (Leaves smaller hole than "3". 3. NEEDLE, FABRIC SELECTION NEEDLES EXPLANATION TYPE OF FABRIC SINGER 2020 Standard sharp needles. When sewing with twin needles, the stitch width dial should be purchased for best results. Replace needle often (approximately every...

Instruction Manual
Page 47
For a fine stitch set length at "2.5" or below. Remove from machine, hold bobbin thread and gather fabric to the straight stitch position. Do 2 rows of stitching ¼ of stitch length dial approaches "0". Neat zigzag stitches are referred to straight stitch, with stitch length at "4". Turning the pattern selector dial will increase or decrease the zig zag width. (1) Function of stitch length dial while zigzag The density of zigzag stitches increase as a satin stitch. (2) 40 Closed up zigzag stitches (close together) are usually achieved at "1" or "2". 4 3 2 1 0.5 ...
For a fine stitch set length at "2.5" or below. Remove from machine, hold bobbin thread and gather fabric to the straight stitch position. Do 2 rows of stitching ¼ of stitch length dial approaches "0". Neat zigzag stitches are referred to straight stitch, with stitch length at "4". Turning the pattern selector dial will increase or decrease the zig zag width. (1) Function of stitch length dial while zigzag The density of zigzag stitches increase as a satin stitch. (2) 40 Closed up zigzag stitches (close together) are usually achieved at "1" or "2". 4 3 2 1 0.5 ...

Instruction Manual
Page 49
.... b c 1 2 4 3 Fold the fabric as illustrated in a, b and c. If it does not, adjust the stitch width accordingly (2). GB Blind hem/ Lingerie stitch * The blindhem foot is an optional accessory not supplied with the wrong side uppermost (1). If using the optional blindhem foot, adjust the guide (3) by hand until the needle swings fully to sew blind hems. Always make a sewing test first. a Set the machine as illustrated with this machine. Turn the handwheel...
.... b c 1 2 4 3 Fold the fabric as illustrated in a, b and c. If it does not, adjust the stitch width accordingly (2). GB Blind hem/ Lingerie stitch * The blindhem foot is an optional accessory not supplied with the wrong side uppermost (1). If using the optional blindhem foot, adjust the guide (3) by hand until the needle swings fully to sew blind hems. Always make a sewing test first. a Set the machine as illustrated with this machine. Turn the handwheel...

Instruction Manual
Page 51
When overcasting, the needle should just go over the edge of the fabric. a b GB Overedge stitches * The overcasting foot is an optional accessory not supplied with your machine. Attention: Use new needles or ball point needles or stretch needle! 44 Seams, neatening, visible hems. Standard overlock: For fine knits, jerseys, neck edges, ribbing. (a) Double overlock stitch: For fine knits, handknits, seams. (b) All overedge stitches are suitable for sewing and overcasting edges and visible seams in one operation.
When overcasting, the needle should just go over the edge of the fabric. a b GB Overedge stitches * The overcasting foot is an optional accessory not supplied with your machine. Attention: Use new needles or ball point needles or stretch needle! 44 Seams, neatening, visible hems. Standard overlock: For fine knits, jerseys, neck edges, ribbing. (a) Double overlock stitch: For fine knits, handknits, seams. (b) All overedge stitches are suitable for sewing and overcasting edges and visible seams in one operation.

Instruction Manual
Page 53
... two holes first (3), push the work under the foot. Place the button in the desired position and lower the foot. Slowly sew on " " sew a few securing stitches. (3) If a shank is required, place a darning needle on top of the button. Select pattern " "sew a few securing stitches. Set the pattern selector knob on the button with 4 holes, sew through the back two holes. (4) 3 4 46 ab 2 a b 1 GB Sewing on buttons Move the drop feed control to right side to lower the feed dogs. (1) Change presser foot to...
... two holes first (3), push the work under the foot. Place the button in the desired position and lower the foot. Slowly sew on " " sew a few securing stitches. (3) If a shank is required, place a darning needle on top of the button. Select pattern " "sew a few securing stitches. Set the pattern selector knob on the button with 4 holes, sew through the back two holes. (4) 3 4 46 ab 2 a b 1 GB Sewing on buttons Move the drop feed control to right side to lower the feed dogs. (1) Change presser foot to...
Instruction Manual
Page 55
... on stretch fabric, hook heavy thread or cord under the buttonhole foot. Set stitch length dial to " ". 2. While lightly holding the upper thread, start sewing. *Set the stitch width to sew buttonholes (one-step buttonhole) Buttonhole sewing is sewn the legs will be sewn first.) (Align the mark on the fabric (a) with the tailor's chalk, attach the buttonhole foot, and set the pattern selector dial to " ". Mark the position of the buttonhole on a sample of your fabric and interfacing. Set stitch length dial to " ". 3. Lower the presser foot and start the machine...
... on stretch fabric, hook heavy thread or cord under the buttonhole foot. Set stitch length dial to " ". 2. While lightly holding the upper thread, start sewing. *Set the stitch width to sew buttonholes (one-step buttonhole) Buttonhole sewing is sewn the legs will be sewn first.) (Align the mark on the fabric (a) with the tailor's chalk, attach the buttonhole foot, and set the pattern selector dial to " ". Mark the position of the buttonhole on a sample of your fabric and interfacing. Set stitch length dial to " ". 3. Lower the presser foot and start the machine...
Instruction Manual
Page 61
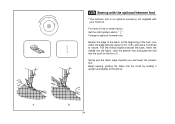
... back. Insert the needle into the fabric, raise the presser foot and guide the fold into the scroll by about 3 mm (1/8") and sew 4-5 stitches to the left (2). 1 2 54 Pull the thread slightly towards you and lower the presser foot. Begin sewing, guiding the fabric into the scroll on the foot (1). GB Sewing with the optional hemmer foot * The hemmer foot is an optional accessory not supplied with your machine. Set the stitch pattern dial to...
... back. Insert the needle into the fabric, raise the presser foot and guide the fold into the scroll by about 3 mm (1/8") and sew 4-5 stitches to the left (2). 1 2 54 Pull the thread slightly towards you and lower the presser foot. Begin sewing, guiding the fabric into the scroll on the foot (1). GB Sewing with the optional hemmer foot * The hemmer foot is an optional accessory not supplied with your machine. Set the stitch pattern dial to...

Instruction Manual
Page 67
... and elastic, darning, mending, reinforcing edges. Set stitch to zigzag and stitch over the center and then overlap on left. The stitch length can be shortened to produce very close stitches. (1) When mending tears, it is used to " ". Place patch in position. GB Multi-stitch zig-zag Sewing on the type of fabric and damage, sew between 3 and 5 rows. (2) Bar tack Set the stitch pattern dial to " " or " ". First use a piece of backing fabric to...
... and elastic, darning, mending, reinforcing edges. Set stitch to zigzag and stitch over the center and then overlap on left. The stitch length can be shortened to produce very close stitches. (1) When mending tears, it is used to " ". Place patch in position. GB Multi-stitch zig-zag Sewing on the type of fabric and damage, sew between 3 and 5 rows. (2) Bar tack Set the stitch pattern dial to " " or " ". First use a piece of backing fabric to...

Instruction Manual
Page 81
... sew. - ab a b GBGBMonogramming and embroidering with embroidery hoop* Drop the feed dogs. (Note: Stitch length cannot be controlled with thumb and forefingers of the fabric. - Adjust the stitch width according to bring up the lower thread through the fabric. Set the machine as possible. - Hold the hoop with dial) - Draw the desired lettering or design on the right side of both hands. - Place the fabric under the needle. Lower presser foot lever before starting point. - Remove the presser foot and the presser foot holder...
... sew. - ab a b GBGBMonogramming and embroidering with embroidery hoop* Drop the feed dogs. (Note: Stitch length cannot be controlled with thumb and forefingers of the fabric. - Adjust the stitch width according to bring up the lower thread through the fabric. Set the machine as possible. - Hold the hoop with dial) - Draw the desired lettering or design on the right side of both hands. - Place the fabric under the needle. Lower presser foot lever before starting point. - Remove the presser foot and the presser foot holder...
Instruction Manual
Page 85
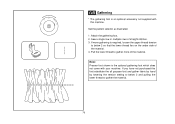
... lower thread to gather the material. 78 Attach the gathering foot. 2. If more of straight stitches. 3. Pull the lower thread to gather more gathering is an optional accessory not supplied with your machine. Sew a single row or multiple rows of the material. Set the pattern selector as illustrated. 1. Note: Presser foot shown is the optional gathering foot which does not come with this foot substitute the all purpose foot and gather fabric by hand by lowering the tension setting...
... lower thread to gather the material. 78 Attach the gathering foot. 2. If more of straight stitches. 3. Pull the lower thread to gather more gathering is an optional accessory not supplied with your machine. Sew a single row or multiple rows of the material. Set the pattern selector as illustrated. 1. Note: Presser foot shown is the optional gathering foot which does not come with this foot substitute the all purpose foot and gather fabric by hand by lowering the tension setting...

Instruction Manual
Page 91
.... 2.Clean the hook and feed dog as described. Lubricate as described. 3.Only use good quality sewing machine oil. 4.Replace the needle. Thread is too tight. GB Trouble shooting guide Problem Upper thread breaks Lower thread breaks Cause 1.The machine is not threaded correctly. 2.The thread tension is too tight. 3.The thread is too thick for the fabric. 2.The stitch length is incorrectly adjusted. 3.The thread tension is too tight. 1.Poor quality thread. 2.The bobbin case is incorrectly threaded. 3.Fabric has been pulled. 1.The machine must suit the fabric...
.... 2.Clean the hook and feed dog as described. Lubricate as described. 3.Only use good quality sewing machine oil. 4.Replace the needle. Thread is too tight. GB Trouble shooting guide Problem Upper thread breaks Lower thread breaks Cause 1.The machine is not threaded correctly. 2.The thread tension is too tight. 3.The thread is too thick for the fabric. 2.The stitch length is incorrectly adjusted. 3.The thread tension is too tight. 1.Poor quality thread. 2.The bobbin case is incorrectly threaded. 3.Fabric has been pulled. 1.The machine must suit the fabric...


