Singer 7363 CONFIDENCE Support and Manuals
Get Help and Manuals for this Singer item
View All Support Options Below
Free Singer 7363 CONFIDENCE manuals!
Problems with Singer 7363 CONFIDENCE?
Ask a Question
Free Singer 7363 CONFIDENCE manuals!
Problems with Singer 7363 CONFIDENCE?
Ask a Question
Most Recent Singer 7363 CONFIDENCE Questions


I Have Threaded And Retreaded This Machine Dozens Of Times And Tension Is Still
the tension is a mess - creates a birds nest mess on underside of fabric- it will work for a few sti...
the tension is a mess - creates a birds nest mess on underside of fabric- it will work for a few sti...
(Posted by Anonymous-165169 5 years ago)

How Adjust Tension Was Getting Stitches On Top Of Fabric. Thread Bunched On
Thread not sewing into fabric. Comes apart immediately.GM
Thread not sewing into fabric. Comes apart immediately.GM
(Posted by gerriej 8 years ago)
Popular Singer 7363 CONFIDENCE Manual Pages
Instruction Manual - Page 2

... this manual. To reduce the risk of burns, fire, electric shock, or injury to person:
• Do not allow to be followed, including the following: Read all instructions before cleaning, removing covers, lubricating or when making any air openings blocked. Return the sewing machine to the nearest authorized dealer or service center for examination, repair, electrical...
Instruction Manual - Page 3

...SINGER is marked with the sewing machine. SERVICING OF DOUBLE INSULATED PRODUCTS
In a double-insulated product, two systems of insulation are disposed of the sewing machine by a person responsible for grounding be added to the product. When replacing... or instruction concerning ...electronic products. The machine must be made by Taiwan Yamamoto Electric Corp. Replacement parts...
Instruction Manual - Page 9
... area and feed dogs 60 - 61
4. KNOWING YOUR SEWING MACHINE Machine identification 6 - 7 Accessories 8 - 9 Setting up your machine 10 - 11 Spool pins 12 - 13 Presser foot lifter, Darning plate 12 - 13 Converting to free-arm sewing 12 - 13 Winding the bobbin 14 - 15 Threading the bobbin thread 16 - 17 Threading the top thread 18 - 19
Using automatic needle threader 20 - 21...
Instruction Manual - Page 12

...stop 9. Presser foot 29. Foot control 34. KNOWING YOUR SEWING MACHINE
MACHINE IDENTIFICATION
1. Power/light switch 14. Identification plate 16. Thread guide 2. Buttonhole lever 18. Power line cord 33. Presser foot lifter 17. Foot release button 27. Thread cutter 6. 1. Face cover 5. Horizontal spool pin 11. Needle threader Thread Guide 20. Feed dogs 30. Bobbin cover release button 32...
Instruction Manual - Page 14

... the majority of your sewing. The Satin Foot (12) is called the General Purpose Foot and will be sure they are Class I5 J.
1
2
3
4
5
6
7
8
9
10
11
12
13
14
8 When purchasing additional bobbins, be used for needle plate 10. Spool pin felt discs (2) 5.
Needles 2. Bobbins - SINGER Class 15J
(4 total - 1 in machine) 3. Spool pin cap...
Instruction Manual - Page 16
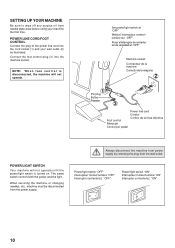
...servicing the machine, or changing needles, etc., machine must be disconnected from the wall-outlet. Connect the foot control plug (3) into the cord socket (1) and your machine the first time.
NOTE: W h e n f o o t c o n t r o l i s disconnected, the machine...re "ON" Interruptor corriente/luz "ON"
10 SETTING UP YOUR MACHINE
Be sure to wipe off any surplus oil from needle plate area before using...
Instruction Manual - Page 30

... bobbin tension has been correctly set at the factory, so you will be less than for straight stitch sewing. Push presser foot release button to a higher number or a lower number side of 4 will always obtain a nicer stitch and less puckering when the upper thread appears on top of the machine. The tension is in...
Instruction Manual - Page 32

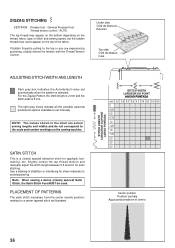
...width/needle position controls
Your sewing machine will sound indicating you are at an Auto/Default Stitch Length and Width. Auto (preprogrammed) default settings are easily determined by ...y ancho.
Note: Instructions for manual adjustments than others. 2.
Once you have determined the Auto / Default position you may sew Straight Stitch. Starting at default settings of stitch length, width...
Instruction Manual - Page 38

... needle at the start and end of the material, stop the sewing machine. C
A. Pull both Metric and Inch Markings as those in doll clothes or baby garments.
32
3/4" (19 mm) 5/8" (16 mm) 1/2" (13 mm) 3/8" ( 9 mm) 1/4" ( 6 mm) Guide the fabric gently with the thread cutter
located on the top of face cover as shown. First...
Instruction Manual - Page 42
... thread must never appear on the sewing machine.
Slightly loosen the top thread tension and manually adjust the stitch length between 0.5 and 2.0 for a center tapered stitch as illustrated. Under side Côté de dessous Reverso
Top side Côté de dessus Cara
ADJUSTING STITCH WIDTH AND LENGTH
Dark grey box indicates the Auto/default value set...
Instruction Manual - Page 46

... For this reason it makes three short stitches where the normal zig-zag makes only one. It is highly recommended for bartacks, mending tears, patching, sewing towelling, patch-work and attaching flat elastic. MULTI-STITCH ZIGZAG
SETTINGS :Presser foot - AUTO
This is a strong stitch because as shown in illustration requires...
Instruction Manual - Page 48

...stronger than an ordinary straight stitch because it locks three times - STRAIGHT STRETCH STITCH
Straight stretch stitch is ideal ...edging neck-bands, armholes, sleeves and hems. When manually adjusted to a very narrow width it forms and ...repairing raw or worn edges of garments.
42
AUTO
Stretch stitches are mainly for a decorative top-stitch. General Purpose Foot or Satin Stitch Foot :Thread...
Instruction Manual - Page 56

... experiment with a slightly lower (-) Tension setting.
Satin stitch foot :Thread tension control - IDEAS ON DESIGN STITCHING
Crescent pattern on bias tape Use bias tape and fold back the edge. When using this time.
Sew the pyramid pattern on top of this stitch pattern for table linen edges, first sew the stitch and then trim the...
Instruction Manual - Page 66

DO NOT use "all times.
(1)
1. CARING FOR YOUR MACHINE
CLEANING HOOK AREA AND FEED DOGS
1
Always disconnect the machine from power supply by the arrows. (A, B)
NOTE: Singer Brand Sewing Machine Oil is at all purpose" oil as illustrated. Use dry rags to avoid electrical shock.
60
(3)
(4) NOTE: Use dry rags to remove dust from the ...
Instruction Manual - Page 68

... sewing satin stitches and as one thread through each spool pin. Place a spool on each needle from front to back.
2. Pull the three threads together under it easily. Turning off the machine returns the machine to avoid puckering. It is most useful for satin stitching. When using a twin-needles, the stitch width should never be set...
Singer 7363 CONFIDENCE Reviews
We have not received any reviews for Singer yet.