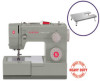
Singer Heavy Duty 4452 and Extension Table Bundle Support and Manuals
Get Help and Manuals for this Singer item
View All Support Options Below
Free Singer Heavy Duty 4452 and Extension Table Bundle manuals!
Problems with Singer Heavy Duty 4452 and Extension Table Bundle?
Ask a Question
Free Singer Heavy Duty 4452 and Extension Table Bundle manuals!
Problems with Singer Heavy Duty 4452 and Extension Table Bundle?
Ask a Question
Popular Singer Heavy Duty 4452 and Extension Table Bundle Manual Pages
Instruction Manual - Page 2

... moving parts. Do not operate where aerosol spray products are being administered. 14. If the supply cord that they have been given supervision or instruction concerning use as threading needle, changing needle, threading bobbin, or changing presser foot, and the like. 10. DANGER - Do not allow to repair or replace at once. Use this
manual...
Instruction Manual - Page 6
EN List of contents
Machine Basics Principle Parts of the Machine ...2/4 Connecting Machine to Power Source... Foot...46 Clearance Plate ...48
General Information Installing the Removable Extension Table ...50 Attaching the Presser Foot Shank ...52 Needle/ Fabric/ Thread Chart ...54 How To Drop Feed Dog ...57
Maintenance and Troubleshooting Inserting & Changing Needle ...59 Troubleshooting Guide...61
Instruction Manual - Page 9
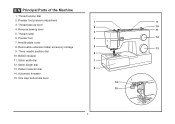
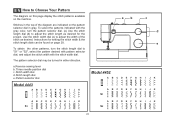
...Stitch width dial
7
12. Thread take-up lever 2
10
4. Removable extension table/ accessory storage
5
13
9. One step buttonhole lever
14
15
2 Reverse sewing lever
11
3
5. Presser foot pressure adjustment
1
9
3. Stitch length dial
13. Thread cutter
6. Pattern selector dial
8
14. EN Principal Parts of the Machine
1. Three needle position dial
6
10. Needle plate...
Instruction Manual - Page 23
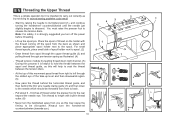
...be threaded from the back as this movement pass thread from spool through the upper thread guide (3) and pulling thread through pre-tension spring as by raising the needle to its highest .... (4)
- Lift up lever and then downwards again. (6)
- Start by not doing so several sewing problems could result.
- At the top of the take-up the spool pin. Trim thread to the spool....
Instruction Manual - Page 27
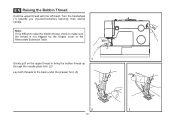
...: If it is difficult to raise the bobbin thread, check to make sure the thread is not trapped by the hinged cover or the Removable Extension Table.
1 Gently pull on the upper thread to bring the bobbin thread up through the needle plate hole. (2) Lay both threads to the back under the...
Instruction Manual - Page 31
... available on page 28. Instructions for the project. Stitch width dial d. Stitch length dial e. Pattern selector dial
Model 4443
ABCDE FGH I JK
ABCDE FGH I JK
S1
ab
c d e
Model 4452
ABCDE FGH I JK
ABCDE...are indicated on the pattern selector dial in the top of the stitch as desired for setting the stitch width & the stitch length dials can be turned in either direction. a.Reverse...
Instruction Manual - Page 41
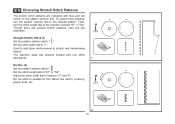
..."3" and "6". Adjust the stitch width dial to "1". Ric Rac (2) Set the pattern selector dial to " ".
Then, turn the pattern selector ...EN Choosing Stretch Stitch Patterns
The stretch stitch patterns are two examples:
Straight Stretch Stitch (1) Set the pattern selector dial to " ". Set the stitch length dial to stretch and hardwearing seams. The machine sews two stitches forward ...
Instruction Manual - Page 43
... for lighter weight fabrics, and a wider stitch is completed and press.
2 Note: To make sure the machine settings are normally sewn with the range shown on curtains, trousers, skirts, etc. Blind hem for stretch fabrics. EN ...blind hem sewing even easier, use a blind hem foot, available from your SINGER® retailer. (See page 10 for part number)
36 Blind hem for firm fabrics.
Instruction Manual - Page 45
... cycle has completed. Lower the presser foot and start the machine. 7. Attach the buttonhole foot and set the pattern selector dial
to always make a test
M
buttonhole on the
fabric. 2. EN Sew 1-....) (Align the mark on the fabric (a) with the tailor's
chalk, attach the buttonhole foot, and set the Pattern Selector Dial to the front of the buttonhole on a sample of the gimp thread.
4. ...
Instruction Manual - Page 49
Turn the handwheel to "0".
Adjust the stitch width, as illustrated in (3).
Set the machine for zig-zag stitch, then set the width to number "3" - Set the machine for straight
a
2
ba b
stitch again, then sew a ...(1)
Change the all purpose foot to the button sewing foot. (2) Set the stitch length to check that the needle goes cleanly into the left and right holes of the fabric.
Instruction Manual - Page 53
..., secure it in place using a fabric marking pen/pencil and ruler as guides for matching plaids or stripes and sewing fabrics with the sewing machine's feeding system...quilt layers, first secure the top fabric, batting and backing fabric together with a medium stitch length setting. Replace the presser bar screw.
Lower the presser foot, then sew the layers together.
Place the Even Feed...
Instruction Manual - Page 57
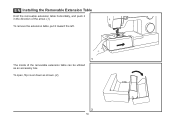
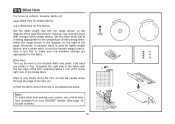
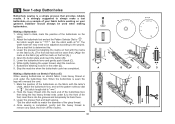
To open, flip cover down as an accessory box. EN Installing the Removable Extension Table
Hold the removable extension table horizontally, and push it in the direction of the arrow. (1) To remove the extension table, pull it toward the left.
1 The inside of the removable extension table can be utilized as shown. (2)
2
50
Instruction Manual - Page 61

...EN Needle/ Fabric/ Thread Chart
NEEDLE, FABRIC, THREAD SELECTION GUIDE
NEEDLE SIZE 9-11 (70-80)
11-14 (80-90...Set stitch length
to 18 (110). Sizes range Natural woven fabrics-wool, cotton, silk, etc. thin to large. 9 (70) to 3 or 4. Replace... fabrics-cotton, satin, kettlecloth, sailcloth, double knits, lightweight woolens. SINGER® 2032 Leather needles. 12 (80) to thread size and weight...
Instruction Manual - Page 66
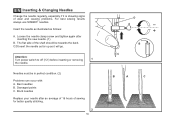
... SINGER® needles. Insert the needle as illustrated as it is showing signs of the shaft should be in perfect condition. (2)
Problems can occur with: A. Attention:
Turn power switch to off ("O") before inserting or removing
1
the needle.
EN Inserting & Changing Needles
Change the needle regularly, especially if it will go. Blunt needles
Replace...
Instruction Manual - Page 68

... 2. Correction
1. Remove the reel and wind thread onto reel. 6. Replace the needle.
1. Insert a new needle. 3. Select the correct foot.
1. Select a finer needle. 2. Replace the needle. The machine is noisy
The machine jams
1. Thread tension .... 2. Wrong needle size for the needle. 4. EN Troubleshooting Guide
Problem Upper thread breaks
Lower thread breaks
Cause
1.
Singer Heavy Duty 4452 and Extension Table Bundle Reviews
We have not received any reviews for Singer yet.