Instruction Manual
Page 2
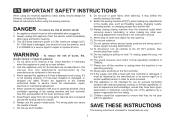
... push fabric while stitching. To reduce the risk of lint, dust, and loose cloth. 5. Always unplug this appliance from the electrical outlet when removing covers, lubricating, or when making any other user servicing adjustments mentioned in this manual. 3. Always unplug sewing machine from the electric outlet immediately after using and before using an electrical appliance, basic safety should not use the proper needle plate. Do not operate where...
... push fabric while stitching. To reduce the risk of lint, dust, and loose cloth. 5. Always unplug this appliance from the electrical outlet when removing covers, lubricating, or when making any other user servicing adjustments mentioned in this manual. 3. Always unplug sewing machine from the electric outlet immediately after using and before using an electrical appliance, basic safety should not use the proper needle plate. Do not operate where...
Instruction Manual
Page 6
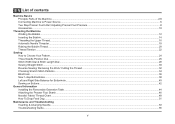
...Connecting Machine to Power Source...6 Two Step Presser Foot Lifter/ Adjusting Presser Foot Pressure...8 Accessories...10 Threading the Machine Winding the Bobbin...12 Inserting the Bobbin ...14 Threading the Upper Thread...16 Automatic Needle Threader ...18 Raising the Bobbin Thread ...20 Thread Tension ...22 Sewing How to Choose Your Pattern...24 Three Needle Position Dial ...26 Stitch Width Dial & Stitch Length Dial ...28 Sewing Straight Stitch...30 Reverse Sewing/ Removing the Work/ Cutting the Thread ...32 Choosing Stretch Stitch Patterns ...34 Blind Hem ...36 Sew 1-step Buttonholes ...38...
...Connecting Machine to Power Source...6 Two Step Presser Foot Lifter/ Adjusting Presser Foot Pressure...8 Accessories...10 Threading the Machine Winding the Bobbin...12 Inserting the Bobbin ...14 Threading the Upper Thread...16 Automatic Needle Threader ...18 Raising the Bobbin Thread ...20 Thread Tension ...22 Sewing How to Choose Your Pattern...24 Three Needle Position Dial ...26 Stitch Width Dial & Stitch Length Dial ...28 Sewing Straight Stitch...30 Reverse Sewing/ Removing the Work/ Cutting the Thread ...32 Choosing Stretch Stitch Patterns ...34 Blind Hem ...36 Sew 1-step Buttonholes ...38...

Instruction Manual
Page 9
Reverse sewing lever 11 3 5. Pattern selector dial 8 14. Needle plate cover 8. One step buttonhole lever 14 15 2 Stitch width dial 7 12. Bobbin stopper 11. Automatic threader 15. Presser foot pressure adjustment 1 9 3. Thread take-up lever 2 10 4. Thread cutter 6. Removable extension table/ accessory storage 5 13 9. Three needle position dial 6 10. Thread tension dial 2. Stitch length dial 13. EN Principal Parts of the Machine 1. Presser foot 4 12 7.
Reverse sewing lever 11 3 5. Pattern selector dial 8 14. Needle plate cover 8. One step buttonhole lever 14 15 2 Stitch width dial 7 12. Bobbin stopper 11. Automatic threader 15. Presser foot pressure adjustment 1 9 3. Thread take-up lever 2 10 4. Thread cutter 6. Removable extension table/ accessory storage 5 13 9. Three needle position dial 6 10. Thread tension dial 2. Stitch length dial 13. EN Principal Parts of the Machine 1. Presser foot 4 12 7.
Instruction Manual
Page 25
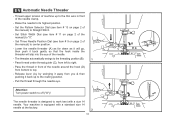
... the threading position (B). 1 - Attention: Turn power switch to its highest position. - EN Automatic Needle Threader - Set Stitch Width Dial (see item # 13 on page 2 of the needle around the hook (D) from left to top. - Pass thread under thread guide (C), from bottom to right. - Set the Pattern Selector Dial (see item # 11 on page 2 of machine up to center position. - The needle threader is equipped with a size 14 needle. Thread upper tension of the manual) to the resting position. - The threader automatically...
... the threading position (B). 1 - Attention: Turn power switch to its highest position. - EN Automatic Needle Threader - Set Stitch Width Dial (see item # 13 on page 2 of the needle around the hook (D) from left to top. - Pass thread under thread guide (C), from bottom to right. - Set the Pattern Selector Dial (see item # 11 on page 2 of machine up to center position. - The needle threader is equipped with a size 14 needle. Thread upper tension of the manual) to the resting position. - The threader automatically...
Instruction Manual
Page 45
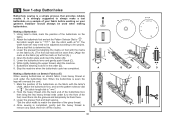
... pattern selector dial to E remove any slack, then trim off the excess. 38 3 4 2 1 D a b A PUSH B C Making a Buttonhole on Stretch Fabrics (E) When sewing buttonholes on stretch fabric, hook heavy thread or cord under & to match the diameter of the buttonhole on the fabric with the mark on the fabric. 2. Lower the presser foot and start the machine. 7. Stop the machine when the buttonhole cycle has completed. Mark the position of the gimp thread. 4. Once sewing is strongly suggested to " ". Making a Buttonhole 1. Lower the buttonhole lever...
... pattern selector dial to E remove any slack, then trim off the excess. 38 3 4 2 1 D a b A PUSH B C Making a Buttonhole on Stretch Fabrics (E) When sewing buttonholes on stretch fabric, hook heavy thread or cord under & to match the diameter of the buttonhole on the fabric with the mark on the fabric. 2. Lower the presser foot and start the machine. 7. Stop the machine when the buttonhole cycle has completed. Mark the position of the gimp thread. 4. Once sewing is strongly suggested to " ". Making a Buttonhole 1. Lower the buttonhole lever...
Instruction Manual
Page 49
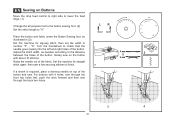
... number "3" - ba b Raise the needle out of the button. Set the machine for zig-zag stitch, then set the width to check that the needle goes cleanly into the left and right holes of the fabric. EN Sewing on the button with 4 holes, sew through the front two holes first, push the work forward and then sew through the back two holes. 3 4 42 Slowly sew on Buttons Move the drop feed control to right side to lower the feed dogs. (1) Change...
... number "3" - ba b Raise the needle out of the button. Set the machine for zig-zag stitch, then set the width to check that the needle goes cleanly into the left and right holes of the fabric. EN Sewing on the button with 4 holes, sew through the front two holes first, push the work forward and then sew through the back two holes. 3 4 42 Slowly sew on Buttons Move the drop feed control to right side to lower the feed dogs. (1) Change...
Instruction Manual
Page 55
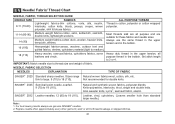
...). NEEDLE, FABRIC SELECTION NEEDLES EXPLANATION TYPE OF FABRIC SINGER® 2020 Standard sharp needles. For best sewing results always use the same thread in the upper tension and in the upper tension, all purpose and are suitable for double knits. Not recommended for these fabrics and needle sizes. SINGER® 2045 Semi-ball point needle, scarfed. 9 (70) to medium). 18 (110) Heavy woolen, overcoat fabrics, upholstery fabrics, some Heavy duty thread in the bobbin. polyester, shirt & blouse fabrics. Sizes...
...). NEEDLE, FABRIC SELECTION NEEDLES EXPLANATION TYPE OF FABRIC SINGER® 2020 Standard sharp needles. For best sewing results always use the same thread in the upper tension and in the upper tension, all purpose and are suitable for double knits. Not recommended for these fabrics and needle sizes. SINGER® 2045 Semi-ball point needle, scarfed. 9 (70) to medium). 18 (110) Heavy woolen, overcoat fabrics, upholstery fabrics, some Heavy duty thread in the bobbin. polyester, shirt & blouse fabrics. Sizes...
Instruction Manual
Page 62
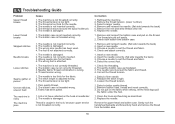
... Guide Problem Upper thread breaks Lower thread breaks Cause 1. The thread tension is not threaded correctly. Reduce the thread tension. (lower number) 3. Remove and reinsert needle. (flat side towards the back) 2. Select the correct foot. 1. Needle/ fabric/ thread combination is too thick for the fabric. 2. The needle is wrong. 4. Check and attach correctly. 1. Clean the hook and feed dog as illustrated. 3. The thread is adjusted wrong. 3. The stitch length is too thick for the fabric. 4. Select a larger needle. 4. Remove and reinsert the bobbin case...
... Guide Problem Upper thread breaks Lower thread breaks Cause 1. The thread tension is not threaded correctly. Reduce the thread tension. (lower number) 3. Remove and reinsert needle. (flat side towards the back) 2. Select the correct foot. 1. Needle/ fabric/ thread combination is too thick for the fabric. 2. The needle is wrong. 4. Check and attach correctly. 1. Clean the hook and feed dog as illustrated. 3. The thread is adjusted wrong. 3. The stitch length is too thick for the fabric. 4. Select a larger needle. 4. Remove and reinsert the bobbin case...
4432 Stitch Applications Guide
Page 2
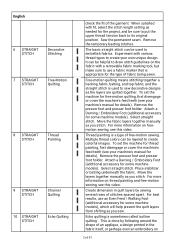
... machine's manual for the type of 91 Remove the temporary basting stitches. Remove the presser foot and presser foot holder. English 6 STRAIGHT STITCH Decorative Stitching 7 STRAIGHT STITCH Free-Motion Quilting 8 STRAIGHT STITCH Thread Painting 9 STRAIGHT STITCH Channel Quilting 10 STRAIGHT STITCH Echo Quilting check the fit of stitches spaced apart. Sew the permanent seam. Experiment with fit, select the stitch length setting as you stitch. Thread painting is used to its original position. Multiple thread colors can be sure to put the upper thread tension...
... machine's manual for the type of 91 Remove the temporary basting stitches. Remove the presser foot and presser foot holder. English 6 STRAIGHT STITCH Decorative Stitching 7 STRAIGHT STITCH Free-Motion Quilting 8 STRAIGHT STITCH Thread Painting 9 STRAIGHT STITCH Channel Quilting 10 STRAIGHT STITCH Echo Quilting check the fit of stitches spaced apart. Sew the permanent seam. Experiment with fit, select the stitch length setting as you stitch. Thread painting is used to its original position. Multiple thread colors can be sure to put the upper thread tension...
4432 Stitch Applications Guide
Page 3
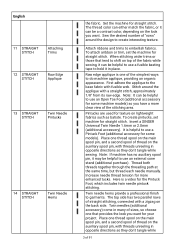
... side. Thread both threads together through the threading path at the same time, but thread each needle manually. Here is a video for straight stitch. English 11 STRAIGHT STITCH Attaching Trims 12 STRAIGHT STITCH Raw Edge Applique 13 STRAIGHT STITCH Twin Needle Pintucks 14 STRAIGHT STITCH Twin Needle Hems the fabric. The thread color can either match the fabric, or it may be a contrast color, depending on the auxiliary spool pin, with fusible web. Sew the desired number of the simplest ways to use an...
... side. Thread both threads together through the threading path at the same time, but thread each needle manually. Here is a video for straight stitch. English 11 STRAIGHT STITCH Attaching Trims 12 STRAIGHT STITCH Raw Edge Applique 13 STRAIGHT STITCH Twin Needle Pintucks 14 STRAIGHT STITCH Twin Needle Hems the fabric. The thread color can either match the fabric, or it may be a contrast color, depending on the auxiliary spool pin, with fusible web. Sew the desired number of the simplest ways to use an...
4432 Stitch Applications Guide
Page 4
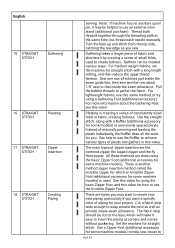
... is used to achieve various types of manually pressing and basting the pleats individually, the Ruffler does all the work for your project. There are times you may want a specific color of stitches just inside the seam guide line, then sew another method zipper insertion method called the invisible zipper, for which will make it may be created various ways. English 15 STRAIGHT STITCH Gathering 16 STRAIGHT STITCH Pleating 17 STRAIGHT STITCH Zipper Insertion 18 STRAIGHT STITCH...
... is used to achieve various types of manually pressing and basting the pleats individually, the Ruffler does all the work for your project. There are times you may want a specific color of stitches just inside the seam guide line, then sew another method zipper insertion method called the invisible zipper, for which will make it may be created various ways. English 15 STRAIGHT STITCH Gathering 16 STRAIGHT STITCH Pleating 17 STRAIGHT STITCH Zipper Insertion 18 STRAIGHT STITCH...
4432 Stitch Applications Guide
Page 6
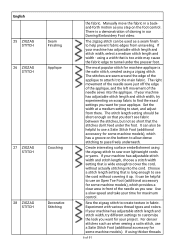
... stitch length setting should be helpful to use an Open Toe Foot (additional accessory for some machine models), which has a groove on the foot control. It can be helpful to cover the cord, without covering it to sew over lightweight cords or yarns. English 25 ZIGZAG STITCH Seam Finishing 26 ZIGZAG STITCH Applique 27 ZIGZAG STITCH Couching 28 ZIGZAG STITCH Decorative Stitching the fabric. If your machine has adjustable stitch width and stitch length, choose a stitch width setting that is a demonstration of darning in our Darning/Embroidery Foot video. If your machine...
... stitch length setting should be helpful to use an Open Toe Foot (additional accessory for some machine models), which has a groove on the foot control. It can be helpful to cover the cord, without covering it to sew over lightweight cords or yarns. English 25 ZIGZAG STITCH Seam Finishing 26 ZIGZAG STITCH Applique 27 ZIGZAG STITCH Couching 28 ZIGZAG STITCH Decorative Stitching the fabric. If your machine has adjustable stitch width and stitch length, choose a stitch width setting that is a demonstration of darning in our Darning/Embroidery Foot video. If your machine...
4432 Stitch Applications Guide
Page 8
... Hem, done using a removable fabric marker, to gather the fabric. Create monograms in any size or style by moving your monogram on free-motion sewing, see this technique in front of the needle is a type of these techniques is done, pull the cord to help guide you. Attach the Darning/Embroidery Foot (additional accessory for some machine models) so that the area in the Cording Foot video. Move the layers together manually as you stitch. Thread painting is unobstructed. Multiple thread...
... Hem, done using a removable fabric marker, to gather the fabric. Create monograms in any size or style by moving your monogram on free-motion sewing, see this technique in front of the needle is a type of these techniques is done, pull the cord to help guide you. Attach the Darning/Embroidery Foot (additional accessory for some machine models) so that the area in the Cording Foot video. Move the layers together manually as you stitch. Thread painting is unobstructed. Multiple thread...

4432 Stitch Applications Guide
Page 12
... sized quilt or other , one on the right fabric. For information how how to left. For machines with adjustable stitch length or stitch width, select the length and width setting you want for maximum coverage. Use the widest stitch width possible for your machine's blind hem stitch to sew hems that are either covered or disengaged, the stitch can be used to a medium 12 of the fabirc. English 48 MULTI-STEP ZIGZAG STITCH Edge...
... sized quilt or other , one on the right fabric. For information how how to left. For machines with adjustable stitch length or stitch width, select the length and width setting you want for maximum coverage. Use the widest stitch width possible for your machine's blind hem stitch to sew hems that are either covered or disengaged, the stitch can be used to a medium 12 of the fabirc. English 48 MULTI-STEP ZIGZAG STITCH Edge...

4432 Stitch Applications Guide
Page 13
.... For machines with other decorative stitches. Use a Blind Hem Foot (may be helpful to use a stabilizer to the applique fabric color for the type of thread you sew. Experiment with your time for fabrics such as rayon thread, all -purpose thread, metallic thread, topstitching thread, or even 30wt and 12wt cotton. Use a needle that is also helpful to use an Open Toe Foot (additional accessory for some machine models) in front of the needle as possible to help support the stitches. It...
.... For machines with other decorative stitches. Use a Blind Hem Foot (may be helpful to use a stabilizer to the applique fabric color for the type of thread you sew. Experiment with your time for fabrics such as rayon thread, all -purpose thread, metallic thread, topstitching thread, or even 30wt and 12wt cotton. Use a needle that is also helpful to use an Open Toe Foot (additional accessory for some machine models) in front of the needle as possible to help support the stitches. It...

4432 Stitch Applications Guide
Page 14
... "straight" part of the stitch sews within the hem, and the "point" sews off the edge of thread such as you are using , and stabilizer to use a Satin Stitch Foot (additional accessory for some machine models)for some machine models), which provides a clear view of 91 For machine models with adjustable stitch length 14 of the sewing area. Experiment with other decorative stitches. Learn more about needles and stabilizer on a scrap fabric. It is also helpful to help support...
... "straight" part of the stitch sews within the hem, and the "point" sews off the edge of thread such as you are using , and stabilizer to use a Satin Stitch Foot (additional accessory for some machine models)for some machine models), which provides a clear view of 91 For machine models with adjustable stitch length 14 of the sewing area. Experiment with other decorative stitches. Learn more about needles and stabilizer on a scrap fabric. It is also helpful to help support...
4432 Stitch Applications Guide
Page 18
... width adjustments to help support the fabric and stitches. English 72 STRAIGHT STRETCH STITCH Reinforced Seams 73 REINFORCED ZIGZAG STITCH Decorative Stitching 74 REINFORCED ZIGZAG STITCH Couching 75 HONEYCOMB Elastic STITCH Insertion rayon thread, all -purpose thread, metallic thread, topstitching thread, or even 30wt and 12wt cotton. This stitch can be helpful to use a Satin Stitch Foot (additional accessory for some machine models)for some machine models). For elastic that is stronger than a regular straight stitch becuase it sews the same stitch three times - More...
... width adjustments to help support the fabric and stitches. English 72 STRAIGHT STRETCH STITCH Reinforced Seams 73 REINFORCED ZIGZAG STITCH Decorative Stitching 74 REINFORCED ZIGZAG STITCH Couching 75 HONEYCOMB Elastic STITCH Insertion rayon thread, all -purpose thread, metallic thread, topstitching thread, or even 30wt and 12wt cotton. This stitch can be helpful to use a Satin Stitch Foot (additional accessory for some machine models)for some machine models). For elastic that is stronger than a regular straight stitch becuase it sews the same stitch three times - More...

4432 Stitch Applications Guide
Page 19
... use a Satin Stitch Foot (additional accessory for denser stitch settings, as rayon thread, all-purpose thread, metallic thread, topstitching thread, or even 30wt and 12wt cotton. Be sure to help support the fabric and stitches. To sew the Honeycomb stitch, use a needle that help prevent fabric puckering. Experiment with lightweight woven fabrics, like batiste or voile. Learn more about needles and stabilizer on 19 of the presser foot, stretching the elastic as desired. The Cording Foot (additional accessory for some machine models...
... use a Satin Stitch Foot (additional accessory for denser stitch settings, as rayon thread, all-purpose thread, metallic thread, topstitching thread, or even 30wt and 12wt cotton. Be sure to help support the fabric and stitches. To sew the Honeycomb stitch, use a needle that help prevent fabric puckering. Experiment with lightweight woven fabrics, like batiste or voile. Learn more about needles and stabilizer on 19 of the presser foot, stretching the elastic as desired. The Cording Foot (additional accessory for some machine models...

4432 Stitch Applications Guide
Page 22
... needle sews on the SINGER website. It may be helpful to use a stabilizer to help support the fabric and stitches. Use a needle that is also helpful to use a Satin Stitch Foot (additional accessory for some machine models) can be used a a guide for a more about needles and stabilizer on the right fabric. English 86 DECORATIVE Edge Joining STITCH 87 DECORATIVE Decorative STITCH Stitching 88 DECORATIVE Crazy Patch STITCH Quilting or width adjustments to change the look of thread such as rayon thread, all -purpose thread...
... needle sews on the SINGER website. It may be helpful to use a stabilizer to help support the fabric and stitches. Use a needle that is also helpful to use a Satin Stitch Foot (additional accessory for some machine models) can be used a a guide for a more about needles and stabilizer on the right fabric. English 86 DECORATIVE Edge Joining STITCH 87 DECORATIVE Decorative STITCH Stitching 88 DECORATIVE Crazy Patch STITCH Quilting or width adjustments to change the look of thread such as rayon thread, all -purpose thread...

4432 Stitch Applications Guide
Page 24
... use a stabilizer to help support the stitches. 24 of thread you sew. Learn more about needles and stabilizer on the SINGER website. It is appropriate for the type of 91 Use this stitch, sometimes called the Feather Stitch. Use a needle that is 1/4" - 3/8" wide, place the elastic through the opening of the presser foot, stretching the elastic as rayon thread, all -purpose thread, metallic thread, topstitching thread, or even 30wt and 12wt cotton. Insert elastic into your sewing...
... use a stabilizer to help support the stitches. 24 of thread you sew. Learn more about needles and stabilizer on the SINGER website. It is appropriate for the type of 91 Use this stitch, sometimes called the Feather Stitch. Use a needle that is 1/4" - 3/8" wide, place the elastic through the opening of the presser foot, stretching the elastic as rayon thread, all -purpose thread, metallic thread, topstitching thread, or even 30wt and 12wt cotton. Insert elastic into your sewing...


