Instruction Manual
Page 2
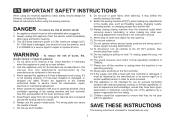
...servicing adjustments mentioned in . 2. To disconnect, turn off the machine or unplug when the machine is not working properly, if it to SINGER or a service agent to repair or replace at once. If the supply cord that they have been given supervision or instruction concerning use...pressure level under normal operating conditions is DC 9V. The LED lamp maximum power is 0.3W, maximum voltage is 75dB(A). 17. Switch the sewing machine off ("O") position, then remove plug from the electrical outlet when removing covers, lubricating, or when making any air openings blocked. This ...
...servicing adjustments mentioned in . 2. To disconnect, turn off the machine or unplug when the machine is not working properly, if it to SINGER or a service agent to repair or replace at once. If the supply cord that they have been given supervision or instruction concerning use...pressure level under normal operating conditions is DC 9V. The LED lamp maximum power is 0.3W, maximum voltage is 75dB(A). 17. Switch the sewing machine off ("O") position, then remove plug from the electrical outlet when removing covers, lubricating, or when making any air openings blocked. This ...
Instruction Manual
Page 6
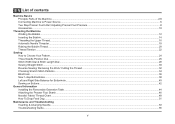
... ...18 Raising the Bobbin Thread ...20 Thread Tension ...22 Sewing How to Choose Your Pattern...24 Three Needle Position Dial ...26 Stitch Width Dial & Stitch Length Dial ...28 Sewing Straight Stitch...30 Reverse Sewing/ Removing the Work/ Cutting the Thread ...32 Choosing Stretch Stitch... Patterns ...34 Blind Hem ...36 Sew 1-step Buttonholes ...38 Left and Right Side Balance for Buttonhole ...40 Sewing on Buttons ...42 General Information Installing ...
... ...18 Raising the Bobbin Thread ...20 Thread Tension ...22 Sewing How to Choose Your Pattern...24 Three Needle Position Dial ...26 Stitch Width Dial & Stitch Length Dial ...28 Sewing Straight Stitch...30 Reverse Sewing/ Removing the Work/ Cutting the Thread ...32 Choosing Stretch Stitch... Patterns ...34 Blind Hem ...36 Sew 1-step Buttonholes ...38 Left and Right Side Balance for Buttonhole ...40 Sewing on Buttons ...42 General Information Installing ...

Instruction Manual
Page 9
EN Principal Parts of the Machine 1. Presser foot pressure adjustment 1 9 3. Thread take-up lever 2 10 4. Stitch width dial 7 12. Stitch length dial 13. Reverse sewing lever 11 3 5. Needle plate cover 8. Bobbin stopper 11. Thread cutter 6. Presser foot 4 12 7. Removable extension table/ accessory storage 5 13 9. Three needle position dial 6 10. One step buttonhole lever 14 15 2 Thread tension dial 2. Pattern selector dial 8 14. Automatic threader 15.
EN Principal Parts of the Machine 1. Presser foot pressure adjustment 1 9 3. Thread take-up lever 2 10 4. Stitch width dial 7 12. Stitch length dial 13. Reverse sewing lever 11 3 5. Needle plate cover 8. Bobbin stopper 11. Thread cutter 6. Presser foot 4 12 7. Removable extension table/ accessory storage 5 13 9. Three needle position dial 6 10. One step buttonhole lever 14 15 2 Thread tension dial 2. Pattern selector dial 8 14. Automatic threader 15.

Instruction Manual
Page 13
... power cord when machine is not in a polarized outlet only one blade is wider than the other). Sewing light Press main switch (A) to install the proper outlet. Foot control The foot control pedal regulates the sewing speed. (3) Attention: Consult a qualified electrician if in any way. To reduce the risk of how to...
... power cord when machine is not in a polarized outlet only one blade is wider than the other). Sewing light Press main switch (A) to install the proper outlet. Foot control The foot control pedal regulates the sewing speed. (3) Attention: Consult a qualified electrician if in any way. To reduce the risk of how to...
Instruction Manual
Page 15
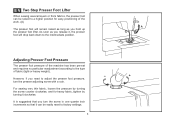
...it can be easily reset to the type of fabric (light-or-heavy weight). EN Two Step Presser Foot Lifter When sewing several layers or thick fabrics, the presser foot can be raised to a higher position for heavy fabric, tighten by turning the screw counter clockwise, and for easy... positioning of the machine has been pre-set and requires no particular readjustment according to factory settings. 8 For sewing very thin fabric, loosen the pressure by turning it ...
...it can be easily reset to the type of fabric (light-or-heavy weight). EN Two Step Presser Foot Lifter When sewing several layers or thick fabrics, the presser foot can be raised to a higher position for heavy fabric, tighten by turning the screw counter clockwise, and for easy... positioning of the machine has been pre-set and requires no particular readjustment according to factory settings. 8 For sewing very thin fabric, loosen the pressure by turning it ...

Instruction Manual
Page 17
... Feed foot w. Bobbin (3x) j. Spool pin felt m. Satin stitch foot o. Gathering foot u. Pack of needles h. L-screwdriver k. Darning/ embroidery foot v. Zipper foot c. Seam ripper/ brush f. Button sewing foot e. they are not supplied with this machine; All purpose foot b. Auxiliary Spool Pin l.
... Feed foot w. Bobbin (3x) j. Spool pin felt m. Satin stitch foot o. Gathering foot u. Pack of needles h. L-screwdriver k. Darning/ embroidery foot v. Zipper foot c. Seam ripper/ brush f. Button sewing foot e. they are not supplied with this machine; All purpose foot b. Auxiliary Spool Pin l.
Instruction Manual
Page 19
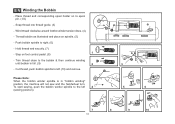
... holder on to the bobbin & then continue winding until bobbin is in "bobbin winding" position, the machine will not sew and the handwheel turn. Step on spindle. (5) - Hold thread end securily. (7) 1 - To start sewing, push the bobbin winder spindle to right. (6) - Please Note: When the bobbin winder spindle is full. (9) 2 - Wind ...bobbin winder tension discs. (4) - Push bobbin spindle to the left (10) and remove. Snap thread into thread guide. (3) - Cut thread, push bobbin spindle to left 4 (sewing position). 3 5 6 7 8 9 10 12 EN Winding the Bobbin -
... holder on to the bobbin & then continue winding until bobbin is in "bobbin winding" position, the machine will not sew and the handwheel turn. Step on spindle. (5) - Hold thread end securily. (7) 1 - To start sewing, push the bobbin winder spindle to right. (6) - Please Note: When the bobbin winder spindle is full. (9) 2 - Wind ...bobbin winder tension discs. (4) - Push bobbin spindle to the left (10) and remove. Snap thread into thread guide. (3) - Cut thread, push bobbin spindle to left 4 (sewing position). 3 5 6 7 8 9 10 12 EN Winding the Bobbin -
Instruction Manual
Page 23
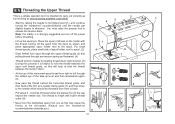
... thread between the spool and thread guide, as this will help to seat the thread between the tension discs. - Start by not doing so several sewing problems could result. - Always turn the handwheel away from spool through the upper thread guide (3) and pulling thread through the slotted eye of thread on...
... thread between the spool and thread guide, as this will help to seat the thread between the tension discs. - Start by not doing so several sewing problems could result. - Always turn the handwheel away from spool through the upper thread guide (3) and pulling thread through the slotted eye of thread on...
Instruction Manual
Page 29
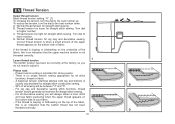
... be between "3" and "5". C. Thread tension too tight for straight stitch sewing. Thread tension too loose for straight stitch sewing. Turn dial to the next number down. Normal thread tension for straight stitch sewing. Please note: - There is important for all stitch functions, thread or... to lower number. A. Normal thread tension for zig zag and decorative sewing. B. Turn dial to the next number up. D. Correct thread tension is usually only desirable for straight stitch sewing. - Lower thread tension 1 The bobbin tension has been set correctly ...
... be between "3" and "5". C. Thread tension too tight for straight stitch sewing. Thread tension too loose for straight stitch sewing. Turn dial to the next number down. Normal thread tension for straight stitch sewing. Please note: - There is important for all stitch functions, thread or... to lower number. A. Normal thread tension for zig zag and decorative sewing. B. Turn dial to the next number up. D. Correct thread tension is usually only desirable for straight stitch sewing. - Lower thread tension 1 The bobbin tension has been set correctly ...

Instruction Manual
Page 31
... stitch length dials can adjust the density by moving the Stitch Length Dial to 1 to make the stitching closer, or towards 4 to between 1 and 5. - Reverse sewing lever b. Stitch width dial d. EN How to 6. For top row stitches F, G, and H follow these steps: - To select the patterns indicated with the gray color, turn...
... stitch length dials can adjust the density by moving the Stitch Length Dial to 1 to make the stitching closer, or towards 4 to between 1 and 5. - Reverse sewing lever b. Stitch width dial d. EN How to 6. For top row stitches F, G, and H follow these steps: - To select the patterns indicated with the gray color, turn...

Instruction Manual
Page 33
For edge stitching or sewing parallel lines of the manual) to the left or right. Zig-zag L. Left Needle Position M. Right Needle Position 26 L M R a b For normal work, the needle position ...
For edge stitching or sewing parallel lines of the manual) to the left or right. Zig-zag L. Left Needle Position M. Right Needle Position 26 L M R a b For normal work, the needle position ...

Instruction Manual
Page 35
... stitch length dial approaches "0". For basting purposes, set the dial to zig zag or any other decorative pattern. To use a longer stitch length when sewing heavier weight fabrics or when using a finer needle or thread. - The standard setting for the straight stitch infinite needle position. When the dial is ...selector dial to 6. For an infinite needle position, first set the Three Needle Position Dial so that the needle is also the control for sewing a seam is set to 6mm. Use a shorter stitch length when sewing lighter weight fabrics or when using a thicker needle or thread.
... stitch length dial approaches "0". For basting purposes, set the dial to zig zag or any other decorative pattern. To use a longer stitch length when sewing heavier weight fabrics or when using a finer needle or thread. - The standard setting for the straight stitch infinite needle position. When the dial is ...selector dial to 6. For an infinite needle position, first set the Three Needle Position Dial so that the needle is also the control for sewing a seam is set to 6mm. Use a shorter stitch length when sewing lighter weight fabrics or when using a thicker needle or thread.
Instruction Manual
Page 37
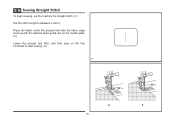
Place the fabric under the presser foot with the fabric edge lined up with the desired seam guide line on the needle plate. (2) Lower the presser foot lifter, and then step on the foot controller to between 2 and 3. EN Sewing Straight Stitch To begin sewing, set the machine for straight stitch. (1) Set the stitch length to start sewing. (3) 1 2 3 30
Place the fabric under the presser foot with the fabric edge lined up with the desired seam guide line on the needle plate. (2) Lower the presser foot lifter, and then step on the foot controller to between 2 and 3. EN Sewing Straight Stitch To begin sewing, set the machine for straight stitch. (1) Set the stitch length to start sewing. (3) 1 2 3 30

Instruction Manual
Page 39
... secure the beginning and the end of the face plate and into thread cutter (B). Sew a few reverse stitches. Guide the threads to the side of a seam, press down to its highest position, raise the presser foot and remove work behind ...the needle and presser 1 2 foot. (2) Cutting the Thread Pull the threads under and behind the presser foot. A Release the lever and the machine will sew forward again. (1) Removing the Work Turn the handwheel toward you (counterclockwise) to bring the thread take up lever to cut. (3) 32 B 3 Pull threads down the...
... secure the beginning and the end of the face plate and into thread cutter (B). Sew a few reverse stitches. Guide the threads to the side of a seam, press down to its highest position, raise the presser foot and remove work behind ...the needle and presser 1 2 foot. (2) Cutting the Thread Pull the threads under and behind the presser foot. A Release the lever and the machine will sew forward again. (1) Removing the Work Turn the handwheel toward you (counterclockwise) to bring the thread take up lever to cut. (3) 32 B 3 Pull threads down the...
Instruction Manual
Page 41
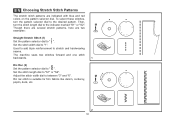
... blue and red colors on the pattern selector dial. To select these stitches, turn the stitch length dial to stretch and hardwearing seams. The machine sews two stitches forward and one stitch backwards. EN Choosing Stretch Stitch Patterns The stretch stitch patterns are two examples: Straight Stretch Stitch (1) Set the pattern...
... blue and red colors on the pattern selector dial. To select these stitches, turn the stitch length dial to stretch and hardwearing seams. The machine sews two stitches forward and one stitch backwards. EN Choosing Stretch Stitch Patterns The stretch stitch patterns are two examples: Straight Stretch Stitch (1) Set the pattern...
Instruction Manual
Page 43
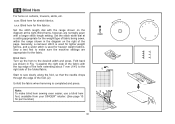
...on the right of the fold. (2) Unfold the fabric when hemming is used for heavier weight fabrics. Blind Hem: Turn up the hem to sew slowly along the fold, so that the needle drops through the edge of the page. Blind hems, however, are appropriate for stretch fabrics. Generally..., a narrower stitch is used for lighter weight fabrics, and a wider stitch is completed and press. Sew a test first to make blind hem sewing even easier, use a blind hem foot, available from your SINGER® retailer. (See page 10 for firm fabrics. Set the stitch width dial at the right. ...
...on the right of the fold. (2) Unfold the fabric when hemming is used for heavier weight fabrics. Blind Hem: Turn up the hem to sew slowly along the fold, so that the needle drops through the edge of the page. Blind hems, however, are appropriate for stretch fabrics. Generally..., a narrower stitch is used for lighter weight fabrics, and a wider stitch is completed and press. Sew a test first to make blind hem sewing even easier, use a blind hem foot, available from your SINGER® retailer. (See page 10 for firm fabrics. Set the stitch width dial at the right. ...
Instruction Manual
Page 45
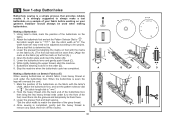
.... a b A PUSH B C Making a Buttonhole on Stretch Fabrics (E) When sewing buttonholes on the fabric with the mark on the fabric. 2. Hook the heavy thread onto the back end of the buttonhole on stretch fabric, hook heavy thread or cord under & to " ". The width however may need to "... to always make a test M buttonhole on a sample of the gimp thread. 4. EN Sew 1-step Buttonholes Buttonhole sewing is done in the order (D). 8. It is completed, gently pull the heavy thread to match the diameter of your fabric before working on your garment. While lightly holding ...
.... a b A PUSH B C Making a Buttonhole on Stretch Fabrics (E) When sewing buttonholes on the fabric with the mark on the fabric. 2. Hook the heavy thread onto the back end of the buttonhole on stretch fabric, hook heavy thread or cord under & to " ". The width however may need to "... to always make a test M buttonhole on a sample of the gimp thread. 4. EN Sew 1-step Buttonholes Buttonhole sewing is done in the order (D). 8. It is completed, gently pull the heavy thread to match the diameter of your fabric before working on your garment. While lightly holding ...
Instruction Manual
Page 49
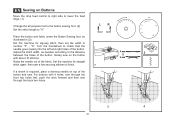
... length to number "3" - LR Place the button and fabric under the Button Sewing foot, as needed, according to the distance a 2 between the holes of the button and sew. Set the machine for straight stitch again, then sew a few securing stitches to check that the needle goes cleanly into the left ...and right holes of the fabric. Adjust the stitch width, as illustrated in (3). Slowly sew on top of the button. Set the machine for zig-zag stitch, then set the width to "0". "6". ba b Raise the needle out of...
... length to number "3" - LR Place the button and fabric under the Button Sewing foot, as needed, according to the distance a 2 between the holes of the button and sew. Set the machine for straight stitch again, then sew a few securing stitches to check that the needle goes cleanly into the left ...and right holes of the fabric. Adjust the stitch width, as illustrated in (3). Slowly sew on top of the button. Set the machine for zig-zag stitch, then set the width to "0". "6". ba b Raise the needle out of...
Instruction Manual
Page 55
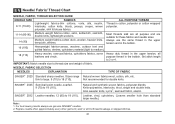
...: Match needle size to 3 or 4. Set stitch length to thread size and weight of fabric. SINGER® 2045 Semi-ball point needle, scarfed. 9 (70) to medium). 18 (110) Heavy woolen, overcoat fabrics, upholstery fabrics, some Heavy duty thread in cotton, polyester or cotton wrapped interlocks, cotton knits, tricots, jerseys, crepes, woven polyester.... to 18 (110). Sizes range Natural woven fabrics-wool, cotton, silk, etc. Knits-polyesters, interlocks, tricot, single and double knits. For best sewing results always use the same thread in the upper tension and in the bobbin.
...: Match needle size to 3 or 4. Set stitch length to thread size and weight of fabric. SINGER® 2045 Semi-ball point needle, scarfed. 9 (70) to medium). 18 (110) Heavy woolen, overcoat fabrics, upholstery fabrics, some Heavy duty thread in cotton, polyester or cotton wrapped interlocks, cotton knits, tricots, jerseys, crepes, woven polyester.... to 18 (110). Sizes range Natural woven fabrics-wool, cotton, silk, etc. Knits-polyesters, interlocks, tricot, single and double knits. For best sewing results always use the same thread in the upper tension and in the bobbin.
Instruction Manual
Page 58
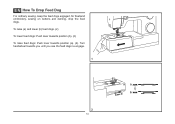
EN How To Drop Feed Dog For ordinary sewing, keep the feed dogs engaged, for freehand embroidery, sewing on buttons and darning, drop the feed dogs. To raise (a) and lower (b) feed dogs. (2) To lower feed dogs: Push lever towards position (b). (2) To raise feed dogs: Push lever towards you until you see the feed dogs re-engage. 1 2 51 a ba b Turn handwheel towards position (a). (2).
EN How To Drop Feed Dog For ordinary sewing, keep the feed dogs engaged, for freehand embroidery, sewing on buttons and darning, drop the feed dogs. To raise (a) and lower (b) feed dogs. (2) To lower feed dogs: Push lever towards position (b). (2) To raise feed dogs: Push lever towards you until you see the feed dogs re-engage. 1 2 51 a ba b Turn handwheel towards position (a). (2).


