Singer Promise II 1512 Support and Manuals
Get Help and Manuals for this Singer item
View All Support Options Below
Free Singer Promise II 1512 manuals!
Problems with Singer Promise II 1512?
Ask a Question
Free Singer Promise II 1512 manuals!
Problems with Singer Promise II 1512?
Ask a Question
Most Recent Singer Promise II 1512 Questions

Bobbin Compartment
I removed pieces of the bobbin compartment and di not find instructions on how to reassemble it. Hel...
I removed pieces of the bobbin compartment and di not find instructions on how to reassemble it. Hel...
(Posted by cathmuse2 9 months ago)
Singer Promise II 1512 Videos

Co zrobi? jak ?cieg jest za lu?ny w maszynie SINGER Promise II 1512 - do czego s?u?? pokr?t?a?
Duration: 3:13
Total Views: 15,291
Duration: 3:13
Total Views: 15,291
Obs?uga maszyny Singer Promise II 1512 Jak nawleka?, regulacja napr??ania
Duration: 5:05
Total Views: 1,074
Duration: 5:05
Total Views: 1,074
Popular Singer Promise II 1512 Manual Pages
Instruction Manual - Page 2
... manual. 3. Keep fingers away from the electrical outlet when removing covers, lubricating, or when making any other user servicing adjustments mentioned in . 2. Do not use bent needles. 8. Do not operate where aerosol spray products are being used or
where oxygen is required around the sewing machine needle. 6. Never place anything on cord. SAVE THESE INSTRUCTIONS
This sewing machine...
Instruction Manual - Page 22
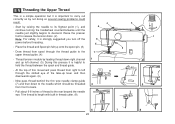
...operation but it is helpful to hold the thread between the spool and thread guide. - Start by not doing so several sewing problems could result. - Raise the presser foot to release the tension discs. (2)... you turn off the power before threading. - Now pass thread behind the thin wire needle clamp guide (7) and then down right channel and up lever and then downwards again. (6) - Place the ...
Instruction Manual - Page 26

... should generally be between "3" and "5".
- Turn
dial to lower number. Turn
dial to higher number. Please note:
- Proper setting of tension is A
B
usually only desirable for straight stitch construction sewing.
- 90% of all sewing will always obtain a nicer
stitch and less fabric puckering when the upper thread
appears on the bottom side of...
Instruction Manual - Page 30
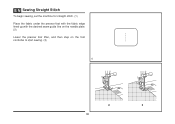
EN Sewing Straight Stitch
To begin sewing, set the machine for straight stitch. (1) Place the fabric under the presser foot with the fabric edge lined up with the desired seam guide line on the needle plate. (2) Lower the presser foot lifter, and then step on the foot controller to start sewing. (3)
1
2
3
30
Instruction Manual - Page 32

... thread cutter (B). Guide the threads to the side of a seam, press down to descend, raise the presser foot and remove work
1
behind the needle and presser foot. (2)
Cutting the Thread
Pull the threads under and behind the presser foot. Sew a few reverse stitches. Release the lever and the machine will sew forward again. (1)
A
Removing...
Instruction Manual - Page 34
... up the hem to form a
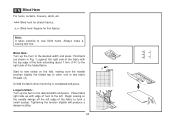
small scallop. Lingerie Stitch : Turn up the hem to sew blind hems. Always make a sewing test first. Blind hem/ lingerie for stretch fabrics. EN Blind Hem
For hems, curtains, trousers... 1) against the right side of the fabric with edge of the folded fabric.
1 Start to sew slowly on the fold, making sure the needle touches slightly the folded top to the left edge of...
Instruction Manual - Page 38
... and then sew through the back two holes.
3
4
38
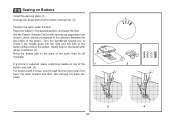
Set the Pattern ...sew. (4)
For buttons with about 10 stitches. (3)
Bring the thread tails to button sewing foot. (2)
Position the work under the foot. Place the button in the desired position and lower the foot.
EN Sewing on Buttons
Install the darning plate. (1) Change the all purpose foot to the back of the work, then tie off manually...
Instruction Manual - Page 40
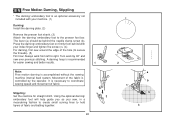
... help guide you as you sew, in a meandering fashion to create small curving lines to hold layers of the fabric is controlled by 90° and
sew over ...sewing machine internal feed system.
Press the darning/ embroidery foot on firmly from left to right. Stippling: Set the machine for easier sewing and better results.
1
2
Note: Free motion darning is necessary to coordinate sewing ...
Instruction Manual - Page 42

EN Installing the Removable Extension Table
Hold the removable extension table horizontally, and push it in the direction of the arrow. (1) To remove the extension table, pull it toward the left.
1 The inside of the removable extension table can be utilized as an accessory box.
2 42
Instruction Manual - Page 44

... switch to off ("O") when carrying out any of
the above the pin (d). (2) The presser foot (f) will engage automatically.
e
3 44
a
e b
d
2
c f
g 4 b
Attaching the edge/ quilting guide
1
Attach the edge/ quilting guide (g) in the slot as illustrated. (1)
a
Attaching the presser foot
Lower the presser foot shank (b) using the presser foot lifter. (3)
Raise the lever (e) and...
Instruction Manual - Page 46
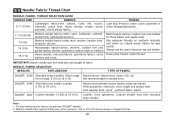
... to large. 9 (70) to thread size and weight of fabric. SINGER® 2045 Semi-ball point needle, scarfed. 9 (70) to 18 (110). Replace needle often (approximately every other garment ) and/ or at first thread breakage or skipped stitches.
46
For best sewing results always use the same thread on natural woven fabrics for...
Instruction Manual - Page 49
... used. For normal sewing, remove the darning plate. For free-motion sewing it is recommended to use a darning/embroidery foot, available as illustrated. EN Darning Plate
For certain types of darning/embroidery foot)
49 Install the darning plate as an optional accessory from authorized SINGER® retailers. (See page 16 for part number of work...
Instruction Manual - Page 51
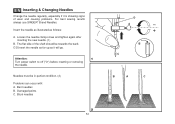
C/D.Insert the needle as far up as follows:
A. Needles must be towards the back. The flat side of wear and causing problems. For best sewing results always use SINGER® Brand Needles. Bent needles B. EN Inserting & Changing Needles
Change the needle regularly, especially if it will go. Attention:
1
Turn power switch to off ("O") before...
Instruction Manual - Page 53
... (220-240V area).
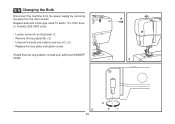
- EN Changing the Bulb
Disconnect the machine from the power supply by removing the plug from the main socket!
Remove the face plate (B). (2) -
Unscrew the bulb and install a new one (C). (3) - Should there be any problem, consult your authorized SINGER®
retailer.
1
A B
2
C
3 53 Replace the face plate and tighten screw. Loosen screw (A) as...
Instruction Manual - Page 55
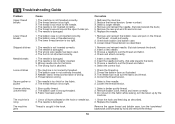
... 2. Replace the needle. 1. Loosen ... fabric while sewing, let it...Troubleshooting Guide
Problem Upper thread breaks
Cause 1. The lower thread tension is damaged. 3. Check and attach correctly. 1. Select a finer needle. 2. The machine is noisy The machine jams
1. The machine is not threaded correctly. 2. Rethread the machine. 2. The wrong foot is attached. 1.The machine...
Singer Promise II 1512 Reviews
We have not received any reviews for Singer yet.