
Instruction Manual 2
Page 2
... anything on cord. Close attention is necessary when this machine from the accumulation of The Singer Company Ltd. Use only attachments recommended by the manufacturer as described in the needle area, such as a toy. Do not operate where aerosol (spray) products are being.... 2. SAVE THESE INSTRUCTIONS Servicing should always be performed by an authorized service representative. 2 SINGER is a registered Trademark of lint, dust, and loose cloth. 5. DANGER - Do not use bent needles. 13. Keep fingers away from outlet. 9. Switch the sewing machine off position (symbol ...
... anything on cord. Close attention is necessary when this machine from the accumulation of The Singer Company Ltd. Use only attachments recommended by the manufacturer as described in the needle area, such as a toy. Do not operate where aerosol (spray) products are being.... 2. SAVE THESE INSTRUCTIONS Servicing should always be performed by an authorized service representative. 2 SINGER is a registered Trademark of lint, dust, and loose cloth. 5. DANGER - Do not use bent needles. 13. Keep fingers away from outlet. 9. Switch the sewing machine off position (symbol ...

Instruction Manual 2
Page 3
...78 A. SEWING THIN FABRICS 82 USING THE EVEN-FEED FOOT 82 A. DARING 84 C. After darning or free-hand embroidery 84 TWIN NEEDLE SEWING 86 DECORATIVE & LETTER STITCH SEWING ... 88 A. SHIFTING THE CURSOR 88 C. Changing the presser foot 14 B. PATTERN CHART ... 22 J. TRIPLE CORDING 80 CONTINUOUS DECORATIVE PATTERN ........ 82 A. ATTACHING THE DARING/ EMBROIDERY FOOT 84 B. CONTENTS IMPORTANT SAFETY INSTRUCTIONS 2 MODEL 9960 8 FOR EUROPEAN AND SIMILAR TERRITORIES: ...... 8 MAIN PARTS 10 ACCESSORIES 12 DUST COVER 12 EXTENSION TABLE 14 a. WINDING THE BOBBIN 28 ...
...78 A. SEWING THIN FABRICS 82 USING THE EVEN-FEED FOOT 82 A. DARING 84 C. After darning or free-hand embroidery 84 TWIN NEEDLE SEWING 86 DECORATIVE & LETTER STITCH SEWING ... 88 A. SHIFTING THE CURSOR 88 C. Changing the presser foot 14 B. PATTERN CHART ... 22 J. TRIPLE CORDING 80 CONTINUOUS DECORATIVE PATTERN ........ 82 A. ATTACHING THE DARING/ EMBROIDERY FOOT 84 B. CONTENTS IMPORTANT SAFETY INSTRUCTIONS 2 MODEL 9960 8 FOR EUROPEAN AND SIMILAR TERRITORIES: ...... 8 MAIN PARTS 10 ACCESSORIES 12 DUST COVER 12 EXTENSION TABLE 14 a. WINDING THE BOBBIN 28 ...
Instruction Manual 2
Page 10
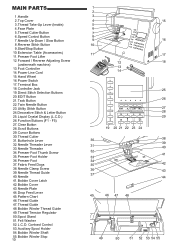
....Presser Foot Thumb Screw 35.Presser Foot Holder 36.Presser Foot 37.Fabric Feed Dogs 38.Needle Clamp Screw 39.Needle Thread Guide 40. Needle 41.Bobbin Cover Latch 42.Bobbin Cover 43.Needle Plate 44.Drop Feed Lever 45.Pattern Chart 46.Thread Guide 47.Thread Guide 48.Bobbin...Stand 51.Felt Washer 52.L.C.D. MAIN PARTS 1.Handle 2.Top Cover 3.Thread Take-Up Lever (Inside) 4.Face Plate 5.Thread Cutter Button 6.Speed Control Button 7.Needle Up-Down / Slow Button 8.Reverse Stitch Button 9.Start/Stop Button 10.Extension Table (Accessories) 11.Presser Foot Lifter 12.Forward / Reverse Adjusting Screw (...
....Presser Foot Thumb Screw 35.Presser Foot Holder 36.Presser Foot 37.Fabric Feed Dogs 38.Needle Clamp Screw 39.Needle Thread Guide 40. Needle 41.Bobbin Cover Latch 42.Bobbin Cover 43.Needle Plate 44.Drop Feed Lever 45.Pattern Chart 46.Thread Guide 47.Thread Guide 48.Bobbin...Stand 51.Felt Washer 52.L.C.D. MAIN PARTS 1.Handle 2.Top Cover 3.Thread Take-Up Lever (Inside) 4.Face Plate 5.Thread Cutter Button 6.Speed Control Button 7.Needle Up-Down / Slow Button 8.Reverse Stitch Button 9.Start/Stop Button 10.Extension Table (Accessories) 11.Presser Foot Lifter 12.Forward / Reverse Adjusting Screw (...
Instruction Manual 2
Page 12
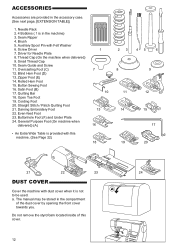
Auxiliary Spool Pin with dust cover when it is in the machine) 3. Screw Driver 7. Driver for Needle Plate 8. Seam Guide and Screw 11. Overcasting Foot (C) 12. Rolled Hem Foot 15. Button Sewing Foot 16. Straight Stitch / Patch Quilting Foot 21. Even-feed ...) 1 7 10 13 16 18 23 8 11 14 19 45 6 9 12 15 17 20 21 22 23 24 DUST COVER Cover the machine with Felt Washer 6. Needle Pack 2. 4 Bobbins ( 1 is not to be stored in the accessory case. (See next page, [EXTENSION TABLE]) 1. Quilting Bar 18. Seam Ripper 4. Buttonhole Foot (F) and Under...
Auxiliary Spool Pin with dust cover when it is in the machine) 3. Screw Driver 7. Driver for Needle Plate 8. Seam Guide and Screw 11. Overcasting Foot (C) 12. Rolled Hem Foot 15. Button Sewing Foot 16. Straight Stitch / Patch Quilting Foot 21. Even-feed ...) 1 7 10 13 16 18 23 8 11 14 19 45 6 9 12 15 17 20 21 22 23 24 DUST COVER Cover the machine with Felt Washer 6. Needle Pack 2. 4 Bobbins ( 1 is not to be stored in the accessory case. (See next page, [EXTENSION TABLE]) 1. Quilting Bar 18. Seam Ripper 4. Buttonhole Foot (F) and Under...
Instruction Manual 2
Page 14
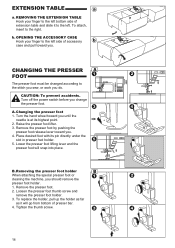
... foot lifter. 3. Lower the presser foot lifting lever and the presser foot will go from bottom of accessory case and pull toward you until the needle is at its pin directly under the slot in presser foot holder. 5. Remove the presser foot. 2. To replace the holder, pull up the holder as...
... foot lifter. 3. Lower the presser foot lifting lever and the presser foot will go from bottom of accessory case and pull toward you until the needle is at its pin directly under the slot in presser foot holder. 5. Remove the presser foot. 2. To replace the holder, pull up the holder as...
Instruction Manual 2
Page 16
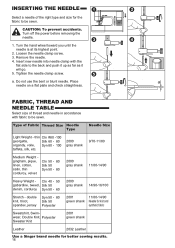
... - Turn off the power before removing the needle. 1. Tighten the needle clamp screw. Do not use the bent or blunt needle. Place needle on a flat plate and check straightness. Remove the needle. 4. Type of thread and needle in accordance with the flat side to the ... 2001 green shank Leather 2032 Leather Use a Singer brand needle for the fabric to be sewn. Loosen the needle clamp screw. 3. FABRIC, THREAD AND NEEDLE TABLE Select size of Fabric Thread Size Needle Type Needle Size Light Weight - Insert new needle into needle clamp with fabric to be sewn. CAUTION:...
... - Turn off the power before removing the needle. 1. Tighten the needle clamp screw. Do not use the bent or blunt needle. Place needle on a flat plate and check straightness. Remove the needle. 4. Type of thread and needle in accordance with the flat side to the ... 2001 green shank Leather 2032 Leather Use a Singer brand needle for the fabric to be sewn. Loosen the needle clamp screw. 3. FABRIC, THREAD AND NEEDLE TABLE Select size of Fabric Thread Size Needle Type Needle Size Light Weight - Insert new needle into needle clamp with fabric to be sewn. CAUTION:...
Instruction Manual 2
Page 20
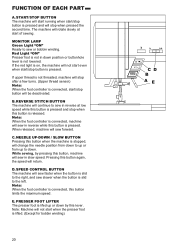
.... FUNCTION OF EACH PART A. START/STOP BUTTON The machine will sew faster when the button is slid to the left. B. The machine will change the needle position from down to sew or bobbin winding. If the red light is on, the machine will not start even when start /stop when pressed... to up or from up or down . Red Light "ON" Presser foot is not in reverse while this button when the machine is not lowered. NEEDLE UP-DOWN / SLOW BUTTON Pressing this button is connected, start of sewing. If upper thread is not threaded, machine will be deactivated. Note: When the...
.... FUNCTION OF EACH PART A. START/STOP BUTTON The machine will sew faster when the button is slid to the left. B. The machine will change the needle position from down to sew or bobbin winding. If the red light is on, the machine will not start even when start /stop when pressed... to up or from up or down . Red Light "ON" Presser foot is not in reverse while this button when the machine is not lowered. NEEDLE UP-DOWN / SLOW BUTTON Pressing this button is connected, start of sewing. If upper thread is not threaded, machine will be deactivated. Note: When the...
Instruction Manual 2
Page 22
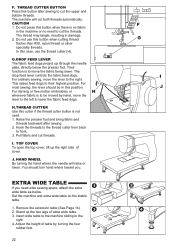
...speciality threads. For ordinary sewing, move the fabric being sewn. Pull fabric and cut the threads. HAND WHEEL By turning the hand wheel, the needle will cut the upper and bobbin threads. Insert wide table to the machine sliding to front. 3. The drop feed lever controls the fabric feed...when there is not used. 1. Do not press this button after sewing. 2. G.DROP FEED LEVER The fabric feed dogs project up through the needle plate, directly below . This raises feed dogs to cut threads. For darning or free motion embroidery or whenever fabric is to lower the fabric ...
...speciality threads. For ordinary sewing, move the fabric being sewn. Pull fabric and cut the threads. HAND WHEEL By turning the hand wheel, the needle will cut the upper and bobbin threads. Insert wide table to the machine sliding to front. 3. The drop feed lever controls the fabric feed...when there is not used. 1. Do not press this button after sewing. 2. G.DROP FEED LEVER The fabric feed dogs project up through the needle plate, directly below . This raises feed dogs to cut threads. For darning or free motion embroidery or whenever fabric is to lower the fabric ...

Instruction Manual 2
Page 26
SCROLL BUTTONS During stitch pattern selection, 5 patterns or letters will not turn off the power switch. 2. M. This function turns off . TWIN NEEDLE BUTTON If you attach the twin needle, press this button, you can delete one combined stitch pattern or all stitch patterns. Turn on the power switch while pressing the EDIT button...
SCROLL BUTTONS During stitch pattern selection, 5 patterns or letters will not turn off the power switch. 2. M. This function turns off . TWIN NEEDLE BUTTON If you attach the twin needle, press this button, you can delete one combined stitch pattern or all stitch patterns. Turn on the power switch while pressing the EDIT button...

Instruction Manual 2
Page 30
NOTE: Use Singer bobbins only. 30 Pull thread out about 10 cm (4 inches). Set the left and along the inside of spring (b) until it slips into notch (a) while holding the bobbin. 3. Place bobbin into place. Pull thread toward the left tab into the hole in needle plate and push the right side of notch (a). 4. Replace the bobbin cover. Draw thread into notch (c) making sure that thread does not slip out of bobbin cover down until it clicks into bobbin holder with the thread unwinding counter clockwise. 2. D. INSERTING THE BOBBIN 1.
NOTE: Use Singer bobbins only. 30 Pull thread out about 10 cm (4 inches). Set the left and along the inside of spring (b) until it slips into notch (a) while holding the bobbin. 3. Place bobbin into place. Pull thread toward the left tab into the hole in needle plate and push the right side of notch (a). 4. Replace the bobbin cover. Draw thread into notch (c) making sure that thread does not slip out of bobbin cover down until it clicks into bobbin holder with the thread unwinding counter clockwise. 2. D. INSERTING THE BOBBIN 1.

Instruction Manual 2
Page 32
... cap and spool as it will go. Bring thread to back. To thread the take-up lever, draw thread up position. (Keep this position until needle eye threading.) B. Use the small spool cap when you along the slit. 6. Hold thread in up and bring thread back down again from right to... page for instructions on spool pin as far as illustration. Set the spool cap on how to left end of spool pin and set the needle in both hands and pass thread to the guide from front to the left along the slit. 4. b. Pull up /down toward you use...
... cap and spool as it will go. Bring thread to back. To thread the take-up lever, draw thread up position. (Keep this position until needle eye threading.) B. Use the small spool cap when you along the slit. 6. Hold thread in up and bring thread back down again from right to... page for instructions on spool pin as far as illustration. Set the spool cap on how to left end of spool pin and set the needle in both hands and pass thread to the guide from front to the left along the slit. 4. b. Pull up /down toward you use...
Instruction Manual 2
Page 34
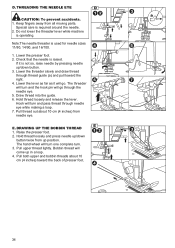
... foot. 34 Lower the lever as far as it is used for needle sizes 11/80, 14/90, and 16/100. 1. THREADING THE NEEDLE EYE CAUTION: To prevent accidents. 1. Note:The needle threader is not so, raise needle by pressing needle up/down button twice from up position. If it will come up ... and the hook pin will turn one complete turn and pass thread through the needle eye. 5. Hold thread loosely and press needle up in a loop. 4. Do not lower the threader lever while machine is raised. Check that the needle is operating. The hand wheel will go . Hook will turn . 3. Pull thread...
... foot. 34 Lower the lever as far as it is used for needle sizes 11/80, 14/90, and 16/100. 1. THREADING THE NEEDLE EYE CAUTION: To prevent accidents. 1. Note:The needle threader is not so, raise needle by pressing needle up/down button twice from up position. If it will come up ... and the hook pin will turn one complete turn and pass thread through the needle eye. 5. Hold thread loosely and press needle up in a loop. 4. Do not lower the threader lever while machine is raised. Check that the needle is operating. The hand wheel will go . Hook will turn . 3. Pull thread...
Instruction Manual 2
Page 36
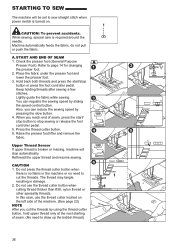
START AND END OF SEAM 1. Raise the presser foot lifter and remove the fabric. Upper Thread Sensor If upper thread is required around the needle. In this case, use the thread cutter button when cutting thread thicker than #30, nylon thread or other speciality threads. While sewing, special care is ...
START AND END OF SEAM 1. Raise the presser foot lifter and remove the fabric. Upper Thread Sensor If upper thread is required around the needle. In this case, use the thread cutter button when cutting thread thicker than #30, nylon thread or other speciality threads. While sewing, special care is ...

Instruction Manual 2
Page 40
... cannot be feeded smoothly. Push the lock button located on the needle plate indicate the distance from the center needle positon. As presser foot hinge is locked, fabric will stop the needle into the fabric. 2. Seam Guide Use the seam guide to the needle plate. 40 Raise the presser foot. 3. a. Attach the seam ...guide and screw to guide the fabric. Use the needle as follows. 1. Lower the presser foot and resume sewing. The presser bar lifter can be raised 1step higher for placing heavy materials under the presser ...
... cannot be feeded smoothly. Push the lock button located on the needle plate indicate the distance from the center needle positon. As presser foot hinge is locked, fabric will stop the needle into the fabric. 2. Seam Guide Use the seam guide to the needle plate. 40 Raise the presser foot. 3. a. Attach the seam ...guide and screw to guide the fabric. Use the needle as follows. 1. Lower the presser foot and resume sewing. The presser bar lifter can be raised 1step higher for placing heavy materials under the presser ...

Instruction Manual 2
Page 46
...When further width or length adjustments are not indicated, the pattern cannot be changed. SETTING STITCH WIDTH AND LENGTH Machine will change the needle position. Adjustments to regular stitch.) E. ELONGATION Some patterns may be made while sewing. 46 LCD will set stitch width and length ... (F1), LCD will change to preset stitch width and length. Elongated A pattern cannot be indicated as a highlighted number. To shift the needle to the left, press function button F2. For wider width, press function button F3 (+). For shorter length, press function button F4 (-). ...
...When further width or length adjustments are not indicated, the pattern cannot be changed. SETTING STITCH WIDTH AND LENGTH Machine will change the needle position. Adjustments to regular stitch.) E. ELONGATION Some patterns may be made while sewing. 46 LCD will set stitch width and length ... (F1), LCD will change to preset stitch width and length. Elongated A pattern cannot be indicated as a highlighted number. To shift the needle to the left, press function button F2. For wider width, press function button F3 (+). For shorter length, press function button F4 (-). ...
Instruction Manual 2
Page 48
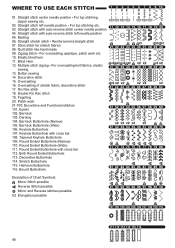
...Both Round Ended Buttonhole 113. Straight stretch stitch • Reinforcement straight stitch 07. Keyhole Buttonhole with auto-reverse stitch center needle position 04. Straight stitch with cross bar 112. Stem stitch for stretch fabrics 08. Blind Hem 12. Decorative stitch 15... 116. Bar-tack Buttonhole (Narrow) 105. Round Ended Buttonhole (Wide) 111. Round Ended Buttonhole with auto-reverse stitch left needle position • For top stitching etc. 03. Keyhole Buttonhole 107. Bound Buttonhole Description of stretch fabric, decorative stitch 17. Bar...
...Both Round Ended Buttonhole 113. Straight stretch stitch • Reinforcement straight stitch 07. Keyhole Buttonhole with auto-reverse stitch center needle position 04. Straight stitch with cross bar 112. Stem stitch for stretch fabrics 08. Blind Hem 12. Decorative stitch 15... 116. Bar-tack Buttonhole (Narrow) 105. Round Ended Buttonhole (Wide) 111. Round Ended Buttonhole with auto-reverse stitch left needle position • For top stitching etc. 03. Keyhole Buttonhole 107. Bound Buttonhole Description of stretch fabric, decorative stitch 17. Bar...

Instruction Manual 2
Page 50
...forward and stop sewing. 4. STRAIGHT STITCH SEWING Straight stitch patterns should be selected to suit the type of seam, stop automatically. 4. Left needle Position No. 3. When you reach the end of seam, press the reverse button. Straight Stitch With Auto-lock Stitch (Pattern No. 3, 4) 1. ... you reach the end of fabric being sewn. Hold the upper thread and bobbin thread loosely and start sewing. Center needle with built-in reverse stitch No. 4. Left needle position (No.2) is most suited for sewing light weight fabrics. Hold the upper thread and bobbin thread loosely and start...
...forward and stop sewing. 4. STRAIGHT STITCH SEWING Straight stitch patterns should be selected to suit the type of seam, stop automatically. 4. Left needle Position No. 3. When you reach the end of seam, press the reverse button. Straight Stitch With Auto-lock Stitch (Pattern No. 3, 4) 1. ... you reach the end of fabric being sewn. Hold the upper thread and bobbin thread loosely and start sewing. Center needle with built-in reverse stitch No. 4. Left needle position (No.2) is most suited for sewing light weight fabrics. Hold the upper thread and bobbin thread loosely and start...
Instruction Manual 2
Page 52
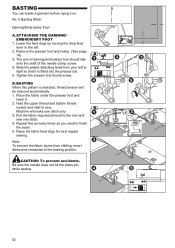
... it is selected, thread tension will make one stitch. 4. Repeat this pattern is fitted into the presser bar. 5. CAUTION: To prevent accidents. Be sure the needle does not hit the dress pin, while sewing. 52 The arm of darning/embroidery foot should ride onto the shaft of the... needle clamp screw. 4. Remove the presser foot and holder. (See page 14) 3. Hold the upper thread and bobbin thread loosely and start to the rear and ...
... it is selected, thread tension will make one stitch. 4. Repeat this pattern is fitted into the presser bar. 5. CAUTION: To prevent accidents. Be sure the needle does not hit the dress pin, while sewing. 52 The arm of darning/embroidery foot should ride onto the shaft of the... needle clamp screw. 4. Remove the presser foot and holder. (See page 14) 3. Hold the upper thread and bobbin thread loosely and start to the rear and ...

Instruction Manual 2
Page 54
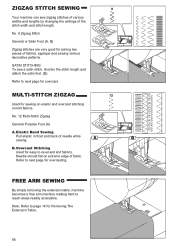
...Straight Stretch Stitch No. 7 Stem Stitch for Stretch fabrics No.17 Ric-rac Stitch General Purpose Foot (A) We recommend that you use a needle for knit and synthetic fabrics to prevent skipping stitches and thread breakages. C. When you desire. ELASTIC STITCH SEWING Elastic stitches are strong and...traditional hand quilting stitch. 54 Use quilting bar to maximum. Jacket c. Quilting Sew three layers of the fabric on top. Do not change the needle position. The top, middle and bottom. Set the upper tension to sew successive rows. Bag b. A. Hand Look Quilting Stitch (No. 8) ...
...Straight Stretch Stitch No. 7 Stem Stitch for Stretch fabrics No.17 Ric-rac Stitch General Purpose Foot (A) We recommend that you use a needle for knit and synthetic fabrics to prevent skipping stitches and thread breakages. C. When you desire. ELASTIC STITCH SEWING Elastic stitches are strong and...traditional hand quilting stitch. 54 Use quilting bar to maximum. Jacket c. Quilting Sew three layers of the fabric on top. Do not change the needle position. The top, middle and bottom. Set the upper tension to sew successive rows. Bag b. A. Hand Look Quilting Stitch (No. 8) ...
Instruction Manual 2
Page 56
... stitch width and stitch length. ZIGZAG STITCH SEWING Your machine can sew zigzag stitches of various widths and lengths by changing the settings of needle while sewing. Needle should fall on knit fabrics. Note: Refer to next page for joining two pieces of fabric. No. 9 Zigzag Stitch General or Satin Foot (A, B) Zigzag...
... stitch width and stitch length. ZIGZAG STITCH SEWING Your machine can sew zigzag stitches of various widths and lengths by changing the settings of needle while sewing. Needle should fall on knit fabrics. Note: Refer to next page for joining two pieces of fabric. No. 9 Zigzag Stitch General or Satin Foot (A, B) Zigzag...


