
Instruction Manual 2
Page 3
...OVERCASTING-OVERLOCKING 58 A. SEWING 82 DARNING/FREE-HAND EMBROIDERY .......... 84 A. After darning or free-hand embroidery 84 TWIN NEEDLE SEWING 86 DECORATIVE & LETTER STITCH SEWING ... 88 A. CONTENTS IMPORTANT SAFETY INSTRUCTIONS 2 MODEL 9960 8 FOR EUROPEAN AND SIMILAR TERRITORIES: ...... 8 ...With Auto-lock Stitch (Pattern No. 3, 4) ......... 50 BASTING 52 A. USING THE GENERAL PURPOSE FOOT 58 C. ATTACHING THE DARING/ EMBROIDERY FOOT 84 B. SELECTING DECORATIVE & LETTER STITCH (selecting mode 88 B. PATTERN CHART 24 D. Quilting 54 C. Thread Shank 78 NARROW ...
...OVERCASTING-OVERLOCKING 58 A. SEWING 82 DARNING/FREE-HAND EMBROIDERY .......... 84 A. After darning or free-hand embroidery 84 TWIN NEEDLE SEWING 86 DECORATIVE & LETTER STITCH SEWING ... 88 A. CONTENTS IMPORTANT SAFETY INSTRUCTIONS 2 MODEL 9960 8 FOR EUROPEAN AND SIMILAR TERRITORIES: ...... 8 ...With Auto-lock Stitch (Pattern No. 3, 4) ......... 50 BASTING 52 A. USING THE GENERAL PURPOSE FOOT 58 C. ATTACHING THE DARING/ EMBROIDERY FOOT 84 B. SELECTING DECORATIVE & LETTER STITCH (selecting mode 88 B. PATTERN CHART 24 D. Quilting 54 C. Thread Shank 78 NARROW ...
Instruction Manual 2
Page 12
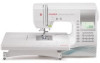
Driver for Needle Plate 8. Open Toe Foot 19. Straight Stitch / Patch Quilting Foot 21. Darning Embroidery Foot 22. Even-feed Foot 23. a. Seam Ripper 4. Screw Driver 7. Rolled Hem Foot 15. Satin Foot (B) 17. Buttonhole Foot (F) and Under Plate 24. Seam Guide ...
Driver for Needle Plate 8. Open Toe Foot 19. Straight Stitch / Patch Quilting Foot 21. Darning Embroidery Foot 22. Even-feed Foot 23. a. Seam Ripper 4. Screw Driver 7. Rolled Hem Foot 15. Satin Foot (B) 17. Buttonhole Foot (F) and Under Plate 24. Seam Guide ...
Instruction Manual 2
Page 22
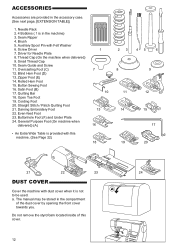
..., move the fabric being sewn. For most sewing, the lever should turn hand wheel toward you need to the right. 4. For darning or free motion embroidery or whenever fabric is to move the lever to cut the threads. TOP COVER To open the top cover, lift up through the needle plate...
..., move the fabric being sewn. For most sewing, the lever should turn hand wheel toward you need to the right. 4. For darning or free motion embroidery or whenever fabric is to move the lever to cut the threads. TOP COVER To open the top cover, lift up through the needle plate...
Instruction Manual 2
Page 52
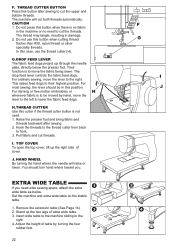
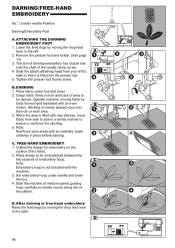
... the plastic attaching head from shifting, insert dress pins crosswise to sew. The arm of darning/embroidery foot should ride onto the shaft of the needle clamp screw. 4. CAUTION: To prevent accidents. ATTACHING THE DARNING/ EMBROIDERY FOOT 1. BASTING When this as many times as you need to right so that it is... amount to the left to finish the seam. 5. B. Be sure the needle does not hit the dress pin, while sewing. 52 No. 5 Basting Stitch Darning/Embroidery Foot A. Lower the feed dogs by moving the drop feed lever to the rear and sew one stitch only. 3.
... the plastic attaching head from shifting, insert dress pins crosswise to sew. The arm of darning/embroidery foot should ride onto the shaft of the needle clamp screw. 4. CAUTION: To prevent accidents. ATTACHING THE DARNING/ EMBROIDERY FOOT 1. BASTING When this as many times as you need to right so that it is... amount to the left to finish the seam. 5. B. Be sure the needle does not hit the dress pin, while sewing. 52 No. 5 Basting Stitch Darning/Embroidery Foot A. Lower the feed dogs by moving the drop feed lever to the rear and sew one stitch only. 3.
Instruction Manual 2
Page 84
... degs by moving fabric by moving the drop feed lever to the left to weave or reinforce the stitching. The arm of darning/embroidery foot should ride onto the shaft of area to be embroidered between the two sections of the fabric. 2. When the area is... fitted into the presser bar. 5. Outline the design for embroidery on the surface of embroidery hoop. Set embroidery hoop under foot and lower. 2. DARNING 1. C. D. Place fabric under needle and lower the foot. 4. Slide the plastic attaching...
... degs by moving fabric by moving the drop feed lever to the left to weave or reinforce the stitching. The arm of darning/embroidery foot should ride onto the shaft of area to be embroidered between the two sections of the fabric. 2. When the area is... fitted into the presser bar. 5. Outline the design for embroidery on the surface of embroidery hoop. Set embroidery hoop under foot and lower. 2. DARNING 1. C. D. Place fabric under needle and lower the foot. 4. Slide the plastic attaching...


