
Instruction Manual 2
Page 2
...machine needle. 11. Use only attachments recommended by the manufacturer as contained in this sewing machine is used by an authorized service representative. 2 SINGER is a registered Trademark of it to be performed by or near children. 2. Keep fingers away from outlet. 9. Handle the foot controller... use bent needles. 13. Do not expose the machine or machine case to lift and move the machine. 18. Read all moving parts. Close attention is necessary when this manual. 3. Never operate this machine from the electrical outlet when removing covers, lubricating, or when ...
...machine needle. 11. Use only attachments recommended by the manufacturer as contained in this sewing machine is used by an authorized service representative. 2 SINGER is a registered Trademark of it to be performed by or near children. 2. Keep fingers away from outlet. 9. Handle the foot controller... use bent needles. 13. Do not expose the machine or machine case to lift and move the machine. 18. Read all moving parts. Close attention is necessary when this manual. 3. Never operate this machine from the electrical outlet when removing covers, lubricating, or when ...

Instruction Manual 2
Page 3
...holder 14 INSERTING THE NEEDLE 16 FABRIC, THREAD AND NEEDLE TABLE ........ 16 CONNECTING THE MACHINE 18 FOOT CONTROLLER 18 FUNCTION OF EACH PART 20 A. DROP FEED LEVER 22 H. PATTERN CHART 24 D. EDIT BUTTON 24 I . SCROLL BUTTONS 26 K. AUTO TACK STITCH... EMBROIDERY 84 D. SEWING THIN FABRICS 82 USING THE EVEN-FEED FOOT 82 A. CONTENTS IMPORTANT SAFETY INSTRUCTIONS 2 MODEL 9960 8 FOR EUROPEAN AND SIMILAR TERRITORIES: ...... 8 MAIN PARTS 10 ACCESSORIES 12 DUST COVER 12 EXTENSION TABLE 14 a. REVERSE STITCH BUTTON 20 C. THREAD CUTTER BUTTON 22 G. ...
...holder 14 INSERTING THE NEEDLE 16 FABRIC, THREAD AND NEEDLE TABLE ........ 16 CONNECTING THE MACHINE 18 FOOT CONTROLLER 18 FUNCTION OF EACH PART 20 A. DROP FEED LEVER 22 H. PATTERN CHART 24 D. EDIT BUTTON 24 I . SCROLL BUTTONS 26 K. AUTO TACK STITCH... EMBROIDERY 84 D. SEWING THIN FABRICS 82 USING THE EVEN-FEED FOOT 82 A. CONTENTS IMPORTANT SAFETY INSTRUCTIONS 2 MODEL 9960 8 FOR EUROPEAN AND SIMILAR TERRITORIES: ...... 8 MAIN PARTS 10 ACCESSORIES 12 DUST COVER 12 EXTENSION TABLE 14 a. REVERSE STITCH BUTTON 20 C. THREAD CUTTER BUTTON 22 G. ...
Instruction Manual 2
Page 10
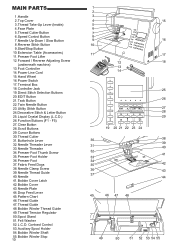
....Presser Foot Thumb Screw 35.Presser Foot Holder 36.Presser Foot 37.Fabric Feed Dogs 38.Needle Clamp Screw 39.Needle Thread Guide 40. MAIN PARTS 1.Handle 2.Top Cover 3.Thread Take-Up Lever (Inside) 4.Face Plate 5.Thread Cutter Button 6.Speed Control Button 7.Needle Up-Down / Slow Button 8.Reverse Stitch Button 9.Start...
....Presser Foot Thumb Screw 35.Presser Foot Holder 36.Presser Foot 37.Fabric Feed Dogs 38.Needle Clamp Screw 39.Needle Thread Guide 40. MAIN PARTS 1.Handle 2.Top Cover 3.Thread Take-Up Lever (Inside) 4.Face Plate 5.Thread Cutter Button 6.Speed Control Button 7.Needle Up-Down / Slow Button 8.Reverse Stitch Button 9.Start...
Instruction Manual 2
Page 20
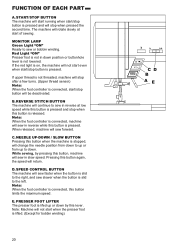
... will continue to the right, and sew slower when the button is pressed. MONITOR LAMP Green Light "ON" Ready to the left. FUNCTION OF EACH PART A. The machine will stop button is slid to sew or bobbin winding. If upper thread is not threaded, machine will stop after a few turns. (Upper...
... will continue to the right, and sew slower when the button is pressed. MONITOR LAMP Green Light "ON" Ready to the left. FUNCTION OF EACH PART A. The machine will stop button is slid to sew or bobbin winding. If upper thread is not threaded, machine will stop after a few turns. (Upper...
Instruction Manual 2
Page 34
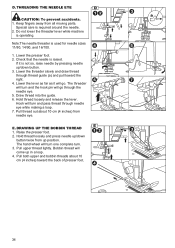
... THREAD 1. Lower the presser foot. 2. Hook will come up /down button twice from needle eye. Raise the presser foot. 2. Keep fingers away from all moving parts. Pull both upper and bobbin threads about 10 cm (4 inches) from up /down button. 3. THREADING THE NEEDLE EYE CAUTION: To prevent accidents. 1. The threader will...
... THREAD 1. Lower the presser foot. 2. Hook will come up /down button twice from needle eye. Raise the presser foot. 2. Keep fingers away from all moving parts. Pull both upper and bobbin threads about 10 cm (4 inches) from up /down button. 3. THREADING THE NEEDLE EYE CAUTION: To prevent accidents. 1. The threader will...


