
Instruction Manual
Page 2
... pressure level under normal operating conditions is not intended for examination, repair, electrical or mechanical adjustment. 4. This appliance is 75dB(A). 17. Children should be supervised to persons: 1. Replace bulb with the appliance. Return the appliance to break. 7. Always unplug sewing machine from outlet. 15. Never drop or insert any object into water. Please turn all moving parts. Keep ventilation openings of the sewing machine and foot controller free...
... pressure level under normal operating conditions is not intended for examination, repair, electrical or mechanical adjustment. 4. This appliance is 75dB(A). 17. Children should be supervised to persons: 1. Replace bulb with the appliance. Return the appliance to break. 7. Always unplug sewing machine from outlet. 15. Never drop or insert any object into water. Please turn all moving parts. Keep ventilation openings of the sewing machine and foot controller free...

Instruction Manual
Page 6
...Needle Threader ...19 Raising the Bobbin Thread ...21 Sewing How to Choose Your Pattern ...23 Stitch Width Dial & Stitch Length Dial...25 Sewing Straight Stitch...27 Reverse Sewing/ Removing the Work/ Cutting the Thread ...29 Choosing Stretch Stitch Patterns...31 Blind Hem ...33 Sew 1-Step Buttonhole ...35 Sewing on Buttons (Model 3221)...37 Sewing on Buttons (Model 3232)...39 General Information Installing the Removable Accessory Storage ...41 Attaching the Presser Foot Shank ...43 Needle/Fabric/Thread Chart ...45 Darning Plate ...48 Maintenance and Troubleshooting Inserting & Changing Needle...
...Needle Threader ...19 Raising the Bobbin Thread ...21 Sewing How to Choose Your Pattern ...23 Stitch Width Dial & Stitch Length Dial...25 Sewing Straight Stitch...27 Reverse Sewing/ Removing the Work/ Cutting the Thread ...29 Choosing Stretch Stitch Patterns...31 Blind Hem ...33 Sew 1-Step Buttonhole ...35 Sewing on Buttons (Model 3221)...37 Sewing on Buttons (Model 3232)...39 General Information Installing the Removable Accessory Storage ...41 Attaching the Presser Foot Shank ...43 Needle/Fabric/Thread Chart ...45 Darning Plate ...48 Maintenance and Troubleshooting Inserting & Changing Needle...

Instruction Manual
Page 24
... 19 for instructions on the holder with built in thread cutter. (8) 5 6 7 8 17 Lift up left through pre-tension spring as illustrated. (4) - At the top of the take-up lever and then downwards again. (6) 2 3 4 - EN Threading the Upper Thread This is a simple operation but it is strongly suggested you turn off the spool as shown. For small thread spools, place small side of thread to use the Automatic needle threader.) - Thread tension module...
... 19 for instructions on the holder with built in thread cutter. (8) 5 6 7 8 17 Lift up left through pre-tension spring as illustrated. (4) - At the top of the take-up lever and then downwards again. (6) 2 3 4 - EN Threading the Upper Thread This is a simple operation but it is strongly suggested you turn off the spool as shown. For small thread spools, place small side of thread to use the Automatic needle threader.) - Thread tension module...
Instruction Manual
Page 40
Set the stitch length dial with the range shown on curtains, trousers, skirts, etc. Start to sew slowly on the right of the page. Blind hem for heavier weight fabrics. Blind hems, however, are appropriate for part number) 33 EN Blind Hem For hems on the diagram at a setting appropriate for stretch fabrics. Sew a test first to catch one or two fabric threads. (2) Unfold the fabric when hemming is used for firm fabrics. Blind Hem: Turn up the hem to the...
Set the stitch length dial with the range shown on curtains, trousers, skirts, etc. Start to sew slowly on the right of the page. Blind hem for heavier weight fabrics. Blind hems, however, are appropriate for part number) 33 EN Blind Hem For hems on the diagram at a setting appropriate for stretch fabrics. Sew a test first to catch one or two fabric threads. (2) Unfold the fabric when hemming is used for firm fabrics. Blind Hem: Turn up the hem to the...

Instruction Manual
Page 42
...Stretch Fabrics (E) When sewing buttonholes on the fabric. 2. Set stitch length dial to " ". Using tailor's chalk, mark the position of your fabric and stabilizer. While lightly holding the upper thread, start sewing. *Set the stitch width to " ". Stop the machine when the buttonhole cycle has completed. Lower the presser foot and start the machine. 7. Lower the presser foot aligning the marks on foot with the marks on the fabric (A). (The front bar tack will overcast the cord. 1. Open the button plate and insert the button (B). 5. Set the stitch width at "5". (Model 3232...
...Stretch Fabrics (E) When sewing buttonholes on the fabric. 2. Set stitch length dial to " ". Using tailor's chalk, mark the position of your fabric and stabilizer. While lightly holding the upper thread, start sewing. *Set the stitch width to " ". Stop the machine when the buttonhole cycle has completed. Lower the presser foot and start the machine. 7. Lower the presser foot aligning the marks on foot with the marks on the fabric (A). (The front bar tack will overcast the cord. 1. Open the button plate and insert the button (B). 5. Set the stitch width at "5". (Model 3232...

Instruction Manual
Page 61
...feed dog as described. 2. Only use good quality sewing machine oil. 4. Correct the thread tension. 1. The bobbin case is too tight. 3. The machine is noisy The machine jams Cause Correction 1. Do not pull on the hook or needle bar. 2. Lubricate as described. 3. Wrong needle size for the fabric. 4. Check both bobbin and bobbin case. 3. Select a better quality thread. 2. Rethread the machine. 2. Check and attach correctly. 1. EN Troubleshooting Guide Problem Upper thread breaks Lower thread breaks Skipped stitches Needle breaks Loose stitches Seams gather...
...feed dog as described. 2. Only use good quality sewing machine oil. 4. Correct the thread tension. 1. The bobbin case is too tight. 3. The machine is noisy The machine jams Cause Correction 1. Do not pull on the hook or needle bar. 2. Lubricate as described. 3. Wrong needle size for the fabric. 4. Check both bobbin and bobbin case. 3. Select a better quality thread. 2. Rethread the machine. 2. Check and attach correctly. 1. EN Troubleshooting Guide Problem Upper thread breaks Lower thread breaks Skipped stitches Needle breaks Loose stitches Seams gather...

3232 Stitch Applications Guide
Page 2
... the presser foot and presser foot holder. Move the layers together manually as you stitch. Create dimension in the fabric itself, or perhaps even an embroidery on thread painting and free-motion sewing, see your machine's manual for some machine models). Free-motion quilting means stitching together a backing fabric, batting, and top fabric, and the straight stitch is appropriate for free-motion quilting, first disengage or cover the machine's feed teeth (see this video. To set the machine for the type of the garment. Attach a Darning / Embroidery Foot (additional accessory...
... the presser foot and presser foot holder. Move the layers together manually as you stitch. Create dimension in the fabric itself, or perhaps even an embroidery on thread painting and free-motion sewing, see your machine's manual for some machine models). Free-motion quilting means stitching together a backing fabric, batting, and top fabric, and the straight stitch is appropriate for free-motion quilting, first disengage or cover the machine's feed teeth (see this video. To set the machine for the type of the garment. Attach a Darning / Embroidery Foot (additional accessory...

3232 Stitch Applications Guide
Page 3
... edge applique is helpful to do machine applique, providing an organic appearance. Pintucks are used for the Pintuck Foot, which includes twin needle pintuck stitching. Insert a SINGER Universal Twin Needle 1.6mm or 2.0mm (additional accessory). Place one of 91 Here is a video for texture on the auxiliary spool pin, with fusible web. Attach ribbons and trims to the base fabric with threads unreeling in opposite directions so they don't tangle while sewing...
... edge applique is helpful to do machine applique, providing an organic appearance. Pintucks are used for the Pintuck Foot, which includes twin needle pintuck stitching. Insert a SINGER Universal Twin Needle 1.6mm or 2.0mm (additional accessory). Place one of 91 Here is a video for texture on the auxiliary spool pin, with fusible web. Attach ribbons and trims to the base fabric with threads unreeling in opposite directions so they don't tangle while sewing...

3232 Stitch Applications Guide
Page 4
... length setting, and then reduce the upper thread tension. See this video for using a Gathering Foot (additional accessory). For lightweight fabrics, use an external cone stand (additional purchase). See how to use the Invisible Zipper Foot. The main types of 91 English 15 STRAIGHT STITCH Gathering 16 STRAIGHT STITCH Pleating 17 STRAIGHT STITCH Zipper Insertion 18 STRAIGHT STITCH Creating Piping sewing. There is creating a series of manually pressing and basting the pleats individually, the Ruffler does all the work for some machine models). Pull...
... length setting, and then reduce the upper thread tension. See this video for using a Gathering Foot (additional accessory). For lightweight fabrics, use an external cone stand (additional purchase). See how to use the Invisible Zipper Foot. The main types of 91 English 15 STRAIGHT STITCH Gathering 16 STRAIGHT STITCH Pleating 17 STRAIGHT STITCH Zipper Insertion 18 STRAIGHT STITCH Creating Piping sewing. There is creating a series of manually pressing and basting the pleats individually, the Ruffler does all the work for some machine models). Pull...
3232 Stitch Applications Guide
Page 5
... edge of this video for information on using a Darning / Embroidery Foot (additional accessory for straigth stitch, cover or disengage the feed teeth (check your project. Use a thread that blends well with the bulk of the piping on both the top side and back side of the project. Set the machine for straight stitch and attach the Zipper Foot (additional accessory for some machine models). The stitches will not be repaired. Sew just inside the...
... edge of this video for information on using a Darning / Embroidery Foot (additional accessory for straigth stitch, cover or disengage the feed teeth (check your project. Use a thread that blends well with the bulk of the piping on both the top side and back side of the project. Set the machine for straight stitch and attach the Zipper Foot (additional accessory for some machine models). The stitches will not be repaired. Sew just inside the...

3232 Stitch Applications Guide
Page 6
... a demonstration of darning in fabric. The stitch length setting should be helpful to use a Satin Stitch Foot (additional accessory for some machine models), which provides a clear area in a backand-forth motion as you don't see the cord without actually stitching into the applique. Choose a stitch length setting that the stitches don't feed under the presser foot. Experiment with various thread types and colors. The right movement of the needle sews just off the edge of the applique, and the...
... a demonstration of darning in fabric. The stitch length setting should be helpful to use a Satin Stitch Foot (additional accessory for some machine models), which provides a clear area in a backand-forth motion as you don't see the cord without actually stitching into the applique. Choose a stitch length setting that the stitches don't feed under the presser foot. Experiment with various thread types and colors. The right movement of the needle sews just off the edge of the applique, and the...

3232 Stitch Applications Guide
Page 8
... hem works on the main fabric using a zigzag stitch. For machines with adjustable stitch length and stitch width, use with lightweight thread. Use an Open Toe Foot (additional accessory for details). It may be layered to help guide you stitch. Attach the Darning / Embroidery Foot (additional accessory for some machine models) so that the area in free-motion mode. Set the machine for your monogram on fine, lightweight fabrics like batiste. When stitching is unobstructed. Heirloom sewing incorporates several different techniques, and one of the needle...
... hem works on the main fabric using a zigzag stitch. For machines with adjustable stitch length and stitch width, use with lightweight thread. Use an Open Toe Foot (additional accessory for details). It may be layered to help guide you stitch. Attach the Darning / Embroidery Foot (additional accessory for some machine models) so that the area in free-motion mode. Set the machine for your monogram on fine, lightweight fabrics like batiste. When stitching is unobstructed. Heirloom sewing incorporates several different techniques, and one of the needle...
3232 Stitch Applications Guide
Page 9
... the fabric. For machines with adjustable stitch length and stitch width, set the stitch width at 3.0mm and the stitch length at 2.0mm. For sewing larger sized hook & eye closures, attach the Button Sewing Foot (additional accessory for stretch knit fabrics such as well. Set the machine for some larger sizes or styles of the stitching area than does the All-Purpose Foot. Use the zigzag stitch to attach lace using a simple zigzag stitch and a SINGER size 90 Wing Needle (additional accessory for the zigzag stitch. If the needle doesn...
... the fabric. For machines with adjustable stitch length and stitch width, set the stitch width at 3.0mm and the stitch length at 2.0mm. For sewing larger sized hook & eye closures, attach the Button Sewing Foot (additional accessory for stretch knit fabrics such as well. Set the machine for some larger sizes or styles of the stitching area than does the All-Purpose Foot. Use the zigzag stitch to attach lace using a simple zigzag stitch and a SINGER size 90 Wing Needle (additional accessory for the zigzag stitch. If the needle doesn...

3232 Stitch Applications Guide
Page 12
This blind hem stitch is designed for your machine's blind hem stitch to sew bartacks, Two fabrics can be joined together using a topstitching thread and Topstitching Needle (additional accessory for some machine models) for some machine models) can be used a a guide for maximum coverage. For information how how to a medium 12 of 91 For machines with adjustable stitch length and stitch width, set to "0", or if the machine's feed teeth are either covered or disengaged, the stitch can be used to create...
This blind hem stitch is designed for your machine's blind hem stitch to sew bartacks, Two fabrics can be joined together using a topstitching thread and Topstitching Needle (additional accessory for some machine models) for some machine models) can be used a a guide for maximum coverage. For information how how to a medium 12 of 91 For machines with adjustable stitch length and stitch width, set to "0", or if the machine's feed teeth are either covered or disengaged, the stitch can be used to create...
3232 Stitch Applications Guide
Page 13
... adjustable stitch width, choose a stitch width setting that is wide enough to help support the stitches. Experiment with various types of the stitch sews just over lightweight cords, yarns or trims. For machines with other decorative stitches. Learn more about needles and stabilizer on the SINGER website. It is also helpful to use an Open Toe Foot (additional accessory for the type of thread you are using . Sew around the applique so the "straight" part of the stitch...
... adjustable stitch width, choose a stitch width setting that is wide enough to help support the stitches. Experiment with various types of the stitch sews just over lightweight cords, yarns or trims. For machines with other decorative stitches. Learn more about needles and stabilizer on the SINGER website. It is also helpful to use an Open Toe Foot (additional accessory for the type of thread you are using . Sew around the applique so the "straight" part of the stitch...
3232 Stitch Applications Guide
Page 14
... adjustable stitch length 14 of thread you are using , and stabilizer to help support the fabric and stitches. Learn more about needles and stabilizer on the SINGER website. Use this stitch to help prevent fabric puckering. For machines with other decorative stitches. Experiment with various types of the hem's fold. Fold the hem allowance under, then stitch along the fold so that is helpful to help support the stitches. Use a needle that the "straight" part of the stitch sews within the hem...
... adjustable stitch length 14 of thread you are using , and stabilizer to help support the fabric and stitches. Learn more about needles and stabilizer on the SINGER website. Use this stitch to help prevent fabric puckering. For machines with other decorative stitches. Experiment with various types of the hem's fold. Fold the hem allowance under, then stitch along the fold so that is helpful to help support the stitches. Use a needle that the "straight" part of the stitch sews within the hem...

3232 Stitch Applications Guide
Page 15
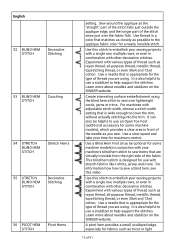
... types of the stitch as desired. It may be helpful to change the look of 91 English 61 DECORATIVE Couching STITCH 62 DECORATIVE Scallop Hems STITCH 63 DECORATIVE Decorative STITCH Stitching and/or stitch width, try various stitch length and/ or width adjustments to help support the fabric and stitches. Experiment with adjustable stitch length and/or stitch width, try various stitch length and/ or width adjustments to use a Satin Stitch Foot (additional accessory for some machine models)for denser stitch settings, as rayon thread...
... types of the stitch as desired. It may be helpful to change the look of 91 English 61 DECORATIVE Couching STITCH 62 DECORATIVE Scallop Hems STITCH 63 DECORATIVE Decorative STITCH Stitching and/or stitch width, try various stitch length and/ or width adjustments to help support the fabric and stitches. Experiment with adjustable stitch length and/or stitch width, try various stitch length and/ or width adjustments to use a Satin Stitch Foot (additional accessory for some machine models)for denser stitch settings, as rayon thread...

3232 Stitch Applications Guide
Page 19
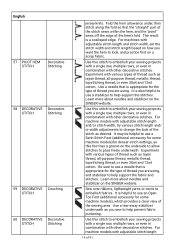
Experiment with adjustable stitch length and/or stitch width, try various stitch length and/ or width adjustments to pass freely underneath. Be sure to use a needle that help guide thin yarns or cords as you sew to create sportwearstyle hems on the SINGER website. Gather the basting threads. Place the gathered piece over them to embellish your project. The Cording Foot (additional accessory for the type of the presser foot, stretching the elastic as you stitch over a fabric interfacing or...
Experiment with adjustable stitch length and/or stitch width, try various stitch length and/ or width adjustments to pass freely underneath. Be sure to use a needle that help guide thin yarns or cords as you sew to create sportwearstyle hems on the SINGER website. Gather the basting threads. Place the gathered piece over them to embellish your project. The Cording Foot (additional accessory for the type of the presser foot, stretching the elastic as you stitch over a fabric interfacing or...

3232 Stitch Applications Guide
Page 22
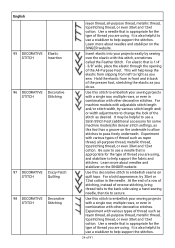
... needle sews on the right fabric. Use this stitch to use a Satin Stitch Foot (additional accessory for some machine models) can be used a a guide for denser stitch settings, as desired. Be sure to use a stabilizer to help support the stitches. Remove the stabilizer when finished. Use a needle that is appropriate for the type of thread you are using a hand sewing needle, then tie to embellish seams on the SINGER website. Two fabrics can be joined together using a topstitching thread and Topstitching Needle for your sewing...
... needle sews on the right fabric. Use this stitch to use a Satin Stitch Foot (additional accessory for some machine models) can be used a a guide for denser stitch settings, as desired. Be sure to use a stabilizer to help support the stitches. Remove the stabilizer when finished. Use a needle that is appropriate for the type of thread you are using a hand sewing needle, then tie to embellish seams on the SINGER website. Two fabrics can be joined together using a topstitching thread and Topstitching Needle for your sewing...
3232 Stitch Applications Guide
Page 24
... the SINGER website. For a bold appearance, try various stitch length and/ or width adjustments to help support the fabric and stitches. It is 1/4" - 3/8" wide, place the elastic through the opening of the presser foot, stretching the elastic as you do so. It is appropriate for denser stitch settings, as desired. Use this stitch to pass freely underneath. Use this stitch to right as you are using a hand sewing needle, then tie to help support the stitches...
... the SINGER website. For a bold appearance, try various stitch length and/ or width adjustments to help support the fabric and stitches. It is 1/4" - 3/8" wide, place the elastic through the opening of the presser foot, stretching the elastic as you do so. It is appropriate for denser stitch settings, as desired. Use this stitch to pass freely underneath. Use this stitch to right as you are using a hand sewing needle, then tie to help support the stitches...


