
Instruction Manual and Troubleshooting Guide
Page 3
... sewing machine only for examination, repair, electrical or mechanical adjustment. - Use this sewing machine is required around the sewing machine needle. - Never operate the sewing machine with IEC/EN 60335-2-28 and UL1594. Special care is used by the manufacturer as described...while stitching. Never drop or insert any object into water. Use only attachments recommended by or near children. - Always use bent needles. - DANGER - Always unplug this sewing machine from the electric outlet immediately after using and before using an electrical appliance, basic ...
... sewing machine only for examination, repair, electrical or mechanical adjustment. - Use this sewing machine is required around the sewing machine needle. - Never operate the sewing machine with IEC/EN 60335-2-28 and UL1594. Special care is used by the manufacturer as described...while stitching. Never drop or insert any object into water. Use only attachments recommended by or near children. - Always use bent needles. - DANGER - Always unplug this sewing machine from the electric outlet immediately after using and before using an electrical appliance, basic ...

Instruction Manual and Troubleshooting Guide
Page 6
...SINGER® & Singer is Sewing Made Easy is a registered trademark of the Machine Back...8 Needle and Presser Foot Area...9 Removable Storage Compartment and Accessories 10 GETTING READY TO SEW 11-16 Powering Your Machine...11 Winding the Bobbin...12 Inserting the Bobbin...13 Threading the Upper Thread...14 Automatic Needle...Decorative Stitch...21 Sewing a Stretch Stitch...22 Sewing a 1-Step Buttonhole...23 Sewing a Button...24 Inserting and Changing Needles...25 Changing the Presser Foot...26 Sew Easy Foot...26 TROUBLESHOOTING AND MAINTENANCE 27-32 Troubleshooting...27-31 Maintenance...32 ...
...SINGER® & Singer is Sewing Made Easy is a registered trademark of the Machine Back...8 Needle and Presser Foot Area...9 Removable Storage Compartment and Accessories 10 GETTING READY TO SEW 11-16 Powering Your Machine...11 Winding the Bobbin...12 Inserting the Bobbin...13 Threading the Upper Thread...14 Automatic Needle...Decorative Stitch...21 Sewing a Stretch Stitch...22 Sewing a 1-Step Buttonhole...23 Sewing a Button...24 Inserting and Changing Needles...25 Changing the Presser Foot...26 Sew Easy Foot...26 TROUBLESHOOTING AND MAINTENANCE 27-32 Troubleshooting...27-31 Maintenance...32 ...

Instruction Manual and Troubleshooting Guide
Page 7
...you to select stitch patterns and buttonhole settings. (See Page 19) 11. STITCH LENGTH DIAL controls the length of the Machine Front 13 1. NEEDLE THREADER LEVER is used to select just the right tension for you as desired. THREAD TENSION DIAL allows you keep seams straight. (See Page..., when securing the beginning and ending of sewing. 4. REVERSE SEWING LEVER reverses stitching direction, for accessories, and provides access to engage the automatic needle threader. (See Page 15) 13. STITCH SELECTOR DIAL is also used for trimming thread ends at the end of a seam. (See Page 20...
...you to select stitch patterns and buttonhole settings. (See Page 19) 11. STITCH LENGTH DIAL controls the length of the Machine Front 13 1. NEEDLE THREADER LEVER is used to select just the right tension for you as desired. THREAD TENSION DIAL allows you keep seams straight. (See Page..., when securing the beginning and ending of sewing. 4. REVERSE SEWING LEVER reverses stitching direction, for accessories, and provides access to engage the automatic needle threader. (See Page 15) 13. STITCH SELECTOR DIAL is also used for trimming thread ends at the end of a seam. (See Page 20...
Instruction Manual and Troubleshooting Guide
Page 8
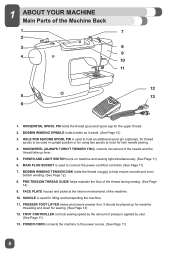
... the thread take-up for machine threading and down for the upper thread. 2. MAIN PLUG SOCKET is used for twin needle sewing. 4. PRESSER FOOT LIFTER raises and lowers presser foot. BOBBIN WINDING SPINDLE holds bobbin as it winds. (See Page 12) 3. FACE PLATE houses and protects ...
... the thread take-up for machine threading and down for the upper thread. 2. MAIN PLUG SOCKET is used for twin needle sewing. 4. PRESSER FOOT LIFTER raises and lowers presser foot. BOBBIN WINDING SPINDLE holds bobbin as it winds. (See Page 12) 3. FACE PLATE houses and protects ...
Instruction Manual and Troubleshooting Guide
Page 9
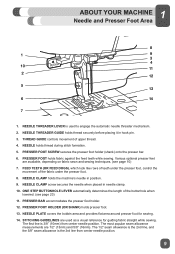
... seam allowance is the 2nd line, and the 5/8" seam allowance is used as a visual reference for sewing. 14. NEEDLE CLAMP screw secures the needle when placed in position. 9. PRESSER FOOT HOLDER (OR SHANK) holds presser foot. 13. The most popular seam allowance ...measurements are used to engage the automatic needle threader mechanism. 2. NEEDLE holds thread during stitch formation. 5. NEEDLE CLAMP holds the machine's needle in needle clamp. 10. 1 ABOUT YOUR MACHINE Needle and Presser Foot Area 8 1 9 3 4 10 11 2 12 5 13 ...
... seam allowance is the 2nd line, and the 5/8" seam allowance is used as a visual reference for sewing. 14. NEEDLE CLAMP screw secures the needle when placed in position. 9. PRESSER FOOT HOLDER (OR SHANK) holds presser foot. 13. The most popular seam allowance ...measurements are used to engage the automatic needle threader mechanism. 2. NEEDLE holds thread during stitch formation. 5. NEEDLE CLAMP holds the machine's needle in needle clamp. 10. 1 ABOUT YOUR MACHINE Needle and Presser Foot Area 8 1 9 3 4 10 11 2 12 5 13 ...

Instruction Manual and Troubleshooting Guide
Page 10
... machine while not in the illustration, and then push it from the machine. FOR INFORMATION ON PURCHASING THIS ITEM, GO TO WWW.SINGER.COM. Sew Easy Foot (for straight & accurate quilting) h. Edge/Quilting guide (for sewing accurate seams) THIS BONUS ITEM IS NOT... MACHINES SOLD IN SOME AREAS AND MAY BE AN OPTIONAL ACCESSORY. L-Screwdriver (to remove needle plate for making buttonholes) d. Spool Pin Felt (to cushion the spool of Needles (replacement needles) i. 21 ABOUT YOUR MACHINE Removable Storage Compartment and Accessories Hold the Removable Storage Compartment horizontally...
... machine while not in the illustration, and then push it from the machine. FOR INFORMATION ON PURCHASING THIS ITEM, GO TO WWW.SINGER.COM. Sew Easy Foot (for straight & accurate quilting) h. Edge/Quilting guide (for sewing accurate seams) THIS BONUS ITEM IS NOT... MACHINES SOLD IN SOME AREAS AND MAY BE AN OPTIONAL ACCESSORY. L-Screwdriver (to remove needle plate for making buttonholes) d. Spool Pin Felt (to cushion the spool of Needles (replacement needles) i. 21 ABOUT YOUR MACHINE Removable Storage Compartment and Accessories Hold the Removable Storage Compartment horizontally...
Instruction Manual and Troubleshooting Guide
Page 13
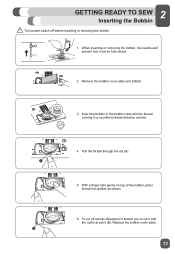
... gently on top of the bobbin, place thread into guides as shown. 6. Pull the thread through the slit (A). 5. When inserting or removing the bobbin, the needle and presser foot must be fully raised. 2. To cut it toward you to cut off before inserting or removing the bobbin. 1 1.
... gently on top of the bobbin, place thread into guides as shown. 6. Pull the thread through the slit (A). 5. When inserting or removing the bobbin, the needle and presser foot must be fully raised. 2. To cut it toward you to cut off before inserting or removing the bobbin. 1 1.

Instruction Manual and Troubleshooting Guide
Page 14
... the machine. Hold the thread with both hands and pull it from back to front through the upper thread guide at the top of the needle. (see the take -up lever, bring the thread downward again. (C) Pass the thread behind the metal thread guide and then down the right channel, A B C..., turn , and up lever. Pull about 6-8 inches of the left channel, hook the thread from front to the needle. 6. Start by turning the handwheel (A) toward you can use the automatic needle threader to be able to see page 15) 14 Place the thread spool and spool cap onto the spool holder. 4....
... the machine. Hold the thread with both hands and pull it from back to front through the upper thread guide at the top of the needle. (see the take -up lever, bring the thread downward again. (C) Pass the thread behind the metal thread guide and then down the right channel, A B C..., turn , and up lever. Pull about 6-8 inches of the left channel, hook the thread from front to the needle. 6. Start by turning the handwheel (A) toward you can use the automatic needle threader to be able to see page 15) 14 Place the thread spool and spool cap onto the spool holder. 4....
Instruction Manual and Troubleshooting Guide
Page 15
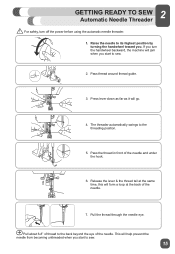
... to sew. 2. Pass thread around thread guide. 3. Pull the thread through the needle eye. Pull about 6-8" of the needle and under the hook. 6. If you turn off the power before using the automatic needle threader. 1. Press lever down as far as it will form a loop at the... same time, this will go. 4. Raise the needle to its highest position by turning the handwheel toward you. 2 GETTING READY TO SEW Automatic Needle Threader ⚠ For safety, turn the handwheel backward, the machine will help prevent the needle from becoming unthreaded when you start to sew. 15
... to sew. 2. Pass thread around thread guide. 3. Pull the thread through the needle eye. Pull about 6-8" of the needle and under the hook. 6. If you turn off the power before using the automatic needle threader. 1. Press lever down as far as it will form a loop at the... same time, this will go. 4. Raise the needle to its highest position by turning the handwheel toward you. 2 GETTING READY TO SEW Automatic Needle Threader ⚠ For safety, turn the handwheel backward, the machine will help prevent the needle from becoming unthreaded when you start to sew. 15
Instruction Manual and Troubleshooting Guide
Page 16
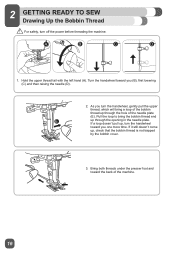
... (E). Pull the loop to bring a loop of the machine. 16 If it still doesn't come up through the opening in the needle plate. Turn the handwheel toward the back of the bobbin thread up , check that the bobbin thread is not trapped by the bobbin cover. 3. As ...
... (E). Pull the loop to bring a loop of the machine. 16 If it still doesn't come up through the opening in the needle plate. Turn the handwheel toward the back of the bobbin thread up , check that the bobbin thread is not trapped by the bobbin cover. 3. As ...
Instruction Manual and Troubleshooting Guide
Page 17
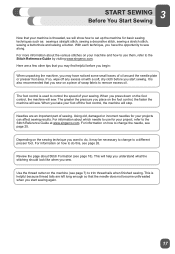
... recommended that you start sewing. For information on a piece of your sewing. This is helpful because thread tails are left long enough so that the needle does not become unthreaded when you sew on how to set up the machine for your machine and how to use for your project, refer... Now that your machine is threaded, we will show how to change to remove excess oil. Here are an important part of oil around the needle plate or presser foot area. When you may find helpful before you sew. With each technique, you want to do this, see page 18). For...
... recommended that you start sewing. For information on a piece of your sewing. This is helpful because thread tails are left long enough so that the needle does not become unthreaded when you sew on how to set up the machine for your machine and how to use for your project, refer... Now that your machine is threaded, we will show how to change to remove excess oil. Here are an important part of oil around the needle plate or presser foot area. When you may find helpful before you sew. With each technique, you want to do this, see page 18). For...
Instruction Manual and Troubleshooting Guide
Page 18
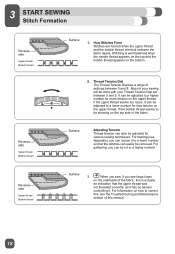
... removed. For basting (see the Troubleshooting and Maintenance section of your Thread Tension Dial set between 3 and 5. Most of this is well balanced when the needle thread appears on the top and the bobbin thread appears on the top side of the fabric. Surface Adjusting Tension Thread tension can be adjusted...
... removed. For basting (see the Troubleshooting and Maintenance section of your Thread Tension Dial set between 3 and 5. Most of this is well balanced when the needle thread appears on the top and the bobbin thread appears on the top side of the fabric. Surface Adjusting Tension Thread tension can be adjusted...
Instruction Manual and Troubleshooting Guide
Page 20
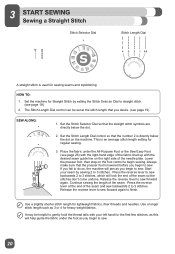
...reverse lever at the stitch length that the number 2 is used for heavy weight fabrics. It may be set at the end of the needle plate. 23 START SEWING Sewing a Straight Stitch Stitch Selector Dial Stitch Length Dial A straight stitch is directly below the dot. 2. Place the fabric ... as you desire. (see page 26) with the right-hand edge of the seam. Start your left hand for lightweight fabrics, finer threads and needles. Continue sewing the length of the fabric lined up with your seam by setting the Stitch Selector Dial to sew forward again. HOW TO: 1. ...
...reverse lever at the stitch length that the number 2 is used for heavy weight fabrics. It may be set at the end of the needle plate. 23 START SEWING Sewing a Straight Stitch Stitch Selector Dial Stitch Length Dial A straight stitch is directly below the dot. 2. Place the fabric ... as you desire. (see page 26) with the right-hand edge of the seam. Start your left hand for lightweight fabrics, finer threads and needles. Continue sewing the length of the fabric lined up with your seam by setting the Stitch Selector Dial to sew forward again. HOW TO: 1. ...
Instruction Manual and Troubleshooting Guide
Page 21
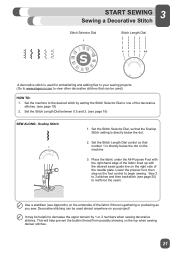
... the underside of the fabric if there is directly below the dot. 2. Sew 2 to 3 stitches and then backstitch (see page 20) to one of the needle plate. Place the fabric under the All-Purpose Foot with the right-hand edge of the fabric lined up with the desired seam guide line...
... the underside of the fabric if there is directly below the dot. 2. Sew 2 to 3 stitches and then backstitch (see page 20) to one of the needle plate. Place the fabric under the All-Purpose Foot with the right-hand edge of the fabric lined up with the desired seam guide line...
Instruction Manual and Troubleshooting Guide
Page 22
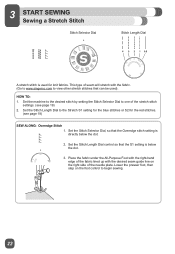
Set the Stitch Length Dial to one of the needle plate. Set the Stitch Length Dial control so that the S1 setting is directly below the dot. 3. Set the Stitch Selector Dial, so that can ...
Set the Stitch Length Dial to one of the needle plate. Set the Stitch Length Dial control so that the S1 setting is directly below the dot. 3. Set the Stitch Selector Dial, so that can ...
Instruction Manual and Troubleshooting Guide
Page 24
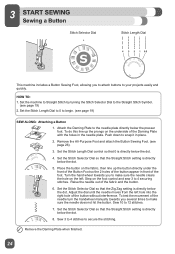
... 7. 23 START SEWING Sewing a Button Stitch Selector Dial Stitch Length Dial This machine includes a Button Sewing Foot, allowing you several times to make sure the needle clears the hole on the left hole into the right hole of the button without interference. Attach the Darning Plate to begin. (see page 19...and the button. 6. Set the Stitch Selector Dial so that the Straight Stitch setting is directly below the presser foot. Adjust the dial until the needle moves from the left . To do this line up the button directly under the front of the Button Foot so the 2 holes of the ...
... 7. 23 START SEWING Sewing a Button Stitch Selector Dial Stitch Length Dial This machine includes a Button Sewing Foot, allowing you several times to make sure the needle clears the hole on the left hole into the right hole of the button without interference. Attach the Darning Plate to begin. (see page 19...and the button. 6. Set the Stitch Selector Dial so that the Straight Stitch setting is directly below the presser foot. Adjust the dial until the needle moves from the left . To do this line up the button directly under the front of the Button Foot so the 2 holes of the ...
Instruction Manual and Troubleshooting Guide
Page 25
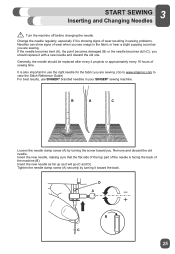
... it is showing signs of wear resulting in sewing problems. Needles can show signs of wear when you see snags in your SINGER® sewing machine. Change the needle regularly, especially if it with a new needle and discard the old one. Loosen the needle clamp screw (A) by turning it will go (C and D).... the fabric you are sewing. (Go to www.singerco.com to view the Stitch Reference Guide) For best results, use SINGER® branded needles in the fabric or hear a slight popping sound as it toward you should be replaced after every 4 projects or approximately every 16 hours...
... it is showing signs of wear resulting in sewing problems. Needles can show signs of wear when you see snags in your SINGER® sewing machine. Change the needle regularly, especially if it with a new needle and discard the old one. Loosen the needle clamp screw (A) by turning it will go (C and D).... the fabric you are sewing. (Go to www.singerco.com to view the Stitch Reference Guide) For best results, use SINGER® branded needles in the fabric or hear a slight popping sound as it toward you should be replaced after every 4 projects or approximately every 16 hours...
Instruction Manual and Troubleshooting Guide
Page 26
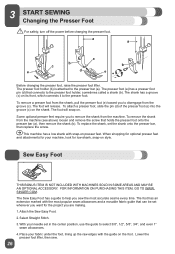
.... The foot has an extension marked with the most popular seam allowances and a movable fabric guide that can be set wherever you want for your needle set the shank onto the presser bar, then replace the screw. This machine has a low shank with the guide on presser feet. To attach...
.... The foot has an extension marked with the most popular seam allowances and a movable fabric guide that can be set wherever you want for your needle set the shank onto the presser bar, then replace the screw. This machine has a low shank with the guide on presser feet. To attach...
Instruction Manual and Troubleshooting Guide
Page 27
...When Sewing 16. This happens when the upper thread is up the bobbin thread. Thread is moving freely through the take up lever. Needles Breaking 10. Fabric Is "Tunneling" Under Stitches 13. Solution: Rethread machine, making sure to first raise the presser foot lifter before starting...case tension. Slip both thread tails under the presser foot, and then draw up or down), this simple test: • Raise the presser foot lifter and thread the top of Fabric 2. Needle Threader Not Working 15. Solution: Reduce upper thread tension. (See Page 18) Possible Cause: Thread...
...When Sewing 16. This happens when the upper thread is up the bobbin thread. Thread is moving freely through the take up lever. Needles Breaking 10. Fabric Is "Tunneling" Under Stitches 13. Solution: Rethread machine, making sure to first raise the presser foot lifter before starting...case tension. Slip both thread tails under the presser foot, and then draw up or down), this simple test: • Raise the presser foot lifter and thread the top of Fabric 2. Needle Threader Not Working 15. Solution: Reduce upper thread tension. (See Page 18) Possible Cause: Thread...
Instruction Manual and Troubleshooting Guide
Page 28
.... (Go to www.singerco.com to sew. (See Page 20) Possible Cause: Sewing was started with good quality thread. (See Page 14) Possible Cause: The needle is either worn or old, or it is the wrong style or size for fabric sewn. Solution: Check that both thread tails for the thickness... sure thread is in take-up lever (raise take up as far as it is shredding the thread, it can cause the thread to a fresh needle in the correct size for first few stitches. (See Page 20) 6. Solution: Change to shred. Solution: Remove upper thread completely, raise presser foot lifter, rethread...
.... (Go to www.singerco.com to sew. (See Page 20) Possible Cause: Sewing was started with good quality thread. (See Page 14) Possible Cause: The needle is either worn or old, or it is the wrong style or size for fabric sewn. Solution: Check that both thread tails for the thickness... sure thread is in take-up lever (raise take up as far as it is shredding the thread, it can cause the thread to a fresh needle in the correct size for first few stitches. (See Page 20) 6. Solution: Change to shred. Solution: Remove upper thread completely, raise presser foot lifter, rethread...


