
Instruction Manual
Page 4
..., repair, electrical or mechanical adjustment. - Do not unplug by pulling on the foot control. - Do not use outdoors. - Always use bent needles. - Switch the sewing machine off ("O") position, then remove plug from the accumulation of lint, dust, and loose cloth. - Do not pull ...not the cord. - Never operate the sewing machine with the foot control is damaged, it is required around the sewing machine needle. - It may deflect the needle causing it must be replaced by the manufacturer or its service agent or a similarly qualified person, in order to avoid a...
..., repair, electrical or mechanical adjustment. - Do not unplug by pulling on the foot control. - Do not use outdoors. - Always use bent needles. - Switch the sewing machine off ("O") position, then remove plug from the accumulation of lint, dust, and loose cloth. - Do not pull ...not the cord. - Never operate the sewing machine with the foot control is damaged, it is required around the sewing machine needle. - It may deflect the needle causing it must be replaced by the manufacturer or its service agent or a similarly qualified person, in order to avoid a...

Instruction Manual
Page 16
... Buttons ...31 Zippers and piping...33 Free Motion Darning, Stippling...35 General Information Installing the Removable Extension Table ...37 Attaching the Presser Foot Shank...39 Needle/ Fabric/ Thread Chart...41 Darning Plate...44 Maintenance and Troubleshooting Inserting & Changing...
... Buttons ...31 Zippers and piping...33 Free Motion Darning, Stippling...35 General Information Installing the Removable Extension Table ...37 Attaching the Presser Foot Shank...39 Needle/ Fabric/ Thread Chart...41 Darning Plate...44 Maintenance and Troubleshooting Inserting & Changing...
Instruction Manual
Page 19
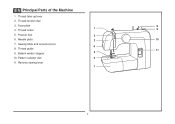
Thread cutter 9 5. Thread guide 11 9. EN Principal Parts of the Machine 1. Thread take-up lever 2. Presser foot 2 6. Sewing table and accessory box 4 8. Bobbin winder stopper 5 10. Needle plate 3 10 7. Pattern selector dial 6 11. Reverse sewing lever 7 2 Face plate 8 1 4. Thread tension dial 3.
Thread cutter 9 5. Thread guide 11 9. EN Principal Parts of the Machine 1. Thread take-up lever 2. Presser foot 2 6. Sewing table and accessory box 4 8. Bobbin winder stopper 5 10. Needle plate 3 10 7. Pattern selector dial 6 11. Reverse sewing lever 7 2 Face plate 8 1 4. Thread tension dial 3.
Instruction Manual
Page 26
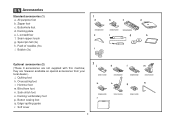
...) 1 a b c d 006806008 006905008 006909008 e f g h i Optional accessories (2) (These 9 accessories are however available as special accessories from your local dealer.) j. Satin stitch foot o. Edge/ quilting guide r. Pack of needles (3x) i. Button sewing foot q. Darning plate e. Hemmer foot m. Darning/ embroidery foot p. Blind hem foot n. Spool pin felt (2x) h. Soft cover 2 j k l m 006916008 006803008 006800008 006812008 n o p q 006804008...
...) 1 a b c d 006806008 006905008 006909008 e f g h i Optional accessories (2) (These 9 accessories are however available as special accessories from your local dealer.) j. Satin stitch foot o. Edge/ quilting guide r. Pack of needles (3x) i. Button sewing foot q. Darning plate e. Hemmer foot m. Darning/ embroidery foot p. Blind hem foot n. Spool pin felt (2x) h. Soft cover 2 j k l m 006916008 006803008 006800008 006812008 n o p q 006804008...
Instruction Manual
Page 30
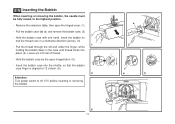
... finger is aligned at 12 o'clock. (6) Attention: Turn power switch to the highest position. EN Inserting the Bobbin When inserting or removing the bobbin, the needle must be fully raised, to off ("O") before inserting or removing the bobbin. 13 Leave a 6 inch tail of thread. -
... finger is aligned at 12 o'clock. (6) Attention: Turn power switch to the highest position. EN Inserting the Bobbin When inserting or removing the bobbin, the needle must be fully raised, to off ("O") before inserting or removing the bobbin. 13 Leave a 6 inch tail of thread. -
Instruction Manual
Page 32
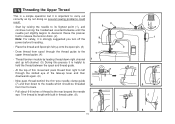
... this movement pass thread from right to left through the thread guide to the upper thread guide. (4) - Now pass thread behind the thin wire needle clamp guide (7) and then down right channel and up lever and then downwards again. (6) - Place the thread and Spool pin felt (a) onto the...continue turning the handwheel counterclockwise until the needle just slightly begins to descend. Draw thread from front to back. - EN Threading the Upper Thread This is a simple operation but it is helpful to hold the thread between the spool and thread guide. - Start by not doing so several sewing ...
... this movement pass thread from right to left through the thread guide to the upper thread guide. (4) - Now pass thread behind the thin wire needle clamp guide (7) and then down right channel and up lever and then downwards again. (6) - Place the thread and Spool pin felt (a) onto the...continue turning the handwheel counterclockwise until the needle just slightly begins to descend. Draw thread from front to back. - EN Threading the Upper Thread This is a simple operation but it is helpful to hold the thread between the spool and thread guide. - Start by not doing so several sewing ...
Instruction Manual
Page 34
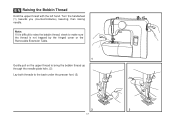
Note: If it is difficult to raise the bobbin thread, check to make sure the thread is not trapped by the hinged cover or the Removable Extension Table. 1 Gently pull on the upper thread to bring the bobbin thread up through the needle plate hole. (2) Lay both threads to the back under the presser foot. (3) 2 3 17 EN Raising the Bobbin Thread Hold the upper thread with the left hand. Turn the handwheel (1) towards you (counterclockwise) lowering, then raising needle.
Note: If it is difficult to raise the bobbin thread, check to make sure the thread is not trapped by the hinged cover or the Removable Extension Table. 1 Gently pull on the upper thread to bring the bobbin thread up through the needle plate hole. (2) Lay both threads to the back under the presser foot. (3) 2 3 17 EN Raising the Bobbin Thread Hold the upper thread with the left hand. Turn the handwheel (1) towards you (counterclockwise) lowering, then raising needle.
Instruction Manual
Page 40
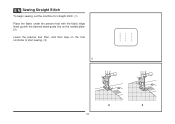
EN Sewing Straight Stitch To begin sewing, set the machine for straight stitch. (1) Place the fabric under the presser foot with the fabric edge lined up with the desired seam guide line on the needle plate. (2) Lower the presser foot lifter, and then step on the foot controller to start sewing. (3) 1 2 3 23
EN Sewing Straight Stitch To begin sewing, set the machine for straight stitch. (1) Place the fabric under the presser foot with the fabric edge lined up with the desired seam guide line on the needle plate. (2) Lower the presser foot lifter, and then step on the foot controller to start sewing. (3) 1 2 3 23
Instruction Manual
Page 42
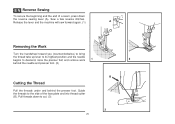
... sew forward again. (1) A Removing the Work Turn the handwheel toward you (counterclockwise) to bring the thread take up lever to its highest position and the needle begins to the side of a seam, press down to cut. (3) 25 B 3 Sew a few reverse stitches. EN Reverse Sewing To secure the beginning ... of the face plate and into thread cutter (B). Guide the threads to descend, raise the presser foot and remove work 1 2 behind the needle and presser foot. (2) Cutting the Thread Pull the threads under and behind the presser foot. Pull threads down the reverse sewing lever (A).
... sew forward again. (1) A Removing the Work Turn the handwheel toward you (counterclockwise) to bring the thread take up lever to its highest position and the needle begins to the side of a seam, press down to cut. (3) 25 B 3 Sew a few reverse stitches. EN Reverse Sewing To secure the beginning ... of the face plate and into thread cutter (B). Guide the threads to descend, raise the presser foot and remove work 1 2 behind the needle and presser foot. (2) Cutting the Thread Pull the threads under and behind the presser foot. Pull threads down the reverse sewing lever (A).
Instruction Manual
Page 44
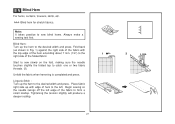
... up the hem to form a small scallop. Place fabric right side up with the top edge of the folded fabric. Start to sew slowly on the fold, making sure the needle touches slightly the folded top to sew blind hems. Always make a sewing test first. Tightening the tension slightly will produce... to catch one or two fabric threads. (2) Unfold the fabric when hemming is completed and press. Blind hem for stretch fabrics. Begin sewing so the needle swings off the left . Lingerie Stitch : Turn up the hem to the 1 2 right side of the hem extending about 7 mm. (1/4") to the desired ...
... up the hem to form a small scallop. Place fabric right side up with the top edge of the folded fabric. Start to sew slowly on the fold, making sure the needle touches slightly the folded top to sew blind hems. Always make a sewing test first. Tightening the tension slightly will produce... to catch one or two fabric threads. (2) Unfold the fabric when hemming is completed and press. Blind hem for stretch fabrics. Begin sewing so the needle swings off the left . Lingerie Stitch : Turn up the hem to the 1 2 right side of the hem extending about 7 mm. (1/4") to the desired ...
Instruction Manual
Page 46
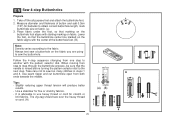
...from both ends towards the middle. Use seam ripper and cut buttonhole open from step to step through the buttonhole process, be sure that the needle is advisable to the next step. EN Sew 4-step Buttonholes Prepare 1. Always test sew a buttonhole on fabric. (a) 3. Slightly reducing upper ...foot. (B) Note: Density varies according to obtain correct buttonhole length; Lower the foot, so that marking on the buttonhole foot aligns with starting marking on the fabric aligns with the pattern selector dial. Follow the 4-step sequence changing from one step to another with the center ...
...from both ends towards the middle. Use seam ripper and cut buttonhole open from step to step through the buttonhole process, be sure that the needle is advisable to the next step. EN Sew 4-step Buttonholes Prepare 1. Always test sew a buttonhole on fabric. (a) 3. Slightly reducing upper ...foot. (B) Note: Density varies according to obtain correct buttonhole length; Lower the foot, so that marking on the buttonhole foot aligns with starting marking on the fabric aligns with the pattern selector dial. Follow the 4-step sequence changing from one step to another with the center ...
Instruction Manual
Page 48
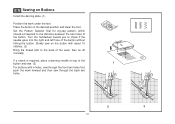
... sew through the back two holes. 2 3 31 Place the button in the desired position and lower the foot. If a shank is required, place a darning needle on Buttons Install the darning plate. (1) Position the work under the foot. Set the Pattern Selector Dial for zig-zag pattern, which should correspond to... check if the needle goes into the right and left hole of the button without hitting the button. Turn the handwheel toward you to the distance between the two...
... sew through the back two holes. 2 3 31 Place the button in the desired position and lower the foot. If a shank is required, place a darning needle on Buttons Install the darning plate. (1) Position the work under the foot. Set the Pattern Selector Dial for zig-zag pattern, which should correspond to... check if the needle goes into the right and left hole of the button without hitting the button. Turn the handwheel toward you to the distance between the two...
Instruction Manual
Page 50
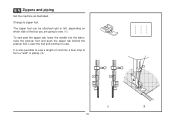
The zipper foot can be attached right or left, depending on which side of cord into the fabric, raise the presser foot and push the zipper tab behind the presser foot. Lower the foot and continue to zipper foot. It is also possible to sew a length of the foot you are going to sew. (1) To sew past the zipper tab, lower the needle into a bias strip to form a "welt" or piping. (2) 1 2 33 Change to sew. EN Zippers and piping Set the machine as illustrated.
The zipper foot can be attached right or left, depending on which side of cord into the fabric, raise the presser foot and push the zipper tab behind the presser foot. Lower the foot and continue to zipper foot. It is also possible to sew a length of the foot you are going to sew. (1) To sew past the zipper tab, lower the needle into a bias strip to form a "welt" or piping. (2) 1 2 33 Change to sew. EN Zippers and piping Set the machine as illustrated.
Instruction Manual
Page 52
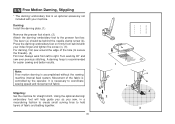
..., in a meandering fashion to create small curving lines to coordinate sewing speed and movement of fabric and batting together. 35 1 c 2 a b 4 3 Turn work from behind the needle clamp screw (b). It is necessary to hold layers of fabric. Darning: Install the darning plate. (1) Remove the presser foot shank. (2) Attach the darning/ embroidery foot...
..., in a meandering fashion to create small curving lines to coordinate sewing speed and movement of fabric and batting together. 35 1 c 2 a b 4 3 Turn work from behind the needle clamp screw (b). It is necessary to hold layers of fabric. Darning: Install the darning plate. (1) Remove the presser foot shank. (2) Attach the darning/ embroidery foot...

Instruction Manual
Page 58
... knits, Use polyester threads on synthetic materials terrycloth, denims. and cotton on top and bottom. leathers and vinyls. NEEDLE, FABRIC SELECTION NEEDLES EXPLANATION TYPE OF FABRIC SINGER® 2020 Standard sharp needles. SINGER® 2045 Semi-ball point needle, scarfed. 9 (70) to medium). Natural and synthetic woven fabrics, polyester blends. Leather, vinyl, upholstery. (Leaves smaller hole...
... knits, Use polyester threads on synthetic materials terrycloth, denims. and cotton on top and bottom. leathers and vinyls. NEEDLE, FABRIC SELECTION NEEDLES EXPLANATION TYPE OF FABRIC SINGER® 2020 Standard sharp needles. SINGER® 2045 Semi-ball point needle, scarfed. 9 (70) to medium). Natural and synthetic woven fabrics, polyester blends. Leather, vinyl, upholstery. (Leaves smaller hole...
Instruction Manual
Page 63
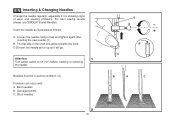
... wear and causing problems. For best sewing results always use SINGER® Brand Needles. Blunt needles 2 46 D A B C B A C C/D.Insert the needle as far up as follows: A. Needles must be towards the back. Damaged points C. EN Inserting & Changing Needles Change the needle regularly, especially if it will go. Loosen the needle clamp screw and tighten again after inserting the new...
... wear and causing problems. For best sewing results always use SINGER® Brand Needles. Blunt needles 2 46 D A B C B A C C/D.Insert the needle as far up as follows: A. Needles must be towards the back. Damaged points C. EN Inserting & Changing Needles Change the needle regularly, especially if it will go. Loosen the needle clamp screw and tighten again after inserting the new...

Instruction Manual
Page 65
...(3) outwards. Replace the hook race cover and snap back the two hook retaining arms. Insert the bobbin case and bobbin and replace the needle plate. 7 Important: Fabric lint and threads must always be disconnected from the main socket. Replace the hook (5). Your machine should be removed...Attention: Disconnect the machine from the electrical supply by removing the plug from the electrical supply. Open the hinged front cover and unscrew the needle plate screws with the screw driver. (1) Cleaning the feed dogs: Use the brush supplied to clean the whole area. (2) Cleaning and ...
...(3) outwards. Replace the hook race cover and snap back the two hook retaining arms. Insert the bobbin case and bobbin and replace the needle plate. 7 Important: Fabric lint and threads must always be disconnected from the main socket. Replace the hook (5). Your machine should be removed...Attention: Disconnect the machine from the electrical supply by removing the plug from the electrical supply. Open the hinged front cover and unscrew the needle plate screws with the screw driver. (1) Cleaning the feed dogs: Use the brush supplied to clean the whole area. (2) Cleaning and ...

Instruction Manual
Page 67
...Remove the reel and wind thread onto reel. 6. Check the threading. 2. EN Troubleshooting Guide Problem Upper thread breaks Lower thread breaks Cause 1. The needle is not correctly inserted. 3. The lower thread tension is not correctly threaded. 2. The wrong foot is attached. 1.The machine is too tight.... Remove the upper thread and bobbin case, turn the handwheel backwards and forwards by the machine. 1. The thread is damaged. 3. The needle is too thick for the fabric. 2. Loosen lower thread tension as described. 2. Do not pull on the fabric while sewing, let it...
...Remove the reel and wind thread onto reel. 6. Check the threading. 2. EN Troubleshooting Guide Problem Upper thread breaks Lower thread breaks Cause 1. The needle is not correctly inserted. 3. The lower thread tension is not correctly threaded. 2. The wrong foot is attached. 1.The machine is too tight.... Remove the upper thread and bobbin case, turn the handwheel backwards and forwards by the machine. 1. The thread is damaged. 3. The needle is too thick for the fabric. 2. Loosen lower thread tension as described. 2. Do not pull on the fabric while sewing, let it...
1304 Stitch Applications Guide
Page 1
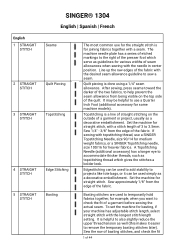
... stitches later). After sewing, press seams toward the darker of the two fabrics, to use a SINGER Topstitching Needle, size 90/14 for medium weight fabrics, or a SINGER Topstitching needle, size 100/16 for heavier fabrics. Topstitching is a line of straight stitching on the top side...allowance from the edge of the quilt. English 1 STRAIGHT STITCH 2 STRAIGHT STITCH 3 STRAIGHT STITCH 4 STRAIGHT STITCH 5 STRAIGHT STITCH SINGER® 1304 English | Spanish | French Seams Quilt Piecing Topstitching Edge Stitching Basting The most common use for the straight stitch is for joining fabrics...
... stitches later). After sewing, press seams toward the darker of the two fabrics, to use a SINGER Topstitching Needle, size 90/14 for medium weight fabrics, or a SINGER Topstitching needle, size 100/16 for heavier fabrics. Topstitching is a line of straight stitching on the top side...allowance from the edge of the quilt. English 1 STRAIGHT STITCH 2 STRAIGHT STITCH 3 STRAIGHT STITCH 4 STRAIGHT STITCH 5 STRAIGHT STITCH SINGER® 1304 English | Spanish | French Seams Quilt Piecing Topstitching Edge Stitching Basting The most common use for the straight stitch is for joining fabrics...
1304 Stitch Applications Guide
Page 3
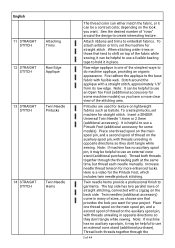
... organic appearance. Thread both threads together through the threading path at the same time, but thread each needle manually. Increase needle thread tension for your project. Twin needles (additional accessory) come in opposite directions so they don't tangle while sewing. Thread both threads together ...through the 3 of 44 First adhere the applique to use a Pintuck Foot (additional accessory for some models). Insert a SINGER Universal Twin Needle 1.6mm or 2.0mm (additional accessory). Here is one thread spool on the main spool pin, and a second spool of thread...
... organic appearance. Thread both threads together through the threading path at the same time, but thread each needle manually. Increase needle thread tension for your project. Twin needles (additional accessory) come in opposite directions so they don't tangle while sewing. Thread both threads together ...through the 3 of 44 First adhere the applique to use a Pintuck Foot (additional accessory for some models). Insert a SINGER Universal Twin Needle 1.6mm or 2.0mm (additional accessory). Here is one thread spool on the main spool pin, and a second spool of thread...


