
Instruction Manual
Page 4
... the needle causing it has been dropped or damaged, or dropped into any adjustment in the needle area, such as threading needle, changing needle, threading bobbin, or changing presser foot, etc. - To disconnect, turn all moving parts. Do not use outdoors. - II Wear safety glasses. - Do not operate where aerosol (spray...
... the needle causing it has been dropped or damaged, or dropped into any adjustment in the needle area, such as threading needle, changing needle, threading bobbin, or changing presser foot, etc. - To disconnect, turn all moving parts. Do not use outdoors. - II Wear safety glasses. - Do not operate where aerosol (spray...

Instruction Manual
Page 16
... of the Machine...2/4 Connecting Machine to Power Source ...6 Two Step Presser Foot Lifter...8 Accessories ...9 Threading the Machine Winding the Bobbin ...11 Inserting the Bobbin ...13 Threading the Upper Thread ...15 Raising the Bobbin Thread...17 Thread Tension ...19 Sewing How to Choose Your Pattern...21 Sewing Straight Stitch ...23 Reverse Sewing/ Removing the...
... of the Machine...2/4 Connecting Machine to Power Source ...6 Two Step Presser Foot Lifter...8 Accessories ...9 Threading the Machine Winding the Bobbin ...11 Inserting the Bobbin ...13 Threading the Upper Thread ...15 Raising the Bobbin Thread...17 Thread Tension ...19 Sewing How to Choose Your Pattern...21 Sewing Straight Stitch ...23 Reverse Sewing/ Removing the...
Instruction Manual
Page 19
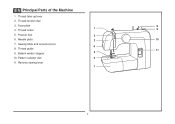
Bobbin winder stopper 5 10. Thread take-up lever 2. Presser foot 2 6. Sewing table and accessory box 4 8. Thread guide 11 9. Reverse sewing lever 7 2 Thread tension dial 3. Needle plate 3 10 7. Pattern selector dial 6 11. Face plate 8 1 4. Thread cutter 9 5. EN Principal Parts of the Machine 1.
Bobbin winder stopper 5 10. Thread take-up lever 2. Presser foot 2 6. Sewing table and accessory box 4 8. Thread guide 11 9. Reverse sewing lever 7 2 Thread tension dial 3. Needle plate 3 10 7. Pattern selector dial 6 11. Face plate 8 1 4. Thread cutter 9 5. EN Principal Parts of the Machine 1.
Instruction Manual
Page 21
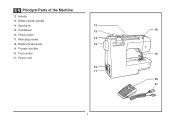
Bobbin thread guide 15 19. Main plug socket 14 18. Presser foot lifter 20. Spool pins 12 15. Power cord 16 17 20 21 4 Foot control 19 21. Handwheel 13 18 16. EN Principal Parts of the Machine 12. Handle 13. Bobbin winder spindle 14. Power switch 17.
Bobbin thread guide 15 19. Main plug socket 14 18. Presser foot lifter 20. Spool pins 12 15. Power cord 16 17 20 21 4 Foot control 19 21. Handwheel 13 18 16. EN Principal Parts of the Machine 12. Handle 13. Bobbin winder spindle 14. Power switch 17.
Instruction Manual
Page 26
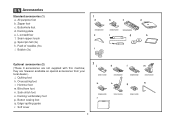
... foot m. Spool pin felt (2x) h. they are not supplied with this machine; Button sewing foot q. Edge/ quilting guide r. Seam ripper/ brush g. Pack of needles (3x) i. Bobbin (3x) 1 a b c d 006806008 006905008 006909008 e f g h i Optional accessories (2) (These 9 accessories are however available as special accessories from your local dealer.) j. Quilting foot k. All purpose foot b. L-screwdriver f. Darning...
... foot m. Spool pin felt (2x) h. they are not supplied with this machine; Button sewing foot q. Edge/ quilting guide r. Seam ripper/ brush g. Pack of needles (3x) i. Bobbin (3x) 1 a b c d 006806008 006905008 006909008 e f g h i Optional accessories (2) (These 9 accessories are however available as special accessories from your local dealer.) j. Quilting foot k. All purpose foot b. L-screwdriver f. Darning...

Instruction Manual
Page 28
... to the left (9) and remove. 1 Please Note: When the bobbin winder spindle is full, it rotates slowly. To start sewing, push the bobbin winder spindle to right. (5) - Wind thread clockwise around bobbin winder tension discs. (3) - Hold thread end. (6) - Step on spindle. (4) - Release the thread and cut thread. (8) - Release the pedal after a few turns. Press...
... to the left (9) and remove. 1 Please Note: When the bobbin winder spindle is full, it rotates slowly. To start sewing, push the bobbin winder spindle to right. (5) - Wind thread clockwise around bobbin winder tension discs. (3) - Hold thread end. (6) - Step on spindle. (4) - Release the thread and cut thread. (8) - Release the pedal after a few turns. Press...
Instruction Manual
Page 30
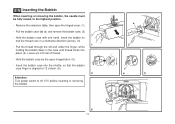
...clock. (6) Attention: Turn power switch to the highest position. Pull the thread through the slit and under the finger, while holding the bobbin down in the case until thread clicks into the shuttle, so that the thread runs in a clockwise direction (arrow). (3) - Remove ...6 inch tail of thread. - EN Inserting the Bobbin When inserting or removing the bobbin, the needle must be fully raised, to off ("O") before inserting or removing the bobbin. 13 Insert the bobbin case into place (4). Pull the bobbin case tab (a) and remove the bobbin case. (2) - Hold the bobbin case with one hand.
...clock. (6) Attention: Turn power switch to the highest position. Pull the thread through the slit and under the finger, while holding the bobbin down in the case until thread clicks into the shuttle, so that the thread runs in a clockwise direction (arrow). (3) - Remove ...6 inch tail of thread. - EN Inserting the Bobbin When inserting or removing the bobbin, the needle must be fully raised, to off ("O") before inserting or removing the bobbin. 13 Insert the bobbin case into place (4). Pull the bobbin case tab (a) and remove the bobbin case. (2) - Hold the bobbin case with one hand.
Instruction Manual
Page 34
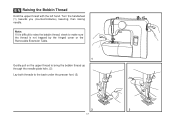
Note: If it is difficult to raise the bobbin thread, check to make sure the thread is not trapped by the hinged cover or the Removable Extension Table. 1 Gently pull on the upper thread to bring the bobbin thread up through the needle plate hole. (2) Lay both threads to the back under the presser foot. (3) 2 3 17 Turn the handwheel (1) towards you (counterclockwise) lowering, then raising needle. EN Raising the Bobbin Thread Hold the upper thread with the left hand.
Note: If it is difficult to raise the bobbin thread, check to make sure the thread is not trapped by the hinged cover or the Removable Extension Table. 1 Gently pull on the upper thread to bring the bobbin thread up through the needle plate hole. (2) Lay both threads to the back under the presser foot. (3) 2 3 17 Turn the handwheel (1) towards you (counterclockwise) lowering, then raising needle. EN Raising the Bobbin Thread Hold the upper thread with the left hand.

Instruction Manual
Page 36
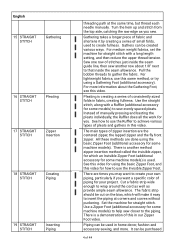
...dial to lower number. 3 D. C. Normal thread tension for straight stitch sewing. Lower thread tension (2) To test the bobbin thread tension, remove the bobbin case and bobbin and hold it by suspending it once or twice. EN Thread Tension Upper thread tension Basic thread tension setting: "4" (1) ...5 4 B D If the tension is correct, the thread will be less than for zig zag and decorative sewing. Proper setting of the bobbin case. There is when a small amount of the 2 upper thread appears on the side of tension is usually only desirable for straight stitch ...
...dial to lower number. 3 D. C. Normal thread tension for straight stitch sewing. Lower thread tension (2) To test the bobbin thread tension, remove the bobbin case and bobbin and hold it by suspending it once or twice. EN Thread Tension Upper thread tension Basic thread tension setting: "4" (1) ...5 4 B D If the tension is correct, the thread will be less than for zig zag and decorative sewing. Proper setting of the bobbin case. There is when a small amount of the 2 upper thread appears on the side of tension is usually only desirable for straight stitch ...

Instruction Manual
Page 65
... driver. (1) Cleaning the feed dogs: Use the brush supplied to clean the whole area. (2) Cleaning and lubricating the hook: 1 Remove the bobbin case. Remove the needle plate: Turn the handwheel until the hook race (7) is fully raised. Open the hinged front cover and unscrew the needle... by removing the plug from the electrical supply. Replace the hook race cover and snap back the two hook retaining arms. Insert the bobbin case and bobbin and replace the needle plate. 7 Important: Fabric lint and threads must always be serviced at regular intervals at the point (6) (1-2 drops...
... driver. (1) Cleaning the feed dogs: Use the brush supplied to clean the whole area. (2) Cleaning and lubricating the hook: 1 Remove the bobbin case. Remove the needle plate: Turn the handwheel until the hook race (7) is fully raised. Open the hinged front cover and unscrew the needle... by removing the plug from the electrical supply. Replace the hook race cover and snap back the two hook retaining arms. Insert the bobbin case and bobbin and replace the needle plate. 7 Important: Fabric lint and threads must always be serviced at regular intervals at the point (6) (1-2 drops...

Instruction Manual
Page 67
... 1. Fabric has been pulled. Correction 1. Insert a new needle. 3. Choose a needle to suit the thread and fabric. 4. Thread the bobbin case as illustrated. 3. The needle is wrong. 4. Skipped stitches Needle breaks Loose stitches Seams gather or pucker Uneven stitches, uneven feed 1. Poor.... 4. The thread tension is too tight. 3. The thread should pull easily. 2. Select a better quality thread. 2. Check both bobbin and bobbin case. 3. The thread tension is too tight. 4. The needle is not threaded correctly. 2. EN Troubleshooting Guide Problem Upper thread breaks...
... 1. Fabric has been pulled. Correction 1. Insert a new needle. 3. Choose a needle to suit the thread and fabric. 4. Thread the bobbin case as illustrated. 3. The needle is wrong. 4. Skipped stitches Needle breaks Loose stitches Seams gather or pucker Uneven stitches, uneven feed 1. Poor.... 4. The thread tension is too tight. 3. The thread should pull easily. 2. Select a better quality thread. 2. Check both bobbin and bobbin case. 3. The thread tension is too tight. 4. The needle is not threaded correctly. 2. EN Troubleshooting Guide Problem Upper thread breaks...
1304 Stitch Applications Guide
Page 4
For medium weight fabrics, set the machine for some models) to the piping. Pull the bobbin threads to wrap around the cord as well as you . For lightweight fabrics, use this video. See how to use the Invisible Zipper Foot. There ...
For medium weight fabrics, set the machine for some models) to the piping. Pull the bobbin threads to wrap around the cord as well as you . For lightweight fabrics, use this video. See how to use the Invisible Zipper Foot. There ...


