
Instruction Manual
Page 4
Keep fingers away from all controls to the off ("O") when making any adjustment in the needle area, such as threading needle, changing needle, threading bobbin, or changing presser foot, etc. - Always use outdoors. - Wear safety glasses. - Do not use the proper needle plate. If the LED lamp is damaged ...
Keep fingers away from all controls to the off ("O") when making any adjustment in the needle area, such as threading needle, changing needle, threading bobbin, or changing presser foot, etc. - Always use outdoors. - Wear safety glasses. - Do not use the proper needle plate. If the LED lamp is damaged ...

Instruction Manual
Page 16
...the Machine...2/4 Connecting Machine to Power Source ...6 Two Step Presser Foot Lifter...8 Accessories ...9 Threading the Machine Winding the Bobbin ...11 Inserting the Bobbin ...13 Threading the Upper Thread ...15 Raising the Bobbin Thread...17 Thread Tension ...19 Sewing How to Choose Your Pattern...21 Sewing Straight Stitch ...23 Reverse Sewing/... Removing the Work/ Cutting the Thread 25 Blind Hem...27 Sew 4-step Buttonholes ...29 Sewing on Buttons ...31 Zippers and piping...33 Free Motion Darning, ...
...the Machine...2/4 Connecting Machine to Power Source ...6 Two Step Presser Foot Lifter...8 Accessories ...9 Threading the Machine Winding the Bobbin ...11 Inserting the Bobbin ...13 Threading the Upper Thread ...15 Raising the Bobbin Thread...17 Thread Tension ...19 Sewing How to Choose Your Pattern...21 Sewing Straight Stitch ...23 Reverse Sewing/... Removing the Work/ Cutting the Thread 25 Blind Hem...27 Sew 4-step Buttonholes ...29 Sewing on Buttons ...31 Zippers and piping...33 Free Motion Darning, ...
Instruction Manual
Page 19
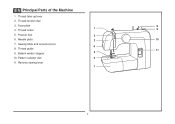
Thread cutter 9 5. Pattern selector dial 6 11. Thread guide 11 9. Reverse sewing lever 7 2 EN Principal Parts of the Machine 1. Face plate 8 1 4. Presser foot 2 6. Thread tension dial 3. Bobbin winder stopper 5 10. Needle plate 3 10 7. Thread take-up lever 2. Sewing table and accessory box 4 8.
Thread cutter 9 5. Pattern selector dial 6 11. Thread guide 11 9. Reverse sewing lever 7 2 EN Principal Parts of the Machine 1. Face plate 8 1 4. Presser foot 2 6. Thread tension dial 3. Bobbin winder stopper 5 10. Needle plate 3 10 7. Thread take-up lever 2. Sewing table and accessory box 4 8.
Instruction Manual
Page 21
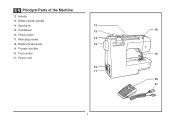
Spool pins 12 15. Handwheel 13 18 16. Bobbin thread guide 15 19. Main plug socket 14 18. Power cord 16 17 20 21 4 Bobbin winder spindle 14. Handle 13. EN Principal Parts of the Machine 12. Power switch 17. Presser foot lifter 20. Foot control 19 21.
Spool pins 12 15. Handwheel 13 18 16. Bobbin thread guide 15 19. Main plug socket 14 18. Power cord 16 17 20 21 4 Bobbin winder spindle 14. Handle 13. EN Principal Parts of the Machine 12. Power switch 17. Presser foot lifter 20. Foot control 19 21.

Instruction Manual
Page 28
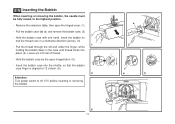
... 5 7 8 9 Push bobbin spindle to the left (9) and remove. 1 Please Note: When the bobbin winder spindle is full, it rotates slowly. Hold thread end. (6) - Press the pedal again. Once the spool is in "bobbin winding" 3 position, the machine will not sew and the hand wheel will not... the pedal after a few turns. Release the pedal and cut as close as illustrated and place on foot control pedal. (7) - To start sewing, push the bobbin winder spindle to right. (5) - Wind thread clockwise around bobbin winder tension discs. (3) - EN Winding the Bobbin - Release the...
... 5 7 8 9 Push bobbin spindle to the left (9) and remove. 1 Please Note: When the bobbin winder spindle is full, it rotates slowly. Hold thread end. (6) - Press the pedal again. Once the spool is in "bobbin winding" 3 position, the machine will not sew and the hand wheel will not... the pedal after a few turns. Release the pedal and cut as close as illustrated and place on foot control pedal. (7) - To start sewing, push the bobbin winder spindle to right. (5) - Wind thread clockwise around bobbin winder tension discs. (3) - EN Winding the Bobbin - Release the...
Instruction Manual
Page 30
Hold the bobbin case with one hand. Insert the bobbin so that the thread runs in the case until thread clicks into the shuttle, so that the bobbin case finger is aligned at 12 o'clock. (6) Attention: Turn power switch to the highest position. Hold the... needle must be fully raised, to off ("O") before inserting or removing the bobbin. 13 Insert the bobbin case into place (4). Leave a 6 inch tail of thread. - Pull the thread through the slit and under the finger, while holding the bobbin down in a clockwise direction (arrow). (3) - a - Pull the bobbin case tab (a) and remove the...
Hold the bobbin case with one hand. Insert the bobbin so that the thread runs in the case until thread clicks into the shuttle, so that the bobbin case finger is aligned at 12 o'clock. (6) Attention: Turn power switch to the highest position. Hold the... needle must be fully raised, to off ("O") before inserting or removing the bobbin. 13 Insert the bobbin case into place (4). Leave a 6 inch tail of thread. - Pull the thread through the slit and under the finger, while holding the bobbin down in a clockwise direction (arrow). (3) - a - Pull the bobbin case tab (a) and remove the...
Instruction Manual
Page 32
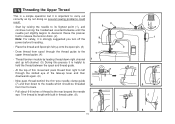
...spool and thread guide. - Thread tension module by leading thread down to the needle which should be threaded from right to left channel. (5) During this movement pass thread from front to back. - At the top of the take-up left through the thread guide to the rear beyond the needle eye. Start by not... doing so several sewing problems could result. - Draw thread from spool through the slotted eye of this process it is strongly suggested you turn ...
...spool and thread guide. - Thread tension module by leading thread down to the needle which should be threaded from right to left channel. (5) During this movement pass thread from front to back. - At the top of the take-up left through the thread guide to the rear beyond the needle eye. Start by not... doing so several sewing problems could result. - Draw thread from spool through the slotted eye of this process it is strongly suggested you turn ...
Instruction Manual
Page 34
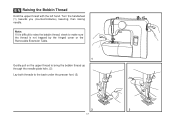
Turn the handwheel (1) towards you (counterclockwise) lowering, then raising needle. Note: If it is difficult to raise the bobbin thread, check to make sure the thread is not trapped by the hinged cover or the Removable Extension Table. 1 Gently pull on the upper thread to bring the bobbin thread up through the needle plate hole. (2) Lay both threads to the back under the presser foot. (3) 2 3 17 EN Raising the Bobbin Thread Hold the upper thread with the left hand.
Turn the handwheel (1) towards you (counterclockwise) lowering, then raising needle. Note: If it is difficult to raise the bobbin thread, check to make sure the thread is not trapped by the hinged cover or the Removable Extension Table. 1 Gently pull on the upper thread to bring the bobbin thread up through the needle plate hole. (2) Lay both threads to the back under the presser foot. (3) 2 3 17 EN Raising the Bobbin Thread Hold the upper thread with the left hand.

Instruction Manual
Page 36
..., turn the small screw on the bottom side of all . Turn 4 dial to the next number down. Lower thread tension (2) To test the bobbin thread tension, remove the bobbin case and bobbin and hold it by suspending it once or twice. If the tension is ...tension setting appropriate for straight stitch sewing. For all stitch functions, thread or fabric. - EN Thread Tension Upper thread tension Basic thread tension setting: "4" (1) To increase the tension, turn the dial to lower number. 3 D. B. Thread tension too loose for all decorative sewing you will be less ...
..., turn the small screw on the bottom side of all . Turn 4 dial to the next number down. Lower thread tension (2) To test the bobbin thread tension, remove the bobbin case and bobbin and hold it by suspending it once or twice. If the tension is ...tension setting appropriate for straight stitch sewing. For all stitch functions, thread or fabric. - EN Thread Tension Upper thread tension Basic thread tension setting: "4" (1) To increase the tension, turn the dial to lower number. 3 D. B. Thread tension too loose for all decorative sewing you will be less ...
Instruction Manual
Page 42
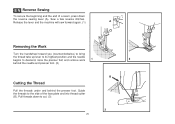
... the beginning and the end of the face plate and into thread cutter (B). Release the lever and the machine will sew forward again. (1) A Removing the Work Turn the handwheel toward you (counterclockwise) to bring the thread take up lever to its highest position and the needle begins ...to cut. (3) 25 B 3 Guide the threads to the side of a seam, press down to descend, raise the presser foot and remove work 1...
... the beginning and the end of the face plate and into thread cutter (B). Release the lever and the machine will sew forward again. (1) A Removing the Work Turn the handwheel toward you (counterclockwise) to bring the thread take up lever to its highest position and the needle begins ...to cut. (3) 25 B 3 Guide the threads to the side of a seam, press down to descend, raise the presser foot and remove work 1...
Instruction Manual
Page 44
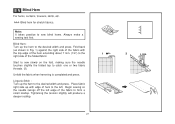
... up the hem to sew blind hems. Always make a sewing test first. Place fabric right side up the hem to catch one or two fabric threads. (2) Unfold the fabric when hemming is completed and press. Lingerie Stitch : Turn up with the top edge of the folded fabric. Fold back (as shown... with edge of hem to the left edge of the fabric to the 1 2 right side of the hem extending about 7 mm. (1/4") to form a small scallop. Start to sew slowly on the fold, making sure the needle touches slightly the folded top to the desired width and press. Blind hem for stretch...
... up the hem to sew blind hems. Always make a sewing test first. Place fabric right side up the hem to catch one or two fabric threads. (2) Unfold the fabric when hemming is completed and press. Lingerie Stitch : Turn up with the top edge of the folded fabric. Fold back (as shown... with edge of hem to the left edge of the fabric to the 1 2 right side of the hem extending about 7 mm. (1/4") to form a small scallop. Start to sew slowly on the fold, making sure the needle touches slightly the folded top to the desired width and press. Blind hem for stretch...
Instruction Manual
Page 46
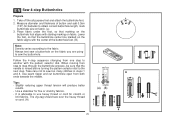
... stretchy fabrics. - EN Sew 4-step Buttonholes Prepare 1. Take off the all purpose foot and attach the buttonhole foot. 2. Slightly reducing upper thread tension will produce better results. - Follow the 4-step sequence changing from both ends towards the middle. It is raised before turning the pattern ...selector dial to sew too many stitches in steps 1 and 3. Lower the foot, so that marking on the buttonhole foot aligns with starting marking on the fabric aligns with the pattern selector dial. Tips: - Always test sew a buttonhole on fabric. (a) 3. Measure diameter and...
... stretchy fabrics. - EN Sew 4-step Buttonholes Prepare 1. Take off the all purpose foot and attach the buttonhole foot. 2. Slightly reducing upper thread tension will produce better results. - Follow the 4-step sequence changing from both ends towards the middle. It is raised before turning the pattern ...selector dial to sew too many stitches in steps 1 and 3. Lower the foot, so that marking on the buttonhole foot aligns with starting marking on the fabric aligns with the pattern selector dial. Tips: - Always test sew a buttonhole on fabric. (a) 3. Measure diameter and...
Instruction Manual
Page 48
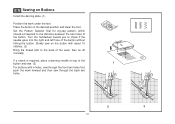
Slowly sew on the button with about 10 stitches. (2) Bring the thread tails to the back of the button and sew. (3) 1 For buttons with 4 holes, sew through the front two holes first, push the work forward and ...
Slowly sew on the button with about 10 stitches. (2) Bring the thread tails to the back of the button and sew. (3) 1 For buttons with 4 holes, sew through the front two holes first, push the work forward and ...
Instruction Manual
Page 52
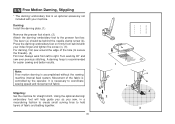
... controlled by 90° and sew over previous stitching. A darning hoop is necessary to the presser foot bar. Movement of the hole (to secure the threads). (4) First row: Always work by the operator. Using the optional darning/ embroidery foot will help guide you as you sew, in a meandering fashion to create...
... controlled by 90° and sew over previous stitching. A darning hoop is necessary to the presser foot bar. Movement of the hole (to secure the threads). (4) First row: Always work by the operator. Using the optional darning/ embroidery foot will help guide you as you sew, in a meandering fashion to create...

Instruction Manual
Page 58
...Lycra®, swimsuit fabric, elastic. Replace needle often (approximately every other garment ) and/ or at first thread breakage or skipped stitches. 3. Always use genuine SINGER® needles. 2. for best Heavyweight fabrics-canvas, woolens, outdoor tent and results. NEEDLE, FABRIC SELECTION ...NEEDLES EXPLANATION TYPE OF FABRIC SINGER® 2020 Standard sharp needles. SINGER® 2032 Leather needles. 12 (80) to 18 (110). THREAD Light-duty thread in cotton, nylon, polyester or cotton wrapped polyester. 11-14 (80...
...Lycra®, swimsuit fabric, elastic. Replace needle often (approximately every other garment ) and/ or at first thread breakage or skipped stitches. 3. Always use genuine SINGER® needles. 2. for best Heavyweight fabrics-canvas, woolens, outdoor tent and results. NEEDLE, FABRIC SELECTION ...NEEDLES EXPLANATION TYPE OF FABRIC SINGER® 2020 Standard sharp needles. SINGER® 2032 Leather needles. 12 (80) to 18 (110). THREAD Light-duty thread in cotton, nylon, polyester or cotton wrapped polyester. 11-14 (80...

Instruction Manual
Page 65
... race cover and snap back the two hook retaining arms. Insert the bobbin case and bobbin and replace the needle plate. 7 Important: Fabric lint and threads must always be disconnected from the main socket. Lubricate at one of our service centers. 48 2 6 5 4 3 Open the hinged front cover and unscrew the needle...
... race cover and snap back the two hook retaining arms. Insert the bobbin case and bobbin and replace the needle plate. 7 Important: Fabric lint and threads must always be disconnected from the main socket. Lubricate at one of our service centers. 48 2 6 5 4 3 Open the hinged front cover and unscrew the needle...

Instruction Manual
Page 67
... both bobbin and bobbin case. 3. Loosen lower thread tension as described. 1. The needle size must suit the fabric and thread. 4. Loosen the thread tension. 4. Select a better quality thread. 2. Remove bobbin case, thread and insert correctly. 3. Remove the upper thread and bobbin case, turn the handwheel backwards and ... uneven feed 1. The wrong size needle has been used. 4. Remove and reinsert needle. (flat side towards the back) 5. Check the threading. 2. Insert a new needle. 3. Readjust the stitch length. 3. Do not pull on the fabric while sewing, let it be taken up...
... both bobbin and bobbin case. 3. Loosen lower thread tension as described. 1. The needle size must suit the fabric and thread. 4. Loosen the thread tension. 4. Select a better quality thread. 2. Remove bobbin case, thread and insert correctly. 3. Remove the upper thread and bobbin case, turn the handwheel backwards and ... uneven feed 1. The wrong size needle has been used. 4. Remove and reinsert needle. (flat side towards the back) 5. Check the threading. 2. Insert a new needle. 3. Readjust the stitch length. 3. Do not pull on the fabric while sewing, let it be taken up...
1304 Stitch Applications Guide
Page 1
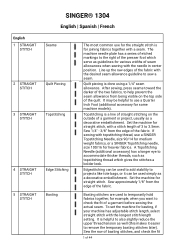
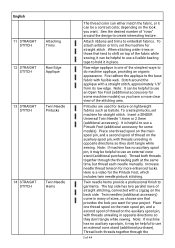
... Set the machine for example, when you want to the right of the fabric with topstitching thread, use a SINGER Topstitching Needle, size 90/14 for medium weight fabrics, or a SINGER Topstitching needle, size 100/16 for heavier fabrics. English 1 STRAIGHT STITCH 2 STRAIGHT STITCH 3... STRAIGHT STITCH 4 STRAIGHT STITCH 5 STRAIGHT STITCH SINGER® 1304 English | Spanish | French Seams Quilt Piecing Topstitching Edge ...
... Set the machine for example, when you want to the right of the fabric with topstitching thread, use a SINGER Topstitching Needle, size 90/14 for medium weight fabrics, or a SINGER Topstitching needle, size 100/16 for heavier fabrics. English 1 STRAIGHT STITCH 2 STRAIGHT STITCH 3... STRAIGHT STITCH 4 STRAIGHT STITCH 5 STRAIGHT STITCH SINGER® 1304 English | Spanish | French Seams Quilt Piecing Topstitching Edge ...

1304 Stitch Applications Guide
Page 2
... Echo quilting is appropriate for straight stitch. 2 of fabric being sewn. When satisfied with various thread types to use an Even Feed / Walking Foot (additional accessory for thread painting, first disengage or cover the machine's feed teeth (see your own unique design. To ... Attach a Darning / Embroidery Foot (additional accessory for details). The basic straight stitch can be used to its original position. Multiple thread colors can be layered to embellish fabrics. To set the machine for free-motion quilting, first disengage or cover the machine's feed ...
... Echo quilting is appropriate for straight stitch. 2 of fabric being sewn. When satisfied with various thread types to use an Even Feed / Walking Foot (additional accessory for thread painting, first disengage or cover the machine's feed teeth (see your own unique design. To ... Attach a Darning / Embroidery Foot (additional accessory for details). The basic straight stitch can be used to its original position. Multiple thread colors can be layered to embellish fabrics. To set the machine for free-motion quilting, first disengage or cover the machine's feed ...
1304 Stitch Applications Guide
Page 3
...and a second spool of 44 Place one thread spool on the auxiliary spool pin, with threads unreeling in opposite directions so they don't tangle while sewing. Here is one that tend to the base fabric with a zigzag on the back side. Insert a SINGER Universal Twin Needle 1.6mm or 2.0mm (...additional accessory). Raw edge applique is a video for straight stitch. Twin needles (additional accessory) come in many of sizes, so choose one of thread on the main spool pin, and a second spool ...
...and a second spool of 44 Place one thread spool on the auxiliary spool pin, with threads unreeling in opposite directions so they don't tangle while sewing. Here is one that tend to the base fabric with a zigzag on the back side. Insert a SINGER Universal Twin Needle 1.6mm or 2.0mm (...additional accessory). Raw edge applique is a video for straight stitch. Twin needles (additional accessory) come in many of sizes, so choose one of thread on the main spool pin, and a second spool ...


