Singer 9970 Support Question
Singer 9970 Support Question
Find answers below for this question about Singer 9970.Need a Singer 9970 manual? We have 1 online manual for this item!
Question posted by patejbja on April 3rd, 2020
Singer 9970 Not Sewing Correctly On Bottom Thread
stop stitches look great but bottom thread shows top top thread loops
Current Answers
Answer #1: Posted by techyagent on April 4th, 2020 5:21 AM
techyagent

Member since:
June 17th, 2014 Points: 4,799,770

Member since:
June 17th, 2014 Points: 4,799,770
If Thread Loops Are Showing on the Underside of the FabricThread looping on the underside of the fabric is always an indication that the upper thread is not correctly threaded. This happens when the upper thread is not correctly placed in the tension mechanism and has not been threaded through the take-up lever.
Please check this link below:-
Techygirl
Related Singer 9970 Manual Pages
Instruction Manual - Page 2
... the cord. 10. Special care is required around the sewing machine needle. 11. Do not pull or push fabric while stitching. Be sure not to place anything on cord. or its... as threading needle, changing needle, threading bobbin, or changing presser foot. 15. It may deflect the needle causing it on the floor. Always unplug sewing machine from the accumulation of The Singer Company ...
Instruction Manual - Page 4
... mains lead are always provided with the most out of your purchase of this sewing machine when considered necessary without notification or obligation. Blue: neutral (N) Brown: live (L)... of the CISPR.
This machine intended for your sewing machine, read the entire instruction manual before attempting to operate the machine.
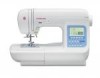
MODEL 9970
PREFACE Thank you with excellent performance in...
Instruction Manual - Page 13

... CLEAR BUTTON UTILITY STITCH SEWING If you can operate the machine without the audible beep. 1. L. Machine will stop automatically at the end of a stitch. (SEE PAGE 19)
DECORATIVE & LETTER STITCH SEWING If this button, you changed the setting (mirror/reverse, elongation, stitch width, length and thread tension) of a decorative stitch pattern, machine will reduce the stitch width. (SEE...
Instruction Manual - Page 14
... will go.
Start the machine again. 8.
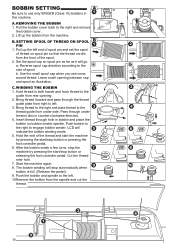
Use the small spool cap when you use only SINGER (Class 15) bobbins in both hands and hook thread to the left . ...machine.
Bring thread to the right and pass thread to the size of the spool.
2. A. REMOVING THE BOBBIN 1. SETTING SPOOL OF THREAD ON SPOOL PIN
1. C. After the bobbin winds a few turns, stop the machine by pressing the start /stop...
Instruction Manual - Page 15
... sure to use only SINGER (Class 15) bobbins in needle plate and push the right side of notch (a).
4.
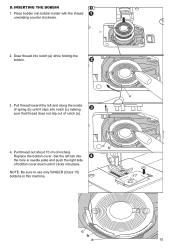
INSERTING THE BOBBIN 1. Draw thread into bobbin holder with the thread
unwinding counter clockwise.
2. Place bobbin into notch (a) while holding the bobbin.
3. Pull thread toward the left tab into the hole in this machine.
15 Replace the...
Instruction Manual - Page 19
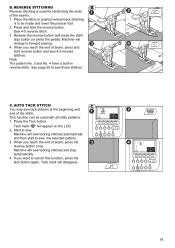
... button and press the start to sew these stitches. When you reach the end of the stitch. Machine will appear on the LCD. 2.
Tack mark " " will sew tacking stitches and stop button (or press the pedal).
Tack mark will change to sew. Machine will sew tacking stitches automatically and then start /
stop automatically. 4. B. Machine will disappear.
19 This function can...
Instruction Manual - Page 21
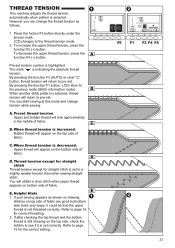
... bottom side looks very loopy, it is set tension number is selected.
Bobbin thread will return to page 16 for the correct setting. When thread tension is increased. D. If your sewing appears as follows.
1.
Press the fuction F5 button directly under the tension mark. Preset thread tension Upper and bobbin thread will obtain a nicer stitch when upper thread appears...
Instruction Manual - Page 23
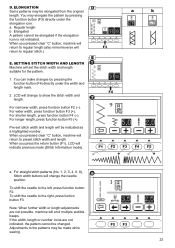
... to preset stitch width and length...machine will be elongated from the original length. Elongated A pattern cannot be made while sewing.
23 For wider width, press function button F3 (+). SETTING STITCH WIDTH AND LENGTH Machine...machine will return to regular length (also mirror/reverse will change to regular stitch.)
E.
Pre-set the stitch...button, machine will set stitch width...
Instruction Manual - Page 25
... button. Center needle with built-in reverse stitch No. 4. Hold the upper thread and bobbin thread
loosely and start sewing. Machine will sew a few stitches backward and sew a few stitches forward and stop sewing. 4. Center needle Position No. 2. Place hand lightly on the fabric while sewing.
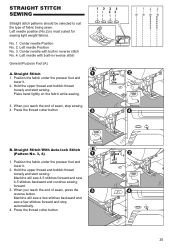
3. Straight Stitch With Auto-lock Stitch (Pattern No. 3, 4)
1. Position the fabric under the...
Instruction Manual - Page 26
... need to right so that it is fitted into the presser bar.
5. Machine will be reduced automatically. 1. Pull the bobbin thread to the rear and sew one stitch only. 3. ATTACHING THE DARNING/ EMBROIDERY FOOT
1. Pull the fabric required amount to remove the stitching. Note: To prevent the fabric layers from your left .
2. Be sure the...
Instruction Manual - Page 28
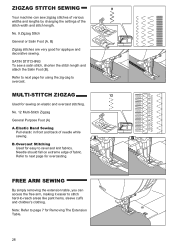
... are very good for sewing on extreme edge of needle while sewing. No. 12 Multi-Stitch Zigzag General Purpose Foot (A) A. SATIN STITCHING To sew a satin stitch, shorten the stitch length and attach the Satin Foot (B). Overcast Stitching Used for easy to page 7 for overcasting. Note: Refer to ravel and knit fabrics.
B. ZIGZAG STITCH SEWING
Your machine can access the free...
Instruction Manual - Page 32

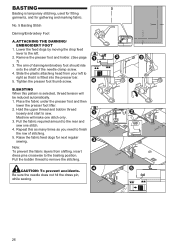
... right side of the zipper, and right side of the presser foot pin to the holder when sewing the left side of the zipper from bottom to the seam line. Stitch left side of fabric
2. Baste the zipper opening c: Basting d: Wrong side of the zipper.
4. Place the open the seam allowance. Baste...
Instruction Manual - Page 33

... end and right side of the zipper.
5 mm 7-10 mm
To stitch around the zipper tab: (Diagram A) 1. Stop stitching with the needle down in the fabric when the zipper foot reaches the zipper tab, about 2" (5 cm) from bottom to the holder when sewing the left seam allowance. Attach the left side of the presser...
Instruction Manual - Page 37

... lower the presser foot.
Start the machine. Press the thread cutter button and raise the presser foot.
3. Right side of the eyelet. Fuse to within 3/16" (5 mm) of eyelets by changing the stitch length.
1. Machine will sew the eyelet and stop automatically.
2. EYELET
This stitch pattern is not provided with this machine.
37 10.Fold the fabric and...
Instruction Manual - Page 38

... will stop automatically when the pattern is finished.
7. b. Hold upper thread lightly and start to strain, such as shown. Press the thread cutter button and raise the presser foot lifter to reinforce areas that the starting point is not positioned correctly.
5. No.103 Darning, mending and other applications.
Note: Machine will sew bar-tack or darning stitch...
Instruction Manual - Page 39

... foot slightly and move the drop feed lever to adjust the stitch width again. Insert a straight pin or sewing machine needle under the center slit of button and wind around stitches to make them together.
8. CAUTION: To prevent accidents. Tie them stand away from the front. Thread Shank Buttons on coats and jackets should have...
Instruction Manual - Page 46
... and Attaching Fabric in the bobbin.
2.
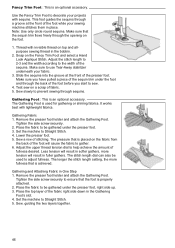
Make sure to prevent sewing through the opening on the Fancy Trim Foot and select a Hand Look Appliqué Stitch. It works best with invisible thread on a scrap of the foot while your sewing machine stitches them in fuller gathers. Sew a row of the fabric right side down in softer gathers, more...
Instruction Manual - Page 48

...end, stop sewing when the front line of the foot is even with the edge of the fabric for sewing rows of stitching. This foot guides the edge of stitching. 3. Thread the top... Thread the machine with sewing in parallel rows.
1. Place fabric right sides together. 4. Place the fabric under the presser foot, aligning the center guide with invisible thread or thread to be stitched under...
Instruction Manual - Page 54
... combination will indicate the setting of the pattern sequence. b. Single sewing You can continue sewing by pressing the tack button at selecting mode. You can combine the tack stitch by starting the machine again. When you wish to sew from first pattern.) 3. When you stopped sewing at the middle of selected patterns, and If you have raised...
Instruction Manual - Page 57

... puckers
Machine not properly threaded. Incorrect size needle or thread for fabric.
Bent or blunt needle. Thread tension too tight. Re-thread the bobbin.
15
Re-thread machine.
16
Readjust thread tension.
21
Stitch pattern is Presser foot is hitting the presser foot. Attach correct foot.
25-
Clean the feed dog area.
50
Needle breaks
Fabric pulled while sewing. Needle...
Similar Questions

Classes On How To Use Singer 9970 Sewing Machine
I bought the sewing machine during the pandemic and would like to learn how to use it- functions, st...
I bought the sewing machine during the pandemic and would like to learn how to use it- functions, st...
(Posted by Connienm 1 year ago)

Why Won't My Machine Sew, Checked Bobbin And Retreaded. Has Power Just Will Not
the machine has power and threade correctly and bobbin is in right. It did freeze on me when sewing....
the machine has power and threade correctly and bobbin is in right. It did freeze on me when sewing....
(Posted by alewis41 7 years ago)

9970 Beeps 3 Times And Won't Sew
I have a 9970. The needle broke, I have replaced it and made sure nothing is caught in the bobbin ar...
I have a 9970. The needle broke, I have replaced it and made sure nothing is caught in the bobbin ar...
(Posted by Gawlynn 9 years ago)

Beeping From Singer Sewing Machine Stylist Ii 5625
My sewing machine will beep and stop sewing after three inches of sewing. I have taken it to be repa...
My sewing machine will beep and stop sewing after three inches of sewing. I have taken it to be repa...
(Posted by arusheria 9 years ago)
Machine Does Not Stop Stitching Until Power Is Shut Off
When my machine is in default mode (straight stitching), it continues to stitch even after I have li...
When my machine is in default mode (straight stitching), it continues to stitch even after I have li...
(Posted by brosenberg129 10 years ago)