User Manual
Page 2
... unplug by persons (including children) with any opening. 12. Special care is 75dB(A). 17. Switch the sewing machine off the machine or unplug when the machine is being used or where oxygen is not operating properly. 18. Please turn all controls to persons: 1....not the cord. 16. DANGER - Close attention is intended for examination, repair, electrical or mechanical adjustment. 4. SAVE THESE INSTRUCTIONS This sewing machine is necessary when this appliance from outlet. 15. Replace bulb with foot controller is used as contained in . 2. Never place anything...
... unplug by persons (including children) with any opening. 12. Special care is 75dB(A). 17. Switch the sewing machine off the machine or unplug when the machine is being used or where oxygen is not operating properly. 18. Please turn all controls to persons: 1....not the cord. 16. DANGER - Close attention is intended for examination, repair, electrical or mechanical adjustment. 4. SAVE THESE INSTRUCTIONS This sewing machine is necessary when this appliance from outlet. 15. Replace bulb with foot controller is used as contained in . 2. Never place anything...

User Manual
Page 6
GB List of contents Machine Basics Principle Parts of the Machine...2/4 Connecting Machine to Power Source ...6 Two Step Presser Foot Lifter...8 Accessories ...9 Threading the Machine Winding the Bobbin ...11 Inserting the Bobbin ...13 Thread Tension ...15 Threading the Upper Thread ...17 Automatic Needle Threader ...19 Raising the Bobbin Thread...21 Sewing How to Choose Your Pattern...
GB List of contents Machine Basics Principle Parts of the Machine...2/4 Connecting Machine to Power Source ...6 Two Step Presser Foot Lifter...8 Accessories ...9 Threading the Machine Winding the Bobbin ...11 Inserting the Bobbin ...13 Thread Tension ...15 Threading the Upper Thread ...17 Automatic Needle Threader ...19 Raising the Bobbin Thread...21 Sewing How to Choose Your Pattern...
User Manual
Page 9
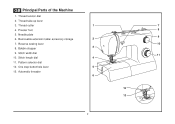
Thread tension dial 2. Presser foot 5. One step buttonhole lever 13. Thread take-up lever 3. Pattern selector dial 12. Needle plate 6. Stitch width dial 10. Thread cutter 4. Removable extension table/ accessory storage 7. Automatic threader 1 7 8 9 2 10 3 PUSH 4 11 5 6 12 PUSH 13 2 Bobbin stopper 9. GB Principal Parts of the Machine 1. Reverse sewing lever 8. Stitch length dial 11.
Thread tension dial 2. Presser foot 5. One step buttonhole lever 13. Thread take-up lever 3. Pattern selector dial 12. Needle plate 6. Stitch width dial 10. Thread cutter 4. Removable extension table/ accessory storage 7. Automatic threader 1 7 8 9 2 10 3 PUSH 4 11 5 6 12 PUSH 13 2 Bobbin stopper 9. GB Principal Parts of the Machine 1. Reverse sewing lever 8. Stitch length dial 11.
User Manual
Page 13
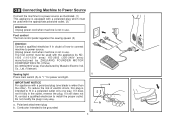
...in any way. If it does not fit fully in a polarized outlet only one blade is wider than a the other). Co., Ltd. (Vietnam) Sewing light 1 Press main switch (A) to install the proper outlet. Do not modify the plug in doubt of electric shock, this plug is intended to fit... in the outlet, reverse the plug. IMPORTANT NOTICE For appliance with a polarized plug (one way. Polarized attachment plug b. Unplug power cord when machine is not in use . b a. The foot control must be used with the appliance by KD1902 (110-120V area)/ KD-2902 (220-240V area) ...
...in any way. If it does not fit fully in a polarized outlet only one blade is wider than a the other). Co., Ltd. (Vietnam) Sewing light 1 Press main switch (A) to install the proper outlet. Do not modify the plug in doubt of electric shock, this plug is intended to fit... in the outlet, reverse the plug. IMPORTANT NOTICE For appliance with a polarized plug (one way. Polarized attachment plug b. Unplug power cord when machine is not in use . b a. The foot control must be used with the appliance by KD1902 (110-120V area)/ KD-2902 (220-240V area) ...
User Manual
Page 16
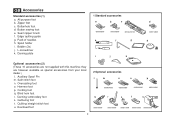
Spool holder i. Darning/ embroidery foot s. Gathering foot t. Zipper foot c. Button sewing foot e. Seam ripper/ brush f. Darning plate 1 Standard accessories a b c 006806008 006905008 006Q6A0150 e f g d 006914008 h i j ...Cording foot q. L-screwdriver k. Blind hem foot r. All purpose foot b. Bobbin (3x) j. they are not supplied with this machine; Auxiliary Spool Pin m. Overcasting foot o. Hemmer foot p. Evenfeed foot 2 Optional accessories l m n o p 006804008 006803008 006800008 006810008 q r s t u 006812008 006016008...
Spool holder i. Darning/ embroidery foot s. Gathering foot t. Zipper foot c. Button sewing foot e. Seam ripper/ brush f. Darning plate 1 Standard accessories a b c 006806008 006905008 006Q6A0150 e f g d 006914008 h i j ...Cording foot q. L-screwdriver k. Blind hem foot r. All purpose foot b. Bobbin (3x) j. they are not supplied with this machine; Auxiliary Spool Pin m. Overcasting foot o. Hemmer foot p. Evenfeed foot 2 Optional accessories l m n o p 006804008 006803008 006800008 006810008 q r s t u 006812008 006016008...
User Manual
Page 18
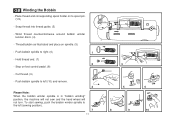
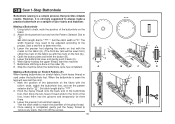
... pin. (1/2) - GB Winding the Bobbin - Hold thread end. (7) 2 - Thread bobbin as illustrated and place on foot control pedal. (8) - To start sewing, push the bobbin winder spindle to right. (6) 1 - Cut thread. (9) - Push bobbin spindle to the left (10) and remove. 4 Please Note: When... the bobbin winder spindle is in "bobbin winding" position, the machine will not sew and the hand wheel will not turn. Snap thread into thread guide. (3) - Wind thread counterclockwise around bobbin winder tension discs. (4) -
... pin. (1/2) - GB Winding the Bobbin - Hold thread end. (7) 2 - Thread bobbin as illustrated and place on foot control pedal. (8) - To start sewing, push the bobbin winder spindle to right. (6) 1 - Cut thread. (9) - Push bobbin spindle to the left (10) and remove. 4 Please Note: When... the bobbin winder spindle is in "bobbin winding" position, the machine will not sew and the hand wheel will not turn. Snap thread into thread guide. (3) - Wind thread counterclockwise around bobbin winder tension discs. (4) -
User Manual
Page 30
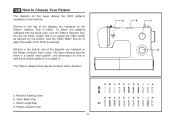
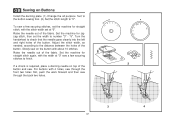
Use the Stitch Width Dial (b) to adjust the stitch length as desired. Stitch Width Dial c. a b c d a. Reverse Sewing Lever b. Pattern Selector Dial ABCDE FGH I JK ABCDE FGH I JK S1 23 To select the patterns indicated with the black color, turn the Pattern Selector ... stitch is a stretch stitch pattern, and information on how to Choose Your Pattern The diagram on this page display the stitch patterns available on the machine. The Pattern Selector Dial may be turned in black. GB How to sew these stretch patterns is on page 31.
Use the Stitch Width Dial (b) to adjust the stitch length as desired. Stitch Width Dial c. a b c d a. Reverse Sewing Lever b. Pattern Selector Dial ABCDE FGH I JK ABCDE FGH I JK S1 23 To select the patterns indicated with the black color, turn the Pattern Selector ... stitch is a stretch stitch pattern, and information on how to Choose Your Pattern The diagram on this page display the stitch patterns available on the machine. The Pattern Selector Dial may be turned in black. GB How to sew these stretch patterns is on page 31.
User Manual
Page 34
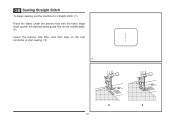
GB Sewing Straight Stitch To begin sewing, set the machine for straight stitch. (1) Place the fabric under the presser foot with the fabric edge lined up with the desired seam guide line on the needle plate. (2) Lower the presser foot lifter, and then step on the foot controller to start sewing. (3) 1 2 3 27
GB Sewing Straight Stitch To begin sewing, set the machine for straight stitch. (1) Place the fabric under the presser foot with the fabric edge lined up with the desired seam guide line on the needle plate. (2) Lower the presser foot lifter, and then step on the foot controller to start sewing. (3) 1 2 3 27
User Manual
Page 36
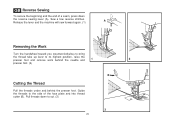
... the beginning and the end of a seam, press down to the side of the face plate and into thread cutter (B). Release the lever and the machine will sew forward again. (1) A Removing the Work Turn the handwheel toward you (counterclockwise) to bring the thread take up lever to its highest position, raise the...
... the beginning and the end of a seam, press down to the side of the face plate and into thread cutter (B). Release the lever and the machine will sew forward again. (1) A Removing the Work Turn the handwheel toward you (counterclockwise) to bring the thread take up lever to its highest position, raise the...

User Manual
Page 38
... several stretch patterns, here are indicated with a blue color on the Pattern Selector Dial. Used to add triple reinforcement to stretch and hardwearing seams. The machine sews two stitches forward and one stitch backwards. 1 Ric Rac Set the Pattern Selector Dial to between "3" and "5". Then, turn the Pattern Selector Dial to the...
... several stretch patterns, here are indicated with a blue color on the Pattern Selector Dial. Used to add triple reinforcement to stretch and hardwearing seams. The machine sews two stitches forward and one stitch backwards. 1 Ric Rac Set the Pattern Selector Dial to between "3" and "5". Then, turn the Pattern Selector Dial to the...
User Manual
Page 40
... Unfold the fabric when hemming is used for lighter weight fabrics, and a wider stitch is completed and press. 2 Note: To make sure the machine settings are normally sewn with 1 the top edge of the hem extending about 7 mm (1/4") to the right side of the folded fabric. Blind ...hem for heavier weight fabrics. Sew a test first to make blind hem sewing even easier, use a blind hem foot, available from your SINGER retailer. (See page 9 for the fabric. Blind hems, however, are appropriate for part number) ...
... Unfold the fabric when hemming is used for lighter weight fabrics, and a wider stitch is completed and press. 2 Note: To make sure the machine settings are normally sewn with 1 the top edge of the hem extending about 7 mm (1/4") to the right side of the folded fabric. Blind ...hem for heavier weight fabrics. Sew a test first to make blind hem sewing even easier, use a blind hem foot, available from your SINGER retailer. (See page 9 for the fabric. Blind hems, however, are appropriate for part number) ...
User Manual
Page 42
...heavy thread ends to the front of the gimp thread. E 4. Open the button plate and insert the button (B). 5. Stop the machine when the buttonhole cycle has completed. Using tailor's chalk, mark the position of the buttonhole on the fabric. 2. Set the stitch ...Sew a test first to determine this. 3. However, it back (C). 6. Set stitch length dial to " ". 2. The width however may need to be sewn first.) (Align the mark on the fabric (a) with the tailor's chalk, attach the buttonhole foot, and set the Pattern Selector Dial to " ". Lower the presser foot and start the machine...
...heavy thread ends to the front of the gimp thread. E 4. Open the button plate and insert the button (B). 5. Stop the machine when the buttonhole cycle has completed. Using tailor's chalk, mark the position of the buttonhole on the fabric. 2. Set the stitch ...Sew a test first to determine this. 3. However, it back (C). 6. Set stitch length dial to " ". 2. The width however may need to be sewn first.) (Align the mark on the fabric (a) with the tailor's chalk, attach the buttonhole foot, and set the Pattern Selector Dial to " ". Lower the presser foot and start the machine...
User Manual
Page 44
... between the holes of the button. To sew a few securing stitches, set the machine for zigzag stitch, then set at "0" sew a few securing stitches to finish. 1 2 If a shank is required, place a darning needle on top of the button and sew. Set the machine for straight stitch, with the width at ..."0". Turn the handwheel to "0". Raise the needle out of the fabric. Slowly sew on the button with 4 holes, sew through the front two holes first, push the work forward ...
... between the holes of the button. To sew a few securing stitches, set the machine for zigzag stitch, then set at "0" sew a few securing stitches to finish. 1 2 If a shank is required, place a darning needle on top of the button and sew. Set the machine for straight stitch, with the width at ..."0". Turn the handwheel to "0". Raise the needle out of the fabric. Slowly sew on the button with 4 holes, sew through the front two holes first, push the work forward ...

User Manual
Page 59
...1. Loosen the thread tension. 1. The bobbin case is attached. 1. Lint or oil have collected on the fabric while sewing, let it be lubricated. 1. The needle is damaged. 3. Rethread the machine. 2. The needle is not inserted correctly. 5. The needle is not correctly threaded. 2. Insert a new needle. 2....hand and remove the thread. Select a finer needle. 2. Do not pull on the hook or needle bar. 2. Only use good quality sewing machine oil. 4. Replace the needle. The needle is not attached correctly. 1. The wrong size or type of needle has been used . 3....
...1. Loosen the thread tension. 1. The bobbin case is attached. 1. Lint or oil have collected on the fabric while sewing, let it be lubricated. 1. The needle is damaged. 3. Rethread the machine. 2. The needle is not inserted correctly. 5. The needle is not correctly threaded. 2. Insert a new needle. 2....hand and remove the thread. Select a finer needle. 2. Do not pull on the hook or needle bar. 2. Only use good quality sewing machine oil. 4. Replace the needle. The needle is not attached correctly. 1. The wrong size or type of needle has been used . 3....
2277 Stitch Applications Guide
Page 1
... before sewing the actual seam. Basting stitches are used simply as a decorative embellishment. The machine needle plate has a series of etched markings to the right of 3 to 3.5mm. Set the machine for straight stitch, with the needle in center position. English 1 STRAIGHT STITCH 2 STRAIGHT STITCH 3 STRAIGHT STITCH 4 STRAIGHT STITCH 5 STRAIGHT STITCH SINGER® 2277 English...
... before sewing the actual seam. Basting stitches are used simply as a decorative embellishment. The machine needle plate has a series of etched markings to the right of 3 to 3.5mm. Set the machine for straight stitch, with the needle in center position. English 1 STRAIGHT STITCH 2 STRAIGHT STITCH 3 STRAIGHT STITCH 4 STRAIGHT STITCH 5 STRAIGHT STITCH SINGER® 2277 English...

2277 Stitch Applications Guide
Page 2
...to draw stitch guidelines on thread painting and free-motion sewing, see this video. Create dimension in the fabric itself, or perhaps even an embroidery on free-motion sewing, see this video. Set the machine for the type of fabric being sewn. It can... a Darning / Embroidery Foot (additional accessory for details). Sew the permanent seam. Place stabilizer or batting underneath the fabric. For best results, use a fabric marker that is used to create your machine's manual for some machine models). When satisfied with various thread types to embellish fabrics...
...to draw stitch guidelines on thread painting and free-motion sewing, see this video. Create dimension in the fabric itself, or perhaps even an embroidery on free-motion sewing, see this video. Set the machine for the type of fabric being sewn. It can... a Darning / Embroidery Foot (additional accessory for details). Sew the permanent seam. Place stabilizer or batting underneath the fabric. For best results, use a fabric marker that is used to create your machine's manual for some machine models). When satisfied with various thread types to embellish fabrics...

2277 Stitch Applications Guide
Page 3
...SINGER Universal Twin Needle 1.6mm or 2.0mm (additional accessory). Twin needle hems provide a professional finish to embellish fabrics. Place one thread spool on the main spool pin, and a second spool of "rows" around the applique with threads unreeling in opposite directions so they don't tangle while sewing... stitch. Place one thread spool on the main spool pin, and a second spool of the fabric while sewing, it may be helpful to do machine applique, providing an organic appearance. Twin needles (additional accessory) come in opposite directions so they don't tangle while...
...SINGER Universal Twin Needle 1.6mm or 2.0mm (additional accessory). Twin needle hems provide a professional finish to embellish fabrics. Place one thread spool on the main spool pin, and a second spool of "rows" around the applique with threads unreeling in opposite directions so they don't tangle while sewing... stitch. Place one thread spool on the main spool pin, and a second spool of the fabric while sewing, it may be helpful to do machine applique, providing an organic appearance. Twin needles (additional accessory) come in opposite directions so they don't tangle while...

2277 Stitch Applications Guide
Page 4
...setting, and then reduce the upper thread tension. See this video for using the basic Zipper Foot (additional accessory for some machine models) to help sew closer to gather the fabric. Piping can be purchased 4 of 80 All these methods are done using the basic Zipper Foot... each needle manually. Pleating is creating a series of consistently sized folds in this video for some machine models) is a demonstration of this in home decor, fashion and accessory sewing, and more information about 1/8" next to achieve various types of zipper insertion are times you . There...
...setting, and then reduce the upper thread tension. See this video for using the basic Zipper Foot (additional accessory for some machine models) to help sew closer to gather the fabric. Piping can be purchased 4 of 80 All these methods are done using the basic Zipper Foot... each needle manually. Pleating is creating a series of consistently sized folds in this video for some machine models) is a demonstration of this in home decor, fashion and accessory sewing, and more information about 1/8" next to achieve various types of zipper insertion are times you . There...

2277 Stitch Applications Guide
Page 5
... them at the edge of the garment. Use a thread that matches the fabric for a hem that feeds the fabric while the machines sews a straight stitch to be repaired. English 20 STRAIGHT STITCH Narrow / Rolled Hems 21 STRAIGHT STITCH Topstitched Hems 22 STRAIGHT STITCH Understitching ... This foot has a small scroll in fabric can make it yourself. Set the machine for straight stitch. Sew though the facing and seam allowance only. Sew just inside the seam allowance. Set the machine for straight stitch and attach the Zipper Foot (additional accessory for a bold appearance....
... them at the edge of the garment. Use a thread that matches the fabric for a hem that feeds the fabric while the machines sews a straight stitch to be repaired. English 20 STRAIGHT STITCH Narrow / Rolled Hems 21 STRAIGHT STITCH Topstitched Hems 22 STRAIGHT STITCH Understitching ... This foot has a small scroll in fabric can make it yourself. Set the machine for straight stitch. Sew though the facing and seam allowance only. Sew just inside the seam allowance. Set the machine for straight stitch and attach the Zipper Foot (additional accessory for a bold appearance....

2277 Stitch Applications Guide
Page 6
...threads such as 12wt cotton, use a Satin Stitch Foot (additional accessory for some machine models). Sew the zigzag stitch to create texture in front of the applique to attach it . For denser stitches such as when sewing a satin stitch, use a larger size needle so that the thread passes freely ... and colors. The stitch length setting should be short enough so that you sew. Choose a stitch length setting that the stitches don't feed under the presser foot. Use a slow speed and take your machine has adjustable stitch length and stitch width, try experimenting on scrap fabric to ...
...threads such as 12wt cotton, use a Satin Stitch Foot (additional accessory for some machine models). Sew the zigzag stitch to create texture in front of the applique to attach it . For denser stitches such as when sewing a satin stitch, use a larger size needle so that the thread passes freely ... and colors. The stitch length setting should be short enough so that you sew. Choose a stitch length setting that the stitches don't feed under the presser foot. Use a slow speed and take your machine has adjustable stitch length and stitch width, try experimenting on scrap fabric to ...


