Instruction Manual
Page 3
...112 - 113 Special accessories 114 - 115 Helpful messages 116 - 117 For European version Sewing machine Dimensions: 567 mm × 240 mm × 317 mm Mass of the equipment: 10.8 kg Embroidery unit Dimensions: 504 mm × 411 mm × 141 mm Mass of patterns Blind... switches, Thread tension control Troubleshooting 84 - 93 Helpful information for embroidering with FUTURA Multi hoop 94 - 101 Control panel when embroidering 102 - 103 Helpful messages when embroidering 104 - 105 4. STARTING TO SEW Quick reference table of stitch length and width ---------- 32 - 35 Straight stitching...
...112 - 113 Special accessories 114 - 115 Helpful messages 116 - 117 For European version Sewing machine Dimensions: 567 mm × 240 mm × 317 mm Mass of the equipment: 10.8 kg Embroidery unit Dimensions: 504 mm × 411 mm × 141 mm Mass of patterns Blind... switches, Thread tension control Troubleshooting 84 - 93 Helpful information for embroidering with FUTURA Multi hoop 94 - 101 Control panel when embroidering 102 - 103 Helpful messages when embroidering 104 - 105 4. STARTING TO SEW Quick reference table of stitch length and width ---------- 32 - 35 Straight stitching...

Instruction Manual
Page 8
...embroidery function and all of your sewing. To install the FUTURA software, refer to install the FUTURA software. Needles 2. Buttonhole foot and underplate 17. Thread spool net (long) 18. Spool pin cap (mini) 6. Screwdriver (large) 11. Button sewing foot 1 16. Thread spool net (short) The Foot that comes on your 7 Sewing machine... 10 11 13 14 15 17 18 20 21 22 23 ACCESSORIES FOR SEWING MACHINE 1. Scissors 22. Blind hem foot 14. Bobbins 21. Satin foot 15. Embroidery presser foot 23. Bobbins 3. Auxiliary spool pin 4. Spool pin cap (...
...embroidery function and all of your sewing. To install the FUTURA software, refer to install the FUTURA software. Needles 2. Buttonhole foot and underplate 17. Thread spool net (long) 18. Spool pin cap (mini) 6. Screwdriver (large) 11. Button sewing foot 1 16. Thread spool net (short) The Foot that comes on your 7 Sewing machine... 10 11 13 14 15 17 18 20 21 22 23 ACCESSORIES FOR SEWING MACHINE 1. Scissors 22. Blind hem foot 14. Bobbins 21. Satin foot 15. Embroidery presser foot 23. Bobbins 3. Auxiliary spool pin 4. Spool pin cap (...

Instruction Manual
Page 24
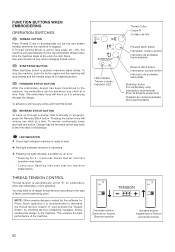
... Read more about the display when embroidering. 2. PROGRAM MODE BUTTON Press this button to select that stitch. 3. CONTROL PANEL FUNCTIONS 4 1 5 2 3 6 7 8 1. For regular sewing, the LCD display shows the number of the selected stitch, an image of the stitch, and stitch width and stitch length settings. Simply press a button ...about programming under 4 and 5 below. 24 DIRECT SELECTION BUTTONS Frequently used stitches are available by the direct selection buttons. The information on the machine without the embroidery unit attached, straight stitch number 00, is selected.
... Read more about the display when embroidering. 2. PROGRAM MODE BUTTON Press this button to select that stitch. 3. CONTROL PANEL FUNCTIONS 4 1 5 2 3 6 7 8 1. For regular sewing, the LCD display shows the number of the selected stitch, an image of the stitch, and stitch width and stitch length settings. Simply press a button ...about programming under 4 and 5 below. 24 DIRECT SELECTION BUTTONS Frequently used stitches are available by the direct selection buttons. The information on the machine without the embroidery unit attached, straight stitch number 00, is selected.

Instruction Manual
Page 64
... toward you to touch the needle when CAUTION replacing presser foot. Needle clamp Serre-aiguille Abrazadera de aguja Embroidery presser foot Pied presseur de broderie Prensatelas de bordado 64 Presser foot Pied de biche zigzag Pie prensatelas Presser... in its highest position. 1. Secure it by tightening presser foot screw. 3. PREPARATION FOR EMBROIDERY SEWING BEFORE ATTACHING EMBROIDERY UNIT ATTACHING EMBROIDERY FOOT Foot holder Support du pied Sujetador prensatelas Always be sure to machine CAUTION before changing presser foot. * Raise presser foot lifter. 3. Screw Vis Guia *...
... toward you to touch the needle when CAUTION replacing presser foot. Needle clamp Serre-aiguille Abrazadera de aguja Embroidery presser foot Pied presseur de broderie Prensatelas de bordado 64 Presser foot Pied de biche zigzag Pie prensatelas Presser... in its highest position. 1. Secure it by tightening presser foot screw. 3. PREPARATION FOR EMBROIDERY SEWING BEFORE ATTACHING EMBROIDERY UNIT ATTACHING EMBROIDERY FOOT Foot holder Support du pied Sujetador prensatelas Always be sure to machine CAUTION before changing presser foot. * Raise presser foot lifter. 3. Screw Vis Guia *...

Instruction Manual
Page 68
... the left to the embroidery unit. REMOVING EMBROIDERY UNIT * Turn off the machine. * Remove embroidery hoop from machine. (Refer to open. Holding handle of the embroidery unit and pull it towards the left direction, checking that the embroidery unit is not securely installed, the finished embroidery may cause CAUTION damage to close for general sewing. 3 Handle Poignée Mango...
... the left to the embroidery unit. REMOVING EMBROIDERY UNIT * Turn off the machine. * Remove embroidery hoop from machine. (Refer to open. Holding handle of the embroidery unit and pull it towards the left direction, checking that the embroidery unit is not securely installed, the finished embroidery may cause CAUTION damage to close for general sewing. 3 Handle Poignée Mango...

Instruction Manual
Page 80
... this happens. Simply click on "Cancel". Finally you plan to the given directory on your computer and sewing machine. 1. Double click on the FUTURA Icon on your embroidery unit. 3. If the installation utility identifies a lack of the FUTURA software files to work with the installation. You can always abort the installation procedure by turning the...
... this happens. Simply click on "Cancel". Finally you plan to the given directory on your computer and sewing machine. 1. Double click on the FUTURA Icon on your embroidery unit. 3. If the installation utility identifies a lack of the FUTURA software files to work with the installation. You can always abort the installation procedure by turning the...
Instruction Manual
Page 82
... design. Pressing the button once will stop sewing and the needle stops at its highest position. LED indicator Témoin a diode Indicador LED LED INDICATOR Green light indicates machine is ready to start /stop button (For embroidery only) Interrupteur marche/arrêt (Pour ...by checking the box in progress, press the Reverse Stitch button. NOTE: When sewing designs created by the software for embroidery, when the embroidery unit is stopped. If Thread Cutting Mode is pushed, machines starts slowly. This ensures the best performance of a color block. THREAD TENSION ...
... design. Pressing the button once will stop sewing and the needle stops at its highest position. LED indicator Témoin a diode Indicador LED LED INDICATOR Green light indicates machine is ready to start /stop button (For embroidery only) Interrupteur marche/arrêt (Pour ...by checking the box in progress, press the Reverse Stitch button. NOTE: When sewing designs created by the software for embroidery, when the embroidery unit is stopped. If Thread Cutting Mode is pushed, machines starts slowly. This ensures the best performance of a color block. THREAD TENSION ...

Instruction Manual
Page 94
Multi-Hoop Multi-Hooping is a special feature in the FUTURA software that will allow embroidery data which is larger than a single embroidery hoop to be sent to the machine to stitch out, while making it easy to re-hoop the fabric so that each other . When these points are input on the ...;o. Notez s'il vous plaît : Une ligne mince est très importante pour l'exactitude du résultat final de la broderie. and then sews them precisely, matching one section to hoop the fabric as accurately as the design data requires. These lines will now be referred to three additional...
Multi-Hoop Multi-Hooping is a special feature in the FUTURA software that will allow embroidery data which is larger than a single embroidery hoop to be sent to the machine to stitch out, while making it easy to re-hoop the fabric so that each other . When these points are input on the ...;o. Notez s'il vous plaît : Une ligne mince est très importante pour l'exactitude du résultat final de la broderie. and then sews them precisely, matching one section to hoop the fabric as accurately as the design data requires. These lines will now be referred to three additional...

Instruction Manual
Page 96
...in the hoop area on the tool bar. 5. The example shown uses lettering and designs from the Design Library that is sent to the machine for Multiple Hooping. Set fabric and stabilizer into the software. (Additional numbered hoops will appear as Guide lines. In each side of the hoop... design parts flow out of the hoop. On each corner of the hoop there are two sets of the embroidery data that is a Center Hoop line which together define the maximum sewing area for sewing. 3. Fig. 3 Fig. 3 Fig. 3 Fig. 4 Fig. 4 Fig. 4 Guide line Ligne Guide Línea guía Guide line...
...in the hoop area on the tool bar. 5. The example shown uses lettering and designs from the Design Library that is sent to the machine for Multiple Hooping. Set fabric and stabilizer into the software. (Additional numbered hoops will appear as Guide lines. In each side of the hoop... design parts flow out of the hoop. On each corner of the hoop there are two sets of the embroidery data that is a Center Hoop line which together define the maximum sewing area for sewing. 3. Fig. 3 Fig. 3 Fig. 3 Fig. 4 Fig. 4 Fig. 4 Guide line Ligne Guide Línea guía Guide line...

Instruction Manual
Page 102
... Needle Stop Up/Down and Reverse buttons as illustrated. CONTROL PANEL WHEN EMBROIDERING When embroidering, the dials on the control panel are used to your FUTURA sewing and embroidery machine, the display shows number of current color block and total number of color blocks as described on page 82 - 83. 102 Go to that...
... Needle Stop Up/Down and Reverse buttons as illustrated. CONTROL PANEL WHEN EMBROIDERING When embroidering, the dials on the control panel are used to your FUTURA sewing and embroidery machine, the display shows number of current color block and total number of color blocks as described on page 82 - 83. 102 Go to that...

Instruction Manual
Page 106
...flat-bed model. Down Haut Abajo Feed dog control Abaisse-griffe d'entraînement Control de dientes CONVERTING TO FREE-ARM SEWING Your machine can be raised for all general sewing purposes and lowered for children's clothes, cuffs, trouser legs, and other hard-to-reach places. 106 To remove the ...or to the left as a freearm model. 4. To replace, slide the extension table back into a slim free-arm model for darning, freehand embroidery and monogramming so that is being sewn. OTHER THINGS YOU SHOULD KNOW PRESSER FOOT LIFTER There are moving the fabric. bed or as shown. ...
...flat-bed model. Down Haut Abajo Feed dog control Abaisse-griffe d'entraînement Control de dientes CONVERTING TO FREE-ARM SEWING Your machine can be raised for all general sewing purposes and lowered for children's clothes, cuffs, trouser legs, and other hard-to-reach places. 106 To remove the ...or to the left as a freearm model. 4. To replace, slide the extension table back into a slim free-arm model for darning, freehand embroidery and monogramming so that is being sewn. OTHER THINGS YOU SHOULD KNOW PRESSER FOOT LIFTER There are moving the fabric. bed or as shown. ...


