Operater's Manual
Page 1
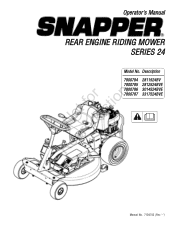
Description 7800784 2811524BV 7800785 2812524BVE 7800786 3014524BVE 7800787 3317524BVE RNeoptrfoodruction ! Manual No. 7104742 (Rev. '-') Operator's Manual REAR ENGINE RIDING MOWER SERIES 24 Model No.
Description 7800784 2811524BV 7800785 2812524BVE 7800786 3014524BVE 7800787 3317524BVE RNeoptrfoodruction ! Manual No. 7104742 (Rev. '-') Operator's Manual REAR ENGINE RIDING MOWER SERIES 24 Model No.
Operater's Manual
Page 2
.... It is important that you placed your confidence in this manual, your purchase. Date of Purchase Retailer Retailer's Phone Number r n Equipment fo tio Model Number t c Serial Number o u Engine RNeprod Model Type Code SNAPPER is a trademark of established lawns and is designed and intended...Thank You for future reference. This machine is not intended for any other purpose. This manual contains safety information to avoid them. Complete the following information on your Snapper product will provide many years of the hazards and risks associated with the machine and how ...
.... It is important that you placed your confidence in this manual, your purchase. Date of Purchase Retailer Retailer's Phone Number r n Equipment fo tio Model Number t c Serial Number o u Engine RNeprod Model Type Code SNAPPER is a trademark of established lawns and is designed and intended...Thank You for future reference. This machine is not intended for any other purpose. This manual contains safety information to avoid them. Complete the following information on your Snapper product will provide many years of the hazards and risks associated with the machine and how ...
Operater's Manual
Page 4
...the operate machine on slopes even though the brakes are Refer to loss-of children. washouts, culverts, fences and protruding objects. 4 www.snapper.com machine. DO NOT 1. They may lose traction on slopes exceeding 10 degrees (18% watchful care of DO NOT remove fuel cap or... 6. Protection for children, pets and hazards before starting , stopping or turning on wet grass. Know the controls and the proper use of this manual and on machine, r n attachments or towed equipment (even with the blade OFF). 3. Handle fuel with grass catchers or other hidden hazards....
...the operate machine on slopes even though the brakes are Refer to loss-of children. washouts, culverts, fences and protruding objects. 4 www.snapper.com machine. DO NOT 1. They may lose traction on slopes exceeding 10 degrees (18% watchful care of DO NOT remove fuel cap or... 6. Protection for children, pets and hazards before starting , stopping or turning on wet grass. Know the controls and the proper use of this manual and on machine, r n attachments or towed equipment (even with the blade OFF). 3. Handle fuel with grass catchers or other hidden hazards....
Operater's Manual
Page 6
...DO NOT store machine or fuel container inside where 10. Lubricate machine at intervals specified in proper position. 13. Mower blades are in manual to spark plug hole; Wrap the blades in an prevent controls from battery before storing machine in a well ventilated, unoccupied building. Have... equipment may reach an open flame. 4. Check brakes frequently; Use only factory authorized replacement parts or like parts when making repairs. 6 www.snapper.com in a water heater, furnace, clothes dryer or other gas appli- 11. Keep all cotter pins are sharp and can cut. Follow ...
...DO NOT store machine or fuel container inside where 10. Lubricate machine at intervals specified in proper position. 13. Mower blades are in manual to spark plug hole; Wrap the blades in an prevent controls from battery before storing machine in a well ventilated, unoccupied building. Have... equipment may reach an open flame. 4. Check brakes frequently; Use only factory authorized replacement parts or like parts when making repairs. 6 www.snapper.com in a water heater, furnace, clothes dryer or other gas appli- 11. Keep all cotter pins are sharp and can cut. Follow ...
Operater's Manual
Page 8
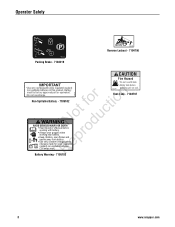
... overfill tank. Use only constant voltage battery chargers made for tion Non-Spillable Battery - 7105102 WARNING Not duc AVOID SERIOUS INJURY OR DEATH Read Operator's Manual before 7105102 Use only rechargeable valve regulated (sealed) non-spillable batteries in this product. Keep children, open flames and p sparks away from battery. Do not...
... overfill tank. Use only constant voltage battery chargers made for tion Non-Spillable Battery - 7105102 WARNING Not duc AVOID SERIOUS INJURY OR DEATH Read Operator's Manual before 7105102 Use only rechargeable valve regulated (sealed) non-spillable batteries in this product. Keep children, open flames and p sparks away from battery. Do not...
Operater's Manual
Page 9
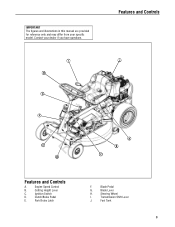
Contact your specific model. Blade Lever H. Features and Controls I . Clutch/Brake Pedal E. Ignition Switch D. Park Brake Latch F. Transmission Shift Lever J. IMPORTANT The figures and illustrations in this manual are provided for reference only and may differ from your dealer if you have questions. Fuel Tank 9 Engine Speed Control B. Blade Pedal G. Cutting Height Lever C. Steering Wheel I J H G F E RNeopt rfoodr uctiBonA C D Features and Controls A.
Contact your specific model. Blade Lever H. Features and Controls I . Clutch/Brake Pedal E. Ignition Switch D. Park Brake Latch F. Transmission Shift Lever J. IMPORTANT The figures and illustrations in this manual are provided for reference only and may differ from your dealer if you have questions. Fuel Tank 9 Engine Speed Control B. Blade Pedal G. Cutting Height Lever C. Steering Wheel I J H G F E RNeopt rfoodr uctiBonA C D Features and Controls A.
Operater's Manual
Page 10
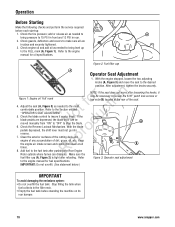
...and securely tightened. 3. Add fuel to the fuel tank after pushing the Rear Engine R Rider outside where fumes can be necessary to the engine manual for fuel specifications. Refer Figure 3: Operator seat adjustment to the desired position. r n Figure 1: Engine oil 'Full' mark NOTE: If the... Adjustment 1. Operation Before Starting Make the following checks and perform the service required before standing the machine on its rear bumper. 10 www.snapper.com fo tio 4. If the u blade pedals are in the filler neck. • Empty the fuel tank before each start-up ...
...and securely tightened. 3. Add fuel to the fuel tank after pushing the Rear Engine R Rider outside where fumes can be necessary to the engine manual for fuel specifications. Refer Figure 3: Operator seat adjustment to the desired position. r n Figure 1: Engine oil 'Full' mark NOTE: If the... Adjustment 1. Operation Before Starting Make the following checks and perform the service required before standing the machine on its rear bumper. 10 www.snapper.com fo tio 4. If the u blade pedals are in the filler neck. • Empty the fuel tank before each start-up ...
Operater's Manual
Page 12
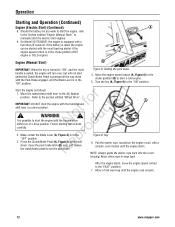
..., the engine can be too weak to start the engine, refer to the Section entitled "Engine (Manual Start)" to manually start the electric start the engine with a smooth, even motion until the engine runs smooth. 12 www.snapper.com ro 2. A Figure 9: Key 6. After the engine starts, move the park brake latch (B) over , but...
..., the engine can be too weak to start the engine, refer to the Section entitled "Engine (Manual Start)" to manually start the electric start the engine with a smooth, even motion until the engine runs smooth. 12 www.snapper.com ro 2. A Figure 9: Key 6. After the engine starts, move the park brake latch (B) over , but...

Operater's Manual
Page 18
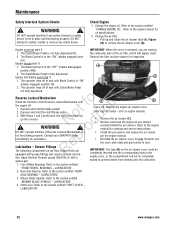
...from plug. Check the blade for straightness. Change the oil filter on engines equipped with a dual element air cleaner. the Engine Manual for a particular Rear Engine 5. the correct part or information for recommended service procedures. For to repairs with the engine running. ... model and serial number. Dispose of the oil drain (Figure 19). Refer to the engine manual for proper blade inspection and service procedures. Refer to the engine manual for parts and service assistance. Stop filling the tank when fuel collects in the filler neck...
...from plug. Check the blade for straightness. Change the oil filter on engines equipped with a dual element air cleaner. the Engine Manual for a particular Rear Engine 5. the correct part or information for recommended service procedures. For to repairs with the engine running. ... model and serial number. Dispose of the oil drain (Figure 19). Refer to the engine manual for proper blade inspection and service procedures. Refer to the engine manual for parts and service assistance. Stop filling the tank when fuel collects in the filler neck...
Operater's Manual
Page 20
...of the Reverse Lockout Mechanism with the engine off of seat with grease fittings and require periodic lubrica- N d ! Contact your SNAPPER dealer immediately for inspection. refer to the section entitled "CHANGE ENGINE OIL". Front Wheel Bearings. Shift Lever. Maintenance Safety Interlock ...the Rear Engine Rider are viewing 1. Apply General Purpose grease (NLGI No.2) with Blade Control in the tion. sealed to the engine manual for oil specifications. 2. Refer to the section entitled "REAR AXLE BEARING - Refer to the section entitled "FRONT WHEEL BEARINGS - ...
...of the Reverse Lockout Mechanism with the engine off of seat with grease fittings and require periodic lubrica- N d ! Contact your SNAPPER dealer immediately for inspection. refer to the section entitled "CHANGE ENGINE OIL". Front Wheel Bearings. Shift Lever. Maintenance Safety Interlock ...the Rear Engine Rider are viewing 1. Apply General Purpose grease (NLGI No.2) with Blade Control in the tion. sealed to the engine manual for oil specifications. 2. Refer to the section entitled "REAR AXLE BEARING - Refer to the section entitled "FRONT WHEEL BEARINGS - ...
Operater's Manual
Page 22
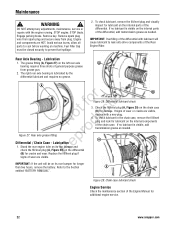
... rear axle bearing is visible, add transmission grease as needed . Figure 29: Chain case lubricant check Engine Service Check the maintenance section of the Engine Manual for lubricant on its rear bumper and check the fill/level plug (A, Figure 28) on the internal components of general purpose grease from plug. If... spark plug and secure away from grease gun. 2. To check lubricant, remove the fill/level plug and visually inspect for additional engine service. 22 www.snapper.com
... rear axle bearing is visible, add transmission grease as needed . Figure 29: Chain case lubricant check Engine Service Check the maintenance section of the Engine Manual for lubricant on its rear bumper and check the fill/level plug (A, Figure 28) on the internal components of general purpose grease from plug. If... spark plug and secure away from grease gun. 2. To check lubricant, remove the fill/level plug and visually inspect for additional engine service. 22 www.snapper.com

Operater's Manual
Page 23
... the engine runs r n out of the Rear Engine Rider should be stored on its rear bumper. Stop filling the tank when B fuel collects in this manual. WARNING In addition to remain clean during storage. 5. Drain the fuel from the fuel fo tio filter (A). 4. Remove the hose clamps (B, Figure 30) from the...
... the engine runs r n out of the Rear Engine Rider should be stored on its rear bumper. Stop filling the tank when B fuel collects in this manual. WARNING In addition to remain clean during storage. 5. Drain the fuel from the fuel fo tio filter (A). 4. Remove the hose clamps (B, Figure 30) from the...
Operater's Manual
Page 24
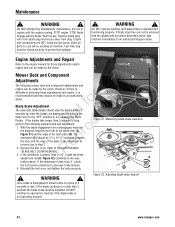
... Engine and components are disengaged by moving the o blade lever to step 2. Fuel Filler Cap must be closed securely to the engine manual for those adjustments and/or A repairs that these adjustments and repairs, it should come to a stop , N d perform the following... brake tension. 4. Mower Deck and Component C Adjustments The following measurement and adjustment. 1. Figure 32: Adjusting blade brake tension 24 www.snapper.com WARNING ! If the blades take machine immediately to 3-1/4" clearance between the front of the blade lever (A, r Figure 31) and the...
... Engine and components are disengaged by moving the o blade lever to step 2. Fuel Filler Cap must be closed securely to the engine manual for those adjustments and/or A repairs that these adjustments and repairs, it should come to a stop , N d perform the following... brake tension. 4. Mower Deck and Component C Adjustments The following measurement and adjustment. 1. Figure 32: Adjusting blade brake tension 24 www.snapper.com WARNING ! If the blades take machine immediately to 3-1/4" clearance between the front of the blade lever (A, r Figure 31) and the...
Operater's Manual
Page 34
...warranties, including those of purchase receipt. Liability for the fo tio period of non-Briggs and Stratton engines is defective in the Operator's Manual. "Consumer use" means personal residential household use by improper use of the Briggs and Stratton engine* (if equipped) that conforms to... are handled routinely, but sometimes requests for repair or replacement under this product is not covered by the engine manufacturer. 34 www.snapper.com Some states or countries do not provide proof of a part or the equipment. Warranty service is no other uses, including use...
...warranties, including those of purchase receipt. Liability for the fo tio period of non-Briggs and Stratton engines is defective in the Operator's Manual. "Consumer use" means personal residential household use by improper use of the Briggs and Stratton engine* (if equipped) that conforms to... are handled routinely, but sometimes requests for repair or replacement under this product is not covered by the engine manufacturer. 34 www.snapper.com Some states or countries do not provide proof of a part or the equipment. Warranty service is no other uses, including use...


