Operater's Manual
Page 3
... Contents Operator Safety 4 Features and Controls 9 Operation 10 Before Starting 10 Operator Seat Adjustment 10 Starting Engine 11 Engaging Mower Blade 13 Engaging Wheel Drive 13 Stopping Engine, Wheel Drive, Blade 14 Setting Park Brake 15 Cutting Height Adjustment 15 Reverse... Chart 17 r n General Maintenance 18 Storage 23 fo tio Engine Adjustments and Repairs 24 Mower Deck and Component Adjustments 24 Rear Engine Rider Drive Components 27 t c Mower Blade Replacement 28 o Mower Drive Belt Replacement 29 u Battery 30 N d Troubleshooting 32 ro Warranty 34 Rep Slope Guide...
... Contents Operator Safety 4 Features and Controls 9 Operation 10 Before Starting 10 Operator Seat Adjustment 10 Starting Engine 11 Engaging Mower Blade 13 Engaging Wheel Drive 13 Stopping Engine, Wheel Drive, Blade 14 Setting Park Brake 15 Cutting Height Adjustment 15 Reverse... Chart 17 r n General Maintenance 18 Storage 23 fo tio Engine Adjustments and Repairs 24 Mower Deck and Component Adjustments 24 Rear Engine Rider Drive Components 27 t c Mower Blade Replacement 28 o Mower Drive Belt Replacement 29 u Battery 30 N d Troubleshooting 32 ro Warranty 34 Rep Slope Guide...
Operater's Manual
Page 5
... it on clothing, change clothing immediate- STOP BLADES and ENGINE and make sure blades have a dust mask, long pants and substantial footwear. mower to STOP blades and engine quickly in prepa- ground. 13. Use only an approved fuel container. p 6. If this is in daylight ... components frequently for emergencies. 6. DO NOT refuel the machine indoors. 5. When towing, travel slowly and allow extra distance to prevent neath deck. Only use extreme fo tio care in contact with the rim of ignition. 2. Keep clear 7. Start engine from rotating blades under- Make...
... it on clothing, change clothing immediate- STOP BLADES and ENGINE and make sure blades have a dust mask, long pants and substantial footwear. mower to STOP blades and engine quickly in prepa- ground. 13. Use only an approved fuel container. p 6. If this is in daylight ... components frequently for emergencies. 6. DO NOT refuel the machine indoors. 5. When towing, travel slowly and allow extra distance to prevent neath deck. Only use extreme fo tio care in contact with the rim of ignition. 2. Keep clear 7. Start engine from rotating blades under- Make...
Operater's Manual
Page 7
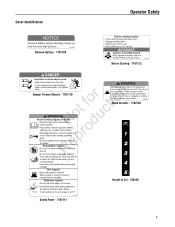
WARNING • Do not operate mower unless discharge chute or entire grass catcher is in its proper place. 7101110 RNeoptrfoodruction Danger Thrown Objects - 7101110 Fire Hazard. A spark arrestor may ...dry vegetation. Decal Identification Operator Safety Remove Battery - 7101109 Before Starting - 7101112 Amputation and thrown objects hazard • Keep hands and feet away from deck. The operator should contact local fire agencies for laws or regulations relating to fire prevention requirements. 7102746 Spark Arrestor - 7102746 7103440 Safety Panel - 7101111 Height...
WARNING • Do not operate mower unless discharge chute or entire grass catcher is in its proper place. 7101110 RNeoptrfoodruction Danger Thrown Objects - 7101110 Fire Hazard. A spark arrestor may ...dry vegetation. Decal Identification Operator Safety Remove Battery - 7101109 Before Starting - 7101112 Amputation and thrown objects hazard • Keep hands and feet away from deck. The operator should contact local fire agencies for laws or regulations relating to fire prevention requirements. 7102746 Spark Arrestor - 7102746 7103440 Safety Panel - 7101111 Height...
Operater's Manual
Page 17
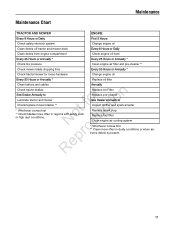
... Every 8 Hours or Daily First 5 Hours Check safety interlock system Change engine oil Clean debris off tractor and mower deck Every 8 Hours or Daily Clean debris from engine compartment Check engine oil level Every 25 Hours or Annually * Every 25 Hours or Annually *... Check tire pressure Clean engine air filter and pre-cleaner ** Check mower blade stopping time Every 50 Hours or Annually * Check tractor/mower for loose hardware Change engine oil Every 50 Hours or Annually * Replace oil filter Clean battery and cables Annually Check...
... Every 8 Hours or Daily First 5 Hours Check safety interlock system Change engine oil Clean debris off tractor and mower deck Every 8 Hours or Daily Clean debris from engine compartment Check engine oil level Every 25 Hours or Annually * Every 25 Hours or Annually *... Check tire pressure Clean engine air filter and pre-cleaner ** Check mower blade stopping time Every 50 Hours or Annually * Check tractor/mower for loose hardware Change engine oil Every 50 Hours or Annually * Replace oil filter Clean battery and cables Annually Check...

Operater's Manual
Page 19
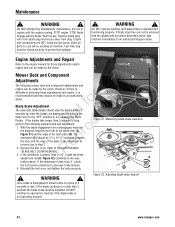
...the section entitled "SERVICE BRAKE - A Check the Blade Drive Belt The blade drive consists of Figure 22: Measuring the belt spacing the mower deck. WARNING ! Clear area of deterioration and proper ten- DO NOT operate machine until blade brake has been adjusted and functioning properly. be ... to the section entitled to the "ON" position and depress the blade pedals. 5. 28" and 30" Decks *: Measure the belt spacing at the R idler pulley (A, Figure 22). SNAPPER dealer for assistance. * IMPORTANT: The blade drive belt on machine. If the belt becomes worn or slack ...
...the section entitled "SERVICE BRAKE - A Check the Blade Drive Belt The blade drive consists of Figure 22: Measuring the belt spacing the mower deck. WARNING ! Clear area of deterioration and proper ten- DO NOT operate machine until blade brake has been adjusted and functioning properly. be ... to the section entitled to the "ON" position and depress the blade pedals. 5. 28" and 30" Decks *: Measure the belt spacing at the R idler pulley (A, Figure 22). SNAPPER dealer for assistance. * IMPORTANT: The blade drive belt on machine. If the belt becomes worn or slack ...

Operater's Manual
Page 21
... shots of general purpose grease, from plug. Avoid serious burns, allow all grass clippings fo tio and debris. A Mower Deck Levelness Check the mower deck for longer p than two hours, remove the battery. r n 5. LEVELNESS". Follow the WARNING statement found on the...gun. Maintenance ! STOP blade. Adjust as required. Lubrication bumper. (See statement below .) 3. Clean the underside of the mower deck, removing all mower deck linkage pivot points with N d three shots of grass clippings and debris. A Figure 25: Front wheel grease fitting Shift Lever...
... shots of general purpose grease, from plug. Avoid serious burns, allow all grass clippings fo tio and debris. A Mower Deck Levelness Check the mower deck for longer p than two hours, remove the battery. r n 5. LEVELNESS". Follow the WARNING statement found on the...gun. Maintenance ! STOP blade. Adjust as required. Lubrication bumper. (See statement below .) 3. Clean the underside of the mower deck, removing all mower deck linkage pivot points with N d three shots of grass clippings and debris. A Figure 25: Front wheel grease fitting Shift Lever...

Operater's Manual
Page 23
... lever and detent. 4. Install a new fuel filter. WARNING In addition to regular maintenance, the following procedures to run until the engine runs r n out of fuel. Mower deck linkage and pivot areas. Remove the fuel lines from the fuel fo tio filter (A). 4. t c 6. components of storage. Refer to remain clean during storage. 5. STOP engine...
... lever and detent. 4. Install a new fuel filter. WARNING In addition to regular maintenance, the following procedures to run until the engine runs r n out of fuel. Mower deck linkage and pivot areas. Remove the fuel lines from the fuel fo tio filter (A). 4. t c 6. components of storage. Refer to remain clean during storage. 5. STOP engine...
Operater's Manual
Page 24
...above, take longer than 3", rotate the nut counter-clockwise to increase + brake tension. Figure 32: Adjusting blade brake tension 24 www.snapper.com Maintenance ! Engage parking brake. However, if there is difficulty in 3 seconds or less. The dimension (C) should be closed securely ... plug and secure away from plug. WARNING ! If blade stop , N d perform the following mower deck and component adjustments and repairs can not be made by the owner. Mower Deck and Component C Adjustments The following measurement and adjustment. 1. Remove the belt cover. Once blade is...
...above, take longer than 3", rotate the nut counter-clockwise to increase + brake tension. Figure 32: Adjusting blade brake tension 24 www.snapper.com Maintenance ! Engage parking brake. However, if there is difficulty in 3 seconds or less. The dimension (C) should be closed securely ... plug and secure away from plug. WARNING ! If blade stop , N d perform the following mower deck and component adjustments and repairs can not be made by the owner. Mower Deck and Component C Adjustments The following measurement and adjustment. 1. Remove the belt cover. Once blade is...

Operater's Manual
Page 25
... attempt any adjustments, maintenance, service or repairs with adjustment. The distance should be the same, or the Mower Deck Adjustment (Side-To-Side Levelness) Before making deck leveling adjustments, check the tire rear 1/8" to -rear) 25 Move the lift arm (C) up or down... Front Floor X Rear X-1/8" (28, 33") X+1/8" (30") B B A C C Figure 33: Adjusting deck levelness (side-to-side) (View of left N d side of machine) D A Figure 34: Adjusting the mower deck (front-to 1/4" lower than the front, proceed with the engine running. ceed to check front to -Rear ...
... attempt any adjustments, maintenance, service or repairs with adjustment. The distance should be the same, or the Mower Deck Adjustment (Side-To-Side Levelness) Before making deck leveling adjustments, check the tire rear 1/8" to -rear) 25 Move the lift arm (C) up or down... Front Floor X Rear X-1/8" (28, 33") X+1/8" (30") B B A C C Figure 33: Adjusting deck levelness (side-to-side) (View of left N d side of machine) D A Figure 34: Adjusting the mower deck (front-to 1/4" lower than the front, proceed with the engine running. ceed to check front to -Rear ...

Operater's Manual
Page 26
... the parking brake and allow all parts to the section entitled "CHECK MOWER DRIVE BELT". Refer to remain in the third position (middle notch). Engine and components are HOT. Engage parking brake. IMPORTANT: The SNAPPER Rear Engine Rider Models with 33" decks do not require belt tension adjustment. r n B Not foductio A ro Figure 35...
... the parking brake and allow all parts to the section entitled "CHECK MOWER DRIVE BELT". Refer to remain in the third position (middle notch). Engine and components are HOT. Engage parking brake. IMPORTANT: The SNAPPER Rear Engine Rider Models with 33" decks do not require belt tension adjustment. r n B Not foductio A ro Figure 35...

Operater's Manual
Page 29
... the fuel tank before working on its rear bumper. 29 Tighten the idler pulley bolt securely. 10. Check the mower drive belt tension and adjust if necessary (28" & 30" decks only). Make sure the belt is inside the spindle belt guide (D) and the idler belt guide (B). Remove spark plug... wire from spark plug and secure away from plug. Reinstall the mower drive belt cover. Mower Drive Belt Replacement Inspect the mower drive belt as shown. ...
... the fuel tank before working on its rear bumper. 29 Tighten the idler pulley bolt securely. 10. Check the mower drive belt tension and adjust if necessary (28" & 30" decks only). Make sure the belt is inside the spindle belt guide (D) and the idler belt guide (B). Remove spark plug... wire from spark plug and secure away from plug. Reinstall the mower drive belt cover. Mower Drive Belt Replacement Inspect the mower drive belt as shown. ...

Operater's Manual
Page 33
... Not Move Or Loss of grass clippings and debris under deck. Rubber drive disc is dry. 4. Tapered axle bolt and nut missing. 4. Axle bearing seized. 5. Move lever to a slower speed. 3. Uneven tire pressure. 2. Mower belt slipping. t c 3. Grass is dull, worn or... Terraced cut, side to rear. 7. Adjust tension or replace mower belt. 1. Replace drive disc. 2. Sharpen or replace cutting blade. 1. Excessive deck pitch, front to side. 6. fo tio 1. Mow when grass is not tracking properly on deck. Verify plugs are not cracked & are in the "OFF...
... Not Move Or Loss of grass clippings and debris under deck. Rubber drive disc is dry. 4. Tapered axle bolt and nut missing. 4. Axle bearing seized. 5. Move lever to a slower speed. 3. Uneven tire pressure. 2. Mower belt slipping. t c 3. Grass is dull, worn or... Terraced cut, side to rear. 7. Adjust tension or replace mower belt. 1. Replace drive disc. 2. Sharpen or replace cutting blade. 1. Excessive deck pitch, front to side. 6. fo tio 1. Mow when grass is not tracking properly on deck. Verify plugs are not cracked & are in the "OFF...
Operater's Manual
Page 36
...- Torque values are placed, the gas engine may substitute an engine of engine components (air cleaner, exhaust, charg- REAR ENGINE RIDING MOWER SERIES 24 Product Specifications 2811524BV 2812524BVE 3014524BVE 3317524BVE Deck Size (inches) 28 28 30 33 Height of Cut (inches) 1.5 - 4.0 1.5 - 4.0 1.5 - 4.0 1.5 - 4.0 ...30") r Cutting Deck Belt (33") 7104196 7026565 7034168 7022252 7043844 5-Spd Disc 1.0-4.6 / 0-1.9 17.5 502 7 ep Power Rating R The gross power rating for this Series engine. This differ- tude), and engine-to -engine variability. www.snapper.com out these ...
...- Torque values are placed, the gas engine may substitute an engine of engine components (air cleaner, exhaust, charg- REAR ENGINE RIDING MOWER SERIES 24 Product Specifications 2811524BV 2812524BVE 3014524BVE 3317524BVE Deck Size (inches) 28 28 30 33 Height of Cut (inches) 1.5 - 4.0 1.5 - 4.0 1.5 - 4.0 1.5 - 4.0 ...30") r Cutting Deck Belt (33") 7104196 7026565 7034168 7022252 7043844 5-Spd Disc 1.0-4.6 / 0-1.9 17.5 502 7 ep Power Rating R The gross power rating for this Series engine. This differ- tude), and engine-to -engine variability. www.snapper.com out these ...


