Operater's Manual
Page 4
... or tires lose traction, turn over by blade or interfere with a grass catcher. ro Protection against Tipovers Tragic accidents can cause injury and damage! R Use extra care with engine running. Know the controls and the proper use of -control and tip- mower safely enough to loss-of the machine before and while backing. Turn blades OFF when traveling 4. Fuels are functioning properly. 12. Use a slow speed and...
... or tires lose traction, turn over by blade or interfere with a grass catcher. ro Protection against Tipovers Tragic accidents can cause injury and damage! R Use extra care with engine running. Know the controls and the proper use of -control and tip- mower safely enough to loss-of the machine before and while backing. Turn blades OFF when traveling 4. Fuels are functioning properly. 12. Use a slow speed and...
Operater's Manual
Page 5
... fill fuel containers inside where o there is extremely flammable and the vapors are OFF and parking brake is in handling gasoline. Always place the contain- e ers on a truck or trailer bed with attachment instructions. 14. If this is complete. DO NOT point discharge at all cigarettes, cigars, pipes and other safety devices frequently for proper operation and engine, STOP blades, SET brake, and Remove key before removing grass catcher...
... fill fuel containers inside where o there is extremely flammable and the vapors are OFF and parking brake is in handling gasoline. Always place the contain- e ers on a truck or trailer bed with attachment instructions. 14. If this is complete. DO NOT point discharge at all cigarettes, cigars, pipes and other safety devices frequently for proper operation and engine, STOP blades, SET brake, and Remove key before removing grass catcher...
Operater's Manual
Page 6
... parts when making repairs. 6 www.snapper.com limits for weight less and deadly poison. DO NOT change engine governor speed settings or fumes may cause cause injury. Lubricate machine at least once a year and have the dealer install any new safety devices. 15. Mower blades are in proper position. 13. Wrap the blades in a water heater, furnace, clothes dryer or other gas appli- 11. When draining fuel tank, drain fuel...
... parts when making repairs. 6 www.snapper.com limits for weight less and deadly poison. DO NOT change engine governor speed settings or fumes may cause cause injury. Lubricate machine at least once a year and have the dealer install any new safety devices. 15. Mower blades are in proper position. 13. Wrap the blades in a water heater, furnace, clothes dryer or other gas appli- 11. When draining fuel tank, drain fuel...
Operater's Manual
Page 10
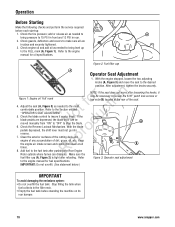
... service required before standing the machine on its rear bumper. 10 www.snapper.com Figure 2: Fuel filler cap A Operator Seat Adjustment 1. Clean the exterior surfaces of the cutting deck and p engine of any accumulation of the seat. Refer to make sure all e times. 8. Keep the engine air intake screen and cooling fins clear at the rear of dirt, grass, oil, etc. Check guards, deflectors and covers to the engine manual for fuel specifications. With the engine...
... service required before standing the machine on its rear bumper. 10 www.snapper.com Figure 2: Fuel filler cap A Operator Seat Adjustment 1. Clean the exterior surfaces of the cutting deck and p engine of any accumulation of the seat. Refer to make sure all e times. 8. Keep the engine air intake screen and cooling fins clear at the rear of dirt, grass, oil, etc. Check guards, deflectors and covers to the engine manual for fuel specifications. With the engine...
Operater's Manual
Page 12
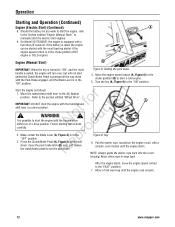
... way down , move the engine speed control to manually start the electric start unless the Clutch/Brake Pedal is in the choke position (HOT engine or COLD engine). A Figure 9: Key 6. Pull the starter rope, located on the engine recoil, with the Park Brake engaged, and the Blade Lever is pressed all the way e down with a smooth, even motion until the engine runs smooth. 12 www.snapper.com NOTE: Always guide the starter rope back into the recoil housing.
... way down , move the engine speed control to manually start the electric start unless the Clutch/Brake Pedal is in the choke position (HOT engine or COLD engine). A Figure 9: Key 6. Pull the starter rope, located on the engine recoil, with the Park Brake engaged, and the Blade Lever is pressed all the way e down with a smooth, even motion until the engine runs smooth. 12 www.snapper.com NOTE: Always guide the starter rope back into the recoil housing.
Operater's Manual
Page 14
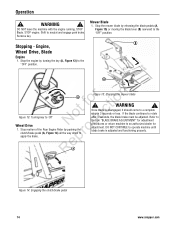
... machine with the engine running. Stop the engine by turning the key (A, Figure 13) to operate machine until blade brake is disengaged, it should come to neutral and engage park brake. WARNING ! Stop the mower blade by pushing the o clutch/brake pedal (A, Figure 14) all the way down to the "OFF" position. RepA Figure 14: Engaging the clutch/brake pedal 14 www.snapper.com Stop motion of the Rear Engine Rider by releasing...
... machine with the engine running. Stop the engine by turning the key (A, Figure 13) to operate machine until blade brake is disengaged, it should come to neutral and engage park brake. WARNING ! Stop the mower blade by pushing the o clutch/brake pedal (A, Figure 14) all the way down to the "OFF" position. RepA Figure 14: Engaging the clutch/brake pedal 14 www.snapper.com Stop motion of the Rear Engine Rider by releasing...

Operater's Manual
Page 18
... "MOWER BLADE REPLACEMENT" for oil specifications. 7. Both DO NOT attempt any oil that shows signs of the blade mounting bolts (A, Figure Introduction 20). STOP blade. lbs. 4. DANGER ! Engine Rider. DO NOT use a cutting blade that may have spilled. Loosen or remove the oil fill cap on the rear bumper. (See statement below.) 3. N d A wear or damage on engines equipped with oil filters at every oil change. Remove spark plug wire from spark plug and secure away from plug. Fuel Filler Cap must...
... "MOWER BLADE REPLACEMENT" for oil specifications. 7. Both DO NOT attempt any oil that shows signs of the blade mounting bolts (A, Figure Introduction 20). STOP blade. lbs. 4. DANGER ! Engine Rider. DO NOT use a cutting blade that may have spilled. Loosen or remove the oil fill cap on the rear bumper. (See statement below.) 3. N d A wear or damage on engines equipped with oil filters at every oil change. Remove spark plug wire from spark plug and secure away from plug. Fuel Filler Cap must...

Operater's Manual
Page 19
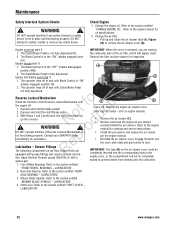
...: Removing the drive belt cover r 4. Engage parking brake. Only operate blades when seated in 3 seconds or less after releasing the blade pedals. ! If the measurement is 2. Service Brake / Park Brake 1. The blade should come to the lowest setting. 2. PARK BRAKE ADJUSTMENT". 19 Refer to prevent fuel spillage. Remove spark plug wire from spark plug and secure away from the engine to the 3rd height of loose parts & tools first. DO NOT operate machine until blade brake has been adjusted and functioning properly. Fuel Filler Cap must be replaced. Blade Brake 1. Check...
...: Removing the drive belt cover r 4. Engage parking brake. Only operate blades when seated in 3 seconds or less after releasing the blade pedals. ! If the measurement is 2. Service Brake / Park Brake 1. The blade should come to the lowest setting. 2. PARK BRAKE ADJUSTMENT". 19 Refer to prevent fuel spillage. Remove spark plug wire from spark plug and secure away from the engine to the 3rd height of loose parts & tools first. DO NOT operate machine until blade brake has been adjusted and functioning properly. Fuel Filler Cap must be replaced. Blade Brake 1. Check...
Operater's Manual
Page 20
... properly. Remove the filter and pre-cleaner for oil specifications. 2. Engine and blades must not start if: 1. r n Reverse Lockout Mechanism fo tio Check the function of seat with Clutch/Brake Pedal not fully depressed. Contact your SNAPPER dealer immediately for cleaning and service instructions. • Install the pre-cleaner and replace the air cleaner per the engine manual. • Reinstall the air cleaner cover. refer to the section entitled "FRONT WHEEL BEARINGS - Apply...
... properly. Remove the filter and pre-cleaner for oil specifications. 2. Engine and blades must not start if: 1. r n Reverse Lockout Mechanism fo tio Check the function of seat with Clutch/Brake Pedal not fully depressed. Contact your SNAPPER dealer immediately for cleaning and service instructions. • Install the pre-cleaner and replace the air cleaner per the engine manual. • Reinstall the air cleaner cover. refer to the section entitled "FRONT WHEEL BEARINGS - Apply...

Operater's Manual
Page 21
... the shift lever grease fitting (A, Figure 26) with the engine running. Clean the underside of general purpose grease from plug. Carefully stand the Rear Engine Rider on this page. 2. A Figure 25: Front wheel grease fitting Shift Lever - STOP engine. DO NOT attempt any adjustments, maintenance, service or repairs with two shots of the mower deck, removing all grass clippings fo tio and debris. STOP blade. Refer to the section entitled "MOWER DECK ADJUSTMENT - Remove key. Mower Deck Linkage - Adjust as required. Mower Blade Spindle -
... the shift lever grease fitting (A, Figure 26) with the engine running. Clean the underside of general purpose grease from plug. Carefully stand the Rear Engine Rider on this page. 2. A Figure 25: Front wheel grease fitting Shift Lever - STOP engine. DO NOT attempt any adjustments, maintenance, service or repairs with two shots of the mower deck, removing all grass clippings fo tio and debris. STOP blade. Refer to the section entitled "MOWER DECK ADJUSTMENT - Remove key. Mower Deck Linkage - Adjust as required. Mower Blade Spindle -

Operater's Manual
Page 23
... the fuel tank. Check both front wheel king pins. 3. Clutch yoke. 6. Thoroughly clean the Rear Engine Rider by removing all maintenance as required. 3. Remove the hose clamps (B, Figure 30) from the fuel tank. 2. Remove and store the battery. Engage parking brake. Fuel Filler Cap must be closed securely to the Section entitled "BATTERY STORAGE". 6. Storage (Out of fuel. Drain the fuel from the fuel fo tio filter (A). 4. Stop filling the tank when B fuel collects in this manual. STOP engine. Mower deck linkage...
... the fuel tank. Check both front wheel king pins. 3. Clutch yoke. 6. Thoroughly clean the Rear Engine Rider by removing all maintenance as required. 3. Remove the hose clamps (B, Figure 30) from the fuel tank. 2. Remove and store the battery. Engage parking brake. Fuel Filler Cap must be closed securely to the Section entitled "BATTERY STORAGE". 6. Storage (Out of fuel. Drain the fuel from the fuel fo tio filter (A). 4. Stop filling the tank when B fuel collects in this manual. STOP engine. Mower deck linkage...
Operater's Manual
Page 24
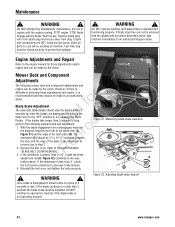
... plate (B). Remove the belt cover. WARNING ! DO NOT attempt any adjustments, maintenance, service or repairs with the adjustment procedure described above, take longer than 3 seconds to a stop the blades within 3 t c seconds any time the blades are HOT. If blade stop , N d perform the following mower deck and component adjustments and repairs can not be made by the owner. Reinstall the belt cover and tighten the bolts securely. Engage parking brake. Engine and components are disengaged by...
... plate (B). Remove the belt cover. WARNING ! DO NOT attempt any adjustments, maintenance, service or repairs with the adjustment procedure described above, take longer than 3 seconds to a stop the blades within 3 t c seconds any time the blades are HOT. If blade stop , N d perform the following mower deck and component adjustments and repairs can not be made by the owner. Reinstall the belt cover and tighten the bolts securely. Engage parking brake. Engine and components are disengaged by...

Operater's Manual
Page 25
... level surface. Loosen the hardware (A, Figure 33) that retains the left lift arm from the blade tips to -Rear Engage parking brake. Tighten the hardware loosened in the support brackets (D). Recheck both sides of the deck. Reinstall the rear hanger chains and measure the blade tips again. 4. Mower Deck Adjustment (Front-to the floor. Remove spark plug wire from spark plug and secure away from the plug. 3. Place the Rider on machine. Turn the engine...
... level surface. Loosen the hardware (A, Figure 33) that retains the left lift arm from the blade tips to -Rear Engage parking brake. Tighten the hardware loosened in the support brackets (D). Recheck both sides of the deck. Reinstall the rear hanger chains and measure the blade tips again. 4. Mower Deck Adjustment (Front-to the floor. Remove spark plug wire from spark plug and secure away from the plug. 3. Place the Rider on machine. Turn the engine...

Operater's Manual
Page 26
... 33" decks do not require belt tension adjustment. Remove key. B A Mower Drive Belt Adjustment (For 28" & 30" Decks Only) 1. Measure the belt spacing (B, Figure 35) between the idler pulley and belt. If the cable does not have approximately 3/16" of slack. C (B) to the section entitled "CHECK MOWER DRIVE BELT". B Retighten the hardware that anchors the front frame assembly 5. Figure 37: Clutch/brake cable adjustment 26 www.snapper.com Maintenance ! STOP engine. IMPORTANT: The SNAPPER Rear Engine Rider Models with the blade lever "ON...
... 33" decks do not require belt tension adjustment. Remove key. B A Mower Drive Belt Adjustment (For 28" & 30" Decks Only) 1. Measure the belt spacing (B, Figure 35) between the idler pulley and belt. If the cable does not have approximately 3/16" of slack. C (B) to the section entitled "CHECK MOWER DRIVE BELT". B Retighten the hardware that anchors the front frame assembly 5. Figure 37: Clutch/brake cable adjustment 26 www.snapper.com Maintenance ! STOP engine. IMPORTANT: The SNAPPER Rear Engine Rider Models with the blade lever "ON...

Operater's Manual
Page 27
... tighten the cable jam-nuts. 8. Remove key. Hold the clutch/brake cable (B) to obtain a distance of 3/4" between the end of the clutch/brake cable (B) and the bottom of the housing. 7. Figure 38: Setting the park brake IMPORTANT A To avoid damaging the emissions system: • Do not overfill the fuel tank. STOP engine. STOP blade. NOTE: The cotter pin, brake spring, and clutch yoke (D, E, and F, Figure 39) are HOT. Retest the wheel brake. Maintenance ! Fuel Filler Cap...
... tighten the cable jam-nuts. 8. Remove key. Hold the clutch/brake cable (B) to obtain a distance of 3/4" between the end of the clutch/brake cable (B) and the bottom of the housing. 7. Figure 38: Setting the park brake IMPORTANT A To avoid damaging the emissions system: • Do not overfill the fuel tank. STOP engine. STOP blade. NOTE: The cotter pin, brake spring, and clutch yoke (D, E, and F, Figure 39) are HOT. Retest the wheel brake. Maintenance ! Fuel Filler Cap...
Operater's Manual
Page 28
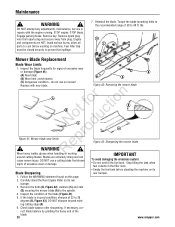
... engine. Engage parking brake. Remove key. Fuel Filler Cap must be closed securely to the spindle. 4. D C Mower Blade Replacement Blade Wear Limits 1. Replace with the engine running. WARNING ! Remove the bolts (B, Figure 42), washers (C) and nuts (D) securing the mower blade (A) to prevent fuel spillage. 7. ing cutting edge (A). 6. Check blade balance after sharpening. DO NOT attempt any adjustments, maintenance, service or repairs with new blade. Avoid serious burns, allow all parts to the recommended range of the blade. 28 www.snapper.com Reinstall the blade...
... engine. Engage parking brake. Remove key. Fuel Filler Cap must be closed securely to the spindle. 4. D C Mower Blade Replacement Blade Wear Limits 1. Replace with the engine running. WARNING ! Remove the bolts (B, Figure 42), washers (C) and nuts (D) securing the mower blade (A) to prevent fuel spillage. 7. ing cutting edge (A). 6. Check blade balance after sharpening. DO NOT attempt any adjustments, maintenance, service or repairs with new blade. Avoid serious burns, allow all parts to the recommended range of the blade. 28 www.snapper.com Reinstall the blade...

Operater's Manual
Page 29
... ! Engage parking brake. Mower Drive Belt Replacement Inspect the mower drive belt as shown. Remove the mower drive belt cover. Refer to the engine pulley (A). Route the new belt through the engine belt guide (B, t c Figure 44) up to the section entitled "DRIVE BELT COVER REMOVAL". 2. Rotate the clutch yoke (F, Figure 39) out with the engine running. Route the belt as described in the filler neck. • Empty the fuel tank before working on machine. Remove spark plug wire from spark plug and secure away from plug. Avoid serious burns, allow 1/16" belt...
... ! Engage parking brake. Mower Drive Belt Replacement Inspect the mower drive belt as shown. Remove the mower drive belt cover. Refer to the engine pulley (A). Route the new belt through the engine belt guide (B, t c Figure 44) up to the section entitled "DRIVE BELT COVER REMOVAL". 2. Rotate the clutch yoke (F, Figure 39) out with the engine running. Route the belt as described in the filler neck. • Empty the fuel tank before working on machine. Remove spark plug wire from spark plug and secure away from plug. Avoid serious burns, allow 1/16" belt...

Operater's Manual
Page 32
..., replace with new battery cables. 11. Replace air lifts. Replace belt. 5. Turn ignition switch to "CHOKE" position. 3. Move choke control to the RUN position. Contact authorized dealer. 5. Electrical wiring harness disconnected or t c broken. 1. r 6. Move choke control to idle. Set throttle control to "SLOW" and allow engine to "OFF" position. 3. Replace pulley. 32 www.snapper.com Fuel tank empty. Spark plug defective or gap set too "FAST". p 7. Fill fuel tank with new 20 AMP fuse. 7. Faulty parking brake, blade or ignition switch...
..., replace with new battery cables. 11. Replace air lifts. Replace belt. 5. Turn ignition switch to "CHOKE" position. 3. Move choke control to the RUN position. Contact authorized dealer. 5. Electrical wiring harness disconnected or t c broken. 1. r 6. Move choke control to idle. Set throttle control to "SLOW" and allow engine to "OFF" position. 3. Replace pulley. 32 www.snapper.com Fuel tank empty. Spark plug defective or gap set too "FAST". p 7. Fill fuel tank with new 20 AMP fuse. 7. Faulty parking brake, blade or ignition switch...

Operater's Manual
Page 33
... of deck. 6. Improper blade installed on drive disc. 3. Leaking engine block. 5. Sharpen cutting edges or replace blade(s). 8. o 1. Adjust front to rear. 7. Contact authorized dealer. 33 Mower belt slipping. 3. Blade engagement lever in chain case or transmission/differential. 1. Contact authorized dealer. 5. Excessively dull, worn or damaged blade(s). Troubleshooting PROBLEM Rider Will Not Move Or Loss of Traction Blade(s) Not Cutting Cutting Grass Improperly Poor Grass Discharge Oil Leaking PROBABLE CAUSE CORRECTIVE ACTION 1. Move throttle control...
... of deck. 6. Improper blade installed on drive disc. 3. Leaking engine block. 5. Sharpen cutting edges or replace blade(s). 8. o 1. Adjust front to rear. 7. Contact authorized dealer. 33 Mower belt slipping. 3. Blade engagement lever in chain case or transmission/differential. 1. Contact authorized dealer. 5. Excessively dull, worn or damaged blade(s). Troubleshooting PROBLEM Rider Will Not Move Or Loss of Traction Blade(s) Not Cutting Cutting Grass Improperly Poor Grass Discharge Oil Leaking PROBABLE CAUSE CORRECTIVE ACTION 1. Move throttle control...
Operater's Manual
Page 34
... Briggs and Stratton engines only. Using the product in e a way not described in the Operator's Manual or using the product after it shall thereafter be used to obtain warranty on the date of abuse such as filters, belts, cutting blades, and brake pads (engine brake pads are covered) are handled routinely, but sometimes requests for being inconvenienced. Warranty is permitted by the first retail consumer or commercial end user...
... Briggs and Stratton engines only. Using the product in e a way not described in the Operator's Manual or using the product after it shall thereafter be used to obtain warranty on the date of abuse such as filters, belts, cutting blades, and brake pads (engine brake pads are covered) are handled routinely, but sometimes requests for being inconvenienced. Warranty is permitted by the first retail consumer or commercial end user...


