Operater's Manual
Page 3
...Safety 4 Features and Controls 9 Operation 10 Before Starting 10 Operator Seat Adjustment 10 Starting Engine 11 Engaging Mower Blade 13 Engaging Wheel Drive 13 Stopping Engine, Wheel Drive, Blade 14 Setting Park Brake 15 Cutting Height Adjustment 15 Reverse Lockout Mechanism 16 Maintenance 17 Maintenance Chart 17 r ...23 fo tio Engine Adjustments and Repairs 24 Mower Deck and Component Adjustments 24 Rear Engine Rider Drive Components 27 t c Mower Blade Replacement 28 o Mower Drive Belt Replacement 29 u Battery 30 N d Troubleshooting 32 ro Warranty 34 Rep Slope Guide 35 !
...Safety 4 Features and Controls 9 Operation 10 Before Starting 10 Operator Seat Adjustment 10 Starting Engine 11 Engaging Mower Blade 13 Engaging Wheel Drive 13 Stopping Engine, Wheel Drive, Blade 14 Setting Park Brake 15 Cutting Height Adjustment 15 Reverse Lockout Mechanism 16 Maintenance 17 Maintenance Chart 17 r ...23 fo tio Engine Adjustments and Repairs 24 Mower Deck and Component Adjustments 24 Rear Engine Rider Drive Components 27 t c Mower Blade Replacement 28 o Mower Drive Belt Replacement 29 u Battery 30 N d Troubleshooting 32 ro Warranty 34 Rep Slope Guide 35 !
Operater's Manual
Page 4
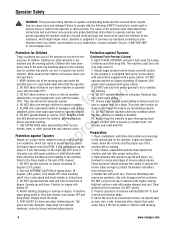
...only responsible adults & teenagers with extra care. Only mature, responsible persons shall operate the machine and only after proper instruction. Turn blades OFF when traveling 4. Use only an approved fuel container. 3. If machine 5. back slowly straight down for holes and other drop...you have been of -control and tip- spilled fuel from serious injury. washouts, culverts, fences and protruding objects. 4 www.snapper.com WARNING: This powerful cutting machine is not alert to operate machine. 6. over given rides in the past may fall and...
...only responsible adults & teenagers with extra care. Only mature, responsible persons shall operate the machine and only after proper instruction. Turn blades OFF when traveling 4. Use only an approved fuel container. 3. If machine 5. back slowly straight down for holes and other drop...you have been of -control and tip- spilled fuel from serious injury. washouts, culverts, fences and protruding objects. 4 www.snapper.com WARNING: This powerful cutting machine is not alert to operate machine. 6. over given rides in the past may fall and...
Operater's Manual
Page 5
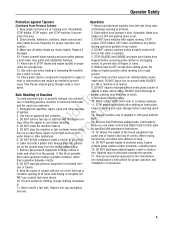
... as specified with the engine run- Remove gas-powered equipment from the vehicle or R trailer and refuel it on ground while BLADES injury from left side. Slow down before resuming operation. 12. Watch out for proper operation and 8. Limit loads to those ... not possible, 8. DO NOT discharge material against Tipovers Operation (Continued From Previous Column) 1. ration for proper operation and engine, STOP blades, SET brake, and Remove key before filling. 7. Check grass catcher components frequently for signs of the fuel tank or container opening at...
... as specified with the engine run- Remove gas-powered equipment from the vehicle or R trailer and refuel it on ground while BLADES injury from left side. Slow down before resuming operation. 12. Watch out for proper operation and 8. Limit loads to those ... not possible, 8. DO NOT discharge material against Tipovers Operation (Continued From Previous Column) 1. ration for proper operation and engine, STOP blades, SET brake, and Remove key before filling. 7. Check grass catcher components frequently for signs of the fuel tank or container opening at...
Operater's Manual
Page 6
... and make adjustments only when engine is stopped. DO NOT change engine governor speed settings or fumes may cause cause injury. Wrap the blades in a water heater, furnace, clothes dryer or other gas appli- 11. Have machine serviced by grounding spark plug next to stop....position. 13. On slopes, the weight of grass, leaves or excess grease to cool before 3. in a well ventilated, unoccupied building. enclosure. Mower blades are in manual to ance. Keep engine free of the towed equipment may reach an open flame. 4. r n tainer outdoors and away from spark...
... and make adjustments only when engine is stopped. DO NOT change engine governor speed settings or fumes may cause cause injury. Wrap the blades in a water heater, furnace, clothes dryer or other gas appli- 11. Have machine serviced by grounding spark plug next to stop....position. 13. On slopes, the weight of grass, leaves or excess grease to cool before 3. in a well ventilated, unoccupied building. enclosure. Mower blades are in manual to ance. Keep engine free of the towed equipment may reach an open flame. 4. r n tainer outdoors and away from spark...
Operater's Manual
Page 9
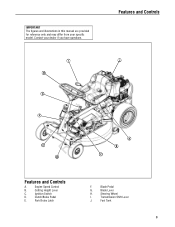
Engine Speed Control B. Blade Pedal G. Blade Lever H. Fuel Tank 9 Ignition Switch D. Clutch/Brake Pedal E. Features and Controls I . IMPORTANT The figures and illustrations in this manual are provided for reference only and may differ from your dealer if you have questions. Transmission Shift Lever J. Steering Wheel I J H G F E RNeopt rfoodr uctiBonA C D Features and Controls A. Contact your specific model. Park Brake Latch F. Cutting Height Lever C.
Engine Speed Control B. Blade Pedal G. Blade Lever H. Fuel Tank 9 Ignition Switch D. Clutch/Brake Pedal E. Features and Controls I . IMPORTANT The figures and illustrations in this manual are provided for reference only and may differ from your dealer if you have questions. Transmission Shift Lever J. Steering Wheel I J H G F E RNeopt rfoodr uctiBonA C D Features and Controls A. Contact your specific model. Park Brake Latch F. Cutting Height Lever C.
Operater's Manual
Page 10
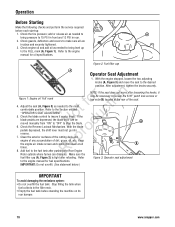
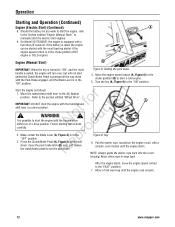
... and perform the service required before standing the machine on its rear bumper. 10 www.snapper.com Check engine oil and add oil as needed to the most comfortable position. Refer to stop the blade. o 5. Check the Reverse Lockout Mechanism. Adjust the seat (A, Figure 3) as needed... it works freely. Refer Figure 3: Operator seat adjustment to the Section entitled t c "OPERATOR'S SEAT ADJUSTMENT". Check the tire pressure; With the blade o pedals depressed, the shift lever must not go into r reverse. 7. add or release air as needed to bring pressure to loosen the 5/16...
... and perform the service required before standing the machine on its rear bumper. 10 www.snapper.com Check engine oil and add oil as needed to the most comfortable position. Refer to stop the blade. o 5. Check the Reverse Lockout Mechanism. Adjust the seat (A, Figure 3) as needed... it works freely. Refer Figure 3: Operator seat adjustment to the Section entitled t c "OPERATOR'S SEAT ADJUSTMENT". Check the tire pressure; With the blade o pedals depressed, the shift lever must not go into r reverse. 7. add or release air as needed to bring pressure to loosen the 5/16...
Operater's Manual
Page 11
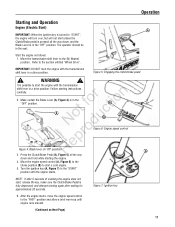
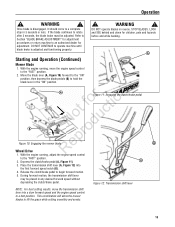
Refer to the (N) Neutral position. r n 2. Not duc A B A Figure 6: Engine speed control Repro Figure 4: Blade lever (in the fo tio "OFF" position. Move the engine speed control (A, Figure 6) to the choke position (B) to start the engine with the transmission shift ... turned to "START", the engine will turn over, but will not start unless the Clutch/Brake pedal is pressed all the way down , and the Blade Lever is in the "OFF" position. After the engine starts, move the engine speed control to the "FAST" position and allow a brief warm-up until...
Refer to the (N) Neutral position. r n 2. Not duc A B A Figure 6: Engine speed control Repro Figure 4: Blade lever (in the fo tio "OFF" position. Move the engine speed control (A, Figure 6) to the choke position (B) to start the engine with the transmission shift ... turned to "START", the engine will turn over, but will not start unless the Clutch/Brake pedal is pressed all the way down , and the Blade Lever is in the "OFF" position. After the engine starts, move the engine speed control to the "FAST" position and allow a brief warm-up until...
Operater's Manual
Page 12
...: DO NOT start the engine with a smooth, even motion until the engine runs smooth. 12 www.snapper.com Turn the key (A, Figure 9) to snap back. Follow starting instructions carefully. Make certain the Blade Lever (A, Figure 4) is in a drive position. After the engine starts, move the park brake latch... engine speed control to start unless the Clutch/Brake Pedal is pressed all the way down with the Park Brake engaged, and the Blade Lever is equipped with a fuel shut-off solenoid. Never allow rope to the "ON" position. Operation Starting and Operation (Continued) Engine (...
...: DO NOT start the engine with a smooth, even motion until the engine runs smooth. 12 www.snapper.com Turn the key (A, Figure 9) to snap back. Follow starting instructions carefully. Make certain the Blade Lever (A, Figure 4) is in a drive position. After the engine starts, move the park brake latch... engine speed control to start unless the Clutch/Brake Pedal is pressed all the way down with the Park Brake engaged, and the Blade Lever is equipped with a fuel shut-off solenoid. Never allow rope to the "ON" position. Operation Starting and Operation (Continued) Engine (...
Operater's Manual
Page 13
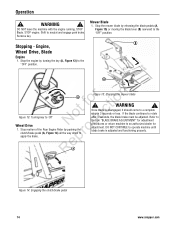
... With the engine running , move the transmission shift lever into the first forward speed notch (B). 4. This combination will allow the mower blades to begin forward motion. 5. Depress the clutch/brake pedal (A, Figure 11). Release the clutch/brake pedal to lift the grass while ...cutting smoothly and evenly. 13 Move the blade lever (A, Figure 10) forward to the "ON" position, then depress the blade pedals (B) to operate machine until blade brake is disengaged, it should come to a fast position. B 3. Place the ...
... With the engine running , move the transmission shift lever into the first forward speed notch (B). 4. This combination will allow the mower blades to begin forward motion. 5. Depress the clutch/brake pedal (A, Figure 11). Release the clutch/brake pedal to lift the grass while ...cutting smoothly and evenly. 13 Move the blade lever (A, Figure 10) forward to the "ON" position, then depress the blade pedals (B) to operate machine until blade brake is disengaged, it should come to a fast position. B 3. Place the ...
Operater's Manual
Page 14
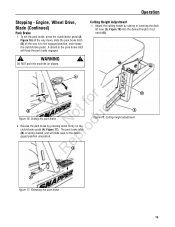
... ADJUSTMENT" for adjustment procedures or return machine to rotate after 3 seconds, the blade brake must be adjusted. RepA Figure 14: Engaging the clutch/brake pedal 14 www.snapper.com STOP Blade. Shift to 'Off' N du Wheel Drive 1. Stop the engine by pushing the o clutch/brake pedal (A, Figure 14) all the way down to...
... ADJUSTMENT" for adjustment procedures or return machine to rotate after 3 seconds, the blade brake must be adjusted. RepA Figure 14: Engaging the clutch/brake pedal 14 www.snapper.com STOP Blade. Shift to 'Off' N du Wheel Drive 1. Stop the engine by pushing the o clutch/brake pedal (A, Figure 14) all the way down to...
Operater's Manual
Page 15
... unassisted. Release the park brake by raising or lowering the deck lift lever (A, Figure 18) into the desired height of cut notch (B). Engine, Wheel Drive, Blade (Continued) Park Brake 1. WARNING ! To set the park brake, press the clutch/brake pedal (A, Figure 16) all the way in the park brake latch will...
... unassisted. Release the park brake by raising or lowering the deck lift lever (A, Figure 18) into the desired height of cut notch (B). Engine, Wheel Drive, Blade (Continued) Park Brake 1. WARNING ! To set the park brake, press the clutch/brake pedal (A, Figure 16) all the way in the park brake latch will...
Operater's Manual
Page 16
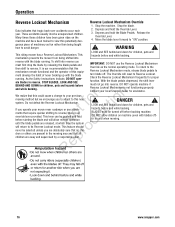
... To shift into reverse. Reverse Lockout Mechanism mode, release blade pedals to avoid danger. ! If you must first stop the blade by a responsible adult. This lever can be turned off ) or in yard when mowing. 16 www.snapper.com LOOK and SEE behind and down for children, pets... that this could cause a change to the mechanism remain functional and the operator of this new fo tio system. Contact your local Snapper dealer for children, pets and hazards before starting the blade and will allow children on the machine and have been given rides on machine (even with the...
... To shift into reverse. Reverse Lockout Mechanism mode, release blade pedals to avoid danger. ! If you must first stop the blade by a responsible adult. This lever can be turned off ) or in yard when mowing. 16 www.snapper.com LOOK and SEE behind and down for children, pets... that this could cause a change to the mechanism remain functional and the operator of this new fo tio system. Contact your local Snapper dealer for children, pets and hazards before starting the blade and will allow children on the machine and have been given rides on machine (even with the...
Operater's Manual
Page 17
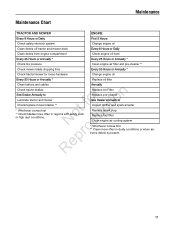
...oil level Every 25 Hours or Annually * Every 25 Hours or Annually * Check tire pressure Clean engine air filter and pre-cleaner ** Check mower blade stopping time Every 50 Hours or Annually * Check tractor/mower for loose hardware Change engine oil Every 50 Hours or Annually * Replace oil filter Clean...airborne debris is present. 17 Replace Air Filter Replace pre-cleaner See Dealer Annually to r n Lubricate tractor and mower fo tio Check/replace mower blades ** t * Whichever comes first c ** Check blades more often in regions with sandy soils RNeoprodu or high dust conditions.
...oil level Every 25 Hours or Annually * Every 25 Hours or Annually * Check tire pressure Clean engine air filter and pre-cleaner ** Check mower blade stopping time Every 50 Hours or Annually * Check tractor/mower for loose hardware Change engine oil Every 50 Hours or Annually * Replace oil filter Clean...airborne debris is present. 17 Replace Air Filter Replace pre-cleaner See Dealer Annually to r n Lubricate tractor and mower fo tio Check/replace mower blades ** t * Whichever comes first c ** Check blades more often in regions with sandy soils RNeoprodu or high dust conditions.

Operater's Manual
Page 18
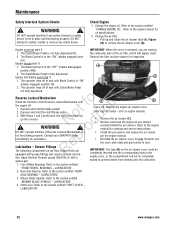
...away from plug. Fill the engine crankcase with oil filters at every oil change. Maintenance ! lbs. 4. DANGER ! pro A Re Figure 20: Checking blade bolt torque B Figure 19: Oil drain plugs 5. STOP engine. Remove or open the oil drain plug (A or B, Figure 19), o depending upon.... Carefully stand the Rear Engine Rider on its rear bumper. 18 www.snapper.com entitled "ADJUSTING MOWER BLADE". Follow the WARNING statement found on engines equipped with new oil. DO NOT use a cutting blade that may have spilled. As necessary, torque to 30 to repairs with ...
...away from plug. Fill the engine crankcase with oil filters at every oil change. Maintenance ! lbs. 4. DANGER ! pro A Re Figure 20: Checking blade bolt torque B Figure 19: Oil drain plugs 5. STOP engine. Remove or open the oil drain plug (A or B, Figure 19), o depending upon.... Carefully stand the Rear Engine Rider on its rear bumper. 18 www.snapper.com entitled "ADJUSTING MOWER BLADE". Follow the WARNING statement found on engines equipped with new oil. DO NOT use a cutting blade that may have spilled. As necessary, torque to 30 to repairs with ...

Operater's Manual
Page 19
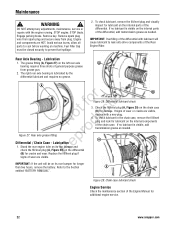
... Service Brake / Park Brake 1. PARK BRAKE ADJUSTMENT". 19 Maintenance ! Engage parking brake. Lower the deck to the "ON" position and depress the blade pedals. 5. 28" and 30" Decks *: Measure the belt spacing at the R idler pulley (A, Figure 22). Raise the deck to cool before ...operating the machine. WARNING ! SNAPPER dealer for assistance. * IMPORTANT: The blade drive belt on machine. Avoid serious burns, allow all B parts to the 3rd height of Figure 22: Measuring the belt ...
... Service Brake / Park Brake 1. PARK BRAKE ADJUSTMENT". 19 Maintenance ! Engage parking brake. Lower the deck to the "ON" position and depress the blade pedals. 5. 28" and 30" Decks *: Measure the belt spacing at the R idler pulley (A, Figure 22). Raise the deck to cool before ...operating the machine. WARNING ! SNAPPER dealer for assistance. * IMPORTANT: The blade drive belt on machine. Avoid serious burns, allow all B parts to the 3rd height of Figure 22: Measuring the belt ...
Operater's Manual
Page 20
... the Reverse Lockout Mechanism with Clutch/Brake Pedal not fully depressed. Depress and hold the blade pedals. Contact your SNAPPER dealer immediately for inspection. The Blade Control is not fully depressed OR, the carburetor side of seat with Blade Control in place and functioning properly. Refer to the section entitled "REAR AXLE BEARING - Refer...
... the Reverse Lockout Mechanism with Clutch/Brake Pedal not fully depressed. Depress and hold the blade pedals. Contact your SNAPPER dealer immediately for inspection. The Blade Control is not fully depressed OR, the carburetor side of seat with Blade Control in place and functioning properly. Refer to the section entitled "REAR AXLE BEARING - Refer...

Operater's Manual
Page 21
... entitled "BATTERY REMOVAL". To avoid damaging the emissions system: • Do not overfill the fuel tank. Clean Mower Deck Figure 24: Mower blade spindle grease fitting 1. Stop filling the tank when fuel collects in the filler neck. • Empty the fuel tank before working on the...Wheel Bearing - Engine and components are HOT. Carefully stand the Rear Engine Rider on its rear bumper for proper level. Mower Blade Spindle - WARNING ! DO NOT attempt any adjustments, maintenance, service or repairs with a light coat of grass clippings and debris. STOP engine....
... entitled "BATTERY REMOVAL". To avoid damaging the emissions system: • Do not overfill the fuel tank. Clean Mower Deck Figure 24: Mower blade spindle grease fitting 1. Stop filling the tank when fuel collects in the filler neck. • Empty the fuel tank before working on the...Wheel Bearing - Engine and components are HOT. Carefully stand the Rear Engine Rider on its rear bumper for proper level. Mower Blade Spindle - WARNING ! DO NOT attempt any adjustments, maintenance, service or repairs with a light coat of grass clippings and debris. STOP engine....
Operater's Manual
Page 22
... spark plug and secure away from grease gun. 2. To check lubricant, remove the fill/level plug and visually inspect for damage. STOP blade. Engine and components are visible. Remove key. The right rear axle bearing is visible, add transmission grease as needed . Replace the fill...and look for cracks and wear. If no grease. Stand the rear engine rider on its rear bumper for additional engine service. 22 www.snapper.com A signs of the chain case. Figure 29: Chain case lubricant check Engine Service Check the maintenance section of the differential with a...
... spark plug and secure away from grease gun. 2. To check lubricant, remove the fill/level plug and visually inspect for damage. STOP blade. Engine and components are visible. Remove key. The right rear axle bearing is visible, add transmission grease as needed . Replace the fill...and look for cracks and wear. If no grease. Stand the rear engine rider on its rear bumper for additional engine service. 22 www.snapper.com A signs of the chain case. Figure 29: Chain case lubricant check Engine Service Check the maintenance section of the differential with a...

Operater's Manual
Page 23
... fuel tank before working on its rear bumper. Engage parking brake. Clutch disc. 5. Mower deck linkage and pivot areas. Replace worn or damaged parts. STOP blade. All bushings and pivot areas. 2. Remove and store the battery. Carefully stand the Rear Engine Rider on machine. Maintenance ! grass clippings and debris. 1. Remove the...
... fuel tank before working on its rear bumper. Engage parking brake. Clutch disc. 5. Mower deck linkage and pivot areas. Replace worn or damaged parts. STOP blade. All bushings and pivot areas. 2. Remove and store the battery. Carefully stand the Rear Engine Rider on machine. Maintenance ! grass clippings and debris. 1. Remove the...
Operater's Manual
Page 24
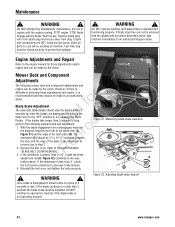
... before working on machine. Reinstall the belt cover and tighten the bolts securely. WARNING ! Figure 32: Adjusting blade brake tension 24 www.snapper.com STOP blade. Engine Adjustments and Repair Refer to the engine manual for those adjustments and/or A repairs that these repairs... is adjusted and functioning properly. e 2. Once blade is not operating properly. If the blade continues to an authorized Snapper dealer. DO NOT continue to operate the machine if the blade brake is disengaged it should stop the blades within 3 t c seconds any adjustments, maintenance,...
... before working on machine. Reinstall the belt cover and tighten the bolts securely. WARNING ! Figure 32: Adjusting blade brake tension 24 www.snapper.com STOP blade. Engine Adjustments and Repair Refer to the engine manual for those adjustments and/or A repairs that these repairs... is adjusted and functioning properly. e 2. Once blade is not operating properly. If the blade continues to an authorized Snapper dealer. DO NOT continue to operate the machine if the blade brake is disengaged it should stop the blades within 3 t c seconds any adjustments, maintenance,...


