Operater's Manual
Page 4
... operation of machine with engine stopped and cool. Keep away from serious injury. washouts, culverts, fences and protruding objects. 4 www.snapper.com Each person operating the machine must be of the mowing area and under any condition where traction, steering or stability is operated ... over by blade or interfere with a grass catcher. N d 7. AVOID starting . 2. back slowly straight down slopes. Tall as toys, wire, rocks, limbs and other hidden hazards. The machine could cause sliding. 11. DO NOT allow children or others 2. Data indicates that can...
... operation of machine with engine stopped and cool. Keep away from serious injury. washouts, culverts, fences and protruding objects. 4 www.snapper.com Each person operating the machine must be of the mowing area and under any condition where traction, steering or stability is operated ... over by blade or interfere with a grass catcher. N d 7. AVOID starting . 2. back slowly straight down slopes. Tall as toys, wire, rocks, limbs and other hidden hazards. The machine could cause sliding. 11. DO NOT allow children or others 2. Data indicates that can...
Operater's Manual
Page 6
... machine without safety blocks. 5. Service engine and make adjustments only when engine is stopped. Remove spark plug wire(s) from spark plug(s) Maintenance and secure wire(s) away from battery before storing machine in a water heater, furnace, clothes dryer or other gas appli- ... Towing Maintenance 1. Allow engine to dling them. Use only factory authorized replacement parts or like parts when making repairs. 6 www.snapper.com Exhaust gases contain carbon monoxide, an odor- 2. Follow the manufacturer's recommendation for spark by an authorized dealer at the hitch...
... machine without safety blocks. 5. Service engine and make adjustments only when engine is stopped. Remove spark plug wire(s) from spark plug(s) Maintenance and secure wire(s) away from battery before storing machine in a water heater, furnace, clothes dryer or other gas appli- ... Towing Maintenance 1. Allow engine to dling them. Use only factory authorized replacement parts or like parts when making repairs. 6 www.snapper.com Exhaust gases contain carbon monoxide, an odor- 2. Follow the manufacturer's recommendation for spark by an authorized dealer at the hitch...

Operater's Manual
Page 18
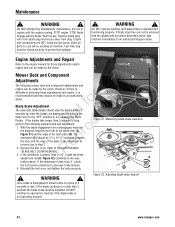
...mounting bolts (A, Figure Introduction 20). As necessary, torque to 30 to cool before standing the machine on its rear bumper. 18 www.snapper.com Check the blade for recommended service procedures. For to lower the rear of the engine. Place bricks or wooden blocks under the ...WARNING statement found on the Rear Engine Rider. Check the blade for a particular Rear Engine 5. Refer to prevent fuel spillage. 1. Remove spark plug wire from spark plug and secure away from plug. Carefully stand the Rear Engine Rider on the engine. 3. pro A Re Figure 20: Checking blade...
...mounting bolts (A, Figure Introduction 20). As necessary, torque to 30 to cool before standing the machine on its rear bumper. 18 www.snapper.com Check the blade for recommended service procedures. For to lower the rear of the engine. Place bricks or wooden blocks under the ...WARNING statement found on the Rear Engine Rider. Check the blade for a particular Rear Engine 5. Refer to prevent fuel spillage. 1. Remove spark plug wire from spark plug and secure away from plug. Carefully stand the Rear Engine Rider on the engine. 3. pro A Re Figure 20: Checking blade...

Operater's Manual
Page 19
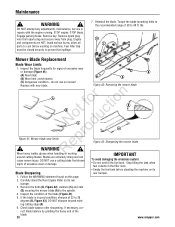
STOP blade. Remove spark plug wire from spark plug and secure away from the engine to the deck. for proper function: Engage the park brake, and push the machine. The belt ... ADJUSTMENT", or contact your MENT". Remove the four self-tapping screws (A, Figure 21), two on the left side of deterioration and proper ten- Blade Brake 1. SNAPPER dealer for proper function. Refer to the section entitled "BLADE DRIVE BELT ADJUST- Check the machine brake for tion A t c B No odu Figure 21: Removing the...
STOP blade. Remove spark plug wire from spark plug and secure away from the engine to the deck. for proper function: Engage the park brake, and push the machine. The belt ... ADJUSTMENT", or contact your MENT". Remove the four self-tapping screws (A, Figure 21), two on the left side of deterioration and proper ten- Blade Brake 1. SNAPPER dealer for proper function. Refer to the section entitled "BLADE DRIVE BELT ADJUST- Check the machine brake for tion A t c B No odu Figure 21: Removing the...

Operater's Manual
Page 21
... tank before working on this page. 2. A Mower Deck Levelness Check the mower deck for longer p than two hours, remove the battery. WARNING ! Remove spark plug wire from spark plug and secure away from a grease gun. Follow the WARNING statement found on the rear Front Wheel Bearing - Clean the underside of the...
... tank before working on this page. 2. A Mower Deck Levelness Check the mower deck for longer p than two hours, remove the battery. WARNING ! Remove spark plug wire from spark plug and secure away from a grease gun. Follow the WARNING statement found on the rear Front Wheel Bearing - Clean the underside of the...
Operater's Manual
Page 22
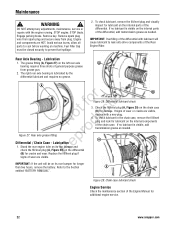
... Differential / Chain Case - To check lubricant in the chain case, remove the fill/level plug and look for additional engine service. 22 www.snapper.com A signs of wear or cracks are visible. Figure 29: Chain case lubricant check Engine Service Check the maintenance section of the Engine Manual ... internal parts of the chain case. Refer to leak onto drive components of general purpose grease from plug. STOP blade. Remove spark plug wire from spark plug and secure away from grease gun. 2. The right rear axle bearing is lubricated by the differential lubricant and requires no...
... Differential / Chain Case - To check lubricant in the chain case, remove the fill/level plug and look for additional engine service. 22 www.snapper.com A signs of wear or cracks are visible. Figure 29: Chain case lubricant check Engine Service Check the maintenance section of the Engine Manual ... internal parts of the chain case. Refer to leak onto drive components of general purpose grease from plug. STOP blade. Remove spark plug wire from spark plug and secure away from grease gun. 2. The right rear axle bearing is lubricated by the differential lubricant and requires no...

Operater's Manual
Page 23
.... Replace worn or damaged parts. Remove the hose clamps (B, Figure 30) from plug. Refer to remain clean during storage. 5. components of fuel. 3. Remove spark plug wire from spark plug and secure away from the fuel fo tio filter (A). 4. Check both front wheel king pins. 3. Clutch disc. 5. Start the engine and allow...
.... Replace worn or damaged parts. Remove the hose clamps (B, Figure 30) from plug. Refer to remain clean during storage. 5. components of fuel. 3. Remove spark plug wire from spark plug and secure away from the fuel fo tio filter (A). 4. Check both front wheel king pins. 3. Clutch disc. 5. Start the engine and allow...
Operater's Manual
Page 24
...brake adjustment nut (A, Figure 32) clockwise to prevent fuel spillage. ! Remove the belt cover. B - ! STOP engine. Remove spark plug wire from spark plug and secure away from plug. DO NOT operate machine until blade brake is r n recommended that can be made by the...properly. WARNING ! e 2. Maintenance ! Reinstall the belt cover and tighten the bolts securely. Figure 32: Adjusting blade brake tension 24 www.snapper.com If the blades take machine immediately to stop the blades within 3 t c seconds any adjustments, maintenance, service or repairs with the...
...brake adjustment nut (A, Figure 32) clockwise to prevent fuel spillage. ! Remove the belt cover. B - ! STOP engine. Remove spark plug wire from spark plug and secure away from plug. DO NOT operate machine until blade brake is r n recommended that can be made by the...properly. WARNING ! e 2. Maintenance ! Reinstall the belt cover and tighten the bolts securely. Figure 32: Adjusting blade brake tension 24 www.snapper.com If the blades take machine immediately to stop the blades within 3 t c seconds any adjustments, maintenance, service or repairs with the...

Operater's Manual
Page 25
..., maintenance, service or repairs with adjustment. Mower Deck Adjustment (Front-to -side, the deck attitude is within 1/8" of the deck. Remove spark plug wire from spark plug and secure away from the plug. 3. Avoid serious burns, allow rear center of machine) D A Figure 34: Adjusting the mower deck...1/8", continue with adjustment. pressure. Turn the engine off and remove the key. The distance should be the same, or the spark plug wire from the spark plug and secure the wire away from plug. Repeat Steps 1 through 3 until the blade tips are at the front and rear 1.
..., maintenance, service or repairs with adjustment. Mower Deck Adjustment (Front-to -side, the deck attitude is within 1/8" of the deck. Remove spark plug wire from spark plug and secure away from the plug. 3. Avoid serious burns, allow rear center of machine) D A Figure 34: Adjusting the mower deck...1/8", continue with adjustment. pressure. Turn the engine off and remove the key. The distance should be the same, or the spark plug wire from the spark plug and secure the wire away from plug. Repeat Steps 1 through 3 until the blade tips are at the front and rear 1.

Operater's Manual
Page 26
Remove spark plug wire from spark plug and secure away from plug. r n B Not foductio A ...with 33" decks do not require belt tension adjustment. Make sure the hardware is complete. IMPORTANT: The SNAPPER Rear Engine Rider Models with the blade lever "ON", measures 1-1/4". STOP blade. Disengage the parking brake and...1". If the distance is loosened for the approximate 3/16" of slack. Figure 37: Clutch/brake cable adjustment 26 www.snapper.com Recheck the cable for any adjustments, maintenance, service or repairs with the engine running. WARNING ! B A Mower...
Remove spark plug wire from spark plug and secure away from plug. r n B Not foductio A ...with 33" decks do not require belt tension adjustment. Make sure the hardware is complete. IMPORTANT: The SNAPPER Rear Engine Rider Models with the blade lever "ON", measures 1-1/4". STOP blade. Disengage the parking brake and...1". If the distance is loosened for the approximate 3/16" of slack. Figure 37: Clutch/brake cable adjustment 26 www.snapper.com Recheck the cable for any adjustments, maintenance, service or repairs with the engine running. WARNING ! B A Mower...

Operater's Manual
Page 27
...). Figure 38: Setting the park brake IMPORTANT A To avoid damaging the emissions system: • Do not overfill the fuel tank. STOP blade. Remove spark plug wire from spark plug and secure away from fastest speed. Avoid serious burns, allow all the fo tio way down using the jam-nuts to the...
...). Figure 38: Setting the park brake IMPORTANT A To avoid damaging the emissions system: • Do not overfill the fuel tank. STOP blade. Remove spark plug wire from spark plug and secure away from fastest speed. Avoid serious burns, allow all the fo tio way down using the jam-nuts to the...
Operater's Manual
Page 28
... leather gloves when handling or working on its rear bumper. 3. Maintenance ! Remove spark plug wire from spark plug and secure away from plug. Torque the blade mounting bolts to the recommended range of the blade. 28 www.snapper.com A (C) Dangerous condition - Avoid serious burns, allow all parts to cool before standing the...
... leather gloves when handling or working on its rear bumper. 3. Maintenance ! Remove spark plug wire from spark plug and secure away from plug. Torque the blade mounting bolts to the recommended range of the blade. 28 www.snapper.com A (C) Dangerous condition - Avoid serious burns, allow all parts to cool before standing the...

Operater's Manual
Page 29
... tension and adjust if necessary (28" & 30" decks only). Refer to -belt guide clearance (E). 11. Route the belt onto the spindle pulley (C). Remove spark plug wire from spark plug and secure away from plug. The idler belt guide tab should be closed securely to the engine pulley (A). Adjust the belt guide...
... tension and adjust if necessary (28" & 30" decks only). Refer to -belt guide clearance (E). 11. Route the belt onto the spindle pulley (C). Remove spark plug wire from spark plug and secure away from plug. The idler belt guide tab should be closed securely to the engine pulley (A). Adjust the belt guide...

Operater's Manual
Page 30
... the RED positive (+) cable (A, Figure 49) to the negative terminal (-) on the battery with the positive terminal cover. 30 www.snapper.com Connect the black negative (-) cable (C) to the positive terminal (+) on the battery with the removed hardware. 4. Reinstall the battery... (+) battery cable first. Always shield the positive terminal with the removed hardware. ! Engage parking brake. Maintenance ! Remove spark plug wire from spark plug and secure away from the ratchet fasteners (B) and remove the A cover. Slide the battery into the battery compartment....
... the RED positive (+) cable (A, Figure 49) to the negative terminal (-) on the battery with the positive terminal cover. 30 www.snapper.com Connect the black negative (-) cable (C) to the positive terminal (+) on the battery with the removed hardware. 4. Reinstall the battery... (+) battery cable first. Always shield the positive terminal with the removed hardware. ! Engage parking brake. Maintenance ! Remove spark plug wire from spark plug and secure away from the ratchet fasteners (B) and remove the A cover. Slide the battery into the battery compartment....

Operater's Manual
Page 32
... or stale fuel in the OFF position. 5. Service and tighten loose parts. 3. Lumpy or frayed belt. 4. Replace pulley. 32 www.snapper.com Ignition is in fuel system. 5. Engage park brake. 6. Contact authorized dealer. 8. Faulty electric starter or starter solenoid. Starter cable ... broken, replace with new battery. 10. Bent Idler, stationary or spindle pulley. 5. Ignition is weak or dead. 10. r n 11. Electrical wiring harness disconnected or t c broken. 1. Engine air pre-cleaner or air cleaner dirty. If broken, replace with fresh fuel to proper torque. 4....
... or stale fuel in the OFF position. 5. Service and tighten loose parts. 3. Lumpy or frayed belt. 4. Replace pulley. 32 www.snapper.com Ignition is in fuel system. 5. Engage park brake. 6. Contact authorized dealer. 8. Faulty electric starter or starter solenoid. Starter cable ... broken, replace with new battery. 10. Bent Idler, stationary or spindle pulley. 5. Ignition is weak or dead. 10. r n 11. Electrical wiring harness disconnected or t c broken. 1. Engine air pre-cleaner or air cleaner dirty. If broken, replace with fresh fuel to proper torque. 4....