Operater's Manual
Page 10
... on its rear bumper. 10 www.snapper.com Refer to the fuel tank after refueling. Check the tire pressure; add or release air as needed to bring pressure to the FULL mark (A, Figure 1). Refer to the desired position. After adjustment, tighten the knobs securely. r n Figure 1: Engine oil 'Full' mark NOTE: If the seat...
... on its rear bumper. 10 www.snapper.com Refer to the fuel tank after refueling. Check the tire pressure; add or release air as needed to bring pressure to the FULL mark (A, Figure 1). Refer to the desired position. After adjustment, tighten the knobs securely. r n Figure 1: Engine oil 'Full' mark NOTE: If the seat...
Operater's Manual
Page 17
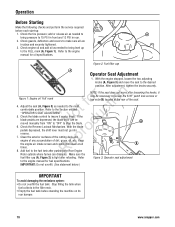
.... Maintenance Chart Maintenance TRACTOR AND MOWER ENGINE Every 8 Hours or Daily First 5 Hours Check safety interlock system Change engine oil Clean debris off tractor and mower deck Every 8 Hours or Daily Clean debris from engine compartment Check engine oil level Every 25 Hours or Annually *...Check mower blade stopping time Every 50 Hours or Annually * Check tractor/mower for loose hardware Change engine oil Every 50 Hours or Annually * Replace oil filter Clean battery and cables Annually Check tractor brakes See Dealer Annually to Inspect muffler and spark arrester...
.... Maintenance Chart Maintenance TRACTOR AND MOWER ENGINE Every 8 Hours or Daily First 5 Hours Check safety interlock system Change engine oil Clean debris off tractor and mower deck Every 8 Hours or Daily Clean debris from engine compartment Check engine oil level Every 25 Hours or Annually *...Check mower blade stopping time Every 50 Hours or Annually * Check tractor/mower for loose hardware Change engine oil Every 50 Hours or Annually * Replace oil filter Clean battery and cables Annually Check tractor brakes See Dealer Annually to Inspect muffler and spark arrester...

Operater's Manual
Page 18
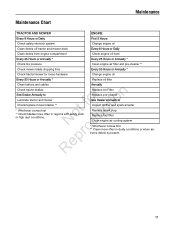
.... • Empty the fuel tank before working on engines equipped with oil filters at every oil change. Engine Rider. Both DO NOT attempt any oil that shows signs of the oil drain (Figure 19). Follow the WARNING statement found on its rear bumper. 18 www.snapper.com Fill the engine crankcase with . IMPORTANT To avoid damaging the emissions...
.... • Empty the fuel tank before working on engines equipped with oil filters at every oil change. Engine Rider. Both DO NOT attempt any oil that shows signs of the oil drain (Figure 19). Follow the WARNING statement found on its rear bumper. 18 www.snapper.com Fill the engine crankcase with . IMPORTANT To avoid damaging the emissions...
Operater's Manual
Page 20
... will not be completely inserted into reverse. With Steps 1 and 2 performed, the shift lever must be completely grease gun. Contact your SNAPPER dealer immediately for inspection. LUBRICATION". 2. LUBRICATION". 3. LUBRICATION". 4. Change the engine oil. Engine must stop if: C 1. Depress and hold the clutch/brake pedal. 3. Refer to prevent debris from entering into the carburetor. 1. Front...
... will not be completely inserted into reverse. With Steps 1 and 2 performed, the shift lever must be completely grease gun. Contact your SNAPPER dealer immediately for inspection. LUBRICATION". 2. LUBRICATION". 3. LUBRICATION". 4. Change the engine oil. Engine must stop if: C 1. Depress and hold the clutch/brake pedal. 3. Refer to prevent debris from entering into the carburetor. 1. Front...

Operater's Manual
Page 21
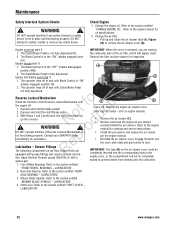
... removing all grass clippings fo tio and debris. STOP blade. Remove key. Engine and components are HOT. LEVELNESS". Carefully stand the Rear Engine Rider on this page. 2. Clean the underside of motor oil. Clean the top of the deck, removing all accumulation of general purpose grease...: If the unit will be closed securely to cool before standing the machine on its rear bumper. WARNING ! Carefully stand the Rear Engine Rider on this page. 2. Re IMPORTANT Lubricate the front wheel grease fittings (A, Figure 25) with N d three shots of grass clippings and ...
... removing all grass clippings fo tio and debris. STOP blade. Remove key. Engine and components are HOT. LEVELNESS". Carefully stand the Rear Engine Rider on this page. 2. Clean the underside of motor oil. Clean the top of the deck, removing all accumulation of general purpose grease...: If the unit will be closed securely to cool before standing the machine on its rear bumper. WARNING ! Carefully stand the Rear Engine Rider on this page. 2. Re IMPORTANT Lubricate the front wheel grease fittings (A, Figure 25) with N d three shots of grass clippings and ...

Operater's Manual
Page 33
...too fast. 1. Forward speed too fast. Build up of Traction Blade(s) Not Cutting Cutting Grass Improperly Poor Grass Discharge Oil Leaking PROBABLE CAUSE CORRECTIVE ACTION 1. Improper blade installed on drive disc. 3. Sharpen cutting edges or replace blade(s). 8. ...differential. 1. Tapered axle bolt and nut missing. 4. Replace drive disc. 2. Sharpen or replace cutting blade. 1. t c 3. o u 5. Leaking engine block. 5. Engine speed too slow. 4. Repr 2. Mower belt slipping. Contact authorized dealer. 5. Adjust cutting height. 3. Adjust side to a slower speed. 5. Install ...
...too fast. 1. Forward speed too fast. Build up of Traction Blade(s) Not Cutting Cutting Grass Improperly Poor Grass Discharge Oil Leaking PROBABLE CAUSE CORRECTIVE ACTION 1. Improper blade installed on drive disc. 3. Sharpen cutting edges or replace blade(s). 8. ...differential. 1. Tapered axle bolt and nut missing. 4. Replace drive disc. 2. Sharpen or replace cutting blade. 1. t c 3. o u 5. Leaking engine block. 5. Engine speed too slow. 4. Repr 2. Mower belt slipping. Contact authorized dealer. 5. Adjust cutting height. 3. Adjust side to a slower speed. 5. Install ...


