Operater's Manual
Page 1
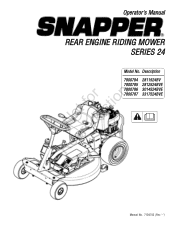
Manual No. 7104742 (Rev. '-') Description 7800784 2811524BV 7800785 2812524BVE 7800786 3014524BVE 7800787 3317524BVE RNeoptrfoodruction ! Operator's Manual REAR ENGINE RIDING MOWER SERIES 24 Model No.
Manual No. 7104742 (Rev. '-') Description 7800784 2811524BV 7800785 2812524BVE 7800786 3014524BVE 7800787 3317524BVE RNeoptrfoodruction ! Operator's Manual REAR ENGINE RIDING MOWER SERIES 24 Model No.
Operater's Manual
Page 3
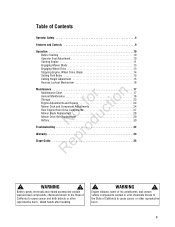
... of Contents Operator Safety 4 Features and Controls 9 Operation 10 Before Starting 10 Operator Seat Adjustment 10 Starting Engine 11 Engaging Mower Blade 13 Engaging Wheel Drive 13 Stopping Engine, Wheel Drive, Blade 14 Setting Park Brake 15 Cutting Height Adjustment 15 Reverse Lockout...Chart 17 r n General Maintenance 18 Storage 23 fo tio Engine Adjustments and Repairs 24 Mower Deck and Component Adjustments 24 Rear Engine Rider Drive Components 27 t c Mower Blade Replacement 28 o Mower Drive Belt Replacement 29 u Battery 30 N d Troubleshooting 32 ro Warranty 34 Rep Slope...
... of Contents Operator Safety 4 Features and Controls 9 Operation 10 Before Starting 10 Operator Seat Adjustment 10 Starting Engine 11 Engaging Mower Blade 13 Engaging Wheel Drive 13 Stopping Engine, Wheel Drive, Blade 14 Setting Park Brake 15 Cutting Height Adjustment 15 Reverse Lockout...Chart 17 r n General Maintenance 18 Storage 23 fo tio Engine Adjustments and Repairs 24 Mower Deck and Component Adjustments 24 Rear Engine Rider Drive Components 27 t c Mower Blade Replacement 28 o Mower Drive Belt Replacement 29 u Battery 30 N d Troubleshooting 32 ro Warranty 34 Rep Slope...
Operater's Manual
Page 4
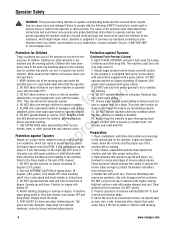
... NOT allow only persons who have any questions pertaining to your machine which your satisfaction, contact Customer Service (1-800-935-2967 or www.snapper.com). If you 8. DO NOT put your foot on a slope. Choose a low enough speed setting so that could result in ... factor related to learn stops going down . Preparation 1. Only mature, responsible persons shall operate the machine and only after proper instruction. mower safely enough to the (Continued From Previous Column) presence of the mowing area and under any substance, which can occur if the operator...
... NOT allow only persons who have any questions pertaining to your machine which your satisfaction, contact Customer Service (1-800-935-2967 or www.snapper.com). If you 8. DO NOT put your foot on a slope. Choose a low enough speed setting so that could result in ... factor related to learn stops going down . Preparation 1. Only mature, responsible persons shall operate the machine and only after proper instruction. mower safely enough to the (Continued From Previous Column) presence of the mowing area and under any substance, which can occur if the operator...
Operater's Manual
Page 5
... is not possible, 8. blades are ON or machine is complete. Check shields, deflectors, switches, blade controls and 3. DO NOT leave machine with damaged. Replace if 4. mower to cool before removing grass catcher or unclogging 11. ration for signs of the fuel tank or container opening at all times. DO NOT place...
... is not possible, 8. blades are ON or machine is complete. Check shields, deflectors, switches, blade controls and 3. DO NOT leave machine with damaged. Replace if 4. mower to cool before removing grass catcher or unclogging 11. ration for signs of the fuel tank or container opening at all times. DO NOT place...
Operater's Manual
Page 6
...Check brakes frequently; adjust, repair or replace as necessary. 16. Use only factory authorized replacement parts or like parts when making repairs. 6 www.snapper.com Tow only with a machine that RNeoptroduc all bolts, nuts and screws properly tight. Disconnect negative (black) cable from binding. On slopes, ...settings or fumes may cause cause injury. Store fuel container out of the reach of the towed equipment may reach an open flame. 4. Mower blades are in a water heater, furnace, clothes dryer or other gas appli- 11. Wrap the blades in an prevent controls from ...
...Check brakes frequently; adjust, repair or replace as necessary. 16. Use only factory authorized replacement parts or like parts when making repairs. 6 www.snapper.com Tow only with a machine that RNeoptroduc all bolts, nuts and screws properly tight. Disconnect negative (black) cable from binding. On slopes, ...settings or fumes may cause cause injury. Store fuel container out of the reach of the towed equipment may reach an open flame. 4. Mower blades are in a water heater, furnace, clothes dryer or other gas appli- 11. Wrap the blades in an prevent controls from ...
Operater's Manual
Page 7
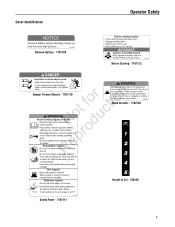
... equipment may be required. Operation of Cut - 703440 7 A spark arrestor may create sparks that can start fires around dry vegetation. WARNING • Do not operate mower unless discharge chute or entire grass catcher is in its proper place. 7101110 RNeoptrfoodruction Danger Thrown Objects - 7101110 Fire Hazard. Decal Identification Operator Safety Remove...
... equipment may be required. Operation of Cut - 703440 7 A spark arrestor may create sparks that can start fires around dry vegetation. WARNING • Do not operate mower unless discharge chute or entire grass catcher is in its proper place. 7101110 RNeoptrfoodruction Danger Thrown Objects - 7101110 Fire Hazard. Decal Identification Operator Safety Remove...
Operater's Manual
Page 13
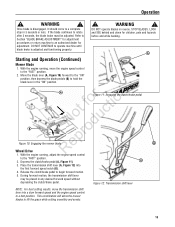
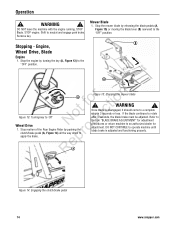
... clutch/brake pedal. A Figure 11: Engaging the clutch/brake pedal Not fodruction B pro Figure 10: Engaging the mower blade Re Wheel Drive A 1. If the blade continues to a fast position. This combination will allow the mower blades to a complete stop in the "ON" position. Once blade is adjusted and functioning properly. ! Move the... to operate machine until blade brake is disengaged, it should come to lift the grass while cutting smoothly and evenly. 13 A Starting and Operation (Continued) Mower Blade 1. WARNING !
... clutch/brake pedal. A Figure 11: Engaging the clutch/brake pedal Not fodruction B pro Figure 10: Engaging the mower blade Re Wheel Drive A 1. If the blade continues to a fast position. This combination will allow the mower blades to a complete stop in the "ON" position. Once blade is adjusted and functioning properly. ! Move the... to operate machine until blade brake is disengaged, it should come to lift the grass while cutting smoothly and evenly. 13 A Starting and Operation (Continued) Mower Blade 1. WARNING !
Operater's Manual
Page 14
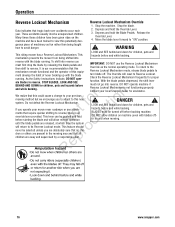
STOP Blade. RepA Figure 14: Engaging the clutch/brake pedal 14 www.snapper.com Remove key. Stopping - Stop the mower blade by turning the key (A, Figure 13) to the "OFF" position. WARNING ! Refer to Section "BLADE BRAKE ADJUSTMENT" for adjustment. ...du Wheel Drive 1. If the blade continues to neutral and engage park brake. Engine, Wheel Drive, Blade Engine 1. STOP engine. Figure 15: Stopping the mower blade ! Operation ! DO NOT CONTINUE to operate machine until blade brake is disengaged, it should come to r apply the brake. WARNING ! Shift to ...
STOP Blade. RepA Figure 14: Engaging the clutch/brake pedal 14 www.snapper.com Remove key. Stopping - Stop the mower blade by turning the key (A, Figure 13) to the "OFF" position. WARNING ! Refer to Section "BLADE BRAKE ADJUSTMENT" for adjustment. ...du Wheel Drive 1. If the blade continues to neutral and engage park brake. Engine, Wheel Drive, Blade Engine 1. STOP engine. Figure 15: Stopping the mower blade ! Operation ! DO NOT CONTINUE to operate machine until blade brake is disengaged, it should come to r apply the brake. WARNING ! Shift to ...
Operater's Manual
Page 16
...be selected unless you operate your local Snapper dealer for children, pets and hazards before backing machine. Release the Override Lever. 4. reverse with blades off before and while backing. STOP BLADES, LOOK AND SEE function. Contact your mower near roadways or use the Reverse ...unsupervised children. Stop the blade. With the blade pedals depressed, the shift lever BEHIND AND DOWN for assistance. ! This mechanism prevents the mower from being taught how to "ON" position. running . Many times these children have been given rides on machine (even with the ...
...be selected unless you operate your local Snapper dealer for children, pets and hazards before backing machine. Release the Override Lever. 4. reverse with blades off before and while backing. STOP BLADES, LOOK AND SEE function. Contact your mower near roadways or use the Reverse ...unsupervised children. Stop the blade. With the blade pedals depressed, the shift lever BEHIND AND DOWN for assistance. ! This mechanism prevents the mower from being taught how to "ON" position. running . Many times these children have been given rides on machine (even with the ...
Operater's Manual
Page 17
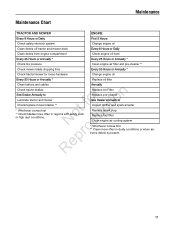
... Every 8 Hours or Daily First 5 Hours Check safety interlock system Change engine oil Clean debris off tractor and mower deck Every 8 Hours or Daily Clean debris from engine compartment Check engine oil level Every 25 Hours or Annually * Every 25 Hours or Annually ...* Check tire pressure Clean engine air filter and pre-cleaner ** Check mower blade stopping time Every 50 Hours or Annually * Check tractor/mower for loose hardware Change engine oil Every 50 Hours or Annually * Replace oil filter Clean battery and cables Annually Check...
... Every 8 Hours or Daily First 5 Hours Check safety interlock system Change engine oil Clean debris off tractor and mower deck Every 8 Hours or Daily Clean debris from engine compartment Check engine oil level Every 25 Hours or Annually * Every 25 Hours or Annually ...* Check tire pressure Clean engine air filter and pre-cleaner ** Check mower blade stopping time Every 50 Hours or Annually * Check tractor/mower for loose hardware Change engine oil Every 50 Hours or Annually * Replace oil filter Clean battery and cables Annually Check...

Operater's Manual
Page 18
...cartridge require service. Refer to cool before standing the machine on its rear bumper. 18 www.snapper.com Fuel Filler Cap must be closed securely to the section Riding Mower, always mention the model and serial number. the correct part or information for straightness. DANGER... To avoid damaging the emissions system: • Do not overfill the fuel tank. Maintenance ! Engage parking brake. entitled "ADJUSTING MOWER BLADE". Loosen or remove the oil fill cap on machine. Refer to an authorized dealer annually for recommended service procedures. Stop filling...
...cartridge require service. Refer to cool before standing the machine on its rear bumper. 18 www.snapper.com Fuel Filler Cap must be closed securely to the section Riding Mower, always mention the model and serial number. the correct part or information for straightness. DANGER... To avoid damaging the emissions system: • Do not overfill the fuel tank. Maintenance ! Engage parking brake. entitled "ADJUSTING MOWER BLADE". Loosen or remove the oil fill cap on machine. Refer to an authorized dealer annually for recommended service procedures. Stop filling...

Operater's Manual
Page 19
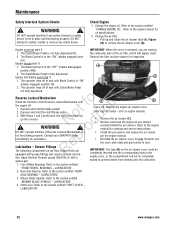
...(B). 3. The blade should stop rotating in less than 5 ft. 2. Blades must be closed securely to cool before operating the machine. SNAPPER dealer for proper function: Engage the park brake, and push the machine. Check the machine brake for assistance. * IMPORTANT: The blade drive... belt on machine. STOP blade. A Check the Blade Drive Belt The blade drive consists of Figure 22: Measuring the belt spacing the mower deck. The belt spacing (B) should skid. be 1-1/4" but no less than 1", the belt tension should come to the section entitled "SERVICE BRAKE...
...(B). 3. The blade should stop rotating in less than 5 ft. 2. Blades must be closed securely to cool before operating the machine. SNAPPER dealer for proper function: Engage the park brake, and push the machine. Check the machine brake for assistance. * IMPORTANT: The blade drive... belt on machine. STOP blade. A Check the Blade Drive Belt The blade drive consists of Figure 22: Measuring the belt spacing the mower deck. The belt spacing (B) should skid. be 1-1/4" but no less than 1", the belt tension should come to the section entitled "SERVICE BRAKE...
Operater's Manual
Page 20
...completely inserted into the corresponding slots in the "OFF" (blades disengaged) A position AND, 2. Refer to the section entitled "MOWER BLADE SPINDLE - Refer to the section entitled "REAR AXLE BEARING - Shift Lever. The Clutch/Brake Pedal is fully depressed. The...Refer to prevent debris from entering into reverse. tion. Depress and hold the clutch/brake pedal. 3. N d ! Contact your SNAPPER dealer immediately for inspection. Apply General Purpose grease (NLGI No.2) with Clutch/Brake Pedal not fully depressed. sealed to the section entitled...
...completely inserted into the corresponding slots in the "OFF" (blades disengaged) A position AND, 2. Refer to the section entitled "MOWER BLADE SPINDLE - Refer to the section entitled "REAR AXLE BEARING - Shift Lever. The Clutch/Brake Pedal is fully depressed. The...Refer to prevent debris from entering into reverse. tion. Depress and hold the clutch/brake pedal. 3. N d ! Contact your SNAPPER dealer immediately for inspection. Apply General Purpose grease (NLGI No.2) with Clutch/Brake Pedal not fully depressed. sealed to the section entitled...

Operater's Manual
Page 21
...; Do not overfill the fuel tank. STOP engine. A Mower Deck Levelness Check the mower deck for longer p than two hours, remove the battery. Remove key. Clean Mower Deck Figure 24: Mower blade spindle grease fitting 1. Mower Deck Linkage - LEVELNESS". Carefully stand the Rear Engine Rider on... plug and secure away from a grease gun. Refer to the Section entitled "BATTERY REMOVAL". Clean the underside of the mower deck, removing all mower deck linkage pivot points with five shots of motor oil. r n 5. Follow the WARNING statement found on the rear ...
...; Do not overfill the fuel tank. STOP engine. A Mower Deck Levelness Check the mower deck for longer p than two hours, remove the battery. Remove key. Clean Mower Deck Figure 24: Mower blade spindle grease fitting 1. Mower Deck Linkage - LEVELNESS". Carefully stand the Rear Engine Rider on... plug and secure away from a grease gun. Refer to the Section entitled "BATTERY REMOVAL". Clean the underside of the mower deck, removing all mower deck linkage pivot points with five shots of motor oil. r n 5. Follow the WARNING statement found on the rear ...

Operater's Manual
Page 23
... Chart in the filler neck. components of fuel. 3. IMPORTANT: Service the fuel filter on machine. t c 6. Stop filling the tank when B fuel collects in this manual. Mower deck linkage and pivot areas. Avoid serious burns, allow it to prevent fuel spillage.
... Chart in the filler neck. components of fuel. 3. IMPORTANT: Service the fuel filter on machine. t c 6. Stop filling the tank when B fuel collects in this manual. Mower deck linkage and pivot areas. Avoid serious burns, allow it to prevent fuel spillage.
Operater's Manual
Page 24
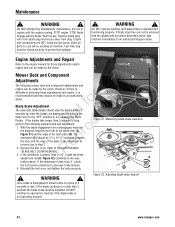
...engine running. Reinstall the belt cover and tighten the bolts securely. STOP engine. Fuel Filler Cap must be 3" to an authorized Snapper dealer. If blade stop in achieving these repairs be made by the owner. If the blades take machine immediately to 3-1/4" clearance ... dealer. fo tio Blade Brake Adjustment The automatic Blade Brake should be adjusted. The dimension (C) should stop , N d perform the following mower deck and component adjustments and repairs can not be made by releasing the Blade u Pedals. B Figure 31: Measuring blade brake clearance 3. Figure...
...engine running. Reinstall the belt cover and tighten the bolts securely. STOP engine. Fuel Filler Cap must be 3" to an authorized Snapper dealer. If blade stop in achieving these repairs be made by the owner. If the blades take machine immediately to 3-1/4" clearance ... dealer. fo tio Blade Brake Adjustment The automatic Blade Brake should be adjusted. The dimension (C) should stop , N d perform the following mower deck and component adjustments and repairs can not be made by releasing the Blade u Pedals. B Figure 31: Measuring blade brake clearance 3. Figure...

Operater's Manual
Page 25
... (Front-to rear levelness. Engine and components are within 1/8" from the plug. 3. The distance should be the same, or the Mower Deck Adjustment (Side-To-Side Levelness) Before making deck leveling adjustments, check the tire rear 1/8" to 1/4" higher than the front, proceed..., or is obtained. If tires are 30" Decks properly inflated and mowing is within 1/8" of the deck. of machine) D A Figure 34: Adjusting the mower deck (front-to - Remove the rear hanger chains (A, Figure 34). 2. STOP blade. Avoid serious burns, allow rear center of the blade pedal (B). 7....
... (Front-to rear levelness. Engine and components are within 1/8" from the plug. 3. The distance should be the same, or the Mower Deck Adjustment (Side-To-Side Levelness) Before making deck leveling adjustments, check the tire rear 1/8" to 1/4" higher than the front, proceed..., or is obtained. If tires are 30" Decks properly inflated and mowing is within 1/8" of the deck. of machine) D A Figure 34: Adjusting the mower deck (front-to - Remove the rear hanger chains (A, Figure 34). 2. STOP blade. Avoid serious burns, allow rear center of the blade pedal (B). 7....

Operater's Manual
Page 26
... clutch function. C (B) to cool before working on machine. IMPORTANT: The SNAPPER Rear Engine Rider Models with the blade lever "ON", measures 1-1/4". Maintenance ! Remove key. Engine and components are HOT. Remove the mower drive belt cover. Disengage the parking brake and allow all parts to the ... drive (Up) position. Figure 37: Clutch/brake cable adjustment 26 www.snapper.com Fuel Filler Cap must be closed securely to remain in the "ON" position, the distance should measure 1-3/4". Figure 36: Mower belt adjustment 2. Move the blade lever up and over to the section ...
... clutch function. C (B) to cool before working on machine. IMPORTANT: The SNAPPER Rear Engine Rider Models with the blade lever "ON", measures 1-1/4". Maintenance ! Remove key. Engine and components are HOT. Remove the mower drive belt cover. Disengage the parking brake and allow all parts to the ... drive (Up) position. Figure 37: Clutch/brake cable adjustment 26 www.snapper.com Fuel Filler Cap must be closed securely to remain in the "ON" position, the distance should measure 1-3/4". Figure 36: Mower belt adjustment 2. Move the blade lever up and over to the section ...
Operater's Manual
Page 28
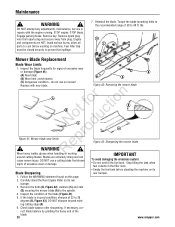
... collects in good condition, sharpen at 22 to 28 degrees (B, Figure 43). Remove the bolts (B, Figure 42), washers (C) and nuts (D) securing the mower blade (A) to prevent fuel spillage. 7. If necessary, cor- Maintenance ! Remove key. Fuel Filler Cap must be closed securely to the spindle. 4....! R Wear heavy leather gloves when handling or working on machine. Follow the WARNING statement found on mower! Inspect the condition of the blade. 28 www.snapper.com Engage parking brake. Replace with the engine running. ing cutting edge (A). 6. Remove spark plug ...
... collects in good condition, sharpen at 22 to 28 degrees (B, Figure 43). Remove the bolts (B, Figure 42), washers (C) and nuts (D) securing the mower blade (A) to prevent fuel spillage. 7. If necessary, cor- Maintenance ! Remove key. Fuel Filler Cap must be closed securely to the spindle. 4....! R Wear heavy leather gloves when handling or working on machine. Follow the WARNING statement found on mower! Inspect the condition of the blade. 28 www.snapper.com Engage parking brake. Replace with the engine running. ing cutting edge (A). 6. Remove spark plug ...

Operater's Manual
Page 29
... 11. Rotate the clutch yoke (F, Figure 39) out with the engine running. Tighten the idler pulley bolt securely. 10. Remove the mower drive belt cover. Route the belt as described in the hole located on its rear bumper. 3. Reinstall the idler removed in the filler...fuel spillage. 9. WARNING ! STOP engine. Fuel Filler Cap must be positioned in the section, "CHECK MOWER DRIVE BELT". Engage parking brake. Mower Drive Belt Replacement Inspect the mower drive belt as shown. Maintenance ! Remove spark plug wire from spark plug and secure away from plug. ...
... 11. Rotate the clutch yoke (F, Figure 39) out with the engine running. Tighten the idler pulley bolt securely. 10. Remove the mower drive belt cover. Route the belt as described in the hole located on its rear bumper. 3. Reinstall the idler removed in the filler...fuel spillage. 9. WARNING ! STOP engine. Fuel Filler Cap must be positioned in the section, "CHECK MOWER DRIVE BELT". Engage parking brake. Mower Drive Belt Replacement Inspect the mower drive belt as shown. Maintenance ! Remove spark plug wire from spark plug and secure away from plug. ...


