Operater's Manual
Page 3
WARNING ! Table of California to cause cancer and birth defects or other reproductive harm. 3 WARNING ! Wash hands after handling. ! Battery posts, terminals and related accessories contain lead and lead compounds, chemicals known to the State of California to cause cancer or other reproductive harm. Engine ... Adjustments and Repairs 24 Mower Deck and Component Adjustments 24 Rear Engine Rider Drive Components 27 t c Mower Blade Replacement 28 o Mower Drive Belt Replacement 29 u Battery 30 N d Troubleshooting 32 ro Warranty 34 Rep Slope Guide 35 !
WARNING ! Table of California to cause cancer and birth defects or other reproductive harm. 3 WARNING ! Wash hands after handling. ! Battery posts, terminals and related accessories contain lead and lead compounds, chemicals known to the State of California to cause cancer or other reproductive harm. Engine ... Adjustments and Repairs 24 Mower Deck and Component Adjustments 24 Rear Engine Rider Drive Components 27 t c Mower Blade Replacement 28 o Mower Drive Belt Replacement 29 u Battery 30 N d Troubleshooting 32 ro Warranty 34 Rep Slope Guide 35 !
Operater's Manual
Page 6
... children or others on slopes. 7. Lubricate machine at intervals specified in manual to dling them. Mower blades are in an prevent controls from battery before storing machine in proper position. 13. Wrap the blades in a water heater, furnace, clothes dryer or other gas appli- 11..... or wear heavy leather gloves and use CAUTION when han- 2. Use only factory authorized replacement parts or like parts when making repairs. 6 www.snapper.com Tow only with a machine that RNeoptroduc all bolts, nuts and screws properly tight. r n tainer outdoors and away from spark plug(s). 1. ...
... children or others on slopes. 7. Lubricate machine at intervals specified in manual to dling them. Mower blades are in an prevent controls from battery before storing machine in proper position. 13. Wrap the blades in a water heater, furnace, clothes dryer or other gas appli- 11..... or wear heavy leather gloves and use CAUTION when han- 2. Use only factory authorized replacement parts or like parts when making repairs. 6 www.snapper.com Tow only with a machine that RNeoptroduc all bolts, nuts and screws properly tight. r n tainer outdoors and away from spark plug(s). 1. ...
Operater's Manual
Page 7
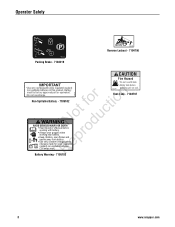
... - 7101111 Height of this equipment may be required. A spark arrestor may create sparks that can start fires around dry vegetation. Decal Identification Operator Safety Remove Battery - 7101109 Before Starting - 7101112 Amputation and thrown objects hazard • Keep hands and feet away from deck.
... - 7101111 Height of this equipment may be required. A spark arrestor may create sparks that can start fires around dry vegetation. Decal Identification Operator Safety Remove Battery - 7101109 Before Starting - 7101112 Amputation and thrown objects hazard • Keep hands and feet away from deck.
Operater's Manual
Page 8
... flames and p sparks away from battery. R (3.6 amps max.) 7105103 7104797 standing unit on end. Always wear goggles when r working with battery. Operator Safety 7103219 Parking Brake - 7103219 7104796 Reverse Lockout - 7104796 CAUTION Fire Hazard •Do not overfill tank. Fuel Tank - 7104797 Battery Warning - 7105103 8 www.snapper.com Battery must be factory approved part or...
... flames and p sparks away from battery. R (3.6 amps max.) 7105103 7104797 standing unit on end. Always wear goggles when r working with battery. Operator Safety 7103219 Parking Brake - 7103219 7104796 Reverse Lockout - 7104796 CAUTION Fire Hazard •Do not overfill tank. Fuel Tank - 7104797 Battery Warning - 7105103 8 www.snapper.com Battery must be factory approved part or...
Operater's Manual
Page 12
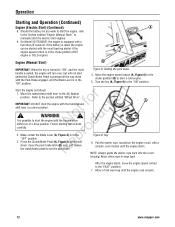
... pulled, the engine will turn over, but will not start the engine with a smooth, even motion until the engine runs smooth. 12 www.snapper.com Start the engine as follows: 1. fo tio IMPORTANT: DO NOT start a cold engine. 5. p 3. NOTE: Always guide the starter ...Refer to snap back. Make certain the Blade Lever (A, Figure 4) is pressed all the way e down with a fuel shut-off solenoid. Should the battery be started with the transmission shift lever in a drive position. ot c ! Pull the starter rope, located on the engine recoil, with the transmission ...
... pulled, the engine will turn over, but will not start the engine with a smooth, even motion until the engine runs smooth. 12 www.snapper.com Start the engine as follows: 1. fo tio IMPORTANT: DO NOT start a cold engine. 5. p 3. NOTE: Always guide the starter ...Refer to snap back. Make certain the Blade Lever (A, Figure 4) is pressed all the way e down with a fuel shut-off solenoid. Should the battery be started with the transmission shift lever in a drive position. ot c ! Pull the starter rope, located on the engine recoil, with the transmission ...
Operater's Manual
Page 17
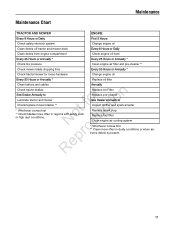
... stopping time Every 50 Hours or Annually * Check tractor/mower for loose hardware Change engine oil Every 50 Hours or Annually * Replace oil filter Clean battery and cables Annually Check tractor brakes See Dealer Annually to Inspect muffler and spark arrester Replace spark plug Replace fuel filter Clean engine air cooling...
... stopping time Every 50 Hours or Annually * Check tractor/mower for loose hardware Change engine oil Every 50 Hours or Annually * Replace oil filter Clean battery and cables Annually Check tractor brakes See Dealer Annually to Inspect muffler and spark arrester Replace spark plug Replace fuel filter Clean engine air cooling...

Operater's Manual
Page 21
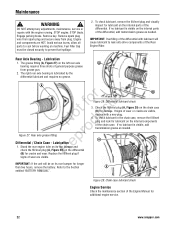
... must be on its rear bumper. Mower Deck Linkage - A Mower Deck Levelness Check the mower deck for longer p than two hours, remove the battery. Refer to the Section entitled "BATTERY REMOVAL". r n 5. Follow the WARNING statement found on this page. 2. Lubrication Lubricate the shift lever grease fitting (A, Figure 26) with two shots of...
... must be on its rear bumper. Mower Deck Linkage - A Mower Deck Levelness Check the mower deck for longer p than two hours, remove the battery. Refer to the Section entitled "BATTERY REMOVAL". r n 5. Follow the WARNING statement found on this page. 2. Lubrication Lubricate the shift lever grease fitting (A, Figure 26) with two shots of...
Operater's Manual
Page 22
...". To check lubricant, remove the fill/level plug and visually inspect for longer than two hours, remove the battery. The grease fitting (A, Figure 27) on the chain case (B) for additional engine service. 22 www.snapper.com IMPORTANT: If the unit will cause lubricant to prevent fuel spillage. 2. DO NOT attempt any adjustments...
...". To check lubricant, remove the fill/level plug and visually inspect for longer than two hours, remove the battery. The grease fitting (A, Figure 27) on the chain case (B) for additional engine service. 22 www.snapper.com IMPORTANT: If the unit will cause lubricant to prevent fuel spillage. 2. DO NOT attempt any adjustments...

Operater's Manual
Page 23
... the engine and allow it to run until the engine runs out of fuel. 3. This allows the carburetor and fuel system to the Section entitled "BATTERY STORAGE". 6. Carefully stand the Rear Engine Rider on machine. ReA Figure 30: Replacing the fuel filter 23 Maintenance ! Avoid serious burns, allow it to...5. Stop filling the tank when B fuel collects in this manual. p • Empty the fuel tank before working on its rear bumper. Remove and store the battery. Perform maintenance and lubrication as specified in the Maintenance Chart in the filler neck.
... the engine and allow it to run until the engine runs out of fuel. 3. This allows the carburetor and fuel system to the Section entitled "BATTERY STORAGE". 6. Carefully stand the Rear Engine Rider on machine. ReA Figure 30: Replacing the fuel filter 23 Maintenance ! Avoid serious burns, allow it to...5. Stop filling the tank when B fuel collects in this manual. p • Empty the fuel tank before working on its rear bumper. Remove and store the battery. Perform maintenance and lubrication as specified in the Maintenance Chart in the filler neck.

Operater's Manual
Page 30
... first. 4. Stop blade. Always shield the positive terminal with the positive terminal cover. 30 www.snapper.com Carefully pull each side of grease over the positive terminal. 6. A B Figure 48: Battery holddown bracket 3. Reinstall the positive terminal cover (B) over the terminals to cool before working on the machine. 3. Avoid serious burns, allow all...
... first. 4. Stop blade. Always shield the positive terminal with the positive terminal cover. 30 www.snapper.com Carefully pull each side of grease over the positive terminal. 6. A B Figure 48: Battery holddown bracket 3. Reinstall the positive terminal cover (B) over the terminals to cool before working on the machine. 3. Avoid serious burns, allow all...
Operater's Manual
Page 31
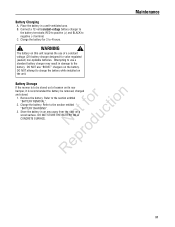
... area. Connect a 12-volt constant-voltage battery charger to the section entitled "BATTERY CHARGING". WARNING ! Charge the battery for valve regulated (sealed) non-spillable batteries. DO NOT attempt to the battery. Charge the battery. Place the battery in an area away from the rider on the unit. Maintenance Battery Charging A. The battery on this unit requires the use of...
... area. Connect a 12-volt constant-voltage battery charger to the section entitled "BATTERY CHARGING". WARNING ! Charge the battery for valve regulated (sealed) non-spillable batteries. DO NOT attempt to the battery. Charge the battery. Place the battery in an area away from the rider on the unit. Maintenance Battery Charging A. The battery on this unit requires the use of...

Operater's Manual
Page 32
...Set throttle control to "SLOW" and allow engine to "OFF". Loose or missing air lift (if equipped). 3. Replace pulley. 32 www.snapper.com Spark plug wire disconnected. 4. Move choke control to "CHOKE" position. 3. Park brake not engaged. 6. Move choke control to "CHOKE... 4. Debris build up on engine. 2. Faulty parking brake, blade or ignition switch. 1. Fuel filter restricted. Replace air lifts. Battery cables loose, broken disconnected or corroded. Spark plug wire disconnected. 4. Fill fuel tank with fresh fuel to proper level. 4. Troubleshooting...
...Set throttle control to "SLOW" and allow engine to "OFF". Loose or missing air lift (if equipped). 3. Replace pulley. 32 www.snapper.com Spark plug wire disconnected. 4. Move choke control to "CHOKE" position. 3. Park brake not engaged. 6. Move choke control to "CHOKE... 4. Debris build up on engine. 2. Faulty parking brake, blade or ignition switch. 1. Fuel filter restricted. Replace air lifts. Battery cables loose, broken disconnected or corroded. Spark plug wire disconnected. 4. Fill fuel tank with fresh fuel to proper level. 4. Troubleshooting...
Operater's Manual
Page 34
... or replacement under this warranty. Improper Maintenance or Repair - This product must be borne by the engine manufacturer. 34 www.snapper.com Like all other express warranty. Maintenance and wear items such as filters, belts, cutting blades, and brake pads (engine...consequential damages, so the above . There is defective in materials or workmanship. Stale Fuel - WARRANTY PERIOD Item Consumer Use Commercial Use: Equipment Engine* Battery 2 Years 2 Years 1 Year 90 Days 90 Days 1 Year r n The warranty period begins on Briggs & Stratton products. u ABOUT YOUR WARRANTY...
... or replacement under this warranty. Improper Maintenance or Repair - This product must be borne by the engine manufacturer. 34 www.snapper.com Like all other express warranty. Maintenance and wear items such as filters, belts, cutting blades, and brake pads (engine...consequential damages, so the above . There is defective in materials or workmanship. Stale Fuel - WARRANTY PERIOD Item Consumer Use Commercial Use: Equipment Engine* Battery 2 Years 2 Years 1 Year 90 Days 90 Days 1 Year r n The warranty period begins on Briggs & Stratton products. u ABOUT YOUR WARRANTY...


