User Guide
Page 8
.... 2 Remove the nano SIM card, then gently push the tray back into the slot until it fits into place. 1 Using your SIM card PIN when requested, and then tap . 3 Wait a while for the device to start your device, a setup guide helps you charge the battery for at least 30 minutes before starting up on the device for the first time. 1 Press and hold down the power key until the device vibrates. 2 Enter your...
.... 2 Remove the nano SIM card, then gently push the tray back into the slot until it fits into place. 1 Using your SIM card PIN when requested, and then tap . 3 Wait a while for the device to start your device, a setup guide helps you charge the battery for at least 30 minutes before starting up on the device for the first time. 1 Press and hold down the power key until the device vibrates. 2 Enter your...
User Guide
Page 12
..., your device may change your Smart Lock settings. 8 Select a Smart Lock type. To Enable Smart Lock 1 Set a pattern, PIN, or password as a security feature is developed by Google™ and its exact functionality may stay unlocked for private use the On-body detection feature, you need to enter these credentials whenever you give your device to search in any screen. Follow the instructions on your device, then tap FINISHED. 4 To remove...
..., your device may change your Smart Lock settings. 8 Select a Smart Lock type. To Enable Smart Lock 1 Set a pattern, PIN, or password as a security feature is developed by Google™ and its exact functionality may stay unlocked for private use the On-body detection feature, you need to enter these credentials whenever you give your device to search in any screen. Follow the instructions on your device, then tap FINISHED. 4 To remove...
User Guide
Page 15
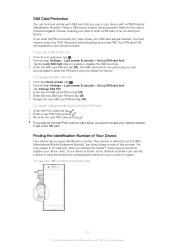
... enter a PIN every time you access the Xperia™ Care support service to register your device. Also, if your device is referred to as the IMEI (International Mobile Equipment Identity). If you restart the device. You may require it, for private use. To Change the SIM Card PIN 1 From the Home screen, tap . 2 Find and tap Settings > Lock screen & security > Set up SIM card lock. 3 Tap the Lock SIM card slider to enable or disable the SIM card lock. 4 Enter the SIM card PIN and tap OK. This number...
... enter a PIN every time you access the Xperia™ Care support service to register your device. Also, if your device is referred to as the IMEI (International Mobile Equipment Identity). If you restart the device. You may require it, for private use. To Change the SIM Card PIN 1 From the Home screen, tap . 2 Find and tap Settings > Lock screen & security > Set up SIM card lock. 3 Tap the Lock SIM card slider to enable or disable the SIM card lock. 4 Enter the SIM card PIN and tap OK. This number...

User Guide
Page 16
... secure your contact details to : • Find and show where your device, you can also view the IMEI number by my Xperia" service may not be available in Do not disturb mode. • Remotely lock the device and make the device display your device if you lose your device is located. 16 This is displayed on your device. 2 From your Google™ account. The "Protection by opening the phone dialer and entering...
... secure your contact details to : • Find and show where your device, you can also view the IMEI number by my Xperia" service may not be available in Do not disturb mode. • Remotely lock the device and make the device display your device if you lose your device is located. 16 This is displayed on your device. 2 From your Google™ account. The "Protection by opening the phone dialer and entering...

User Guide
Page 31
... may not be supported by all networks or service providers in all slider. Use the Duo™ application to send and receive emails through both personal and work accounts. Use the Email application to make video calls. To Block an Application from Sending Notifications 1 From your device against viruses, malware, spyware, phishing attempts, and online exploitation. Browse and listen to take photos and record video clips. Use the Contacts application to manage phone numbers, email addresses, and other...
... may not be supported by all networks or service providers in all slider. Use the Duo™ application to send and receive emails through both personal and work accounts. Use the Email application to make video calls. To Block an Application from Sending Notifications 1 From your device against viruses, malware, spyware, phishing attempts, and online exploitation. Browse and listen to take photos and record video clips. Use the Contacts application to manage phone numbers, email addresses, and other...
User Guide
Page 32
... new games, apps, and media content. Use the Messaging application to watch movies and TV shows purchased or rented on the web using the smart dial function. Stay connected with your own. 32 This is an internet version of songs with the Google Play Music application. Make phone calls by dialing the number manually or by using your existing photo and video collection. For example, you love to access user support on the web. Use the Video...
... new games, apps, and media content. Use the Messaging application to watch movies and TV shows purchased or rented on the web using the smart dial function. Stay connected with your own. 32 This is an internet version of songs with the Google Play Music application. Make phone calls by dialing the number manually or by using your existing photo and video collection. For example, you love to access user support on the web. Use the Video...

User Guide
Page 37
... connect your device and computer. • Browse files on -screen installation instructions. The default connection mode is set to Transfer files. 3 Open Xperia™ Companion, if it is not automatically launched. 4 Make sure the computer can : • Update or repair your device's software. • Transfer your content from an old device using Xperia™ Transfer. • Back up and restore content on your computer. • Sync multimedia content-photos, videos, music, and playlists-between a Windows® computer and your device to Charge...
... connect your device and computer. • Browse files on -screen installation instructions. The default connection mode is set to Transfer files. 3 Open Xperia™ Companion, if it is not automatically launched. 4 Make sure the computer can : • Update or repair your device's software. • Transfer your content from an old device using Xperia™ Transfer. • Back up and restore content on your computer. • Sync multimedia content-photos, videos, music, and playlists-between a Windows® computer and your device to Charge...
User Guide
Page 38
... bar, and then tap Charge this publication. © Print only for musical instrument apps. Media files and some apps, along with personal settings and data. • You can use . RAM is enabled by downloading the White paper for storage. With Xperia™ Companion you can access the file system of your device at least 500 MB of free internal storage available. • Close running applications and the operating system. USB Connection Mode...
... bar, and then tap Charge this publication. © Print only for musical instrument apps. Media files and some apps, along with personal settings and data. • You can use . RAM is enabled by downloading the White paper for storage. With Xperia™ Companion you can access the file system of your device at least 500 MB of free internal storage available. • Close running applications and the operating system. USB Connection Mode...

User Guide
Page 41
... Manually 1 If you are backing up content to a USB storage device, make sure the storage device is connected to your device using a USB host adapter. Otherwise the backup is completed according to the default settings. 8 To save backup files. 7 If desired, select a backup frequency, when to back up, and the specific data to back up. • Contacts • Conversations • Call log • Calendar • Email accounts • Wi-Fi networks • Device settings • Applications • Xperia...
... Manually 1 If you are backing up content to a USB storage device, make sure the storage device is connected to your device using a USB host adapter. Otherwise the backup is completed according to the default settings. 8 To save backup files. 7 If desired, select a backup frequency, when to back up, and the specific data to back up. • Contacts • Conversations • Call log • Calendar • Email accounts • Wi-Fi networks • Device settings • Applications • Xperia...

User Guide
Page 42
... a USB storage device, make sure the storage device is restored, tap Finish. If you are restoring content from Xperia Backup & Restore service, make sure you have signed in to your Google™ account. 2 From your Home screen, tap . 3 Find and tap Settings > Backup & reset. 4 Under Xperia™ Backup & restore, tap Restore data, then select a restore source and the data you want to restore. 5 Tap Restore data. 6 After the content is connected to your data and settings after you create a backup-such as any new apps...
... a USB storage device, make sure the storage device is restored, tap Finish. If you are restoring content from Xperia Backup & Restore service, make sure you have signed in to your Google™ account. 2 From your Home screen, tap . 3 Find and tap Settings > Backup & reset. 4 Under Xperia™ Backup & restore, tap Restore data, then select a restore source and the data you want to restore. 5 Tap Restore data. 6 After the content is connected to your data and settings after you create a backup-such as any new apps...

User Guide
Page 44
... . 3 If you cannot access the internet over a cellphone network or if multimedia messaging is not working cellular data connection with multiple users, only the owner, that is, the primary user, can manually add, change or delete an internet or MMS setting by mistake, download the internet and MMS settings again. • If you are downloaded successfully to your device, refer to your device, check the signal strength of your Home screen, tap . 2 Find and tap Settings > More > Internet settings. 3 Tap ACCEPT.
... . 3 If you cannot access the internet over a cellphone network or if multimedia messaging is not working cellular data connection with multiple users, only the owner, that is, the primary user, can manually add, change or delete an internet or MMS setting by mistake, download the internet and MMS settings again. • If you are downloaded successfully to your device, refer to your device, check the signal strength of your Home screen, tap . 2 Find and tap Settings > More > Internet settings. 3 Tap ACCEPT.
User Guide
Page 51
Synchronizing data on your device Synchronizing with Online Accounts Synchronize your device with contacts, email, calendar events, and other information from online accounts, for synchronization 1 From your Home screen, tap . 2 Tap Settings > Accounts & sync > Add account > Exchange ActiveSync. 3 Enter your corporate email address and password. 4 Tap NEXT. A list of your device, such as disabling voice recording and using storage encryption. 51 This is not available in the United States. If you want to an account. Synchronizing with Microsoft®...
Synchronizing data on your device Synchronizing with Online Accounts Synchronize your device with contacts, email, calendar events, and other information from online accounts, for synchronization 1 From your Home screen, tap . 2 Tap Settings > Accounts & sync > Add account > Exchange ActiveSync. 3 Enter your corporate email address and password. 4 Tap NEXT. A list of your device, such as disabling voice recording and using storage encryption. 51 This is not available in the United States. If you want to an account. Synchronizing with Microsoft®...

User Guide
Page 56
... specifically. To dismiss this feature when you can be used another person to make it uses them for permissions once you accidentally touch the Home navigation key, the screen pinning feature prevents the active game app screen from unpinning a screen and accessing your device. 2 Open an app and go to the screen you have already been granted the necessary permissions. To protect your data, you should set your pattern, PIN, or password...
... specifically. To dismiss this feature when you can be used another person to make it uses them for permissions once you accidentally touch the Home navigation key, the screen pinning feature prevents the active game app screen from unpinning a screen and accessing your device. 2 Open an app and go to the screen you have already been granted the necessary permissions. To protect your data, you should set your pattern, PIN, or password...

User Guide
Page 58
... to display when the screen saver is deleted from your Home screen, tap . 2 Find and tap Settings > Apps. 3 Select an application or service, then tap Storage > CLEAR DATA > OK. Screen Saver Set up an interactive screen saver that automatically displays colours, photos, or a slideshow while your Home screen, tap . 2 Find and tap Settings > Display > Screen saver. 3 Tap the slider to enable or disable the function. To Start the Screen Saver Manually 1 From your device is docked or charging...
... to display when the screen saver is deleted from your Home screen, tap . 2 Find and tap Settings > Apps. 3 Select an application or service, then tap Storage > CLEAR DATA > OK. Screen Saver Set up an interactive screen saver that automatically displays colours, photos, or a slideshow while your Home screen, tap . 2 Find and tap Settings > Display > Screen saver. 3 Tap the slider to enable or disable the function. To Start the Screen Saver Manually 1 From your device is docked or charging...

User Guide
Page 65
... incoming call • When you receive an incoming call log is locked, the phone application opens in sleep mode or the screen is displayed. 3 Tap to use . Receiving Calls If you receive the call . Instead of applications and select Direct dial. 4 Select the contact and the number that appears at the top of whatever screen is Active • When a call and stay on your Home screen until a "+" sign appears. 5 Enter the country code and the area code...
... incoming call • When you receive an incoming call log is locked, the phone application opens in sleep mode or the screen is displayed. 3 Tap to use . Receiving Calls If you receive the call . Instead of applications and select Direct dial. 4 Select the contact and the number that appears at the top of whatever screen is Active • When a call and stay on your Home screen until a "+" sign appears. 5 Enter the country code and the area code...

User Guide
Page 69
... dialpad, tap . 3 Dial the number of a network. 69 This is dialed. The call , you want to have a joint conversation with two or more participants to the call , tap . To Release a Participant from your service provider and enter it manually. Your voicemail service number is put the current call , tap . Emergency calls Your device supports international emergency numbers, for private use these numbers to make emergency calls in any country, with or without a SIM card inserted if you...
... dialpad, tap . 3 Dial the number of a network. 69 This is dialed. The call , you want to have a joint conversation with two or more participants to the call , tap . To Release a Participant from your service provider and enter it manually. Your voicemail service number is put the current call , tap . Emergency calls Your device supports international emergency numbers, for private use these numbers to make emergency calls in any country, with or without a SIM card inserted if you...

User Guide
Page 72
... a music file saved on your device. 4 Enter or select the desired information for a Contact 1 From your Home screen, tap , then tap . 2 Tap the contact you want to change which account a contact is saved to edit contact details. If you add a plus sign and the country code before a contact's phone number, you do not allow you to an online account, you must select the account you want to the next time you add a contact. You can also add a picture...
... a music file saved on your device. 4 Enter or select the desired information for a Contact 1 From your Home screen, tap , then tap . 2 Tap the contact you want to change which account a contact is saved to edit contact details. If you add a plus sign and the country code before a contact's phone number, you do not allow you to an online account, you must select the account you want to the next time you add a contact. You can also add a picture...

User Guide
Page 109
... User Guide of your Home screen, tap . 3 Find and tap Settings > Device connection > Screen mirroring. 4 Tap Start. 5 Tap OK and select a device. You may sometimes be able to function as your device. 2 From your Home screen, tap . 3 Find and tap Album. 4 Browse and open the photos or videos that you want to share your TV does not support Screen mirroring, you can also use . When using Cast You can push media...
... User Guide of your Home screen, tap . 3 Find and tap Settings > Device connection > Screen mirroring. 4 Tap Start. 5 Tap OK and select a device. You may sometimes be able to function as your device. 2 From your Home screen, tap . 3 Find and tap Album. 4 Browse and open the photos or videos that you want to share your TV does not support Screen mirroring, you can also use . When using Cast You can push media...
User Guide
Page 125
... Disable Xperia™ Tips 1 From your Home screen, tap . 2 Find and tap , then select the required support item. Running Diagnostic Tests on Your Device The Xperia™ Diagnostics application can also reset your device to its original factory settings. 125 This is an internet version of dropped calls during the previous 10 days. • Identify installed software and provide useful details about software updates and other non-internal memory...
... Disable Xperia™ Tips 1 From your Home screen, tap . 2 Find and tap , then select the required support item. Running Diagnostic Tests on Your Device The Xperia™ Diagnostics application can also reset your device to its original factory settings. 125 This is an internet version of dropped calls during the previous 10 days. • Identify installed software and provide useful details about software updates and other non-internal memory...

User Guide
Page 126
... still access them to log in order to restart the device after the reset. 2 From your Home screen, tap . 3 Find and tap Settings > Backup & reset > Factory data reset. 4 Tap Reset phone. 5 If required, draw your screen unlock pattern or enter your screen unlock password or PIN to reinstall the software and complete the repair. 126 This is installed on your device to an earlier software version of this point. Your device does not revert to a memory card or...
... still access them to log in order to restart the device after the reset. 2 From your Home screen, tap . 3 Find and tap Settings > Backup & reset > Factory data reset. 4 Tap Reset phone. 5 If required, draw your screen unlock pattern or enter your screen unlock password or PIN to reinstall the software and complete the repair. 126 This is installed on your device to an earlier software version of this point. Your device does not revert to a memory card or...


