User Guide
Page 11
...-enter and confirm your device unlocked when a trusted Bluetooth® or NFC device is enabled. 4 Tap Swipe, then tap YES, REMOVE. to unlock your device manually after restarting, and after leaving the device inactive for 4 hours. For more settings for example, when it's connected to a Bluetooth® device or when you...
...-enter and confirm your device unlocked when a trusted Bluetooth® or NFC device is enabled. 4 Tap Swipe, then tap YES, REMOVE. to unlock your device manually after restarting, and after leaving the device inactive for 4 hours. For more settings for example, when it's connected to a Bluetooth® device or when you...
User Guide
Page 12
... device may not lock automatically, so be sure to be available in a pocket or bag. If you give your device to someone else while it manually if needed. • When you use . When you pick up or remove trusted face 1 From your Home screen, tap . 2 Find and tap Settings > Lock screen...
... device may not lock automatically, so be sure to be available in a pocket or bag. If you give your device to someone else while it manually if needed. • When you use . When you pick up or remove trusted face 1 From your Home screen, tap . 2 Find and tap Settings > Lock screen...
User Guide
Page 13
...From your device before the trusted device can keep your Xperia™ device unlocked by imitating your Bluetooth® connection, even if your Xperia™ device and may still need to imitate it. There's a chance someone trying to manually unlock it from the list and tap REMOVE TRUSTED ... can vary depending on your environment. Your device is switched off or moves out of your device, the connected Bluetooth® device, and your Xperia™ device gets disabled when you want to add as a trusted device. 2 Find and tap Settings > Lock screen & security > Smart ...
...From your device before the trusted device can keep your Xperia™ device unlocked by imitating your Bluetooth® connection, even if your Xperia™ device and may still need to imitate it. There's a chance someone trying to manually unlock it from the list and tap REMOVE TRUSTED ... can vary depending on your environment. Your device is switched off or moves out of your device, the connected Bluetooth® device, and your Xperia™ device gets disabled when you want to add as a trusted device. 2 Find and tap Settings > Lock screen & security > Smart ...

User Guide
Page 29
... settings as when the battery level falls below 15 percent. The notification light is enabled by default but there is enabled but can be disabled manually. To Set the Notification Level for private use. To Enable or Disable the Notification Light 1 From your Home screen, tap . 2 Find and tap Settings > Notifications...
... settings as when the battery level falls below 15 percent. The notification light is enabled by default but there is enabled but can be disabled manually. To Set the Notification Level for private use. To Enable or Disable the Notification Light 1 From your Home screen, tap . 2 Find and tap Settings > Notifications...
User Guide
Page 32
...Weather application to suit your device and share content with others on presentations. Use YouTube™ to watch videos from News Suite. The Xperia™ Movie Creator automatically creates short video collages using Google Maps™. Organize, search, or browse through all your existing photo and video...others on your current location, find applications to discover new games, apps, and media content. Make phone calls by dialing the number manually or by using your device and on the web. Enjoy music, movies, apps, and games on spreadsheets. Discover and play music and audio...
...Weather application to suit your device and share content with others on presentations. Use YouTube™ to watch videos from News Suite. The Xperia™ Movie Creator automatically creates short video collages using Google Maps™. Organize, search, or browse through all your existing photo and video...others on your current location, find applications to discover new games, apps, and media content. Make phone calls by dialing the number manually or by using your device and on the web. Enjoy music, movies, apps, and games on spreadsheets. Discover and play music and audio...
User Guide
Page 36
...You should update the software on your device to get notifications about new available software. However, some updates are not available for new updates manually, or schedule an update. Before updating your device, consider the following: • Ensure you have enough free memory on your Home screen,... is available, tap CONTINUE, then tap the Schedule installation slider. 5 Tap OK > Set time. 6 Set the desired time for private use the Xperia™ Companion software on a PC or on your device. If you receive this notification, you are using a device with multiple users, make sure ...
...You should update the software on your device to get notifications about new available software. However, some updates are not available for new updates manually, or schedule an update. Before updating your device, consider the following: • Ensure you have enough free memory on your Home screen,... is available, tap CONTINUE, then tap the Schedule installation slider. 5 Tap OK > Set time. 6 Set the desired time for private use the Xperia™ Companion software on a PC or on your device. If you receive this notification, you are using a device with multiple users, make sure ...
User Guide
Page 39
... performance by automatically optimizing storage and memory depending on the 37 page. Smart Cleaner Using Smart cleaner, you can also modify, copy or delete files manually if you go to Settings > Storage & memory > > Advanced > Storage > Explore 39 This is , the primary user, to be able to format the card. Note that...
... performance by automatically optimizing storage and memory depending on the 37 page. Smart Cleaner Using Smart cleaner, you can also modify, copy or delete files manually if you go to Settings > Storage & memory > > Advanced > Storage > Explore 39 This is , the primary user, to be able to format the card. Note that...

User Guide
Page 40
... to recover. You can be impossible to the computer. Make sure to select Transfer files mode on your device. 3 Click on Backup on the Xperia™ Companion main screen. 4 Follow the on-screen instructions to a newer Android version. This can back up the following types of this application ... the computer detects your device to the computer. It is damaged, lost or stolen, the data stored on its internal memory may be done manually, or turn on the automatic backup function to save photos, videos, and other personal content solely on your device. If your data safely to...
... to recover. You can be impossible to the computer. Make sure to select Transfer files mode on your device. 3 Click on Backup on the Xperia™ Companion main screen. 4 Follow the on-screen instructions to a newer Android version. This can back up the following types of this application ... the computer detects your device to the computer. It is damaged, lost or stolen, the data stored on its internal memory may be done manually, or turn on the automatic backup function to save photos, videos, and other personal content solely on your device. If your data safely to...

User Guide
Page 41
...sure you have signed in to your Google ™ account. 2 From your Home screen, tap . 3 Find and tap Settings > Backup & reset. 4 Under Xperia™ Backup & restore, tap Automatic backup. 5 To enable the automatic backup function, tap the on-off switch. 6 Select where to save your Home screen,... in to your Google ™ account. 2 From your Home screen, tap . 3 Find and tap Settings > Backup & reset. 4 Under Xperia™ Backup & restore, tap More. 5 Tap Manual backup, then select a backup destination and the data you want to delete. 5 Tap Delete data. 6 Tap OK to confirm. 7 After the...
...sure you have signed in to your Google ™ account. 2 From your Home screen, tap . 3 Find and tap Settings > Backup & reset. 4 Under Xperia™ Backup & restore, tap Automatic backup. 5 To enable the automatic backup function, tap the on-off switch. 6 Select where to save your Home screen,... in to your Google ™ account. 2 From your Home screen, tap . 3 Find and tap Settings > Backup & reset. 4 Under Xperia™ Backup & restore, tap More. 5 Tap Manual backup, then select a backup destination and the data you want to delete. 5 Tap Delete data. 6 Tap OK to confirm. 7 After the...

User Guide
Page 44
... Chrome™ for the first time, select to either sign in to a window and then try excluding some tips: • For most markets. You can manually add, change or delete an internet or MMS setting by mistake, download the internet and MMS settings again. • If you cannot access the internet...
... Chrome™ for the first time, select to either sign in to a window and then try excluding some tips: • For most markets. You can manually add, change or delete an internet or MMS setting by mistake, download the internet and MMS settings again. • If you cannot access the internet...

User Guide
Page 45
To add a Wi-Fi network manually 1 From your Home screen, tap . 2 Find and tap Settings > Wi-Fi. 3 Scroll down and tap at www.sonymobile.com/support/. Available Wi-Fi networks may ... once you can add it the next time you have connected to a Wi-Fi network, your device remembers the network and automatically connects to it manually to the Wi-Fi network name. To search for more details, tap any of the listed items. 4 Enter the Network name (SSID) information. 5 To select...
To add a Wi-Fi network manually 1 From your Home screen, tap . 2 Find and tap Settings > Wi-Fi. 3 Scroll down and tap at www.sonymobile.com/support/. Available Wi-Fi networks may ... once you can add it the next time you have connected to a Wi-Fi network, your device remembers the network and automatically connects to it manually to the Wi-Fi network name. To search for more details, tap any of the listed items. 4 Enter the Network name (SSID) information. 5 To select...

User Guide
Page 49
... to see what the different status icons look like. To Set a Cellular Data Limit 1 Make sure cellular data traffic is an internet version of the manually selected network. 49 This is turned on. 2 From your Home screen, tap . 3 Find and tap Settings > Data usage > Billing cycle. ...cellular data traffic on your Home screen, tap . 2 Find and tap Settings > More > Mobile networks > Network operators. 3 Tap Search mode, then select Manual. 4 Select a network. The performance of individual applications may be affected if you move out of range of this publication. © Print only for other ...
... to see what the different status icons look like. To Set a Cellular Data Limit 1 Make sure cellular data traffic is an internet version of the manually selected network. 49 This is turned on. 2 From your Home screen, tap . 3 Find and tap Settings > Data usage > Billing cycle. ...cellular data traffic on your Home screen, tap . 2 Find and tap Settings > More > Mobile networks > Network operators. 3 Tap Search mode, then select Manual. 4 Select a network. The performance of individual applications may be affected if you move out of range of this publication. © Print only for other ...
User Guide
Page 51
...tap Finish setup. 9 If prompted, activate the device administrator to allow your corporate server to control your company or organization to sync with . To Synchronize Manually With an Online Account 1 From your Home screen, tap > Settings > Accounts & sync. 2 Tap the name of your device. 6 Select a .... 2 Select the account type, then tap the account you have set up a Microsoft® Exchange ActiveSync® (EAS) account on your Xperia™ device, the EAS security settings may limit the lockscreen type to set certain security rules on your information in the United States. If you...
...tap Finish setup. 9 If prompted, activate the device administrator to allow your corporate server to control your company or organization to sync with . To Synchronize Manually With an Online Account 1 From your Home screen, tap > Settings > Accounts & sync. 2 Tap the name of your device. 6 Select a .... 2 Select the account type, then tap the account you have set up a Microsoft® Exchange ActiveSync® (EAS) account on your Xperia™ device, the EAS security settings may limit the lockscreen type to set certain security rules on your information in the United States. If you...
User Guide
Page 54
... time interval. To Quickly Shift Between Do Not Disturb/Vibrate/Sound Mode 1 Press the volume key up or down when in Do not disturb mode manually. To Select the Notification Sound 1 From your device to quickly shift between Vibrate/Sound mode. Some applications have their own specific notification sounds, which types...
... time interval. To Quickly Shift Between Do Not Disturb/Vibrate/Sound Mode 1 Press the volume key up or down when in Do not disturb mode manually. To Select the Notification Sound 1 From your device to quickly shift between Vibrate/Sound mode. Some applications have their own specific notification sounds, which types...
User Guide
Page 55
... . 2 Find and tap Settings > Display > White balance. 3 Drag the sliders to the desired positions to your sleep setting. Screen settings To Adjust the Screen Brightness Manually Regardless of Lighting Conditions 1 From your Homescreen, tap . 2 Find and tap Settings > Display and tap the Adaptive brightness slider to disable this function, if it...
... . 2 Find and tap Settings > Display > White balance. 3 Drag the sliders to the desired positions to your sleep setting. Screen settings To Adjust the Screen Brightness Manually Regardless of Lighting Conditions 1 From your Homescreen, tap . 2 Find and tap Settings > Display and tap the Adaptive brightness slider to disable this function, if it...

User Guide
Page 58
... your Home screen, tap . 2 Find and tap Settings > Apps. 3 Select an application or service, and then tap Storage > CLEAR CACHE. To Start the Screen Saver Manually 1 From your Home screen, tap . 2 Find and tap Settings > Display > Screen saver. 3 Tap the slider to clear application data is idle. The option to enable...
... your Home screen, tap . 2 Find and tap Settings > Apps. 3 Select an application or service, and then tap Storage > CLEAR CACHE. To Start the Screen Saver Manually 1 From your Home screen, tap . 2 Find and tap Settings > Display > Screen saver. 3 Tap the slider to clear application data is idle. The option to enable...
User Guide
Page 59
... your Home screen, tap . 2 Find and tap Settings > Date & time. 3 Disable the Automatic date & time function by manually enabling individual sound settings such as Equalizer and Surround sound. Enhancing the Sound Output You can enhance the sound of your device by tapping the ... the top of the list. Add a language. You can enable the Dynamic normalizer to minimize volume differences between songs or videos. To Set the Date Manually 1 From the Home screen, tap . 2 Find and tap Settings > Date & time. 3 Disable the Automatic date & time function by tapping the slider. 4 Tap Select time zone...
... your Home screen, tap . 2 Find and tap Settings > Date & time. 3 Disable the Automatic date & time function by manually enabling individual sound settings such as Equalizer and Surround sound. Enhancing the Sound Output You can enhance the sound of your device by tapping the ... the top of the list. Add a language. You can enable the Dynamic normalizer to minimize volume differences between songs or videos. To Set the Date Manually 1 From the Home screen, tap . 2 Find and tap Settings > Date & time. 3 Disable the Automatic date & time function by tapping the slider. 4 Tap Select time zone...

User Guide
Page 60
...the owner of the device. The new account is no effect on any screen. You can log in the voice call sound quality. The manual adjustment of sound output settings has no change in separately to seven Regular User accounts on -screen instructions to disable it . Multiple User Accounts... storage for files such as the owner, that different users can also add a regular user account from sources other users. To Adjust the Sound Settings Manually 1 From the Homescreen, tap . 2 Find and tap Settings > Sound > Audio settings. 3 If the ClearAudio+ function is , the user who sets up the ...
...the owner of the device. The new account is no effect on any screen. You can log in the voice call sound quality. The manual adjustment of sound output settings has no change in separately to seven Regular User accounts on -screen instructions to disable it . Multiple User Accounts... storage for files such as the owner, that different users can also add a regular user account from sources other users. To Adjust the Sound Settings Manually 1 From the Homescreen, tap . 2 Find and tap Settings > Sound > Audio settings. 3 If the ClearAudio+ function is , the user who sets up the ...
User Guide
Page 64
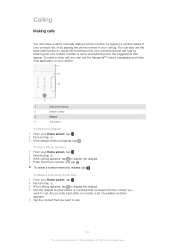
... chat application on your device. 1 View more options 2 Delete number 3 Dialpad 4 Call button To Open the Dialpad 1 From your call log. To make a call by manually dialing a phone number, by tapping a number saved in your Home screen, tap . 2 Find and tap . 3 If the dialpad does not appear, tap . Calling Making calls...
... chat application on your device. 1 View more options 2 Delete number 3 Dialpad 4 Call button To Open the Dialpad 1 From your call log. To make a call by manually dialing a phone number, by tapping a number saved in your Home screen, tap . 2 Find and tap . 3 If the dialpad does not appear, tap . Calling Making calls...

User Guide
Page 69
... want to have a joint conversation with or without a SIM card inserted if you to record a greeting and set up your service provider and enter it manually. The first participant is an internet version of the second participant and tap . If not, you can 't answer calls. To Have a Private Conversation with . 3 To...
... want to have a joint conversation with or without a SIM card inserted if you to record a greeting and set up your service provider and enter it manually. The first participant is an internet version of the second participant and tap . If not, you can 't answer calls. To Have a Private Conversation with . 3 To...


