
Limited Warranty (U.S. Only)
Page 1
... with the Product for the time periods and as fuses or batteries). Instructions: To obtain warranty service, you . Printed in the United States. If Sony elects to its option, (i) repair the product using new or refurbished parts or (ii) replace the product with the Product. Only) Sony Electronics Inc. ("Sony") warrants this Limited Warranty will , at its original specifications. Parts: For a period of one (1) year...
... with the Product for the time periods and as fuses or batteries). Instructions: To obtain warranty service, you . Printed in the United States. If Sony elects to its option, (i) repair the product using new or refurbished parts or (ii) replace the product with the Product. Only) Sony Electronics Inc. ("Sony") warrants this Limited Warranty will , at its original specifications. Parts: For a period of one (1) year...
Operating Instructions
Page 1
Refer to these numbers in the space provided below. Model No. CDX-GT30W © 2005 Sony Corporation Record these numbers whenever you call upon your Sony dealer regarding this product. To cancel the demonstration (DEMO) display, see page 10. Para cancelar la pantalla de demostración (DEMO), consulte la página 11. CDX-GT30W Serial No. 2-653-153-11 (1) FM/AM Compact Disc Player Operating Instructions US Manual de instrucciones ES Owner's Record The model and serial numbers are located on the bottom of the unit.
Refer to these numbers in the space provided below. Model No. CDX-GT30W © 2005 Sony Corporation Record these numbers whenever you call upon your Sony dealer regarding this product. To cancel the demonstration (DEMO) display, see page 10. Para cancelar la pantalla de demostración (DEMO), consulte la página 11. CDX-GT30W Serial No. 2-653-153-11 (1) FM/AM Compact Disc Player Operating Instructions US Manual de instrucciones ES Owner's Record The model and serial numbers are located on the bottom of the unit.
Operating Instructions
Page 2
... car's ignition has no guarantee that any one or more ambient sound field, using virtual speaker synthesis, to radio communications. Reorient or relocate the receiving antenna. - Increase the separation between the equipment and receiver. - BTM (Best Tuning Memory): the unit selects strong signal stations and stores them. • Sound adjustment - CAUTION The use of the following functions. • CD playback You can radiate radio frequency energy and, if not installed...
... car's ignition has no guarantee that any one or more ambient sound field, using virtual speaker synthesis, to radio communications. Reorient or relocate the receiving antenna. - Increase the separation between the equipment and receiver. - BTM (Best Tuning Memory): the unit selects strong signal stations and stores them. • Sound adjustment - CAUTION The use of the following functions. • CD playback You can radiate radio frequency energy and, if not installed...
Operating Instructions
Page 3
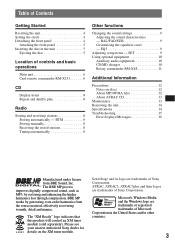
... unit 5 Ejecting the disc 5 Location of controls and basic operations Main unit 6 Card remote commander RM-X151 6 CD Display items 8 Repeat and shuffle play 8 Radio Storing and receiving stations 8 Storing automatically - BTM 8 Storing manually 8 Receiving the stored stations 8 Tuning automatically 8 Other functions Changing the sound settings 9 Adjusting the sound characteristics - Please see your nearest authorized Sony dealer for details on discs 12 About MP3/WMA files 12 About ATRAC CD 13 Maintenance 13 Removing the unit 14 Specifications...
... unit 5 Ejecting the disc 5 Location of controls and basic operations Main unit 6 Card remote commander RM-X151 6 CD Display items 8 Repeat and shuffle play 8 Radio Storing and receiving stations 8 Storing automatically - BTM 8 Storing manually 8 Receiving the stored stations 8 Tuning automatically 8 Other functions Changing the sound settings 9 Adjusting the sound characteristics - Please see your nearest authorized Sony dealer for details on discs 12 About MP3/WMA files 12 About ATRAC CD 13 Maintenance 13 Removing the unit 14 Specifications...
Operating Instructions
Page 4
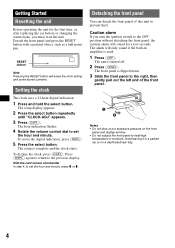
... flashes. 4 Rotate the volume control dial to the previous display. Caution alarm If you must reset the unit. Press (DSPL) again to return to set the hour and minute, press M or m. With the card remote commander In step 4, to the OFF position without detaching the front panel, the caution alarm will sound for the first time, or after replacing the car battery or changing the connections...
... flashes. 4 Rotate the volume control dial to the previous display. Caution alarm If you must reset the unit. Press (DSPL) again to return to set the hour and minute, press M or m. With the card remote commander In step 4, to the OFF position without detaching the front panel, the caution alarm will sound for the first time, or after replacing the car battery or changing the connections...
Operating Instructions
Page 5
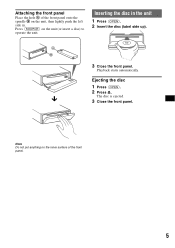
Note Do not put anything on the unit, then lightly push the left side in the unit 1 Press (OPEN). 2 Insert the disc (label side up). Inserting the disc in . A B x 3 Close the front panel. Playback starts automatically. Attaching the front panel Place the hole A of the front panel onto the spindle B on the inner surface of the front panel. 5 The disc is ejected. 3 Close the front panel. Ejecting the disc 1 Press (OPEN). 2 Press Z. Press (SOURCE) on the unit (or insert a disc) to operate the unit.
Note Do not put anything on the unit, then lightly push the left side in the unit 1 Press (OPEN). 2 Insert the disc (label side up). Inserting the disc in . A B x 3 Close the front panel. Playback starts automatically. Attaching the front panel Place the hole A of the front panel onto the spindle B on the inner surface of the front panel. 5 The disc is ejected. 3 Close the front panel. Ejecting the disc 1 Press (OPEN). 2 Press Z. Press (SOURCE) on the unit (or insert a disc) to operate the unit.
Operating Instructions
Page 6
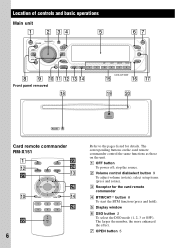
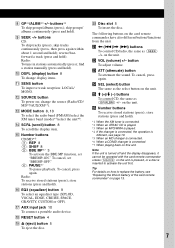
...*1 button 8 To start the BTM function (press and hold). The corresponding buttons on the card remote commander control the same functions as those on the unit. The larger the number, the more enhanced the effect. G OPEN button 5 E Display window F DSO button 2 To select the DSO mode (1, 2, 3 or OFF). Location of controls and basic operations Main unit Front panel removed qk CDX-GT30W ql w; RESET Card remote commander RM-X151 1 qs wa q; A OFF button To power...
...*1 button 8 To start the BTM function (press and hold). The corresponding buttons on the card remote commander control the same functions as those on the unit. The larger the number, the more enhanced the effect. G OPEN button 5 E Display window F DSO button 2 To select the DSO mode (1, 2, 3 or OFF). Location of controls and basic operations Main unit Front panel removed qk CDX-GT30W ql w; RESET Card remote commander RM-X151 1 qs wa q; A OFF button To power...
Operating Instructions
Page 7
... playback. Q AUX input jack 10 To connect a portable audio device. T Disc slot 5 To insert the disc. button To adjust volume. wf SEL (select) button The same as the select button on ; Tip For details on how to activate the unit first. reverse/fastforward a track (press and hold ). Radio: To receive stored stations (press); store stations (press and hold ); R RESET button 4 S Z (eject) button 5 To eject the disc. Radio: To tune in stations automatically (press); J DSPL (display) button 8 To change the source (Radio/CD/ MD*5/AUX/XM...
... playback. Q AUX input jack 10 To connect a portable audio device. T Disc slot 5 To insert the disc. button To adjust volume. wf SEL (select) button The same as the select button on ; Tip For details on how to activate the unit first. reverse/fastforward a track (press and hold ). Radio: To receive stored stations (press); store stations (press and hold ); R RESET button 4 S Z (eject) button 5 To eject the disc. Radio: To tune in stations automatically (press); J DSPL (display) button 8 To change the source (Radio/CD/ MD*5/AUX/XM...
Operating Instructions
Page 8
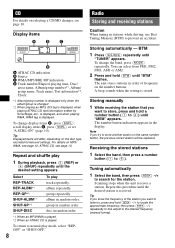
...) -/+ to locate the approximate frequency, then press (SEEK) -/+ repeatedly to fine adjust to store another station on the number buttons. Storing automatically - To change display items D, press (DSPL); A beep sounds when the setting is played. To change the band, press (MODE) repeatedly. Select REP-TRACK REP-ALBM*1 REP-GP*2 SHUF-ALBM*1 SHUF-GP*2 SHUF-DISC To play mode, select "REPOFF" or "SHUF-OFF." 8 Radio Storing and receiving stations Caution When tuning in...
...) -/+ to locate the approximate frequency, then press (SEEK) -/+ repeatedly to fine adjust to store another station on the number buttons. Storing automatically - To change display items D, press (DSPL); A beep sounds when the setting is played. To change the band, press (MODE) repeatedly. Select REP-TRACK REP-ALBM*1 REP-GP*2 SHUF-ALBM*1 SHUF-GP*2 SHUF-DISC To play mode, select "REPOFF" or "SHUF-OFF." 8 Radio Storing and receiving stations Caution When tuning in...
Operating Instructions
Page 9
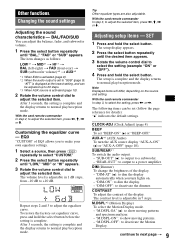
... AUX source is activated (page 10). 2 Rotate the volume control dial to "SUB" (page 9). After 3 seconds, the setting is set to adjust the selected item. Other functions Changing the sound settings Adjusting the sound characteristics - With the card remote commander In step 2, to normal play/reception mode. The item changes as follows: LOW*1 t MID*1 t HI*1 t BAL (left-right) t FAD (front-rear) t SUB (subwoofer volume)*2 t AUX*3 *1 When EQ3 is activated (page 9). *2 When the audio output is complete and the display...
... AUX source is activated (page 10). 2 Rotate the volume control dial to "SUB" (page 9). After 3 seconds, the setting is set to adjust the selected item. Other functions Changing the sound settings Adjusting the sound characteristics - With the card remote commander In step 2, to normal play/reception mode. The item changes as follows: LOW*1 t MID*1 t HI*1 t BAL (left-right) t FAD (front-rear) t SUB (subwoofer volume)*2 t AUX*3 *1 When EQ3 is activated (page 9). *2 When the audio output is complete and the display...

Operating Instructions
Page 10
... volume control dial to not scroll. DEMO*1 (Demonstration) To set to "SUB." "A.SCRL-OFF" (z): to adjust the volume level. To skip album album continuously discs discs continuously Press (GP/ALBM) and release (hold . Follow the procedure below: Connecting the portable audio device 1 Turn off . *2 When the unit is set "DEMO-ON" (z) or "DEMO-OFF." repeatedly. CD/MD changer Selecting the changer 1 Press (SOURCE) repeatedly until "CD" or "MD" appears. 2 Press (MODE) repeatedly until "AUX...
... volume control dial to not scroll. DEMO*1 (Demonstration) To set to "SUB." "A.SCRL-OFF" (z): to adjust the volume level. To skip album album continuously discs discs continuously Press (GP/ALBM) and release (hold . Follow the procedure below: Connecting the portable audio device 1 Turn off . *2 When the unit is set "DEMO-ON" (z) or "DEMO-OFF." repeatedly. CD/MD changer Selecting the changer 1 Press (SOURCE) repeatedly until "CD" or "MD" appears. 2 Press (MODE) repeatedly until "AUX...
Operating Instructions
Page 11
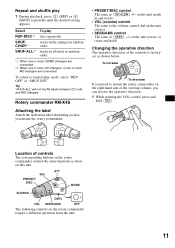
... and shuffle play disc repeatedly. Select REP-DISC*1 SHUFCHGR*1 SHUF-ALL*2 To play 1 During playback, press (3) (REP) or (4) (SHUF) repeatedly until the desired setting appears. SEL MODE DSPL DSPL MODE SEL Location of controls The corresponding buttons on the right hand side of the controls is factoryset as those on the rotary commander require a different operation from the unit. 11 ATT SEL PRESET/ DISC MODE SOURCE OFF DSPL VOL...
... and shuffle play disc repeatedly. Select REP-DISC*1 SHUFCHGR*1 SHUF-ALL*2 To play 1 During playback, press (3) (REP) or (4) (SHUF) repeatedly until the desired setting appears. SEL MODE DSPL DSPL MODE SEL Location of controls The corresponding buttons on the right hand side of the controls is factoryset as those on the rotary commander require a different operation from the unit. 11 ATT SEL PRESET/ DISC MODE SOURCE OFF DSPL VOL...
Operating Instructions
Page 12
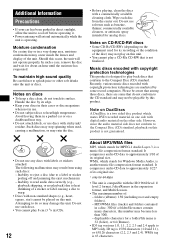
... the unit or discs. Attempting to a label or sticker peeling off before operating it. • Power antenna will not operate properly. Do not use such discs. • You cannot play a CD-R/a CD-RW that conform to warp. • Discs with the ISO 9660 level 1/ level 2 format, Joliet/Romeo in the expansion format, and Multi Session. • The maximum number of: - It compresses audio CD...
... the unit or discs. Attempting to a label or sticker peeling off before operating it. • Power antenna will not operate properly. Do not use such discs. • You cannot play a CD-R/a CD-RW that conform to warp. • Discs with the ISO 9660 level 1/ level 2 format, Joliet/Romeo in the expansion format, and Multi Session. • The maximum number of: - It compresses audio CD...
Operating Instructions
Page 13
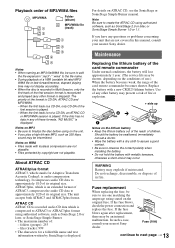
... battery of the format is displayed. Fuse replacement When replacing the fuse, be shorter, depending on ATRAC CD, see the SonicStage or SonicStage Simple Burner manual. ATRAC3plus, which is compressed to use .) When the battery becomes weak, the range of children. In such a case, consult your nearest Sony dealer. If the disc has no data in any questions or problems concerning your unit...
... battery of the format is displayed. Fuse replacement When replacing the fuse, be shorter, depending on ATRAC CD, see the SonicStage or SonicStage Simple Burner manual. ATRAC3plus, which is compressed to use .) When the battery becomes weak, the range of children. In such a case, consult your nearest Sony dealer. If the disc has no data in any questions or problems concerning your unit...
Operating Instructions
Page 14
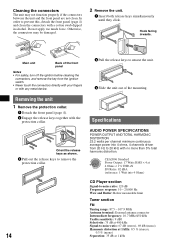
... the release keys to remove the protection collar. 14 Specifications AUDIO POWER SPECIFICATIONS POWER OUTPUT AND TOTAL HARMONIC DISTORTION 23.2 watts per channel minimum continuous average power into 4 Ohms) CD Player section Signal-to-noise ratio: 120 dB Frequency response: 10 - 20,000 Hz Wow and flutter: Below measurable limit Tuner section FM Tuning range: 87.5 - 107.9 MHz Antenna terminal: External antenna connector Intermediate frequency: 10.7 MHz/450 kHz...
... the release keys to remove the protection collar. 14 Specifications AUDIO POWER SPECIFICATIONS POWER OUTPUT AND TOTAL HARMONIC DISTORTION 23.2 watts per channel minimum continuous average power into 4 Ohms) CD Player section Signal-to-noise ratio: 120 dB Frequency response: 10 - 20,000 Hz Wow and flutter: Below measurable limit Tuner section FM Tuning range: 87.5 - 107.9 MHz Antenna terminal: External antenna connector Intermediate frequency: 10.7 MHz/450 kHz...
Operating Instructions
Page 15
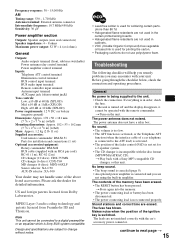
... a Sony MP3 compatible CD changer, or this unit. Design and specifications are subject to change without notice. • Lead-free solder is switched. t Turn on the unit. No sound. • The volume is too low. • The ATT function is activated, or the Telephone ATT function (when the interface cable of a car telephone is connected to a digital preamplifier or an equalizer which is not connected properly. t Store again into the memory. • The power connecting...
... a Sony MP3 compatible CD changer, or this unit. Design and specifications are subject to change without notice. • Lead-free solder is switched. t Turn on the unit. No sound. • The volume is too low. • The ATT function is activated, or the Telephone ATT function (when the interface cable of a car telephone is connected to a digital preamplifier or an equalizer which is not connected properly. t Store again into the memory. • The power connecting...

Operating Instructions
Page 16
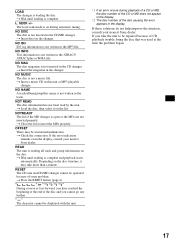
... connection of speakers/amplifiers is heard in monaural reception mode. t Tuning stops too frequently: Press (SENS) until "MS" or "MD" appears, then press (MODE) repeatedly. 16 Radio reception The stations cannot be played. An FM program broadcast in stereo is incorrect. FAILURE (Illuminates for audio use (page 12). t Install the unit at a station: Press (SENS) repeatedly until "MONO-OFF" appears. t Insert another disc. MP3/WMA files take a longer time...
... connection of speakers/amplifiers is heard in monaural reception mode. t Tuning stops too frequently: Press (SENS) until "MS" or "MD" appears, then press (MODE) repeatedly. 16 Radio reception The stations cannot be played. An FM program broadcast in stereo is incorrect. FAILURE (Illuminates for audio use (page 12). t Install the unit at a station: Press (SENS) repeatedly until "MONO-OFF" appears. t Insert another disc. MP3/WMA files take a longer time...
Operating Instructions
Page 17
... changer. t Insert a music CD in the display, consult your nearest Sony dealer. RESET The CD unit and CD/MD changer cannot be an internal malfunction. t Press the RESET button (page 4). " " or " " During reverse or fast-forward, you cannot go any further. The local seek mode is open or the MDs are not inserted properly. t Load the disc, then select it may be operated...
... changer. t Insert a music CD in the display, consult your nearest Sony dealer. RESET The CD unit and CD/MD changer cannot be an internal malfunction. t Press the RESET button (page 4). " " or " " During reverse or fast-forward, you cannot go any further. The local seek mode is open or the MDs are not inserted properly. t Load the disc, then select it may be operated...
Operating Instructions
Page 36
only); Call 1-800-222-7669 URL http://www.SONY.com Sony Corporation Printed in these Operating Instructions. 2 Reset the unit. If you have any questions/problems regarding this product, try the following: 1 Read Troubleshooting in Thailand Note: Stored data may be erased. 3 Please contact (U.S.A.
only); Call 1-800-222-7669 URL http://www.SONY.com Sony Corporation Printed in these Operating Instructions. 2 Reset the unit. If you have any questions/problems regarding this product, try the following: 1 Read Troubleshooting in Thailand Note: Stored data may be erased. 3 Please contact (U.S.A.


