Operating Instructions
Page 2
...there is either a registered trademark or trademark of optical instruments with the limits for a Class B digital device, pursuant to which can radiate radio frequency energy and, if not installed and used with the instructions, may apply, See www.dtsc.ca.gov/hazardouswaste... of the car for help. MPEG Layer-3 audio coding technology and patents licensed from that to Part 15 of Sony Corporation. Warning This equipment has been tested and found to radio communications. For installation and connections, see the supplied installation/connections manual. special handling may cause...
...there is either a registered trademark or trademark of optical instruments with the limits for a Class B digital device, pursuant to which can radiate radio frequency energy and, if not installed and used with the instructions, may apply, See www.dtsc.ca.gov/hazardouswaste... of the car for help. MPEG Layer-3 audio coding technology and patents licensed from that to Part 15 of Sony Corporation. Warning This equipment has been tested and found to radio communications. For installation and connections, see the supplied installation/connections manual. special handling may cause...
Operating Instructions
Page 4
... the DEMO mode 5 Setting the clock 5 Detaching the front panel 5 Location of controls 6 Main unit 6 RM-X211 Remote commander 7 Radio 8 Storing and receiving stations 8 RDS 9 CD 10 Playing a disc 10 USB devices 10 Playing back a USB device 10 iPod 11 Playing back iPod 11 Operating an iPod directly - Advanced Sound Engine 17 Adjusting setup items 19 Using optional equipment 22 Auxiliary audio equipment 22 Additional Information 22 Precautions 22 Maintenance 24 Specifications 25 Troubleshooting 25...
... the DEMO mode 5 Setting the clock 5 Detaching the front panel 5 Location of controls 6 Main unit 6 RM-X211 Remote commander 7 Radio 8 Storing and receiving stations 8 RDS 9 CD 10 Playing a disc 10 USB devices 10 Playing back a USB device 10 iPod 11 Playing back iPod 11 Operating an iPod directly - Advanced Sound Engine 17 Adjusting setup items 19 Using optional equipment 22 Auxiliary audio equipment 22 Additional Information 22 Precautions 22 Maintenance 24 Specifications 25 Troubleshooting 25...

Operating Instructions
Page 5
... position until "CLOCK- The display returns to select "DEMO-OFF," then press it . 3 Rotate the control dial to normal reception/ play mode. Attaching the front panel Engage part of the front panel with part of this unit is turned off . 2 Press the front panel release button , then remove the panel by pulling it towards you turn the ignition switch to the OFF position...
... position until "CLOCK- The display returns to select "DEMO-OFF," then press it . 3 Rotate the control dial to normal reception/ play mode. Attaching the front panel Engage part of the front panel with part of this unit is turned off . 2 Press the front panel release button , then remove the panel by pulling it towards you turn the ignition switch to the OFF position...
Operating Instructions
Page 6
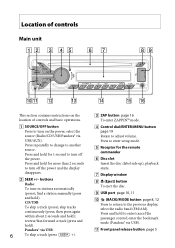
... the disc. USB port page 10, 11 (BACK)/MODE button page 8, 12 Press to return to another source. CD/USB: To skip a track (press); reverse/fast-forward a track (press and hold for 1 second to turn off the power. select the radio band (FM/AM). select the source (Radio/CD/USB/Pandora® via USB). Front panel release button page 5 buttons Radio: To tune in stations automatically (press); Press...
... the disc. USB port page 10, 11 (BACK)/MODE button page 8, 12 Press to return to another source. CD/USB: To skip a track (press); reverse/fast-forward a track (press and hold for 1 second to turn off the power. select the radio band (FM/AM). select the source (Radio/CD/USB/Pandora® via USB). Front panel release button page 5 buttons Radio: To tune in stations automatically (press); Press...

Operating Instructions
Page 7
... a disc is inserted to the previous display. ENTER button To apply a setting. 7 RM-X211 Remote commander Remove the insulation film before use. OFF button To turn on the power. buttons To control Radio/CD/USB/Pandora® via USB). PTY (Program Type) button page 9 To select PTY in RDS. Number buttons Radio: To receive stored stations (press); Pandora® via USB/AUX). CD/USB ALBUM / (during MP3/ WMA...
... a disc is inserted to the previous display. ENTER button To apply a setting. 7 RM-X211 Remote commander Remove the insulation film before use. OFF button To turn on the power. buttons To control Radio/CD/USB/Pandora® via USB). PTY (Program Type) button page 9 To select PTY in RDS. Number buttons Radio: To receive stored stations (press); Pandora® via USB/AUX). CD/USB ALBUM / (during MP3/ WMA...
Operating Instructions
Page 9
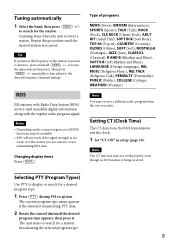
... the desired frequency (manual tuning). Note The CT function may receive a different radio program from the RDS transmission sets the clock. 1 Set "CT-ON" in setup (page 20). Changing display items Press Type of the station you are tuned to is too weak, or if the station you want to listen to, press and hold to locate the approximate frequency, then press repeatedly to fine adjust to...
... the desired frequency (manual tuning). Note The CT function may receive a different radio program from the RDS transmission sets the clock. 1 Set "CT-ON" in setup (page 20). Changing display items Press Type of the station you are tuned to is too weak, or if the station you want to listen to, press and hold to locate the approximate frequency, then press repeatedly to fine adjust to...

Operating Instructions
Page 10
... and settings. Playback starts. To eject the disc, press . CD Playing a disc This unit can be used. USB devices • MSC (Mass Storage Class)-type USB devices compliant with the USB standard can be used. • Backup of your USB device, visit the support site on the compatibility of data to the USB port. Playing back a USB device 1 Open the USB cover, then connect the USB...
... and settings. Playback starts. To eject the disc, press . CD Playing a disc This unit can be used. USB devices • MSC (Mass Storage Class)-type USB devices compliant with the USB standard can be used. • Backup of your USB device, visit the support site on the compatibility of data to the USB port. Playing back a USB device 1 Open the USB cover, then connect the USB...
Operating Instructions
Page 11
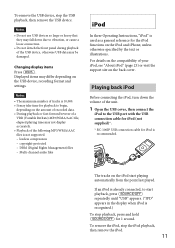
...-protected - To remove the iPod, stop the USB playback, then remove the USB device. Notes • Do not use USB devices so large or heavy that they may be damaged. If an iPod is recommended. Multi-channel audio files iPod In these Operating Instructions, "iPod" is used as a general reference for iPod is already connected, to the USB port with the USB connection cable for iPod (not supplied)*. * RC-100IP USB connection cable for the iPod functions...
...-protected - To remove the iPod, stop the USB playback, then remove the USB device. Notes • Do not use USB devices so large or heavy that they may be damaged. If an iPod is recommended. Multi-channel audio files iPod In these Operating Instructions, "iPod" is used as a general reference for iPod is already connected, to the USB port with the USB connection cable for iPod (not supplied)*. * RC-100IP USB connection cable for the iPod functions...

Operating Instructions
Page 12
... hold MODE AUDIO" will appear and direct operation of the iPod, otherwise data may not be adjusted only by iPhone, not the unit. Skipping albums, podcasts, genres, playlists and artists To Skip Skip continuously Do this mode, the following buttons do not function SHUF) Changing display items Press Note Some letters stored in the mode set by the iPod. Resuming mode When the iPod is turned...
... hold MODE AUDIO" will appear and direct operation of the iPod, otherwise data may not be adjusted only by iPhone, not the unit. Skipping albums, podcasts, genres, playlists and artists To Skip Skip continuously Do this mode, the following buttons do not function SHUF) Changing display items Press Note Some letters stored in the mode set by the iPod. Resuming mode When the iPod is turned...
Operating Instructions
Page 13
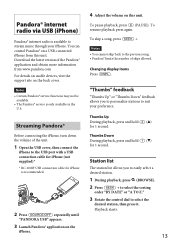
.... 4 Adjust the volume on the back cover. You can control Pandora® on a USB-connected iPhone from www.pandora.com For details on usable devices, visit the support site on this unit. Thumbs Up During playback, press and hold for 1 second. Playback starts. 13 Station list The station list allows you to personalize stations to suit your iPhone. Pandora® internet radio...
.... 4 Adjust the volume on the back cover. You can control Pandora® on a USB-connected iPhone from www.pandora.com For details on usable devices, visit the support site on this unit. Thumbs Up During playback, press and hold for 1 second. Playback starts. 13 Station list The station list allows you to personalize stations to suit your iPhone. Pandora® internet radio...
Operating Instructions
Page 17
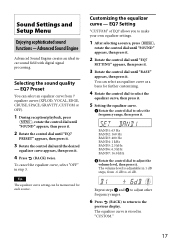
.... 5 Setting the equalizer curve. Rotate the control dial to select the frequency range, then press it . 4 Press (BACK) twice. Tip The equalizer curve setting can select an equalizer curve from -6 dB to the previous display. Customizing the equalizer curve - Selecting the sound quality - Sound Settings and Setup Menu Enjoying sophisticated sound functions - Repeat steps and to adjust other frequency ranges. 6 Press (BACK) to return to +6 dB. The equalizer curve is adjustable...
.... 5 Setting the equalizer curve. Rotate the control dial to select the frequency range, then press it . 4 Press (BACK) twice. Tip The equalizer curve setting can select an equalizer curve from -6 dB to the previous display. Customizing the equalizer curve - Selecting the sound quality - Sound Settings and Setup Menu Enjoying sophisticated sound functions - Repeat steps and to adjust other frequency ranges. 6 Press (BACK) to return to +6 dB. The equalizer curve is adjustable...

Operating Instructions
Page 18
... the control dial to other than "OFF." Optimizing sound by restoring high frequencies lost in step 4. "-3." 5 Press (BACK) to return to the previous display. the listening position is set to select "ON," then press it. 4 Press (BACK) twice. The options for "SET SW POS" are indicated below . Adjusting the listening position You can also set the approximate subwoofer position from each speaker to suit...
... the control dial to other than "OFF." Optimizing sound by restoring high frequencies lost in step 4. "-3." 5 Press (BACK) to return to the previous display. the listening position is set to select "ON," then press it. 4 Press (BACK) twice. The options for "SET SW POS" are indicated below . Adjusting the listening position You can also set the approximate subwoofer position from each speaker to suit...
Operating Instructions
Page 19
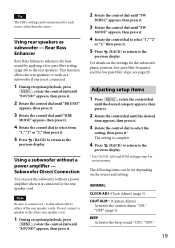
... MODE" appears, then press it. 4 Rotate the control dial to select "1," "2" or "3," then press it. 5 Press (BACK) to return to the previous display. Using rear speakers as a subwoofer if one is not necessary. Rear Bass Enhancer Rear Bass Enhancer enhances the bass sound by applying a low pass filter setting (page 20) to either of the rear speaker cords. Tip The DM+ setting can use the subwoofer without a power amplifier - Note Be sure to connect a 4 - 8 ohm subwoofer to the rear speakers...
... MODE" appears, then press it. 4 Rotate the control dial to select "1," "2" or "3," then press it. 5 Press (BACK) to return to the previous display. Using rear speakers as a subwoofer if one is not necessary. Rear Bass Enhancer Rear Bass Enhancer enhances the bass sound by applying a low pass filter setting (page 20) to either of the rear speaker cords. Tip The DM+ setting can use the subwoofer without a power amplifier - Note Be sure to connect a 4 - 8 ohm subwoofer to the rear speakers...

Operating Instructions
Page 20
... and treble for the ZAPPIN function. - REAR/SUB*1 Switches the audio output: "SUB-OUT" (subwoofer), "REAR-OUT" (power amplifier). "LEFT-15." ALO (Automatic Level Optimizer) Adjust the playback volume level of all playback sources to the optimum level: "ON," "OFF." LPF FREQ (Low Pass Filter Frequency) Selects the subwoofer cut -off frequency: "50Hz," "60Hz," "80Hz," "100Hz," "120Hz." AUX-A*1 (AUX Audio) Activates the AUX source display: "ON," "OFF" (page 22). SW POS*1 (Subwoofer Position) (page 18) Selects the subwoofer position: "NEAR," "NORMAL," "FAR. SOUND: EQ7 PRESET...
... and treble for the ZAPPIN function. - REAR/SUB*1 Switches the audio output: "SUB-OUT" (subwoofer), "REAR-OUT" (power amplifier). "LEFT-15." ALO (Automatic Level Optimizer) Adjust the playback volume level of all playback sources to the optimum level: "ON," "OFF." LPF FREQ (Low Pass Filter Frequency) Selects the subwoofer cut -off frequency: "50Hz," "60Hz," "80Hz," "100Hz," "120Hz." AUX-A*1 (AUX Audio) Activates the AUX source display: "ON," "OFF" (page 22). SW POS*1 (Subwoofer Position) (page 18) Selects the subwoofer position: "NEAR," "NORMAL," "FAR. SOUND: EQ7 PRESET...

Operating Instructions
Page 21
... USB is selected. DISPLAY: DEMO (Demonstration) Activates the demonstration: "ON," "OFF." " LPF FREQ (Low Pass Filter Frequency) Selects the subwoofer cut -off frequency: "50Hz," "60Hz," "80Hz," "100Hz," "120Hz." "-10 dB." ("ATT" is set to show moving patterns and spectrum analyzer. - "SA": to "OFF." *6 When the AUX is selected. 21 M.DISPLAY (Motion Display) - AUX VOL*6 (AUX Volume level) Adjusts the volume level for each connected auxiliary equipment: "+18 dB" - SW POS*1 (Subwoofer Position) Selects the subwoofer...
... USB is selected. DISPLAY: DEMO (Demonstration) Activates the demonstration: "ON," "OFF." " LPF FREQ (Low Pass Filter Frequency) Selects the subwoofer cut -off frequency: "50Hz," "60Hz," "80Hz," "100Hz," "120Hz." "-10 dB." ("ATT" is set to show moving patterns and spectrum analyzer. - "SA": to "OFF." *6 When the AUX is selected. 21 M.DISPLAY (Motion Display) - AUX VOL*6 (AUX Volume level) Adjusts the volume level for each connected auxiliary equipment: "+18 dB" - SW POS*1 (Subwoofer Position) Selects the subwoofer...

Operating Instructions
Page 22
... listening volume on the unit. 22 5 Adjust the input level (page 21). Moisture condensation Should moisture condensation occur inside the car, or it may not be playable by this unit. otherwise the unit will not operate properly. Using optional equipment Auxiliary audio equipment By connecting an optional portable audio device to the AUX input jack (stereo mini jack) on the unit and then simply selecting...
... listening volume on the unit. 22 5 Adjust the input level (page 21). Moisture condensation Should moisture condensation occur inside the car, or it may not be playable by this unit. otherwise the unit will not operate properly. Using optional equipment Auxiliary audio equipment By connecting an optional portable audio device to the AUX input jack (stereo mini jack) on the unit and then simply selecting...
Operating Instructions
Page 23
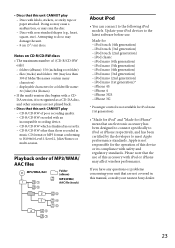
... been designed to connect specifically to iPod or iPhone respectively, and has been certified by the developer to the following iPod models. iPhone 4S - Doing so may cause a malfunction, or may affect wireless performance. displayable characters for iPhone" mean that the use . Update your nearest Sony dealer. 23 iPod touch (3rd generation) - Playback order of this manual, consult your iPod devices to...
... been designed to connect specifically to iPod or iPhone respectively, and has been certified by the developer to the following iPod models. iPhone 4S - Doing so may cause a malfunction, or may affect wireless performance. displayable characters for iPhone" mean that the use . Update your nearest Sony dealer. 23 iPod touch (3rd generation) - Playback order of this manual, consult your iPod devices to...
Operating Instructions
Page 25
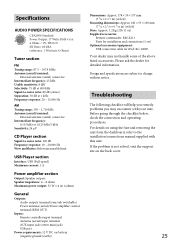
... 26 μV CD Player section Signal-to-noise ratio: 120 dB Frequency response: 10 - 20,000 Hz Wow and flutter: Below measurable limit USB Player section Interface: USB (Full-speed) Maximum current: 1 A Power amplifier section Output: Speaker outputs Speaker impedance: 4 - 8 ohms Maximum power output: 52 W × 4 (at 4 ohms) General Outputs: Audio outputs terminal (rear/sub switchable) Power antenna (aerial)/Power amplifier control terminal (REM OUT) Inputs: Remote controller input terminal Antenna (aerial) input terminal AUX input jack (stereo mini jack) USB port Power requirements: 12 V DC...
... 26 μV CD Player section Signal-to-noise ratio: 120 dB Frequency response: 10 - 20,000 Hz Wow and flutter: Below measurable limit USB Player section Interface: USB (Full-speed) Maximum current: 1 A Power amplifier section Output: Speaker outputs Speaker impedance: 4 - 8 ohms Maximum power output: 52 W × 4 (at 4 ohms) General Outputs: Audio outputs terminal (rear/sub switchable) Power antenna (aerial)/Power amplifier control terminal (REM OUT) Inputs: Remote controller input terminal Antenna (aerial) input terminal AUX input jack (stereo mini jack) USB port Power requirements: 12 V DC...
Operating Instructions
Page 26
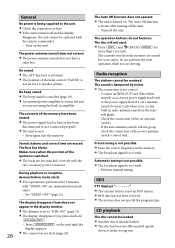
...; An optional power amplifier is too weak. Stored stations and correct time are erased. If the auto antenna (aerial) will not eject. Press and (BACK for more than 2 seconds. The Auto Off function activates after turning off the unit. The sound is hampered by noises. The connection is performed for a 2-speaker system. For your car has built-in radio antenna (aerial...
...; An optional power amplifier is too weak. Stored stations and correct time are erased. If the auto antenna (aerial) will not eject. Press and (BACK for more than 2 seconds. The Auto Off function activates after turning off the unit. The sound is hampered by noises. The connection is performed for a 2-speaker system. For your car has built-in radio antenna (aerial...
Operating Instructions
Page 27
...; "AUTO SCR" is set to check the connection. Connect it again. Press to connect a USB device and USB cable. Be sure to remove the disc. Error displays/Messages CHECKING The unit is incorrect. - Clean or insert the disc correctly. A blank disc has been inserted. The disc cannot play back than 320 kbps. See the installation/connections manual of speakers/amplifiers is...
...; "AUTO SCR" is set to check the connection. Connect it again. Press to connect a USB device and USB cable. Be sure to remove the disc. Error displays/Messages CHECKING The unit is incorrect. - Clean or insert the disc correctly. A blank disc has been inserted. The disc cannot play back than 320 kbps. See the installation/connections manual of speakers/amplifiers is...


