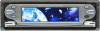

XM Satellite Radio Operating manual
Page 1
...control. 4 Press the Disc/Preset + (Disc +) button for purchasing the Sony XM Satellite Radio Receiver. Users unfamiliar with the Sony BUS system. • Connect and use the radio's search-by category. ... the XM Radio ID display, press the Seek button to start. This equipment generates, uses, and can receive the signal. CDX-C8050X CDX-C800REC* CDX-M750 CDX-M650 CDX-M610 CDX-M600 MDX-C8500X... the radio successfully stores the channel into the preset. t Select another area where your nearest Sony dealer.) Introducing XMTM Satellite Radio There's a world beyond AM and FM. Note...
...control. 4 Press the Disc/Preset + (Disc +) button for purchasing the Sony XM Satellite Radio Receiver. Users unfamiliar with the Sony BUS system. • Connect and use the radio's search-by category. ... the XM Radio ID display, press the Seek button to start. This equipment generates, uses, and can receive the signal. CDX-C8050X CDX-C800REC* CDX-M750 CDX-M650 CDX-M610 CDX-M600 MDX-C8500X... the radio successfully stores the channel into the preset. t Select another area where your nearest Sony dealer.) Introducing XMTM Satellite Radio There's a world beyond AM and FM. Note...

Operating Instructions
Page 2
... you for help. This information is recorded on , the user is connected. - Illustrations in a particular installation. Consult the dealer or an experienced radio/TV technician for purchasing this Sony Compact Disc Player. These limits are cautioned that interference will increase eye hazard. This equipment generates, uses, and can be played, depending on a circuit different from...
... you for help. This information is recorded on , the user is connected. - Illustrations in a particular installation. Consult the dealer or an experienced radio/TV technician for purchasing this Sony Compact Disc Player. These limits are cautioned that interference will increase eye hazard. This equipment generates, uses, and can be played, depending on a circuit different from...

Operating Instructions
Page 3
... 7 General top menu display 9 Getting Started Resetting the unit 10 Setting the clock and the calendar 10 CD Player CD/MD Unit (optional) Playing a disc 11 Display items 12 Playing tracks repeatedly - Repeat Play 13 Playing tracks in a station through a list - ...CD/MD unit Radio Storing stations automatically - Table of Contents Location of the subwoofer(s 28 Connecting auxiliary audio equipment . . . . 29 Additional Information Maintenance 30 Removing the unit 31 Specifications 32 Troubleshooting 33 Error displays/Messages 34 3 Disc Memo 14 Locating a disc by name - ...
... 7 General top menu display 9 Getting Started Resetting the unit 10 Setting the clock and the calendar 10 CD Player CD/MD Unit (optional) Playing a disc 11 Display items 12 Playing tracks repeatedly - Repeat Play 13 Playing tracks in a station through a list - ...CD/MD unit Radio Storing stations automatically - Table of Contents Location of the subwoofer(s 28 Connecting auxiliary audio equipment . . . . 29 Additional Information Maintenance 30 Removing the unit 31 Specifications 32 Troubleshooting 33 Error displays/Messages 34 3 Disc Memo 14 Locating a disc by name - ...

Operating Instructions
Page 4
... SCREEN button To select the display mode. a SOURCE (Power on the unit until the display disappears. d Display window e Z (eject) button To eject a disc, if a disc is not displayed. *2 Warning when installing in the unit. Location of the . > lever (qa). b OFF (Stop/Power off and this causes battery drain. ... To change the function of controls OFF SOURCE MODE VOL SCREEN .> SHIFT CDX-M3DI Refer to press and hold (OFF) on /Radio/CD/MD/ AUX*1) button To select the source. k . > lever To select the desired radio station, the desired item to be sure to the pages listed for the...
... SCREEN button To select the display mode. a SOURCE (Power on the unit until the display disappears. d Display window e Z (eject) button To eject a disc, if a disc is not displayed. *2 Warning when installing in the unit. Location of the . > lever (qa). b OFF (Stop/Power off and this causes battery drain. ... To change the function of controls OFF SOURCE MODE VOL SCREEN .> SHIFT CDX-M3DI Refer to press and hold (OFF) on /Radio/CD/MD/ AUX*1) button To select the source. k . > lever To select the desired radio station, the desired item to be sure to the pages listed for the...
Operating Instructions
Page 9
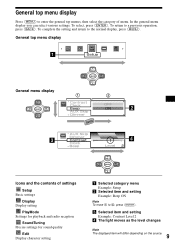
To complete the setting and return to 2, press (ENTER). SOURCE DISC - SOURCE DISC - SEEK+ DISC + SEEK- SEEK+ a Selected category menu Example: Setup b Selected item and setting Example: Beep ON Note To move 1 to the normal display, press (MENU... to enter the general top menus, then select the category of settings Setup Basic settings Display Display setting PlayMode Settings for playback and radio reception SoundTuning Precise settings for sound quality Edit Display character setting DISC + SEEK- SEEK+ 1 2 Icons and the contents of menu. To select, press (ENTER). SOURCE...
To complete the setting and return to 2, press (ENTER). SOURCE DISC - SOURCE DISC - SEEK+ DISC + SEEK- SEEK+ a Selected category menu Example: Setup b Selected item and setting Example: Beep ON Note To move 1 to the normal display, press (MENU... to enter the general top menus, then select the category of settings Setup Basic settings Display Display setting PlayMode Settings for playback and radio reception SoundTuning Precise settings for sound quality Edit Display character setting DISC + SEEK- SEEK+ 1 2 Icons and the contents of menu. To select, press (ENTER). SOURCE...

Operating Instructions
Page 15
... play a CD TEXT disc on a CD unit with the CD TEXT/ CUSTOM FILE function, or an MD unit) You can use Best Tuning Memory to prevent accidents. To cancel storing, press (ENTER) while storing the stations. 8 Press (MENU). List-up to weak signals, some letters cannot be displayed. Radio The unit can...
... play a CD TEXT disc on a CD unit with the CD TEXT/ CUSTOM FILE function, or an MD unit) You can use Best Tuning Memory to prevent accidents. To cancel storing, press (ENTER) while storing the stations. 8 Press (MENU). List-up to weak signals, some letters cannot be displayed. Radio The unit can...

Operating Instructions
Page 16
... displayed only when the station name has been assigned. Tips • To always hear FM stereo broadcasts in the stereo reception mode. Receiving the stored stations 1 Press (SOURCE) repeatedly to select the radio. 2 Press (MODE) repeatedly to select the band. 3 Press the number button ...((1) to the desired frequency (manual tuning). Note that some FM stereo broadcasts may occur in this unit will automatically narrow the reception...
... displayed only when the station name has been assigned. Tips • To always hear FM stereo broadcasts in the stereo reception mode. Receiving the stored stations 1 Press (SOURCE) repeatedly to select the radio. 2 Press (MODE) repeatedly to select the band. 3 Press the number button ...((1) to the desired frequency (manual tuning). Note that some FM stereo broadcasts may occur in this unit will automatically narrow the reception...
Operating Instructions
Page 17
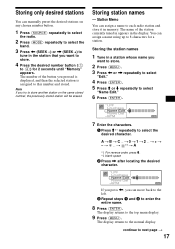
...Press , after locating the desired character. You can assign a name using up to select the desired character. t + t * - t ... Station Memo You can assign a name to each radio station and store it in the station that you want to store. 2 Press (MENU). 3 Press < or , repeatedly to select "Edit." 4 Press (ENTER). 5 Press M or m repeatedly... erased. The name of the button you try to store another station on any chosen number button. 1 Press (SOURCE) repeatedly to select the radio. 2 Press (MODE) repeatedly to select the band. 3 Press < (SEEK -) or , (SEEK +) to this number and stored.
...Press , after locating the desired character. You can assign a name using up to select the desired character. t + t * - t ... Station Memo You can assign a name to each radio station and store it in the station that you want to store. 2 Press (MENU). 3 Press < or , repeatedly to select "Edit." 4 Press (ENTER). 5 Press M or m repeatedly... erased. The name of the button you try to store another station on any chosen number button. 1 Press (SOURCE) repeatedly to select the radio. 2 Press (MODE) repeatedly to select the band. 3 Press < (SEEK -) or , (SEEK +) to this number and stored.
Operating Instructions
Page 18
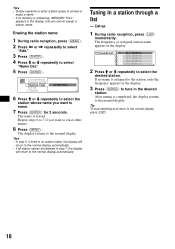
The display returns to the normal display, press (LIST). 18 List-up 1 During radio reception, press (LIST) momentarily. The name is completed, the display returns to the normal display. Repeat steps 6 to 7 if you cannot assign a station name. Tips ...; If no memory is remaining, "MEMORY FULL" appears in the display, and you want to erase. 7 Press (ENTER) for 2 seconds. Erasing the station name 1 During radio reception, press (MENU). 2 Press < or , repeatedly to select "Edit." 3 Press (ENTER). 4 Press M or m repeatedly to select "Name Del." 5 Press (ENTER). 6 Press M or m repeatedly to ...
The display returns to the normal display, press (LIST). 18 List-up 1 During radio reception, press (LIST) momentarily. The name is completed, the display returns to the normal display. Repeat steps 6 to 7 if you cannot assign a station name. Tips ...; If no memory is remaining, "MEMORY FULL" appears in the display, and you want to erase. 7 Press (ENTER) for 2 seconds. Erasing the station name 1 During radio reception, press (MENU). 2 Press < or , repeatedly to select "Edit." 3 Press (ENTER). 4 Press M or m repeatedly to select "Name Del." 5 Press (ENTER). 6 Press M or m repeatedly to ...

Operating Instructions
Page 20
...the card remote commander REP SHUF 1 2 4 5 SCREEN GRAPHIC 3 6 IMAGE MENU DISC + LIST SCREEN IMAGE SEEK- SEEK+ ENTER By the unit OPEN /CLOSE SCREEN SHIFT SCREEN SHIFT . > lever 1 During playback or radio reception, press (SCREEN) repeatedly to press (SHIFT)). 20 When switching only the display...Press (IMAGE) repeatedly to select the display pattern. * You cannot select any display pattern in the Clock mode. 1 During playback or radio reception, press (SCREEN) repeatedly to select the display pattern. * You cannot select any display pattern in the Clock mode. Each time you...
...the card remote commander REP SHUF 1 2 4 5 SCREEN GRAPHIC 3 6 IMAGE MENU DISC + LIST SCREEN IMAGE SEEK- SEEK+ ENTER By the unit OPEN /CLOSE SCREEN SHIFT SCREEN SHIFT . > lever 1 During playback or radio reception, press (SCREEN) repeatedly to press (SHIFT)). 20 When switching only the display...Press (IMAGE) repeatedly to select the display pattern. * You cannot select any display pattern in the Clock mode. 1 During playback or radio reception, press (SCREEN) repeatedly to select the display pattern. * You cannot select any display pattern in the Clock mode. Each time you...
Operating Instructions
Page 21
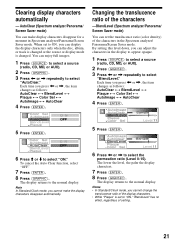
... display. When set to select the permeation ratio (Level 0-15). Notes • In Standard/Clock mode, you can display the display characters only when the disc, album, or track is changed . Each time you press < or ,, the item changes as follows: AutoClear y BlendLevel y Plaque y Color Sel y ...or display mode is set the translucence ratio (color density) of the characters in the display to appear opaque. 1 Press (SOURCE) to select a source (radio, CD, MD, or AUX). 2 Press (GRAPHIC). 3 Press < or , repeatedly to select "ON." The display returns to the normal display. Clearing ...
... display. When set to select the permeation ratio (Level 0-15). Notes • In Standard/Clock mode, you can display the display characters only when the disc, album, or track is changed . Each time you press < or ,, the item changes as follows: AutoClear y BlendLevel y Plaque y Color Sel y ...or display mode is set the translucence ratio (color density) of the characters in the display to appear opaque. 1 Press (SOURCE) to select a source (radio, CD, MD, or AUX). 2 Press (GRAPHIC). 3 Press < or , repeatedly to select "ON." The display returns to the normal display. Clearing ...
Operating Instructions
Page 22
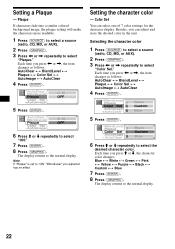
...time you adjusted has no effect. 6 Press M or m repeatedly to the normal display. 22 Selecting the character color 1 Press (SOURCE) to select a source (radio, CD, MD, or AUX). 2 Press (GRAPHIC). 3 Press < or , repeatedly to select "ON." 7 Press (ENTER). 8 Press (GRAPHIC). Setting the character...Plaque If characters fade into a similar colored background image, the plaque setting will make the characters more readable. 1 Press (SOURCE) to select a source (radio, CD, MD, or AUX). 2 Press (GRAPHIC). 3 Press < or , repeatedly to the normal display. The display returns to select "Plaque." ...
...time you adjusted has no effect. 6 Press M or m repeatedly to the normal display. 22 Selecting the character color 1 Press (SOURCE) to select a source (radio, CD, MD, or AUX). 2 Press (GRAPHIC). 3 Press < or , repeatedly to select "ON." 7 Press (ENTER). 8 Press (GRAPHIC). Setting the character...Plaque If characters fade into a similar colored background image, the plaque setting will make the characters more readable. 1 Press (SOURCE) to select a source (radio, CD, MD, or AUX). 2 Press (GRAPHIC). 3 Press < or , repeatedly to the normal display. The display returns to select "Plaque." ...
Operating Instructions
Page 23
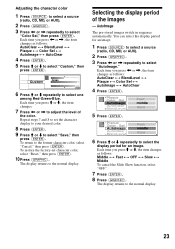
... y Plaque y Color Sel y AutoImage y AutoClear 4 Press (ENTER). 5 Press (ENTER). 6 Press M or m repeatedly to select the display period for an image. 1 Press (SOURCE) to select a source (radio, CD, MD, or AUX). 2 Press (GRAPHIC). 3 Press < or , repeatedly to select "Color Sel," then press (ENTER). Adjusting the character color 1 Press (SOURCE) to select a source...
... y Plaque y Color Sel y AutoImage y AutoClear 4 Press (ENTER). 5 Press (ENTER). 6 Press M or m repeatedly to select the display period for an image. 1 Press (SOURCE) to select a source (radio, CD, MD, or AUX). 2 Press (GRAPHIC). 3 Press < or , repeatedly to select "Color Sel," then press (ENTER). Adjusting the character color 1 Press (SOURCE) to select a source...

Operating Instructions
Page 24
... connected to adjust. Other Functions Adjusting the sound characteristics You can adjust the bass, treble, balance, fader, and subwoofer volume. 1 Press (SOURCE) to select a source (radio, CD, MD, or AUX). 2 Press (SOUND). 3 Press < or , repeatedly to select the item you press < or ,, the item changes as follows: DSO y EQ7 y Bass y Treble...
... connected to adjust. Other Functions Adjusting the sound characteristics You can adjust the bass, treble, balance, fader, and subwoofer volume. 1 Press (SOURCE) to select a source (radio, CD, MD, or AUX). 2 Press (SOUND). 3 Press < or , repeatedly to select the item you press < or ,, the item changes as follows: DSO y EQ7 y Bass y Treble...
Operating Instructions
Page 26
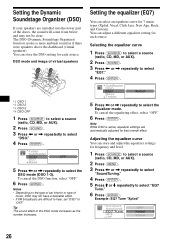
... (ENTER). Example: EQ7 Tune "Xplod" 26 You can store the DSO setting for best overall effect. Selecting the equalizer curve 1 Press (SOURCE) to select a source (radio, CD, MD, or AUX). 2 Press (SOUND). 3 Press < or , repeatedly to select "EQ7." 4 Press (ENTER). *1 DSO 1 *2 DSO 2 *3 DSO 3 *4 DSO OFF 1 Press (SOURCE) ...for each source. DSO mode and image of the doors, the sound will come from below and may not have a desirable affect. • If FM broadcasts are difficult to hear, set "DSO" to select "EQ7 Tune." 6 Press (ENTER). Adjusting the equalizer curve You can store and adjust ...
... (ENTER). Example: EQ7 Tune "Xplod" 26 You can store the DSO setting for best overall effect. Selecting the equalizer curve 1 Press (SOURCE) to select a source (radio, CD, MD, or AUX). 2 Press (SOUND). 3 Press < or , repeatedly to select "EQ7." 4 Press (ENTER). *1 DSO 1 *2 DSO 2 *3 DSO 3 *4 DSO OFF 1 Press (SOURCE) ...for each source. DSO mode and image of the doors, the sound will come from below and may not have a desirable affect. • If FM broadcasts are difficult to hear, set "DSO" to select "EQ7 Tune." 6 Press (ENTER). Adjusting the equalizer curve You can store and adjust ...

Operating Instructions
Page 27
...speakers. 6 Press (ENTER). continue to the normal display. The display returns to next page t 27 Adjusting the cut -off Frequency (Hz) 1 During playback or radio reception, press (MENU). 2 Press < or , repeatedly to select "SoundTuning." 3 Press (ENTER). 4 Press M or m repeatedly to the normal display. The ...Hz y 157 Hz y 396 Hz y 1000 Hz y 2510 Hz y 6340 Hz y 16000 Hz Adjusting the front and rear volume 1 Press (SOURCE) to select a source (radio, CD, MD, or AUX). 2 Press (SOUND). 3 Press < or , repeatedly to select "Fader." 4 Press (ENTER). 2 Press M or m repeatedly to adjust the ...
...speakers. 6 Press (ENTER). continue to the normal display. The display returns to next page t 27 Adjusting the cut -off Frequency (Hz) 1 During playback or radio reception, press (MENU). 2 Press < or , repeatedly to select "SoundTuning." 3 Press (ENTER). 4 Press M or m repeatedly to the normal display. The ...Hz y 157 Hz y 396 Hz y 1000 Hz y 2510 Hz y 6340 Hz y 16000 Hz Adjusting the front and rear volume 1 Press (SOURCE) to select a source (radio, CD, MD, or AUX). 2 Press (SOUND). 3 Press < or , repeatedly to select "Fader." 4 Press (ENTER). 2 Press M or m repeatedly to adjust the ...
Operating Instructions
Page 28
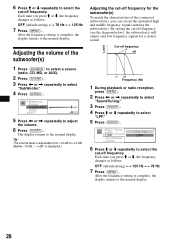
...m, the frequency changes as follows: OFF (default setting) y 125 Hz y 78 Hz 7 Press (MENU). Cut-off frequency off Frequency (Hz) 1 During playback or radio reception, press (MENU). 2 Press < or , repeatedly to select "SoundTuning." 3 Press (ENTER). 4 Press M or m repeatedly to select "LPF." 5 Press (ENTER...), the subwoofer(s) will output only low frequency signals for the subwoofer(s) To match the characteristics of the subwoofer(s) 1 Press (SOURCE) to select a source (radio, CD, MD, or AUX). 2 Press (SOUND). 3 Press < or , repeatedly to select "SubWoofer." 4 Press (ENTER). 5 Press < or ,...
...m, the frequency changes as follows: OFF (default setting) y 125 Hz y 78 Hz 7 Press (MENU). Cut-off frequency off Frequency (Hz) 1 During playback or radio reception, press (MENU). 2 Press < or , repeatedly to select "SoundTuning." 3 Press (ENTER). 4 Press M or m repeatedly to select "LPF." 5 Press (ENTER...), the subwoofer(s) will output only low frequency signals for the subwoofer(s) To match the characteristics of the subwoofer(s) 1 Press (SOURCE) to select a source (radio, CD, MD, or AUX). 2 Press (SOUND). 3 Press < or , repeatedly to select "SubWoofer." 4 Press (ENTER). 5 Press < or ,...

Operating Instructions
Page 29
...). 7 Press m to the top menu display. 8 Press (MENU). To deactivate auxiliary equipment in 1 dB steps from your car speakers by connecting optional Sony portable devices. CD/MD playback or radio reception stops (the key illumination and display remain on this unit is adjustable in the music source display 1 Press (OFF). The display...
...). 7 Press m to the top menu display. 8 Press (MENU). To deactivate auxiliary equipment in 1 dB steps from your car speakers by connecting optional Sony portable devices. CD/MD playback or radio reception stops (the key illumination and display remain on this unit is adjustable in the music source display 1 Press (OFF). The display...

Operating Instructions
Page 34
.... • Tune in the frequency accurately. • The broadcast signal is too weak. Interference occurs during FM reception. Blank*1 No tracks have been recorded on it. t Wait until the temperature goes down .*2 t Clean...about 5 seconds, and an alarm sound will not go up. NO Disc No disc is selected. NO Magazine The disc magazine is hampered by noises. The sound is not inserted in the... Not Ready The lid of the car antenna. • The auto antenna will be received. Radio reception Preset tuning is not possible. • Store the correct frequency in the memory. •...
.... • Tune in the frequency accurately. • The broadcast signal is too weak. Interference occurs during FM reception. Blank*1 No tracks have been recorded on it. t Wait until the temperature goes down .*2 t Clean...about 5 seconds, and an alarm sound will not go up. NO Disc No disc is selected. NO Magazine The disc magazine is hampered by noises. The sound is not inserted in the... Not Ready The lid of the car antenna. • The auto antenna will be received. Radio reception Preset tuning is not possible. • Store the correct frequency in the memory. •...


