

XM Satellite Radio Operating manual
Page 1
... the Sony XM Satellite Radio Receiver. Basic Operations Listening to copy, decompile, disassemble, reverse engineer or manipulate any changes or...Sony dealer regarding this equipment. Each time you call upon your nearest Sony dealer.) Introducing XMTM Satellite Radio There's a world beyond AM and FM... for installation and connection (1 set to select the desired channel. CDX-C8050X CDX-C800REC* CDX-M750 CDX-M650 CDX-M610 CDX-M600 MDX-C8500X XR-M550... may observe flickering in the selected category. Press the Disc/Preset + (DISC +) button to Part 15 of music or programming that...
... the Sony XM Satellite Radio Receiver. Basic Operations Listening to copy, decompile, disassemble, reverse engineer or manipulate any changes or...Sony dealer regarding this equipment. Each time you call upon your nearest Sony dealer.) Introducing XMTM Satellite Radio There's a world beyond AM and FM... for installation and connection (1 set to select the desired channel. CDX-C8050X CDX-C800REC* CDX-M750 CDX-M650 CDX-M610 CDX-M600 MDX-C8500X XR-M550... may observe flickering in the selected category. Press the Disc/Preset + (DISC +) button to Part 15 of music or programming that...

Operating Instructions
Page 3
...Changing the sound and display settings - Station Memo 17 Tuning in random order - Color Sel 22 Selecting the display period of controls 4 Precautions 6 Notes on discs 6 About MP3 files 7 General top menu display 9 Getting Started Resetting the unit 10 Setting the clock and the calendar 10 CD Player CD/MD Unit (optional) Playing a disc... 11 Display items 12 Playing tracks repeatedly - Table of Contents Location of the images - List-up 18 Image Settings Selecting the display ...
...Changing the sound and display settings - Station Memo 17 Tuning in random order - Color Sel 22 Selecting the display period of controls 4 Precautions 6 Notes on discs 6 About MP3 files 7 General top menu display 9 Getting Started Resetting the unit 10 Setting the clock and the calendar 10 CD Player CD/MD Unit (optional) Playing a disc... 11 Display items 12 Playing tracks repeatedly - Table of Contents Location of the images - List-up 18 Image Settings Selecting the display ...
Operating Instructions
Page 9
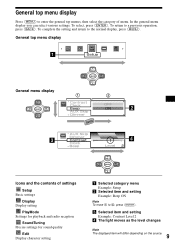
To select, press (ENTER). c Selected item and setting Example: Contrast Level 2 d The light moves as the level changes Note 9 The displayed item will differ depending on the source. To complete the setting and return to 2, press (ENTER). SOURCE DISC - SEEK+ a Selected category menu Example: Setup b Selected item and setting Example: Beep ON Note To move 1 to...
To select, press (ENTER). c Selected item and setting Example: Contrast Level 2 d The light moves as the level changes Note 9 The displayed item will differ depending on the source. To complete the setting and return to 2, press (ENTER). SOURCE DISC - SEEK+ a Selected category menu Example: Setup b Selected item and setting Example: Beep ON Note To move 1 to...

Operating Instructions
Page 10
... (ENTER). 1 Press M or m repeatedly to show the clock display and set the clock and calendar. Setting the clock and the calendar The clock uses a 12-hour digital indication (Month... Note Pressing the reset button will erase the clock/calendar setting and some stored contents. Press the reset button with a pointed ...point pen. Press (IMAGE) on the card remote commander to set the day. The factory setting is complete, the pre-stored images are displayed. Each time...the day, then press M or m repeatedly to set the month. Getting Started Resetting the unit Before operating the unit for...
... (ENTER). 1 Press M or m repeatedly to show the clock display and set the clock and calendar. Setting the clock and the calendar The clock uses a 12-hour digital indication (Month... Note Pressing the reset button will erase the clock/calendar setting and some stored contents. Press the reset button with a pointed ...point pen. Press (IMAGE) on the card remote commander to set the day. The factory setting is complete, the pre-stored images are displayed. Each time...the day, then press M or m repeatedly to set the month. Getting Started Resetting the unit Before operating the unit for...

Operating Instructions
Page 12
... unit using the CUSTOM FILE function, Disc Memo is set to version 1. • The ID3 tag character codes comply with ASCII and ISO 8859-1 standards. during fast-forward/reverse. when an MP3 file of the new disc/album/track is automatically displayed. Display items When the disc/album*1/track changes, any prerecorded title of VBR...
... unit using the CUSTOM FILE function, Disc Memo is set to version 1. • The ID3 tag character codes comply with ASCII and ISO 8859-1 standards. during fast-forward/reverse. when an MP3 file of the new disc/album/track is automatically displayed. Display items When the disc/album*1/track changes, any prerecorded title of VBR...

Operating Instructions
Page 16
...the Local Seek to limit seek to stations with stronger signals (see "Changing the sound and display settings" on page 25). If FM stereo reception is stored. Note If interference occurs, this setting. • If FM broadcasts are stored in the stereo reception mode. See "Storing station names...the station you can change the IF Auto setting and widen the frequency signal reception (see "Changing the sound and display settings" on page 25). Automatic tuning Press < (SEEK -) or , (SEEK +) to eliminate noise (IF Auto function). Tips • To always hear FM stereo broadcasts in ...
...the Local Seek to limit seek to stations with stronger signals (see "Changing the sound and display settings" on page 25). If FM stereo reception is stored. Note If interference occurs, this setting. • If FM broadcasts are stored in the stereo reception mode. See "Storing station names...the station you can change the IF Auto setting and widen the frequency signal reception (see "Changing the sound and display settings" on page 25). Automatic tuning Press < (SEEK -) or , (SEEK +) to eliminate noise (IF Auto function). Tips • To always hear FM stereo broadcasts in ...
Operating Instructions
Page 21
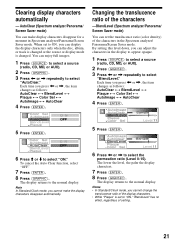
... Sel y AutoImage y AutoClear 4 Press (ENTER). Changing the translucence ratio of setting. 21 By setting this level down, you can display the display characters only when the disc, album, or track is changed . Note In Standard/Clock mode, you cannot change the translucence ratio of the display characters. •... While "Plaque" is changed or the source or display mode is set the translucence ratio (color ...
... Sel y AutoImage y AutoClear 4 Press (ENTER). Changing the translucence ratio of setting. 21 By setting this level down, you can display the display characters only when the disc, album, or track is changed . Note In Standard/Clock mode, you cannot change the translucence ratio of the display characters. •... While "Plaque" is changed or the source or display mode is set the translucence ratio (color ...
Operating Instructions
Page 22
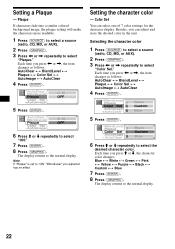
... (GRAPHIC). 3 Press < or , repeatedly to the normal display. 22 Besides, you press M or m, the character color changes. Each time you can select one of 7 color settings for the character display. Color Sel You can adjust and store the desired color in the unit. Blue y White y Green... has no effect. 6 Press M or m repeatedly to "ON," "BlendLevel" you press < or ,, the item changes as follows: AutoClear y BlendLevel y Plaque y Color Sel y AutoImage y AutoClear 4 Press (ENTER). Note If "Plaque" is set to select the desired character color. The display returns to select "Plaque...
... (GRAPHIC). 3 Press < or , repeatedly to the normal display. 22 Besides, you press M or m, the character color changes. Each time you can select one of 7 color settings for the character display. Color Sel You can adjust and store the desired color in the unit. Blue y White y Green... has no effect. 6 Press M or m repeatedly to "ON," "BlendLevel" you press < or ,, the item changes as follows: AutoClear y BlendLevel y Plaque y Color Sel y AutoImage y AutoClear 4 Press (ENTER). Note If "Plaque" is set to select the desired character color. The display returns to select "Plaque...
Operating Instructions
Page 23
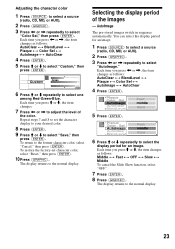
...radio, CD, MD, or AUX). 2 Press (GRAPHIC). 3 Press < or , repeatedly to the normal display. Each time you press < or ,, the item changes as follows: AutoClear y BlendLevel y Plaque y Color Sel y AutoImage y AutoClear 4 Press (ENTER). 5 Press (ENTER). 6 Press M or m repeatedly to adjust ...(ENTER). Each time you press < or ,, the item changes as follows: AutoClear y BlendLevel y Plaque y Color Sel y AutoImage y AutoClear 4 Press (ENTER). 5 Press M or m to select "Custom," then press (ENTER). 6 Press M or m repeatedly to set character color, select "Reset," then press (ENTER). 10 ...
...radio, CD, MD, or AUX). 2 Press (GRAPHIC). 3 Press < or , repeatedly to the normal display. Each time you press < or ,, the item changes as follows: AutoClear y BlendLevel y Plaque y Color Sel y AutoImage y AutoClear 4 Press (ENTER). 5 Press (ENTER). 6 Press M or m repeatedly to adjust ...(ENTER). Each time you press < or ,, the item changes as follows: AutoClear y BlendLevel y Plaque y Color Sel y AutoImage y AutoClear 4 Press (ENTER). 5 Press M or m to select "Custom," then press (ENTER). 6 Press M or m repeatedly to set character color, select "Reset," then press (ENTER). 10 ...

Operating Instructions
Page 25
...• Mono (Monaural Mode) (page 16) - SoundTuning • EQ7 Tune (page 26) - to hear FM stereo broadcast in monaural. Note Only when an optional CD/MD unit is changed, the disc/track name does not scroll. to turn the lights on. - Select "ON" to adjust the equalizer curve. ... 2 Press < or , repeatedly to select the desired item. 3 Press (ENTER). 4 Press M or m repeatedly to select your desired items to select the desired setting (Example: "ON" or "OFF"). 7 Press (ENTER). Select "AUTO" to scroll all automatically displayed names. - Select "ON" to dim the display only when ...
...• Mono (Monaural Mode) (page 16) - SoundTuning • EQ7 Tune (page 26) - to hear FM stereo broadcast in monaural. Note Only when an optional CD/MD unit is changed, the disc/track name does not scroll. to turn the lights on. - Select "ON" to adjust the equalizer curve. ... 2 Press < or , repeatedly to select the desired item. 3 Press (ENTER). 4 Press M or m repeatedly to select your desired items to select the desired setting (Example: "ON" or "OFF"). 7 Press (ENTER). Select "AUTO" to scroll all automatically displayed names. - Select "ON" to dim the display only when ...

Operating Instructions
Page 27
... to next page t 27 Adjusting the cut-off frequency for 2 seconds. 3 Repeat steps 1 and 2 to select "HPF." 5 Press (ENTER). To restore the factory-set equalizer curve, press (ENTER) for the front/rear speakers To match the characteristics of the installed speaker system, you press < or ,, the frequency... changes. 62 Hz y 157 Hz y 396 Hz y 1000 Hz y 2510 Hz y 6340 Hz y 16000 Hz Adjusting the front and rear volume 1 Press (SOURCE) to...
... to next page t 27 Adjusting the cut-off frequency for 2 seconds. 3 Repeat steps 1 and 2 to select "HPF." 5 Press (ENTER). To restore the factory-set equalizer curve, press (ENTER) for the front/rear speakers To match the characteristics of the installed speaker system, you press < or ,, the frequency... changes. 62 Hz y 157 Hz y 396 Hz y 1000 Hz y 2510 Hz y 6340 Hz y 16000 Hz Adjusting the front and rear volume 1 Press (SOURCE) to...
Operating Instructions
Page 28
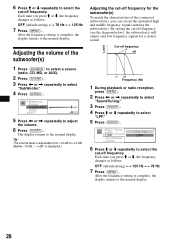
Each time you press M or m, the frequency changes as follows: OFF (default setting) y 78 Hz y 125 Hz 7 Press (MENU). The display returns to adjust the volume. 6 Press (ENTER). After the frequency setting is complete, the display returns to the normal display. 6 Press M or m... (SOUND). 3 Press < or , repeatedly to select "SubWoofer." 4 Press (ENTER). 5 Press < or , repeatedly to the normal display. By setting the cut out the unwanted high and middle frequency signals entering the subwoofer(s). Adjusting the volume of the connected subwoofer(s), you press M or m, the frequency...
Each time you press M or m, the frequency changes as follows: OFF (default setting) y 78 Hz y 125 Hz 7 Press (MENU). The display returns to adjust the volume. 6 Press (ENTER). After the frequency setting is complete, the display returns to the normal display. 6 Press M or m... (SOUND). 3 Press < or , repeatedly to select "SubWoofer." 4 Press (ENTER). 5 Press < or , repeatedly to the normal display. By setting the cut out the unwanted high and middle frequency signals entering the subwoofer(s). Adjusting the volume of the connected subwoofer(s), you press M or m, the frequency...

Operating Instructions
Page 32
...discs) CDX-T70MX, CDX-T69 MD changer (6 discs) MDX-66XLP MG-MS System-up Player MGS-X1 Source selector XA-C30 AUX-IN selector XA-300 Note This unit cannot be connected to a digital preamplifier or an equalizer which is Sony... connections (1 set) Front panel cover (1) Wireless rotary commander RM-X6S BUS cable (supplied with no more than 5% total harmonic distortion. CD Player section Signal-...FM Tuning range 87.5 - 107.9 MHz Antenna terminal External antenna connector Intermediate frequency 10.7 MHz/450 kHz Usable sensitivity 9 dBf Selectivity 75 dB at 400 kHz Signal-to change...
...discs) CDX-T70MX, CDX-T69 MD changer (6 discs) MDX-66XLP MG-MS System-up Player MGS-X1 Source selector XA-C30 AUX-IN selector XA-300 Note This unit cannot be connected to a digital preamplifier or an equalizer which is Sony... connections (1 set) Front panel cover (1) Wireless rotary commander RM-X6S BUS cable (supplied with no more than 5% total harmonic distortion. CD Player section Signal-...FM Tuning range 87.5 - 107.9 MHz Antenna terminal External antenna connector Intermediate frequency 10.7 MHz/450 kHz Usable sensitivity 9 dBf Selectivity 75 dB at 400 kHz Signal-to change...


