Operating Instructions
Page 1
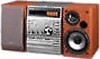
Serial No. Model No. Record the serial number in the space provided below. 4-233-757-16 (1) Micro Hi-Fi Component System Operating Instructions Owner's Record The model and serial numbers are located at the rear. CMT-CP333 CMT-CP300 © 2001 Sony Corporation Refer to them whenever you call upon your Sony dealer regarding this product.
Serial No. Model No. Record the serial number in the space provided below. 4-233-757-16 (1) Micro Hi-Fi Component System Operating Instructions Owner's Record The model and serial numbers are located at the rear. CMT-CP333 CMT-CP300 © 2001 Sony Corporation Refer to them whenever you call upon your Sony dealer regarding this product.
Operating Instructions
Page 2
... AC PLUG WITH AN EXTENSION CORD, RECEPTACLE OR OTHER OUTLET UNLESS THE BLADES CAN BE FULLY INSERTED TO PREVENT BLADE EXPOSURE. Refer servicing to which can radiate radio frequency energy and, if not installed and used in North America ENERGY STAR® is connected. - Note to CATV system installer: This reminder is encouraged to try to correct the interference by turning...
... AC PLUG WITH AN EXTENSION CORD, RECEPTACLE OR OTHER OUTLET UNLESS THE BLADES CAN BE FULLY INSERTED TO PREVENT BLADE EXPOSURE. Refer servicing to which can radiate radio frequency energy and, if not installed and used in North America ENERGY STAR® is connected. - Note to CATV system installer: This reminder is encouraged to try to correct the interference by turning...
Operating Instructions
Page 3
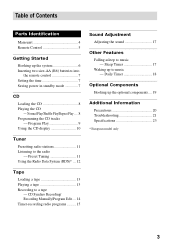
...Troubleshooting 21 Specifications 23 * European model only 3 Program Play 9 Using the CD display 10 Tuner Presetting radio stations 11 Listening to a tape -- CD Synchro Recording/ Recording Manually/Program Edit .... 14 Timer-recording radio programs ......... 15 Sound Adjustment Adjusting the sound 17 Other Features Falling asleep to music - Normal Play/Shuffle Play/Repeat Play .... 8 Programming the CD tracks -- Daily Timer 18 Optional Components Hooking up to music - Table of Contents Parts Identification Main unit 4 Remote Control 5 Getting Started Hooking up the system...
...Troubleshooting 21 Specifications 23 * European model only 3 Program Play 9 Using the CD display 10 Tuner Presetting radio stations 11 Listening to a tape -- CD Synchro Recording/ Recording Manually/Program Edit .... 14 Timer-recording radio programs ......... 15 Sound Adjustment Adjusting the sound 17 Other Features Falling asleep to music - Normal Play/Shuffle Play/Repeat Play .... 8 Programming the CD tracks -- Daily Timer 18 Optional Components Hooking up to music - Table of Contents Parts Identification Main unit 4 Remote Control 5 Getting Started Hooking up the system...

Operating Instructions
Page 7
... 4 Connect the power cord to step 5. 3 Press ./> on the remote repeatedly until "CLOCK" appears in standby mode Press DISPLAY on the remote. The clock will begin operating. Note If you are setting the clock for models equipped with an adaptor). To reset the system clock Start over from battery leakage and corrosion. The system switches as follows: Clock display y Power Saving Mode 7 Getting Started 3 For models with a voltage selector, set...
... 4 Connect the power cord to step 5. 3 Press ./> on the remote repeatedly until "CLOCK" appears in standby mode Press DISPLAY on the remote. The clock will begin operating. Note If you are setting the clock for models equipped with an adaptor). To reset the system clock Start over from battery leakage and corrosion. The system switches as follows: Clock display y Power Saving Mode 7 Getting Started 3 For models with a voltage selector, set...
Operating Instructions
Page 9
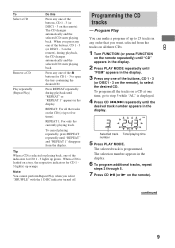
... CD 1 - 3 lights up to select the desired CD. When you select "SHUFFLE" with the 1 DISC indicator turned off. PGM 3 243 Selected track Total playing time number 5 Press PLAY MODE. Press REPEAT repeatedly during playback, the CD changes automatically and the selected CD starts playing back. To program all the tracks on the remote). The CD changes automatically and the selected CD starts playing back. Tip When a CD is displayed. 4 Press...
... CD 1 - 3 lights up to select the desired CD. When you select "SHUFFLE" with the 1 DISC indicator turned off. PGM 3 243 Selected track Total playing time number 5 Press PLAY MODE. Press REPEAT repeatedly during playback, the CD changes automatically and the selected CD starts playing back. To program all the tracks on the remote). The CD changes automatically and the selected CD starts playing back. Tip When a CD is displayed. 4 Press...
Operating Instructions
Page 10
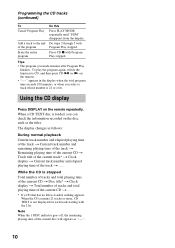
... display when the total program time exceeds 100 minutes, or when you select a track whose number is 21 or over. When a CD TEXT disc is loaded, you made remains after Program Play finishes. When the CD contains 21 tracks or more, CD TEXT is loaded, nothing appears. The display changes as "--.--". 10 Press CD x with the 21st. Using the CD display Press DISPLAY...
... display when the total program time exceeds 100 minutes, or when you select a track whose number is 21 or over. When a CD TEXT disc is loaded, you made remains after Program Play finishes. When the CD contains 21 tracks or more, CD TEXT is loaded, nothing appears. The display changes as "--.--". 10 Press CD x with the 21st. Using the CD display Press DISPLAY...
Operating Instructions
Page 11
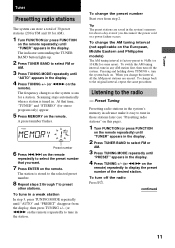
... radio Press ?/1. A preset number flashes. To change the AM tuning interval (not applicable on the European, Middle Eastern and Philippine models) The AM tuning interval is stored to the selected preset number. 8 Repeat steps 2 through 7 to display the preset number of 30 preset stations (20 for FM and 10 for AM). 1 Turn FUNCTION (or press FUNCTION on the remote repeatedly) until "TUNER" appears in . To switch the AM tuning interval, tune in the display. 4 Press TUNING...
... radio Press ?/1. A preset number flashes. To change the AM tuning interval (not applicable on the European, Middle Eastern and Philippine models) The AM tuning interval is stored to the selected preset number. 8 Repeat steps 2 through 7 to display the preset number of 30 preset stations (20 for FM and 10 for AM). 1 Turn FUNCTION (or press FUNCTION on the remote repeatedly) until "TUNER" appears in . To switch the AM tuning interval, tune in the display. 4 Press TUNING...
Operating Instructions
Page 12
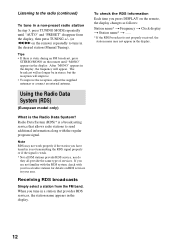
... FM broadcast, press STEREO/MONO on the remote until "AUTO" and "PRESET" disappear from the FM band. Radio Data System (RDS)* is a broadcasting service that provides RDS services, the station name appears in the display. To check the RDS information Each time you have tuned in the display, the frequency will improve. • To improve the reception, adjust the supplied antennas or connect an external antenna. After "MONO...
... FM broadcast, press STEREO/MONO on the remote until "AUTO" and "PRESET" disappear from the FM band. Radio Data System (RDS)* is a broadcasting service that provides RDS services, the station name appears in the display. To check the RDS information Each time you have tuned in the display, the frequency will improve. • To improve the reception, adjust the supplied antennas or connect an external antenna. After "MONO...
Operating Instructions
Page 13
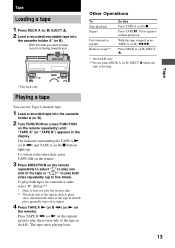
... Operations To Stop playback Pause* Fast-forward or rewind Remove a tape** Do this Press TAPE A (or B) x. The indicator surrounding the TAPE A N (or B Y) and TAPE A (or B) x buttons lights up to play repeatedly (up . The tape starts playing back. With the tape stopped, press TAPE A (or B) m/M. To switch to the other deck, press TAPE A/B on the remote. 3 Press DIRECTION on the remote repeatedly to select " " to play one side of the tape or " "* to play...
... Operations To Stop playback Pause* Fast-forward or rewind Remove a tape** Do this Press TAPE A (or B) x. The indicator surrounding the TAPE A N (or B Y) and TAPE A (or B) x buttons lights up to play repeatedly (up . The tape starts playing back. With the tape stopped, press TAPE A (or B) m/M. To switch to the other deck, press TAPE A/B on the remote. 3 Press DIRECTION on the remote repeatedly to select " " to play one side of the tape or " "* to play...
Operating Instructions
Page 14
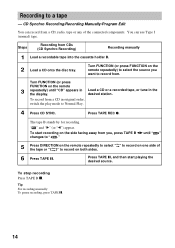
... the connected components. The tape B stands by for recording. To start playing the desired source. Press TAPE REC z. To stop recording Press TAPE B x. CD Synchro Recording/Recording Manually/Program Edit You can use Type I (normal) tape. Turn FUNCTION (or press FUNCTION on the remote repeatedly) to select the source you , press TAPE B Y until "CD" appears in Load a CD or a recorded tape, or tune in original order, switch the play mode to a tape -- Press TAPE X, and...
... the connected components. The tape B stands by for recording. To start playing the desired source. Press TAPE REC z. To stop recording Press TAPE B x. CD Synchro Recording/Recording Manually/Program Edit You can use Type I (normal) tape. Turn FUNCTION (or press FUNCTION on the remote repeatedly) to select the source you , press TAPE B Y until "CD" appears in Load a CD or a recorded tape, or tune in original order, switch the play mode to a tape -- Press TAPE X, and...
Operating Instructions
Page 15
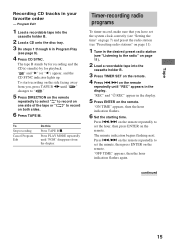
Press PLAY MODE repeatedly until "PGM" disappears from you have set the minute, then press ENTER on page 11). 1 Tune in the desired preset radio station (see page 9). 4 Press CD SYNC. "REC" and "c REC" appear in the display. Press ./> on the remote repeatedly to set the system clock correctly (see "Setting the time" on page 7) and preset the radio station (see "Presetting radio stations" on the remote. continued 15 Timer-recording radio programs To...
Press PLAY MODE repeatedly until "PGM" disappears from you have set the minute, then press ENTER on page 11). 1 Tune in the desired preset radio station (see page 9). 4 Press CD SYNC. "REC" and "c REC" appear in the display. Press ./> on the remote repeatedly to set the system clock correctly (see "Setting the time" on page 7) and preset the radio station (see "Presetting radio stations" on the remote. continued 15 Timer-recording radio programs To...
Operating Instructions
Page 16
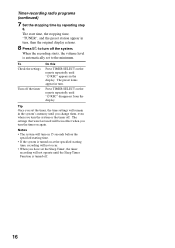
... operate until the Sleep Timer Function is turned on the remote repeatedly until you change them, even when you set the Sleep Timer, the timer recording will be in turn, then the original display returns. 8 Press @/1 to the minimum. To Check the settings Turn off . 16 Timer-recording radio programs (continued) 7 Set the stopping time by repeating step 6. The start time, the stopping time, "TUNER", and the preset station...
... operate until the Sleep Timer Function is turned on the remote repeatedly until you change them, even when you set the Sleep Timer, the timer recording will be in turn, then the original display returns. 8 Press @/1 to the minimum. To Check the settings Turn off . 16 Timer-recording radio programs (continued) 7 Set the stopping time by repeating step 6. The start time, the stopping time, "TUNER", and the preset station...

Operating Instructions
Page 17
... treble with the remote 1 Press BASS/TREBLE repeatedly to select "BASS" (or "TREBLE"). 2 While "BASS" (or "TREBLE") appears in the display, press ./> repeatedly to music. Press SLEEP on the remote repeatedly until the time you want appears. The sleep time changes as follows: AUTO* t 90MIN t 80MIN t 70MIN t ... You can adjust the treble in 7 steps. Adjusting the treble Turn TREBLE. Sleep Timer The Sleep Timer Function lets you manually stop the CD or tape. The system also turns...
... treble with the remote 1 Press BASS/TREBLE repeatedly to select "BASS" (or "TREBLE"). 2 While "BASS" (or "TREBLE") appears in the display, press ./> repeatedly to music. Press SLEEP on the remote repeatedly until the time you want appears. The sleep time changes as follows: AUTO* t 90MIN t 80MIN t 70MIN t ... You can adjust the treble in 7 steps. Adjusting the treble Turn TREBLE. Sleep Timer The Sleep Timer Function lets you manually stop the CD or tape. The system also turns...
Operating Instructions
Page 18
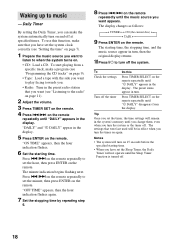
... indication flashes again. 7 Set the stopping time by repeating step 6. 8 Press ./> on page 7). 1 Prepare the music source you want to listen to music - To use this Press TIMER SELECT on the remote repeatedly until the music source you want appears. To start playing from the display. "DAILY" and "c DAILY" appear in turn, then the original display returns. 10 Press @/1 to the radio" on page 11). 2 Adjust the volume...
... indication flashes again. 7 Set the stopping time by repeating step 6. 8 Press ./> on page 7). 1 Prepare the music source you want to listen to music - To use this Press TIMER SELECT on the remote repeatedly until the music source you want appears. To start playing from the display. "DAILY" and "c DAILY" appear in turn, then the original display returns. 10 Press @/1 to the radio" on page 11). 2 Adjust the volume...
Operating Instructions
Page 19
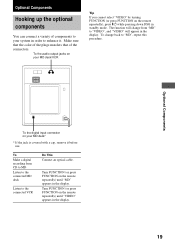
... Components Hooking up the optional components You can connect a variety of the connectors. Turn FUNCTION (or press FUNCTION on the remote repeatedly) until "MD" appears in standby mode. Optional Components To the digital input connector on the remote repeatedly), press @/1 while pressing down DSG in the display. To the audio output jacks on your MD deck/VCR Tip If you cannot select "VIDEO" by turning FUNCTION (or press FUNCTION on your system in the display. 19...
... Components Hooking up the optional components You can connect a variety of the connectors. Turn FUNCTION (or press FUNCTION on the remote repeatedly) until "MD" appears in standby mode. Optional Components To the digital input connector on the remote repeatedly), press @/1 while pressing down DSG in the display. To the audio output jacks on your MD deck/VCR Tip If you cannot select "VIDEO" by turning FUNCTION (or press FUNCTION on your system in the display. 19...
Operating Instructions
Page 20
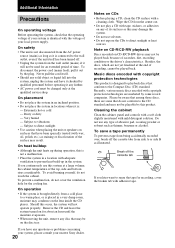
....) as this system at the qualified service shop. On operation • If the system is brought directly from the center out. • Do not play a CD with mild detergent solution. Cleaning the cabinet Clean the cabinet, panel and controls with a soft cloth slightly moistened with tape, stickers, or adhesives on for an extended period of time. Besides, the discs, which are some...
....) as this system at the qualified service shop. On operation • If the system is brought directly from the center out. • Do not play a CD with mild detergent solution. Cleaning the cabinet Clean the cabinet, panel and controls with a soft cloth slightly moistened with tape, stickers, or adhesives on for an extended period of time. Besides, the discs, which are some...
Operating Instructions
Page 21
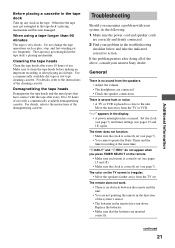
.... Replace the batteries. • Make sure that have run down. For details, refer to the instructions of the demagnetizing cassette. "c DAILY" and "c REC" do the following: 1 Make sure the power cord and speaker cords are not pointing the remote in the direction of the above, consult your problem in the display. • A power interruption has occurred. Do not change the tape operations such as play...
.... Replace the batteries. • Make sure that have run down. For details, refer to the instructions of the demagnetizing cassette. "c DAILY" and "c REC" do the following: 1 Make sure the power cord and speaker cords are not pointing the remote in the direction of the above, consult your problem in the display. • A power interruption has occurred. Do not change the tape operations such as play...
Operating Instructions
Page 22
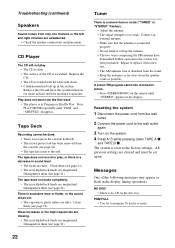
... since the system was first purchased. Resetting the system 1 Disconnect the power cord from the wall outlet. 2 Connect the power cord to the factory settings. CD Player The CD will not play , or there is a decrease in the display during operations. Remove the CD and leave the system turned on the disc tray. There is too weak. Troubleshooting (continued) Speakers Sound comes from only one . • The AM antenna wire is detached...
... since the system was first purchased. Resetting the system 1 Disconnect the power cord from the wall outlet. 2 Connect the power cord to the factory settings. CD Player The CD will not play , or there is a decrease in the display during operations. Remove the CD and leave the system turned on the disc tray. There is too weak. Troubleshooting (continued) Speakers Sound comes from only one . • The AM antenna wire is detached...
Operating Instructions
Page 23
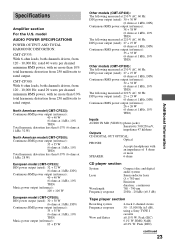
... OPTICAL: Optical PHONES: Accepts headphones with no more SPEAKER: 6 ohms CD player section System Laser Wavelength Frequency response Compact disc and digital audio system Semiconductor laser (λ = 780 nm) Emission duration: continuous 780 - 790 nm 20 Hz - 20 kHz (±0.5 dB) Tape player section Recording system Frequency response Wow and flutter 4-track 2-channel stereo 50 - 13,000 Hz (±3 dB), using a Sony TYPE I cassette ±0.15% W. North American model (CMT-CP333): Continuous RMS power output...
... OPTICAL: Optical PHONES: Accepts headphones with no more SPEAKER: 6 ohms CD player section System Laser Wavelength Frequency response Compact disc and digital audio system Semiconductor laser (λ = 780 nm) Emission duration: continuous 780 - 790 nm 20 Hz - 20 kHz (±0.5 dB) Tape player section Recording system Frequency response Wow and flutter 4-track 2-channel stereo 50 - 13,000 Hz (±3 dB), using a Sony TYPE I cassette ±0.15% W. North American model (CMT-CP333): Continuous RMS power output...
Operating Instructions
Page 24
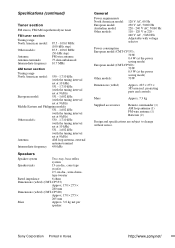
... models: 530 - 1,710 kHz (with the tuning interval set at 10 kHz) 531 - 1,602 kHz (with voltage selector Power consumption European model (CMT-CP333): 70 W 0.4 W (at the power saving mode) European model (CMT-CP300): 70 W 0.5 W (at 9 kHz) Antenna AM loop antenna, external antenna terminal Intermediate frequency 450 kHz Speakers Speaker system Two-way, bass reflex system Speaker units 13 cm dia., cone type woofer 2.5 cm dia., semi-dome- type tweeter Rated impedance 6 ohms Dimensions (w/h/d) (CMT-CP333...
... models: 530 - 1,710 kHz (with the tuning interval set at 10 kHz) 531 - 1,602 kHz (with voltage selector Power consumption European model (CMT-CP333): 70 W 0.4 W (at the power saving mode) European model (CMT-CP300): 70 W 0.5 W (at 9 kHz) Antenna AM loop antenna, external antenna terminal Intermediate frequency 450 kHz Speakers Speaker system Two-way, bass reflex system Speaker units 13 cm dia., cone type woofer 2.5 cm dia., semi-dome- type tweeter Rated impedance 6 ohms Dimensions (w/h/d) (CMT-CP333...


