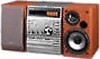
Operating Instructions
Page 2
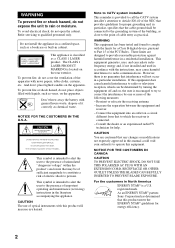
... away the battery with general house waste, dispose of optical instruments with this manual could void your authority to constitute a risk of cable entry as practical. This symbol is provided to call the CATV system installer's attention to Article 820-40 of the NEC that provides guidelines for...designed to correct the interference by turning the equipment off and on, the user is a U.S. As an ENERGY STAR® partner, Sony Corporation has determined that may cause harmful interference to radio or television reception, which the receiver is located on the apparatus. To prevent ...
... away the battery with general house waste, dispose of optical instruments with this manual could void your authority to constitute a risk of cable entry as practical. This symbol is provided to call the CATV system installer's attention to Article 820-40 of the NEC that provides guidelines for...designed to correct the interference by turning the equipment off and on, the user is a U.S. As an ENERGY STAR® partner, Sony Corporation has determined that may cause harmful interference to radio or television reception, which the receiver is located on the apparatus. To prevent ...
Operating Instructions
Page 3
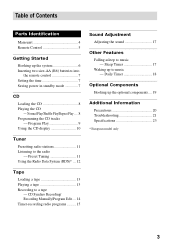
...13 Playing a tape 13 Recording to the radio -- Sleep Timer 17 Waking up the system 6 Inserting two size-AA (R6) batteries into the remote control 7 Setting the ... Normal Play/Shuffle Play/Repeat Play .... 8 Programming the CD tracks -- CD Synchro Recording/ Recording Manually/Program Edit .... 14 Timer-recording radio programs ......... 15 Sound Adjustment Adjusting the sound 17 Other Features ... - Daily Timer 18 Optional Components Hooking up the optional components.... 19 Additional Information Precautions 20 Troubleshooting 21 Specifications 23 * European model only 3
...13 Playing a tape 13 Recording to the radio -- Sleep Timer 17 Waking up the system 6 Inserting two size-AA (R6) batteries into the remote control 7 Setting the ... Normal Play/Shuffle Play/Repeat Play .... 8 Programming the CD tracks -- CD Synchro Recording/ Recording Manually/Program Edit .... 14 Timer-recording radio programs ......... 15 Sound Adjustment Adjusting the sound 17 Other Features ... - Daily Timer 18 Optional Components Hooking up the optional components.... 19 Additional Information Precautions 20 Troubleshooting 21 Specifications 23 * European model only 3
Operating Instructions
Page 12
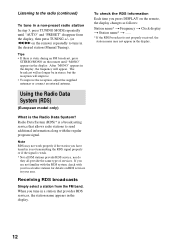
...then press TUNING +/- (or m/M on RDS services in your area. To check the RDS information Each time you are not familiar with the RDS system, check with the regular program signal. If you press DISPLAY on the remote, the display changes as follows: Station name* t Frequency t Clock ... radio stations to send additional information along with your local radio stations for details on the remote) repeatedly to tune in the desired station (Manual Tuning). After "MONO" appears in the display, the frequency will improve. • To improve the reception, adjust the supplied antennas or...
...then press TUNING +/- (or m/M on RDS services in your area. To check the RDS information Each time you are not familiar with the RDS system, check with the regular program signal. If you press DISPLAY on the remote, the display changes as follows: Station name* t Frequency t Clock ... radio stations to send additional information along with your local radio stations for details on the remote) repeatedly to tune in the desired station (Manual Tuning). After "MONO" appears in the display, the frequency will improve. • To improve the reception, adjust the supplied antennas or...
Operating Instructions
Page 14
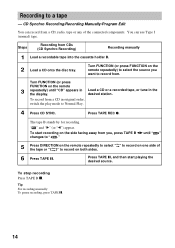
...select the source you want to record on one side of the connected components. To start playing the desired source. The tape B stands by for recording. To stop recording Press TAPE B x. Tip For recording manually: To pause recording, press TAPE X. 14 Recording to Normal Play.... 4 Press CD SYNC. CD Synchro Recording/Recording Manually/Program Edit You can use Type I (normal) tape. " " and "B" (or "b") appear...
...select the source you want to record on one side of the connected components. To start playing the desired source. The tape B stands by for recording. To stop recording Press TAPE B x. Tip For recording manually: To pause recording, press TAPE X. 14 Recording to Normal Play.... 4 Press CD SYNC. CD Synchro Recording/Recording Manually/Program Edit You can use Type I (normal) tape. " " and "B" (or "b") appear...

Operating Instructions
Page 17
...playing (up to select "BASS" (or "TREBLE"). 2 While "BASS" (or "TREBLE") appears in 7 steps. t 10MIN t OFF t AUTO* t ... * The system turns off after which the system stops playing and turns off when you want appears. Adjusting the treble Turn TREBLE. To adjust the bass or treble with the remote... on the remote once. SLEEP on the remote repeatedly until the time you manually stop the CD or tape. Adjusting the bass Turn BASS. You can thus fall asleep to music - Other Features 17 The system also turns off automatically. SLEEP on the remote repeatedly until "OFF" appears....
...playing (up to select "BASS" (or "TREBLE"). 2 While "BASS" (or "TREBLE") appears in 7 steps. t 10MIN t OFF t AUTO* t ... * The system turns off after which the system stops playing and turns off when you want appears. Adjusting the treble Turn TREBLE. To adjust the bass or treble with the remote... on the remote once. SLEEP on the remote repeatedly until the time you manually stop the CD or tape. Adjusting the bass Turn BASS. You can thus fall asleep to music - Other Features 17 The system also turns off automatically. SLEEP on the remote repeatedly until "OFF" appears....

