
Operating Instructions
Page 3
...15 Selecting the Graphic Picture Enhancement (GPE) Mode 16 F ES Technical Features Preset and User Modes ...16 C Displaying the Monitor's Information 17 Power Saving Function ...17 Damper Wires ...17 Plug & Play ...17 Additional Information Warning Messages ...18 Troubleshooting ...18... trademarks of International Business Machines Corporation of the U.S.A. • VESA is a trademark licensed to Apple Computer, Inc., registered in this manual. 3 and other countries. • Windows® is a registered trademark of Microsoft Corporation in the United States and other countries. ...
...15 Selecting the Graphic Picture Enhancement (GPE) Mode 16 F ES Technical Features Preset and User Modes ...16 C Displaying the Monitor's Information 17 Power Saving Function ...17 Damper Wires ...17 Plug & Play ...17 Additional Information Warning Messages ...18 Troubleshooting ...18... trademarks of International Business Machines Corporation of the U.S.A. • VESA is a trademark licensed to Apple Computer, Inc., registered in this manual. 3 and other countries. • Windows® is a registered trademark of Microsoft Corporation in the United States and other countries. ...

Operating Instructions
Page 6
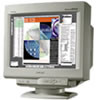
... models may need to a power outlet. For customers using this monitor's model name (CPD-100GS or CPD-200GS) as "Monitor type" from the "Windows 95 Monitor Information Disk" into your carton: • Monitor (1) • Power cord (1) • Macintosh adapter (1) • Windows® 95 Monitor Information Disk and its manual (1) • Warranty card (1) • These operating instructions (1) • Audio miniplug...
... models may need to a power outlet. For customers using this monitor's model name (CPD-100GS or CPD-200GS) as "Monitor type" from the "Windows 95 Monitor Information Disk" into your carton: • Monitor (1) • Power cord (1) • Macintosh adapter (1) • Windows® 95 Monitor Information Disk and its manual (1) • Warranty card (1) • These operating instructions (1) • Audio miniplug...
Operating Instructions
Page 13
... degaussed for at least 20 minutes before repeating the steps above. You can also manually degauss the monitor. 1 Press the MENU button. EN The OPTION OSD appears. to select " DEGAUSS)." (MANUAL 4 Press the > / button. to the left ? . . . OPTION F ES ON C MANUAL DEGAUSS 3 Press the ¨./> buttons to decrease the moire cancellation effect 0 The OSD...
... degaussed for at least 20 minutes before repeating the steps above. You can also manually degauss the monitor. 1 Press the MENU button. EN The OPTION OSD appears. to select " DEGAUSS)." (MANUAL 4 Press the > / button. to the left ? . . . OPTION F ES ON C MANUAL DEGAUSS 3 Press the ¨./> buttons to decrease the moire cancellation effect 0 The OSD...
Operating Instructions
Page 14
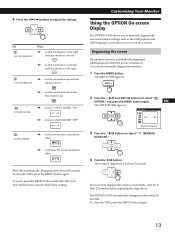
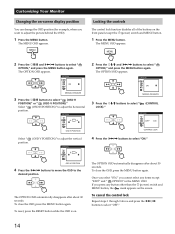
Customizing Your Monitor Changing the on the front panel except the u (power) switch and MENU button. 1 ... -screen display position You can change the OSD position (for example, when you want to select "ON." OPTION ON MANUAL DEGAUSS 3 Press the ¨./> buttons to select "OFF." 14 To reset, press the RESET button while the OSD ...you select "ON," you press any items except "EXIT" and " OPTION" in the MENU OSD. The MENU OSD appears. OPTION ON MANUAL DEGAUSS 3 Press the ¨./> buttons to select " LOCK)." (CONTROL OPTION OFF ON OSD H POSITION Select " position. (OSD V POSITION...
Customizing Your Monitor Changing the on the front panel except the u (power) switch and MENU button. 1 ... -screen display position You can change the OSD position (for example, when you want to select "ON." OPTION ON MANUAL DEGAUSS 3 Press the ¨./> buttons to select "OFF." 14 To reset, press the RESET button while the OSD ...you select "ON," you press any items except "EXIT" and " OPTION" in the MENU OSD. The MENU OSD appears. OPTION ON MANUAL DEGAUSS 3 Press the ¨./> buttons to select " LOCK)." (CONTROL OPTION OFF ON OSD H POSITION Select " position. (OSD V POSITION...
Operating Instructions
Page 15
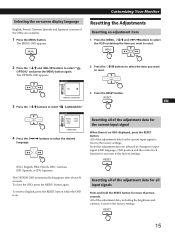
...contrast, is reset to reset. 3 Press the RESET button. The OPTION OSD automatically disappears after about 30 seconds. RESET 15 OPTION ON MANUAL DEGAUSS 3 Press the ¨./> buttons to select " OPTION," and press the MENU button again. RESET EN F ES Resetting all of... reset. Selecting the on . 2 Press the ¨./> buttons to select the item you want to the factory settings. MENU GCeuttsitnogmSiztianrgteYdour Monitor Resetting the Adjustments Resetting an adjustment item 1 Press the MENU, ¨./> and >?//buttons to select the OSD containing the item you ...
...contrast, is reset to reset. 3 Press the RESET button. The OPTION OSD automatically disappears after about 30 seconds. RESET 15 OPTION ON MANUAL DEGAUSS 3 Press the ¨./> buttons to select " OPTION," and press the MENU button again. RESET EN F ES Resetting all of... reset. Selecting the on . 2 Press the ¨./> buttons to select the item you want to the factory settings. MENU GCeuttsitnogmSiztianrgteYdour Monitor Resetting the Adjustments Resetting an adjustment item 1 Press the MENU, ¨./> and >?//buttons to select the OSD containing the item you ...
Operating Instructions
Page 16
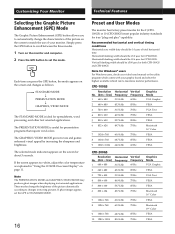
... should be ≥3.6 µsec for Windows® users For Windows users, check your video board manual or the utility program which comes with your monitor. Note for CPD-100GS. These modes change the characteristics of the picture on the screen to match the use of your... graphic board and select the highest available refresh rate to STANDARD MODE. 16 Preset and User Modes The monitor has factory preset modes for the 9 (CPD100GS) or 10 (CPD-200GS) most popular industry standards for presentation programs that require vivid colors. Horizontal blanking width should be ≥3.0...
... should be ≥3.6 µsec for Windows® users For Windows users, check your video board manual or the utility program which comes with your monitor. Note for CPD-100GS. These modes change the characteristics of the picture on the screen to match the use of your... graphic board and select the highest available refresh rate to STANDARD MODE. 16 Preset and User Modes The monitor has factory preset modes for the 9 (CPD100GS) or 10 (CPD-200GS) most popular industry standards for presentation programs that require vivid colors. Horizontal blanking width should be ≥3.0...
Operating Instructions
Page 18
... correct one of the CRT to on " position. Horizontal: 30 - 70 kHz (CPD-100GS), 30 - 85 kHz (CPD-200GS) Vertical: 50 - 120 Hz Refer to your computer's instruction manual to adjust the video frequency range. • If you change the direction of the monitor, color may have a sync pulse that is too narrow for the...
... correct one of the CRT to on " position. Horizontal: 30 - 70 kHz (CPD-100GS), 30 - 85 kHz (CPD-200GS) Vertical: 50 - 120 Hz Refer to your computer's instruction manual to adjust the video frequency range. • If you change the direction of the monitor, color may have a sync pulse that is too narrow for the...

Operating Instructions
Page 19
...8). • Degauss the monitor (page 13). The same hum is heard when the monitor is not a malfunction. • If the problem persists, call your authorized Sony dealer from a location near the monitor, or you have another monitor close to ES your monitor. This aperture grille allows more... 13). White lines show moire. If a second degauss cycle is needed, allow a minimum interval of your desktop pattern. This is manually degaussed. Also note the make and name of 20 minutes for this symptom. Decrease the moire cancellation effect (pages 12 - 13). ...
...8). • Degauss the monitor (page 13). The same hum is heard when the monitor is not a malfunction. • If the problem persists, call your authorized Sony dealer from a location near the monitor, or you have another monitor close to ES your monitor. This aperture grille allows more... 13). White lines show moire. If a second degauss cycle is needed, allow a minimum interval of your desktop pattern. This is manually degaussed. Also note the make and name of 20 minutes for this symptom. Decrease the moire cancellation effect (pages 12 - 13). ...


