Operating Instructions (primary manual)
Page 2
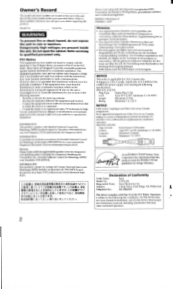
... in December 1990 (MPR II) for very low frequency (VLF) and extremely low frequency (ELF). Serial No. This equipment generates, uses, and can be determined by one or more of the following specifications: SPECIFICATIONS Plug Type Nema-Plug 5-15p Cord Type SVT or SJT, minimum 3 x 18 AWG Length Maximum 15 feet Rating Minimum 7 A, 125 V NOTICE Cette notice s'applique aux Etats...
... in December 1990 (MPR II) for very low frequency (VLF) and extremely low frequency (ELF). Serial No. This equipment generates, uses, and can be determined by one or more of the following specifications: SPECIFICATIONS Plug Type Nema-Plug 5-15p Cord Type SVT or SJT, minimum 3 x 18 AWG Length Maximum 15 feet Rating Minimum 7 A, 125 V NOTICE Cette notice s'applique aux Etats...
Operating Instructions (primary manual)
Page 3
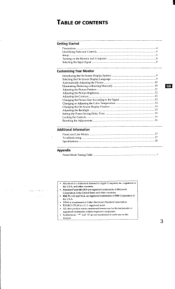
... mentioned in each case in the U.S.A. TABLE OF CONTENTS Getting Started Precautions 4 Identifying Parts and Controls 5 Setup 6 Turning on the Monitor and Computer 8 Selecting the Input Signal 8 Customizing Your Monitor Introducing the On-Screen Display System 9 Selecting the On-Screen Display Language 9 Automatically Adjusting the Picture 10 Eliminating Flickering or Blurring Manually 10 Adjusting the Picture Position 11 Adjusting the Picture Brightness 12 Adjusting the Contrast 12 Changing the Picture Size According to Apple Computer, htc., registered in this...
... mentioned in each case in the U.S.A. TABLE OF CONTENTS Getting Started Precautions 4 Identifying Parts and Controls 5 Setup 6 Turning on the Monitor and Computer 8 Selecting the Input Signal 8 Customizing Your Monitor Introducing the On-Screen Display System 9 Selecting the On-Screen Display Language 9 Automatically Adjusting the Picture 10 Eliminating Flickering or Blurring Manually 10 Adjusting the Picture Position 11 Adjusting the Picture Brightness 12 Adjusting the Contrast 12 Changing the Picture Size According to Apple Computer, htc., registered in this...

Operating Instructions (primary manual)
Page 4
... the picture element may scratch the screen's coating. Examples of cleaner containing an antistatic solution or similar additive as this monitor. However, some of the screen with both hands. This is not a malfunction. Maintenance • Clean the cabinet, panel and controls with a soft cloth lightly moistened with general waste. Do not use the supplied UK cable with the regulations of light (red, blue or green...
... the picture element may scratch the screen's coating. Examples of cleaner containing an antistatic solution or similar additive as this monitor. However, some of the screen with both hands. This is not a malfunction. Maintenance • Clean the cabinet, panel and controls with a soft cloth lightly moistened with general waste. Do not use the supplied UK cable with the regulations of light (red, blue or green...
Operating Instructions (primary manual)
Page 5
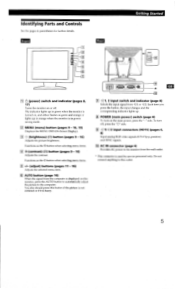
... selecting menu items. 3 (contrast) el button (pages 9 -16) Adjusts the contrast. To turn on , and either flashes in green and orange or lights up in parentheses for further details. L6j AUTO button (page 10) When the signal from the computer is displayed on or off , press the "O" side. 91 -)1/ E2 input connectors (HD15) (pages 6, 8) Input analog RGB video signals (0.714 Vp-p, positive) and SYNC signals. 10 AC IN connector (page 6) Provides AC power to the monitor...
... selecting menu items. 3 (contrast) el button (pages 9 -16) Adjusts the contrast. To turn on , and either flashes in green and orange or lights up in parentheses for further details. L6j AUTO button (page 10) When the signal from the computer is displayed on or off , press the "O" side. 91 -)1/ E2 input connectors (HD15) (pages 6, 8) Input analog RGB video signals (0.714 Vp-p, positive) and SYNC signals. 10 AC IN connector (page 6) Provides AC power to the monitor...
Operating Instructions (primary manual)
Page 6
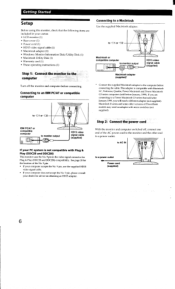
...) compatibility. to a Macintosh Use the supplied Macintosh adapter. Connecting to an IBM PC/AT or compatible computer to -31 or -2 IBM PC/AT or compatible computer to monitor output )410monimenra 11 HD15 video signal cable (supplied) Connecting to a power outlet 4INN Power cord (supplied) 6 Step 2: Connect the power cord With the monitor and computer switched off the monitor and computer before connecting the cable. Macintosh II series and some older versions of PowerBook models may need a different adapter (not supplied...
...) compatibility. to a Macintosh Use the supplied Macintosh adapter. Connecting to an IBM PC/AT or compatible computer to -31 or -2 IBM PC/AT or compatible computer to monitor output )410monimenra 11 HD15 video signal cable (supplied) Connecting to a power outlet 4INN Power cord (supplied) 6 Step 2: Connect the power cord With the monitor and computer switched off the monitor and computer before connecting the cable. Macintosh II series and some older versions of PowerBook models may need a different adapter (not supplied...
Operating Instructions (primary manual)
Page 7
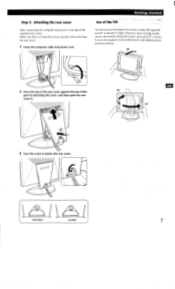
... screen upright when attaching the rear cover. 1 Hook the computer cable and power cord. To turn the monitor, hold at the bottom with both hands as illustrated below. ----- 30° I 2 Press the top of the rear cover against the top of the Tilt The tilt feature will adjust the monitor within 30° upward, and 45° to fasten the rear cover. 11 Unlocked Locked 7 However, best viewing...
... screen upright when attaching the rear cover. 1 Hook the computer cable and power cord. To turn the monitor, hold at the bottom with both hands as illustrated below. ----- 30° I 2 Press the top of the rear cover against the top of the Tilt The tilt feature will adjust the monitor within 30° upward, and 45° to fasten the rear cover. 11 Unlocked Locked 7 However, best viewing...
Operating Instructions (primary manual)
Page 8
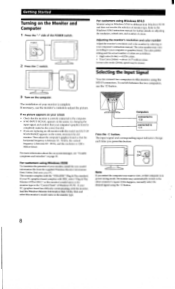
... colors In true color mode (24 bit), speed may be slower. If no picture appears on your screen • Check that the monitor is correctly connected to your computer's instruction manual. Then adjust the computer's graphics board so that the horizontal frequency is between 30 - 92 kHz, the vertical frequency is between the two computers, use the monitor's controls to the other connector's signal. POWER id n O 2 Press the () switch. Selecting the Input Signal You can connect...
... colors In true color mode (24 bit), speed may be slower. If no picture appears on your screen • Check that the monitor is correctly connected to your computer's instruction manual. Then adjust the computer's graphics board so that the horizontal frequency is between 30 - 92 kHz, the vertical frequency is between the two computers, use the monitor's controls to the other connector's signal. POWER id n O 2 Press the () switch. Selecting the Input Signal You can connect...
Operating Instructions (primary manual)
Page 9
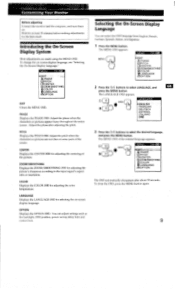
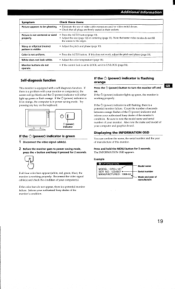
... entire screen. PITCH Displays the PITCH OSD. Adjust the pitch when the characters or pictures are made using the MENU OSD. COLOR Displays the COLOR OSD for adjusting the picture's sharpness according to the input signal's aspect ratio or resolution. Selecting the On-Screen Display Language You can adjust settings such as the backlight, OSD position, power saving delay time and control lock. Customizing Your Monitor Before adjusting Connect the monitor and the computer, and turn them on -screen display language, see "Selecting the On-Screen Display Language." To change...
... entire screen. PITCH Displays the PITCH OSD. Adjust the pitch when the characters or pictures are made using the MENU OSD. COLOR Displays the COLOR OSD for adjusting the picture's sharpness according to the input signal's aspect ratio or resolution. Selecting the On-Screen Display Language You can adjust settings such as the backlight, OSD position, power saving delay time and control lock. Customizing Your Monitor Before adjusting Connect the monitor and the computer, and turn them on -screen display language, see "Selecting the On-Screen Display Language." To change...
Operating Instructions (primary manual)
Page 10
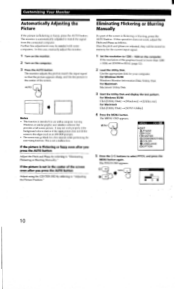
... background color is automatically adjusted to select PITCH, and press the MENU button again. If the picture is not in memory for the current input signal. 1 Set the resolution to the edges (such as follows. If the picture is flickering or fuzzy even after you press the AUTO button Adjust the Pitch and Phase by referring to "Eliminating Flickering or Blurring Manually." If this case, manually adjust the monitor. 1 Turn...
... background color is automatically adjusted to select PITCH, and press the MENU button again. If the picture is not in memory for the current input signal. 1 Set the resolution to the edges (such as follows. If the picture is flickering or fuzzy even after you press the AUTO button Adjust the Pitch and Phase by referring to "Eliminating Flickering or Blurring Manually." If this case, manually adjust the monitor. 1 Turn...
Operating Instructions (primary manual)
Page 11
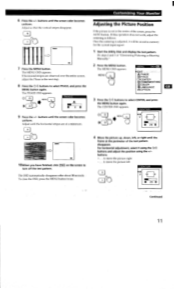
... center of the screen, press the AUTO button. The PHASE OSD appears. * MENU PHASE O ,C7 O 4O 9 Press the +/- buttons until the screen color becomes uniform. If this operation does not work, adjust the centering as follows. The MENU OSD appears. Customizing Your Monitor Adjusting the Picture Position If the picture is adjusted, it will be stored in memory for the current input signal. 1 Start the Utility Disk and display the test pattern...
... center of the screen, press the AUTO button. The PHASE OSD appears. * MENU PHASE O ,C7 O 4O 9 Press the +/- buttons until the screen color becomes uniform. If this operation does not work, adjust the centering as follows. The MENU OSD appears. Customizing Your Monitor Adjusting the Picture Position If the picture is adjusted, it will be stored in memory for the current input signal. 1 Start the Utility Disk and display the test pattern...
Operating Instructions (primary manual)
Page 12
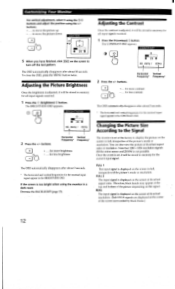
... BRIGHTNESS OSD. Customizing Your Monitor For vertical adjustment, select V using the •01,0, buttons and adjust the position using the monitor in a dark room Decrease the BACKLIGHT (page 15). buttons. + . . . If the screen is not possible. for less contrast The OSD automatically disappears after about 3 seconds. * The horizontal and vertical frequencies for all input signals received. 1 Press the 0 (contrast) 43, button. Changing the Picture Size According to display the picture on the signal. To close the OSD, press the MENU button twice. Horizontal Vertical...
... BRIGHTNESS OSD. Customizing Your Monitor For vertical adjustment, select V using the •01,0, buttons and adjust the position using the monitor in a dark room Decrease the BACKLIGHT (page 15). buttons. + . . . If the screen is not possible. for less contrast The OSD automatically disappears after about 3 seconds. * The horizontal and vertical frequencies for all input signals received. 1 Press the 0 (contrast) 43, button. Changing the Picture Size According to display the picture on the signal. To close the OSD, press the MENU button twice. Horizontal Vertical...
Operating Instructions (primary manual)
Page 14
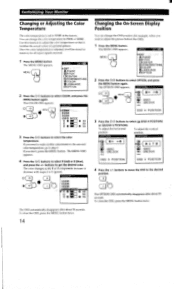
... factory. The OPTION OSD appears. The MENU OSD appears. 4 Press the Q/0 buttons to select COLOR, and press the MENU button again. OPTION 2 Press the Qb9, buttons to select R (red) or B (blue), and press the +1- The COLOR OSD appears. COLOR 9300K O 6500K 5000K 4.15834MODE R =IN 0 50 G _71 50 B Cam© 50 MENU Er ON: 5SEC 0" : UNLOCK 9.4- To adjust the horizontal To adjust the vertical position position OPTION OPTION foliR O el- -+ 5SEC Q++: UNLOCK 10 5SEC : UNLOCK OSD H POSITION OSD V POSITION...
... factory. The OPTION OSD appears. The MENU OSD appears. 4 Press the Q/0 buttons to select COLOR, and press the MENU button again. OPTION 2 Press the Qb9, buttons to select R (red) or B (blue), and press the +1- The COLOR OSD appears. COLOR 9300K O 6500K 5000K 4.15834MODE R =IN 0 50 G _71 50 B Cam© 50 MENU Er ON: 5SEC 0" : UNLOCK 9.4- To adjust the horizontal To adjust the vertical position position OPTION OPTION foliR O el- -+ 5SEC Q++: UNLOCK 10 5SEC : UNLOCK OSD H POSITION OSD V POSITION...
Operating Instructions (primary manual)
Page 15
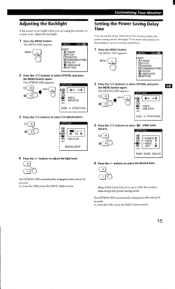
... too bright when you are using the monitor in a dark room, adjust the backlight. 1 Press the MENU button. Customizing Your Monitor Adjusting the Backlight If the screen is set the delay time before the monitor enters the power saving mode. OSD H POSITION 3 Press the Q/0 buttons to select GI (PWR SAVE DELAY). buttons to select OPTION, and press the MENU button again. MENU MENU OK-on2 ►EXIT A PHASE LEI PITCH 0]CENTER &Z00M/SMOOTHING COLOR El LANGUAGE EIOPTION...
... too bright when you are using the monitor in a dark room, adjust the backlight. 1 Press the MENU button. Customizing Your Monitor Adjusting the Backlight If the screen is set the delay time before the monitor enters the power saving mode. OSD H POSITION 3 Press the Q/0 buttons to select GI (PWR SAVE DELAY). buttons to select OPTION, and press the MENU button again. MENU MENU OK-on2 ►EXIT A PHASE LEI PITCH 0]CENTER &Z00M/SMOOTHING COLOR El LANGUAGE EIOPTION...
Operating Instructions (primary manual)
Page 16
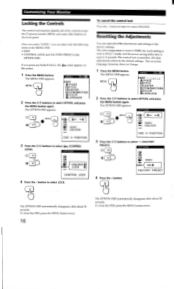
... the OSD, press the MENU button twice. The color temperature is reset to 9300K, the zoom setting is reset to FULL 1 mode, and the power saving delay time is cancelled. The on the front panel. The MENU OSD appears. All other buttons on -screen language, however, does not change. 1 Press the MENU button. OPTION O I=.03 • UNLOCK LOCK O CONTROL LOCK 4 Press the - Customizing Your Monitor Locking the Controls The control lock function disables all of the controls except the (5 (power) switch, MENU and...
... the OSD, press the MENU button twice. The color temperature is reset to 9300K, the zoom setting is reset to FULL 1 mode, and the power saving delay time is cancelled. The on the front panel. The MENU OSD appears. All other buttons on -screen language, however, does not change. 1 Press the MENU button. OPTION O I=.03 • UNLOCK LOCK O CONTROL LOCK 4 Press the - Customizing Your Monitor Locking the Controls The control lock function disables all of the controls except the (5 (power) switch, MENU and...
Operating Instructions (primary manual)
Page 17
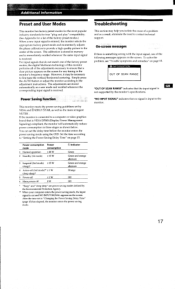
... one of the screen. Power Saving Function This monitor meets the power-saving guidelines set the delay time before the monitor enters the power saving mode using the OSD. Troubleshooting This section may be necessary to the adjustment instructions. Simply press the AUTO button or adjust the monitor according to fine tune the vertical/horizontal centering. For input signals that no signal is cut and NO INPUT SIGNAL appears on the screen. However, it may help you isolate the...
... one of the screen. Power Saving Function This monitor meets the power-saving guidelines set the delay time before the monitor enters the power saving mode using the OSD. Troubleshooting This section may be necessary to the adjustment instructions. Simply press the AUTO button or adjust the monitor according to fine tune the vertical/horizontal centering. For input signals that no signal is cut and NO INPUT SIGNAL appears on the screen. However, it may help you isolate the...
Operating Instructions (primary manual)
Page 18
... is green or flashing orange • Use the self-diagnosis function (page 19). Picture is dark. • Adjust the backlight (page 15) • Adjust the brightness (page 12). • It takes several seconds for the monitor to sync correctly. • Adjust the computer's refresh rate (vertical frequency) to the left or right. •Problems caused by the connected computer or other equipment • Check your graphics board is completely...
... is green or flashing orange • Use the self-diagnosis function (page 19). Picture is dark. • Adjust the backlight (page 15) • Adjust the brightness (page 12). • It takes several seconds for the monitor to sync correctly. • Adjust the computer's refresh rate (vertical frequency) to the left or right. •Problems caused by the connected computer or other equipment • Check your graphics board is completely...
Operating Instructions (primary manual)
Page 19
... monitor. Reconnect the video signal cable(s) and check the condition of your authorized Sony dealer of your monitor or computer(s), the screen will go blank and the ( e) (power) indicator will either light up green, the monitor is green 1 Disconnect the video signal cable(s). 2 Before the monitor goes to power saving mode, press the + button and keep it to UNLOCK (page 16). Be sure to LOCK, set it pressed for 5 seconds. Color is set to note the model name and serial number...
... monitor. Reconnect the video signal cable(s) and check the condition of your authorized Sony dealer of your monitor or computer(s), the screen will go blank and the ( e) (power) indicator will either light up green, the monitor is green 1 Disconnect the video signal cable(s). 2 Before the monitor goes to power saving mode, press the + button and keep it to UNLOCK (page 16). Be sure to LOCK, set it pressed for 5 seconds. Color is set to note the model name and serial number...
Operating Instructions (primary manual)
Page 20
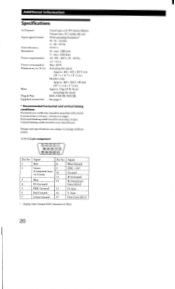
... to change without notice. -1/-S2 pin assignment VEDCXD® 0DCXXD® ggOaO Pin No. 1 2 3 4 5 6 7 Signal Red Green (Composite Sync on Green) Blue ID (Ground) DDC Ground* Red Ground Green Ground Pin No. Horizontal blanking width should be more than 4.8% of VESA 20 Sync 14 V. Additional Information Specifications LCD panel Input signal format Pixel efficiency Resolution Power requirements Power consumption Dimensions (w/h/d) Mass Plug & Play Supplied accessories Panel type: a-Si TFT Active Matrix Picture size: 18.1 inches (46 cm) RGB operating frequency...
... to change without notice. -1/-S2 pin assignment VEDCXD® 0DCXXD® ggOaO Pin No. 1 2 3 4 5 6 7 Signal Red Green (Composite Sync on Green) Blue ID (Ground) DDC Ground* Red Ground Green Ground Pin No. Horizontal blanking width should be more than 4.8% of VESA 20 Sync 14 V. Additional Information Specifications LCD panel Input signal format Pixel efficiency Resolution Power requirements Power consumption Dimensions (w/h/d) Mass Plug & Play Supplied accessories Panel type: a-Si TFT Active Matrix Picture size: 18.1 inches (46 cm) RGB operating frequency...
Marketing Specifications
Page 1
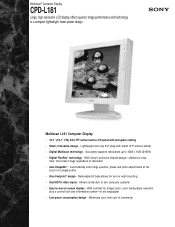
... wall mounting • Dual HD15 video inputs - Automatically sets image position, phase and pitch adjustments at the touch of a single button • Zero Footprint™ design - Multiscan® Computer Display CPD-L181 Large, high-resolution LCD display offers superior image performance and technology in six languages! • Low power consumption design - Lightweight and only 8.2" deep with anti-glare coating • Sleek, innovative design - Removable tilt base allows for image zoom, color temperature selection plus a control lock...
... wall mounting • Dual HD15 video inputs - Automatically sets image position, phase and pitch adjustments at the touch of a single button • Zero Footprint™ design - Multiscan® Computer Display CPD-L181 Large, high-resolution LCD display offers superior image performance and technology in six languages! • Low power consumption design - Lightweight and only 8.2" deep with anti-glare coating • Sleek, innovative design - Removable tilt base allows for image zoom, color temperature selection plus a control lock...
Marketing Specifications
Page 2
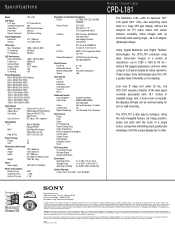
....1" LCD panel (18.1" VIS)-has everything users want in U.S.A. 2/00 Viewing V. Zoom Control Lock Digital Smoothing Center/Phase/Pitch 9300K/6500K/5000K User adjustable Real and Expanded - 2 modes Yes Yes (Standard, Text, Graphics) OSD Controls Phase Pitch Zoom H/V Positioning Power Saving Delay Color Temperature Multi-Language (6 languages) Control Lock Factory Preset OSD Position Backlight Control Reset OSD Information Out of resolutions-up to configure. Purchasers must determine for arm or wall mounting. D186 Printed in a large CRT-type display, without notice. This monitor...
....1" LCD panel (18.1" VIS)-has everything users want in U.S.A. 2/00 Viewing V. Zoom Control Lock Digital Smoothing Center/Phase/Pitch 9300K/6500K/5000K User adjustable Real and Expanded - 2 modes Yes Yes (Standard, Text, Graphics) OSD Controls Phase Pitch Zoom H/V Positioning Power Saving Delay Color Temperature Multi-Language (6 languages) Control Lock Factory Preset OSD Position Backlight Control Reset OSD Information Out of resolutions-up to configure. Purchasers must determine for arm or wall mounting. D186 Printed in a large CRT-type display, without notice. This monitor...


