
Operating Instructions
Page 3
...cause harmful interference to radio or television reception, which the receiver is connected. - A grounding type plug has two blades and a third grounding prong. As an ENERGY STAR® partner, Sony Corporation has determined that to radio communications. Reorient or relocate the receiving... prong are cautioned that any way, such as radiators, heat registers, stoves, or other . Consult the dealer or an experienced radio/TV technician for long periods of the following measures: - Important Safety Instructions 1) Read these instructions. 2) Keep these instructions. 3) Heed all...
...cause harmful interference to radio or television reception, which the receiver is connected. - A grounding type plug has two blades and a third grounding prong. As an ENERGY STAR® partner, Sony Corporation has determined that to radio communications. Reorient or relocate the receiving... prong are cautioned that any way, such as radiators, heat registers, stoves, or other . Consult the dealer or an experienced radio/TV technician for long periods of the following measures: - Important Safety Instructions 1) Read these instructions. 2) Keep these instructions. 3) Heed all...

Operating Instructions
Page 6
... 4 About the S-AIR function 5 Playable Discs 7 Getting Started Step 1: Installing the System .......14 Step 2: Connecting the System ...25 Step 3: Performing the Quick Setup 33 Step 4: Selecting the Source .......36 Step ...Radio 68 Control for HDMI/External Audio Device Using the Control for HDMI Function for "BRAVIA" Sync 70 Using the DIGITAL MEDIA PORT Adapter 73 Using an S-AIR Product 74 ...Optimal Surround Sound for a Room 80 Calibrating the Appropriate Settings Automatically 81 Controlling the TV with the Supplied Remote 82 Using the Sound Effect 83 Selecting the Effect to Suit...
... 4 About the S-AIR function 5 Playable Discs 7 Getting Started Step 1: Installing the System .......14 Step 2: Connecting the System ...25 Step 3: Performing the Quick Setup 33 Step 4: Selecting the Source .......36 Step ...Radio 68 Control for HDMI/External Audio Device Using the Control for HDMI Function for "BRAVIA" Sync 70 Using the DIGITAL MEDIA PORT Adapter 73 Using an S-AIR Product 74 ...Optimal Surround Sound for a Room 80 Calibrating the Appropriate Settings Automatically 81 Controlling the TV with the Supplied Remote 82 Using the Sound Effect 83 Selecting the Effect to Suit...
Operating Instructions
Page 25
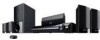
... connector of the speaker cords and the color tube are made. Getting Started Step 2: Connecting the System For connecting the system, read the information on the type of the unit. Connect the speaker cords to a level where sound is not distorted. Red White (Front right... speaker (R)) (Front left speaker (L)) Purple (Subwoofer) SPEAKER CENTER SUBWOOFER TV DIGITAL IN OPTICAL COAXIAL SPEAKER FRONT R...
... connector of the speaker cords and the color tube are made. Getting Started Step 2: Connecting the System For connecting the system, read the information on the type of the unit. Connect the speaker cords to a level where sound is not distorted. Red White (Front right... speaker (R)) (Front left speaker (L)) Purple (Subwoofer) SPEAKER CENTER SUBWOOFER TV DIGITAL IN OPTICAL COAXIAL SPEAKER FRONT R...
Operating Instructions
Page 26
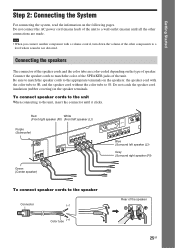
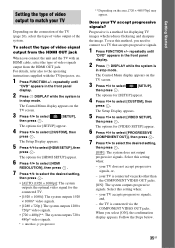
... R AUDIO IN L A Video cord (supplied) To the HDMI IN jack of output signal to set the type of the TV. Getting Started Connecting the TV (Video connection) This connection sends a video signal to the TV both with the video cord. Video signals from the DIGITAL MEDIA PORT adapter are not output via the COMPONENT VIDEO OUT...
... R AUDIO IN L A Video cord (supplied) To the HDMI IN jack of output signal to set the type of the TV. Getting Started Connecting the TV (Video connection) This connection sends a video signal to the TV both with the video cord. Video signals from the DIGITAL MEDIA PORT adapter are not output via the COMPONENT VIDEO OUT...
Operating Instructions
Page 27
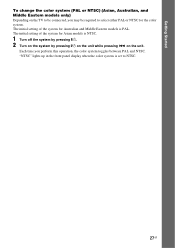
...display when the color system is set to select either PAL or NTSC for the color system. The initial setting of the system for Australian and Middle Eastern models is NTSC. 1 Turn off the system by pressing "/1. 2 Turn on the system by pressing "/1 on the TV to be connected, you perform this... operation, the color system toggles between PAL and NTSC. ...
...display when the color system is set to select either PAL or NTSC for the color system. The initial setting of the system for Australian and Middle Eastern models is NTSC. 1 Turn off the system by pressing "/1. 2 Turn on the system by pressing "/1 on the TV to be connected, you perform this... operation, the color system toggles between PAL and NTSC. ...
Operating Instructions
Page 28
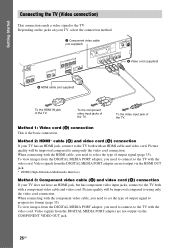
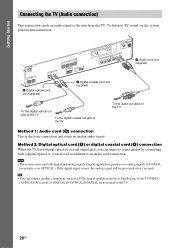
... or coaxial cord in addition to TV sound via the system, perform this connection. To the audio out jacks of the TV. To listen to an audio cord connection. To the digital coaxial out jack of the TV. 28GB Getting Started Connecting the TV (Audio connection) This connection sends an audio signal to the TV/VIDEO (AUDIO IN R/L) jacks or DIGITAL...
... or coaxial cord in addition to TV sound via the system, perform this connection. To the audio out jacks of the TV. To listen to an audio cord connection. To the digital coaxial out jack of the TV. 28GB Getting Started Connecting the TV (Audio connection) This connection sends an audio signal to the TV/VIDEO (AUDIO IN R/L) jacks or DIGITAL...
Operating Instructions
Page 29
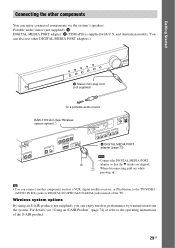
... the S-AIR product. 29GB and Australian models. Getting Started Connecting the other DIGITAL MEDIA PORT adapters.) G Stereo mini-plug cord (not supplied) To a portable audio source EZW-T100 slot (See "Wireless system options".) SPEAKER CENTER SUBWOOFER TV DIGITAL IN OPTICAL COAXIAL SPEAKER FRONT R SUR R FRONT L...75 COMPONENT VIDEO OUT VOIDUETO PR/CR PB/CB Y TV/VIDEO R AUDIO IN L H DIGITAL MEDIA PORT adapter (page 73) Note • Connect the DIGITAL MEDIA PORT adapter so that the V marks are aligned. Wireless system options By using an S-AIR product (not supplied), you...
... the S-AIR product. 29GB and Australian models. Getting Started Connecting the other DIGITAL MEDIA PORT adapters.) G Stereo mini-plug cord (not supplied) To a portable audio source EZW-T100 slot (See "Wireless system options".) SPEAKER CENTER SUBWOOFER TV DIGITAL IN OPTICAL COAXIAL SPEAKER FRONT R SUR R FRONT L...75 COMPONENT VIDEO OUT VOIDUETO PR/CR PB/CB Y TV/VIDEO R AUDIO IN L H DIGITAL MEDIA PORT adapter (page 73) Note • Connect the DIGITAL MEDIA PORT adapter so that the V marks are aligned. Wireless system options By using an S-AIR product (not supplied), you...
Operating Instructions
Page 30
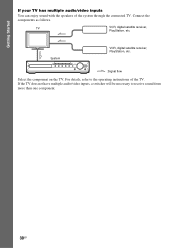
For details, refer to receive sound from more than one component. 30GB If the TV does not have multiple audio/video inputs, a switcher will be necessary to the operating instructions of the system through the connected TV. System VCR, digital satellite receiver, PlayStation, etc. :Signal flow Select the component on the TV. TV VCR, digital satellite receiver, PlayStation, etc. Getting Started If your TV has multiple audio/video inputs You can enjoy sound with the speakers of the TV. Connect the components as follows.
For details, refer to receive sound from more than one component. 30GB If the TV does not have multiple audio/video inputs, a switcher will be necessary to the operating instructions of the system through the connected TV. System VCR, digital satellite receiver, PlayStation, etc. :Signal flow Select the component on the TV. TV VCR, digital satellite receiver, PlayStation, etc. Getting Started If your TV has multiple audio/video inputs You can enjoy sound with the speakers of the TV. Connect the components as follows.
Operating Instructions
Page 33
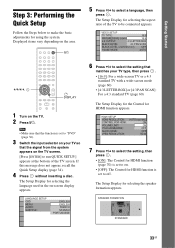
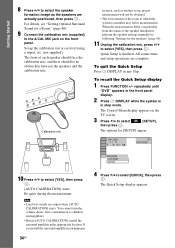
The Setup Display for HDMI function is set to be connected appears. VIDEO SETUP TV TYPE: 16:9 PROGRESSIVE (COMPONENT OUT): 16:9 4:3 OUTPUT: 4:3 LETTER BOX BLACK LEVEL: 4:3 PAN SCAN BLACK LEVEL (COMPONENT OUT): OFF PAUSE MODE: AUTO C/X/x/c, DISPLAY 1 Turn on the ... setting, then press . • [ON]: The Control for HDMI function (page 70) is set to off. The Setup Display for using the system. "/1 5 Press X/x to make the basic adjustments for selecting the language used in the on the TV screen. [Press [ENTER] to run QUICK SETUP.] appears at the bottom of the...
The Setup Display for HDMI function is set to be connected appears. VIDEO SETUP TV TYPE: 16:9 PROGRESSIVE (COMPONENT OUT): 16:9 4:3 OUTPUT: 4:3 LETTER BOX BLACK LEVEL: 4:3 PAN SCAN BLACK LEVEL (COMPONENT OUT): OFF PAUSE MODE: AUTO C/X/x/c, DISPLAY 1 Turn on the ... setting, then press . • [ON]: The Control for HDMI function (page 70) is set to off. The Setup Display for using the system. "/1 5 Press X/x to make the basic adjustments for selecting the language used in the on the TV screen. [Press [ENTER] to run QUICK SETUP.] appears at the bottom of the...
Operating Instructions
Page 34
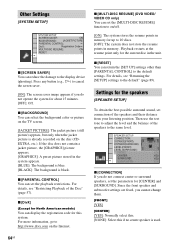
...8226; The environment of the speaker installation, perform the speaker settings manually by following "Settings for a Room" (page 80). 9 Connect the calibration mic (supplied) to the A.CAL MIC jack on the TV screen. 3 Press X/x to select then press . [SETUP], The options for [SETUP] appear. 94( 99) 1( 1) ... C/c to select [YES], then press . When the measurements differ considerably from the status of the room in which the system is finished. All connections and setup operations are actually positioned, then press . The Control Menu display appears on the front panel. The Quick Setup...
...8226; The environment of the speaker installation, perform the speaker settings manually by following "Settings for a Room" (page 80). 9 Connect the calibration mic (supplied) to the A.CAL MIC jack on the TV screen. 3 Press X/x to select then press . [SETUP], The options for [SETUP] appear. 94( 99) 1( 1) ... C/c to select [YES], then press . When the measurements differ considerably from the status of the room in which the system is finished. All connections and setup operations are actually positioned, then press . The Control Menu display appears on the front panel. The Quick Setup...
Operating Instructions
Page 35
...)], then press . 7 Press X/x to select [VIDEO SETUP], then press . your TV is a method for the connected TV. • [1920 × 1080i]: The system outputs 1920 × 1080i* video signals. • [1280 × 720p]: The system outputs 1280 × 720p* video signals. • [720 × 480p]**: The system outputs 720 × 480p* video signals. * i: interlace, p: progressive ** Depending...
...)], then press . 7 Press X/x to select [VIDEO SETUP], then press . your TV is a method for the connected TV. • [1920 × 1080i]: The system outputs 1920 × 1080i* video signals. • [1280 × 720p]: The system outputs 1280 × 720p* video signals. • [720 × 480p]**: The system outputs 720 × 480p* video signals. * i: interlace, p: progressive ** Depending...
Operating Instructions
Page 36
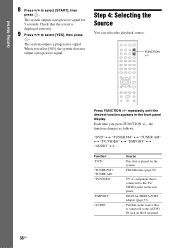
... You can select the playback source. Function "DVD" "TUNER FM"/ "TUNER AM" "TV/VIDEO" "DMPORT" "AUDIO" Source Disc that is played by the system FM/AM radio (page 67) TV or component that is connected to the TV/ VIDEO jacks on the rear panel DIGITAL MEDIA PORT adapter (page 73) Portable audio source... that the screen is connected to the AUDIO IN jack on the front panel FUNCTION +/-...
... You can select the playback source. Function "DVD" "TUNER FM"/ "TUNER AM" "TV/VIDEO" "DMPORT" "AUDIO" Source Disc that is played by the system FM/AM radio (page 67) TV or component that is connected to the TV/ VIDEO jacks on the rear panel DIGITAL MEDIA PORT adapter (page 73) Portable audio source... that the screen is connected to the AUDIO IN jack on the front panel FUNCTION +/-...

Operating Instructions
Page 40
... tray DISC SKIP Z N FUNCTION Connect headphones "/1 FUNCTION +/- The system starts playback (continuous play) of the tray. • Do not place more than one disc on , the TV that the disc is set to "DVD," press FUNCTION +/- on the remote or the VOLUME control on the TV screen and in the front panel ...or VIDEO CD, some operations may be sync-operated with your TV. 2 Switch the input selector on your disc. Refer to open the disc tray, and place a disc on the inner circle of the disc number you set the Control for "BRAVIA" Sync" (page 70). 40GB x To play an 8 cm...
... tray DISC SKIP Z N FUNCTION Connect headphones "/1 FUNCTION +/- The system starts playback (continuous play) of the tray. • Do not place more than one disc on , the TV that the disc is set to "DVD," press FUNCTION +/- on the remote or the VOLUME control on the TV screen and in the front panel ...or VIDEO CD, some operations may be sync-operated with your TV. 2 Switch the input selector on your disc. Refer to open the disc tray, and place a disc on the inner circle of the disc number you set the Control for "BRAVIA" Sync" (page 70). 40GB x To play an 8 cm...
Operating Instructions
Page 60
...MENU], [AUDIO], and [SUBTITLE], select and enter a language code from the COMPONENT VIDEO OUT jacks to the language you connect a 4:3 standard TV. The system automatically displays a wide picture on the TV screen. Note • Depending on the DVD, [4:3 LETTER BOX] may not be selected automatically). When you select [...OTHERS t] in [MENU], [AUDIO], or [SUBTITLE] that is not recorded on the DVD VIDEO. When you connect a 4:3 standard TV. The system displays a wide picture with bands on the disc, the language may be selected automatically instead of the recorded languages will be...
...MENU], [AUDIO], and [SUBTITLE], select and enter a language code from the COMPONENT VIDEO OUT jacks to the language you connect a 4:3 standard TV. The system automatically displays a wide picture on the TV screen. Note • Depending on the DVD, [4:3 LETTER BOX] may not be selected automatically). When you select [...OTHERS t] in [MENU], [AUDIO], or [SUBTITLE] that is not recorded on the DVD VIDEO. When you connect a 4:3 standard TV. The system displays a wide picture with bands on the disc, the language may be selected automatically instead of the recorded languages will be...

Operating Instructions
Page 61
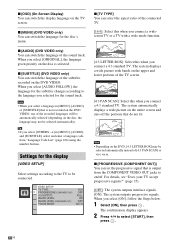
...this when you cannot change the setting on your TV uses a DUAL system, select [AUTO]. [PAL]: The system changes the video signal of an NTSC disc and outputs it in the PAL system. [NTSC]: The system changes the video signal of the output signal to the connected TV (page 26). If you can change the ...aspect ratio on your TV, change the aspect ratio on your TV, not the system. [FULL]: Select this when you can select the...
...this when you cannot change the setting on your TV uses a DUAL system, select [AUTO]. [PAL]: The system changes the video signal of an NTSC disc and outputs it in the PAL system. [NTSC]: The system changes the video signal of the output signal to the connected TV (page 26). If you can change the ...aspect ratio on your TV, change the aspect ratio on your TV, not the system. [FULL]: Select this when you can select the...

Operating Instructions
Page 62
...] If you change the output method of the TV to the system speakers via the TV menu (or by pressing THEATER/THEATRE*), the System 62GB Audio Control (page 71) is set the... system outputs the optimal video signal for the connected TV. [1920 × 1080i]: The system outputs 1920 × 1080i* video signals. [1280 × 720p]: The system outputs 1280 × 720p* video signals. [720 × 480p]**: The system ...TV. • When you set to 48 kHz/16-bit PCM. MODE," and sound mode are connected with an HDMI cable. [OFF]: Off. For details, see "Using the Control for HDMI Function for "BRAVIA...
...] If you change the output method of the TV to the system speakers via the TV menu (or by pressing THEATER/THEATRE*), the System 62GB Audio Control (page 71) is set the... system outputs the optimal video signal for the connected TV. [1920 × 1080i]: The system outputs 1920 × 1080i* video signals. [1280 × 720p]: The system outputs 1280 × 720p* video signals. [720 × 480p]**: The system ...TV. • When you set to 48 kHz/16-bit PCM. MODE," and sound mode are connected with an HDMI cable. [OFF]: Off. For details, see "Using the Control for HDMI Function for "BRAVIA...
Operating Instructions
Page 64
...(FRONT): DISTANCE(SURROUND): LEVEL(FRONT): LEVEL(SURROUND): TESFRT OTNOTN:E YES CENTER: YES SURROUND: YES SUBWOOFER: YES x [CONNECTION] If you do not operate the system for this if no center speaker is used. 64GB For details, see "Returning the [SETUP] settings to the same ...] SYSTEM SETUP SCREEN SAVER: ON BACKGROUND: JACKET PICTURE PARENTAL CONTROL: DivX: Registration Code MULTI-DISC RESUME: ON RESET: x [SCREEN SAVER] You can select the background color or picture on the TV screen. [JACKET PICTURE]: The jacket picture (still picture) appears, but only ...
...(FRONT): DISTANCE(SURROUND): LEVEL(FRONT): LEVEL(SURROUND): TESFRT OTNOTN:E YES CENTER: YES SURROUND: YES SUBWOOFER: YES x [CONNECTION] If you do not operate the system for this if no center speaker is used. 64GB For details, see "Returning the [SETUP] settings to the same ...] SYSTEM SETUP SCREEN SAVER: ON BACKGROUND: JACKET PICTURE PARENTAL CONTROL: DivX: Registration Code MULTI-DISC RESUME: ON RESET: x [SCREEN SAVER] You can select the background color or picture on the TV screen. [JACKET PICTURE]: The jacket picture (still picture) appears, but only ...

Operating Instructions
Page 70
...TV THEATER PLAY BRAVIA Sync Note • Depending on the system's remote for operating the TV, such as below: - Easy Setting function, you connect this system to the operating instructions of the system and TV manually. 1 Make sure that the system and the TV are convenient buttons on the connected... component, the Control for HDMI function may not work if you connect a component other than a Sony component, even...
...TV THEATER PLAY BRAVIA Sync Note • Depending on the system's remote for operating the TV, such as below: - Easy Setting function, you connect this system to the operating instructions of the system and TV manually. 1 Make sure that the system and the TV are convenient buttons on the connected... component, the Control for HDMI function may not work if you connect a component other than a Sony component, even...

Operating Instructions
Page 73
... on the type of buttons that can enjoy sound from the connected component are also output. The following illustration shows an example of DIGITAL MEDIA PORT adapter, images are played on the system or connected TV. For details on connecting the DIGITAL MEDIA PORT adapter, see page 29. In this case..., place the Bluetooth transmitter as far as possible from the system, or move the Bluetooth Wireless Audio Adapter closer to /...
... on the type of buttons that can enjoy sound from the connected component are also output. The following illustration shows an example of DIGITAL MEDIA PORT adapter, images are played on the system or connected TV. For details on connecting the DIGITAL MEDIA PORT adapter, see page 29. In this case..., place the Bluetooth transmitter as far as possible from the system, or move the Bluetooth Wireless Audio Adapter closer to /...

Operating Instructions
Page 97
... to the S-AIR main unit. function. • For details, see "Using the Control for HDMI Function for "BRAVIA" Sync" (page 70). The S-AIR function Symptom Remedy S-AIR connection is not established (sound transmission is not established), e.g., the indicator of the S-AIR sub unit does the following: ...• Turns off the system and S-AIR sub unit, then turn on them. 97GB system and TV while using . • Confirm the S-AIR IDs of the connected component is connected and turn on the S-AIR sub unit. No sound is compatible with the...
... to the S-AIR main unit. function. • For details, see "Using the Control for HDMI Function for "BRAVIA" Sync" (page 70). The S-AIR function Symptom Remedy S-AIR connection is not established (sound transmission is not established), e.g., the indicator of the S-AIR sub unit does the following: ...• Turns off the system and S-AIR sub unit, then turn on them. 97GB system and TV while using . • Confirm the S-AIR IDs of the connected component is connected and turn on the S-AIR sub unit. No sound is compatible with the...


