
Operating Instructions
Page 2
... for help. Model No. For the customers in accordance with this apparatus to use of optical instruments with the instructions, may be determined by qualified personnel before operating it any changes or modifications not expressly approved in this manual could void your Sony dealer regarding this equipment. Note to CATV system installer: This reminder is connected. - 3 WARNING To reduce the risk of cable...
... for help. Model No. For the customers in accordance with this apparatus to use of optical instruments with the instructions, may be determined by qualified personnel before operating it any changes or modifications not expressly approved in this manual could void your Sony dealer regarding this equipment. Note to CATV system installer: This reminder is connected. - 3 WARNING To reduce the risk of cable...
Operating Instructions
Page 4
... Welcome 3 About This Manual 6 This System Can Play the Following Discs 6 Guide to the Control Menu Display...... 10 Getting Started Unpacking 13 Inserting Batteries into the Remote....... 14 Hookup Overview 15 Step 1: Speaker System Hookup........... 16 Step 2: Antenna (Aerial) Hookup ......... 19 Step 3: TV Hookup 20 Step 4: Other Component Hookup........ 25 Step 5: Connecting the AC Power Cord (Mains Lead 28 Step 6: Performing the Quick Setup ..... 29 Step 7: Installing the Speakers 31 Basic Operations Playing Discs 34 System Sound Feature 36 Enjoying...
... Welcome 3 About This Manual 6 This System Can Play the Following Discs 6 Guide to the Control Menu Display...... 10 Getting Started Unpacking 13 Inserting Batteries into the Remote....... 14 Hookup Overview 15 Step 1: Speaker System Hookup........... 16 Step 2: Antenna (Aerial) Hookup ......... 19 Step 3: TV Hookup 20 Step 4: Other Component Hookup........ 25 Step 5: Connecting the AC Power Cord (Mains Lead 28 Step 6: Performing the Quick Setup ..... 29 Step 7: Installing the Speakers 31 Basic Operations Playing Discs 34 System Sound Feature 36 Enjoying...

Operating Instructions
Page 5
Settings and Adjustments Using the Setup Display 75 Setting the Display or Sound Track Language 76 [LANGUAGE SETUP] Settings for the Display 77 [SCREEN SETUP] Custom Settings 79 [CUSTOM SETUP] Speaker Setting (Subwoofer 80 [SPEAKER SETUP] Additional Information Precautions 81 Notes about the Discs 82 Troubleshooting 82 Self-diagnosis Function 85 (When letters/numbers appear in the display) Specifications 86 Glossary 87 Language Code List 90 Index to Parts and Controls 91 DVD Setup Display List 96 AMP Menu List 97 Index 98 5US
Settings and Adjustments Using the Setup Display 75 Setting the Display or Sound Track Language 76 [LANGUAGE SETUP] Settings for the Display 77 [SCREEN SETUP] Custom Settings 79 [CUSTOM SETUP] Speaker Setting (Subwoofer 80 [SPEAKER SETUP] Additional Information Precautions 81 Notes about the Discs 82 Troubleshooting 82 Self-diagnosis Function 85 (When letters/numbers appear in the display) Specifications 86 Glossary 87 Language Code List 90 Index to Parts and Controls 91 DVD Setup Display List 96 AMP Menu List 97 Index 98 5US

Operating Instructions
Page 11
... turn off the display Press DISPLAY. Displays "MP3" in the Control Menu display 1 or "JPEG" in [SETUP] to the default setting. [ALBUM] (page 53) Selects the album to be played, the [ORIGINAL] one title/chapter/track/album repeatedly. [PARENTAL CONTROL] (page 60) Sets to prohibit playback on this system. [SETUP] (page 75) [QUICK] Setup (page 29) Use Quick Setup to choose the desired language of the on ), track number for VIDEO CDs/Super Audio...
... turn off the display Press DISPLAY. Displays "MP3" in the Control Menu display 1 or "JPEG" in [SETUP] to the default setting. [ALBUM] (page 53) Selects the album to be played, the [ORIGINAL] one title/chapter/track/album repeatedly. [PARENTAL CONTROL] (page 60) Sets to prohibit playback on this system. [SETUP] (page 75) [QUICK] Setup (page 29) Use Quick Setup to choose the desired language of the on ), track number for VIDEO CDs/Super Audio...

Operating Instructions
Page 13
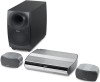
Getting Started Getting Started Unpacking Check that you have the following items: • Speakers (2) • Subwoofer (1) • AM loop antenna (aerial) (1) • FM wire antenna (aerial) (1) • Speaker cord (1) • Video Cord (1) • Remote Commander (remote) (1) • Size AAA (R03) batteries (2) • Operating Instructions • Setup Disc (1) • Quick Start Guide (card) • Speaker pads (8) 13US
Getting Started Getting Started Unpacking Check that you have the following items: • Speakers (2) • Subwoofer (1) • AM loop antenna (aerial) (1) • FM wire antenna (aerial) (1) • Speaker cord (1) • Video Cord (1) • Remote Commander (remote) (1) • Size AAA (R03) batteries (2) • Operating Instructions • Setup Disc (1) • Quick Start Guide (card) • Speaker pads (8) 13US

Operating Instructions
Page 21
... HDMI/DVI (digital visual interface) input jack Use a certified HDMI cord (not supplied) to enjoy high quality digital picture and sound through the video jacks. The DVI jack will not be output through the HDMI OUT jack. Note • Only when DVD function is selected (by pressing FUNCTION repeatedly until "DVD" appears in the front panel display), the COMPONENT VIDEO OUT jacks output video signals, and the HDMI OUT jack outputs video/audio signals (HDMI audio out default setting is not output from the video signals and will not accept any audio signals. To change...
... HDMI/DVI (digital visual interface) input jack Use a certified HDMI cord (not supplied) to enjoy high quality digital picture and sound through the video jacks. The DVI jack will not be output through the HDMI OUT jack. Note • Only when DVD function is selected (by pressing FUNCTION repeatedly until "DVD" appears in the front panel display), the COMPONENT VIDEO OUT jacks output video signals, and the HDMI OUT jack outputs video/audio signals (HDMI audio out default setting is not output from the video signals and will not accept any audio signals. To change...

Operating Instructions
Page 27
If you connect a digital satellite receiver without a DIGITAL OUT jack Connect the digital satellite receiver to the VIDEO 1/SAT 1 OPTICAL or COAXIAL DIGITAL IN or VIDEO 2/SAT 2 COAXIAL DIGITAL IN jack instead of the VIDEO 1/SAT1 or VIDEO 2/SAT2 AUDIO IN jacks of the system. Note • The DIGITAL OUT jack outputs audio signals only when DVD function is selected (by pressing FUNCTION repeatedly until "DVD" appears in the front panel display). (CDs, DVDs only) • When you play a DVD, connected components that do not accept Dolby Digital, DTS...
If you connect a digital satellite receiver without a DIGITAL OUT jack Connect the digital satellite receiver to the VIDEO 1/SAT 1 OPTICAL or COAXIAL DIGITAL IN or VIDEO 2/SAT 2 COAXIAL DIGITAL IN jack instead of the VIDEO 1/SAT1 or VIDEO 2/SAT2 AUDIO IN jacks of the system. Note • The DIGITAL OUT jack outputs audio signals only when DVD function is selected (by pressing FUNCTION repeatedly until "DVD" appears in the front panel display). (CDs, DVDs only) • When you play a DVD, connected components that do not accept Dolby Digital, DTS...

Operating Instructions
Page 38
... front panel display. When you use a digital connection and the selected sound field is AUTO (FOCUS SURROUND), if the system receives 2-channel signal, the system will still only output 2-channel sound. Top view Front speaker (L) Subwoofer TV Front speaker (R) FOCUS SURROUND area WIDE SURROUND area 2 channel source output x 2 CH STEREO This mode outputs 2 channel sound regardless of this system. x WIDE SURROUND You can enjoy TV or VCR sound with the front surround sound of the audio signal type being input. Even when you use both the VIDEO 1/ SAT 1 or VIDEO 2/SAT 2 jacks (analog...
... front panel display. When you use a digital connection and the selected sound field is AUTO (FOCUS SURROUND), if the system receives 2-channel signal, the system will still only output 2-channel sound. Top view Front speaker (L) Subwoofer TV Front speaker (R) FOCUS SURROUND area WIDE SURROUND area 2 channel source output x 2 CH STEREO This mode outputs 2 channel sound regardless of this system. x WIDE SURROUND You can enjoy TV or VCR sound with the front surround sound of the audio signal type being input. Even when you use both the VIDEO 1/ SAT 1 or VIDEO 2/SAT 2 jacks (analog...

Operating Instructions
Page 41
.... x When playing a VIDEO CD, Super Audio CD, or CD • [TRACK]: shuffles tracks on the disc. To turn off . To cancel a program, select [--] under [T], then press ENTER. X/x ENTER DISPLAY 1 Press DISPLAY during playback. The Control Menu appears. 2 Press X/x to be shuffled. "SHUF" appears in Random Order (Shuffle Play) You can have the system "shuffle" tracks. Playing in the front panel display. To change or cancel a program 1 Follow steps...
.... x When playing a VIDEO CD, Super Audio CD, or CD • [TRACK]: shuffles tracks on the disc. To turn off . To cancel a program, select [--] under [T], then press ENTER. X/x ENTER DISPLAY 1 Press DISPLAY during playback. The Control Menu appears. 2 Press X/x to be shuffled. "SHUF" appears in Random Order (Shuffle Play) You can have the system "shuffle" tracks. Playing in the front panel display. To change or cancel a program 1 Follow steps...

Operating Instructions
Page 49
... displayed. To stop playback Press x. The Control Menu appears. 4 Press X/x to view and press ENTER. continued 49US Press X/x while viewing an image. You can play a slide show with Sound Enjoying Discs To play back the DATA CD, select [AUTO] mode as a Slide Show with sound by 90 degrees. 4 Press C/X/x/c to select the image you want and press ENTER. H X/x ENTER x MENU DISPLAY 1 Load a DATA CD. When you play...
... displayed. To stop playback Press x. The Control Menu appears. 4 Press X/x to view and press ENTER. continued 49US Press X/x while viewing an image. You can play a slide show with Sound Enjoying Discs To play back the DATA CD, select [AUTO] mode as a Slide Show with sound by 90 degrees. 4 Press C/X/x/c to select the image you want and press ENTER. H X/x ENTER x MENU DISPLAY 1 Load a DATA CD. When you play...

Operating Instructions
Page 54
..., scene, etc., number you select [CHAPTER] [** (**)] is selected (** refers to a number). Tip • When the Control Menu display is selected. 2 Press ENTER. [T **:**:**] changes to [T --:--:--]. 3 Input the time code using the time code. 54US The system starts playback from the selected number. Note • You cannot search for a scene on a DVD+RW using the number buttons, then press ENTER. If you can search for a chapter (DVD VIDEO/DVD-RW) or track (Super Audio CD/CD...
..., scene, etc., number you select [CHAPTER] [** (**)] is selected (** refers to a number). Tip • When the Control Menu display is selected. 2 Press ENTER. [T **:**:**] changes to [T --:--:--]. 3 Input the time code using the time code. 54US The system starts playback from the selected number. Note • You cannot search for a scene on a DVD+RW using the number buttons, then press ENTER. If you can search for a chapter (DVD VIDEO/DVD-RW) or track (Super Audio CD/CD...
Operating Instructions
Page 65
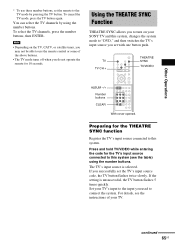
... setting is selected. TV TV CH + THEATRE SYNC TV/VIDEO ALBUM -/+ Number buttons CLEAR With cover opened. If you successfully set with one button push. Using the THEATRE SYNC Function THEATRE SYNC allows you to turn on the TV, CATV, or satellite tuner, you may not be able to this system, changes the system mode to the TV mode by using the number buttons. Other Operations * To use the remote control or some of your SONY TV and this system (see the instructions...
... setting is selected. TV TV CH + THEATRE SYNC TV/VIDEO ALBUM -/+ Number buttons CLEAR With cover opened. If you successfully set with one button push. Using the THEATRE SYNC Function THEATRE SYNC allows you to turn on the TV, CATV, or satellite tuner, you may not be able to this system, changes the system mode to the TV mode by using the number buttons. Other Operations * To use the remote control or some of your SONY TV and this system (see the instructions...
Operating Instructions
Page 69
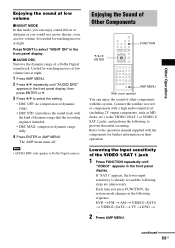
... sound at low volume x NIGHT MODE In this system. Refer to the operation manual supplied with a high audio output level (including 2V output components, such as you press FUNCTION, the system mode changes in a movie theater, even at a low volume. Lowering the input sensitivity of a Dolby Digital sound track. It is already set and the following sequence: DVD t FM t AM t VIDEO1 (SAT1) t VIDEO2 (SAT2) t TV t DVD t .... 2 Press AMP MENU. x AUDIO DRC Narrows the dynamic range of the VIDEO 1/SAT 1 jack 1 Press FUNCTION...
... sound at low volume x NIGHT MODE In this system. Refer to the operation manual supplied with a high audio output level (including 2V output components, such as you press FUNCTION, the system mode changes in a movie theater, even at a low volume. Lowering the input sensitivity of a Dolby Digital sound track. It is already set and the following sequence: DVD t FM t AM t VIDEO1 (SAT1) t VIDEO2 (SAT2) t TV t DVD t .... 2 Press AMP MENU. x AUDIO DRC Narrows the dynamic range of the VIDEO 1/SAT 1 jack 1 Press FUNCTION...
Operating Instructions
Page 71
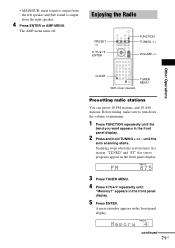
... Operations CLEAR With cover opened. A preset number appears in a station. Scanning stops when the system tunes in the front panel display. TUNED ST 3 Press TUNER MENU. 4 Press C/X/x/c repeatedly until the auto scanning starts. appears in the front panel display. 2 Press and hold TUNING + or - Enjoying the Radio PRESET -/+ C/X/x/c ENTER FUNCTION TUNING -/+ VOLUME +/- The AMP menu turns off. TUNER MENU Presetting radio stations You can preset 20 FM stations, and 10 AM stations. TUNED ST continued 71US • MAIN/SUB: main sound is output from the left speaker...
... Operations CLEAR With cover opened. A preset number appears in a station. Scanning stops when the system tunes in the front panel display. TUNED ST 3 Press TUNER MENU. 4 Press C/X/x/c repeatedly until the auto scanning starts. appears in the front panel display. 2 Press and hold TUNING + or - Enjoying the Radio PRESET -/+ C/X/x/c ENTER FUNCTION TUNING -/+ VOLUME +/- The AMP menu turns off. TUNER MENU Presetting radio stations You can preset 20 FM stations, and 10 AM stations. TUNED ST continued 71US • MAIN/SUB: main sound is output from the left speaker...
Operating Instructions
Page 75
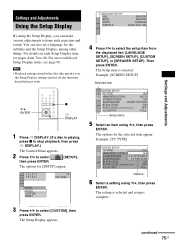
.... LANGUAGE SETUP OSD: MENU: AUDIO: SUBTITLE: ENGLISH ENGLISH ORIGINAL AUDIO FOLLOW 4 Press X/x to items such as picture and sound. Example: [SCREEN SETUP] Selected item SCREEN SETUP TV TYPE: 16:9 HDMI RESOLUTION: AUTO SCREEN SAVER: ON BACKGROUND: JACKET PICTURE BLACK LEVEL: ON BLACK LEVEL (COMPONENT OUT): OFF 4:3 OUTPUT: FULL Setup items 5 Select an item using X/x, then press ENTER. For an overall list of Setup Display items, see pages from the displayed list: [LANGUAGE SETUP], [SCREEN SETUP], [CUSTOM SETUP], or [SPEAKER SETUP]. Note...
.... LANGUAGE SETUP OSD: MENU: AUDIO: SUBTITLE: ENGLISH ENGLISH ORIGINAL AUDIO FOLLOW 4 Press X/x to items such as picture and sound. Example: [SCREEN SETUP] Selected item SCREEN SETUP TV TYPE: 16:9 HDMI RESOLUTION: AUTO SCREEN SAVER: ON BACKGROUND: JACKET PICTURE BLACK LEVEL: ON BLACK LEVEL (COMPONENT OUT): OFF 4:3 OUTPUT: FULL Setup items 5 Select an item using X/x, then press ENTER. For an overall list of Setup Display items, see pages from the displayed list: [LANGUAGE SETUP], [SCREEN SETUP], [CUSTOM SETUP], or [SPEAKER SETUP]. Note...

Operating Instructions
Page 79
... different DVD VIDEO/ VIDEO CD discs (page 39). [ON] [OFF] Stores the resume settings in pause mode. [AUTO] [FRAME] The picture, including subjects that is not compatible with no jitter. To use the display, see "Using the Setup Display" (page 75). Converts Dolby Digital, DTS (digital theater system), or 96 kHz/ 24 bit PCM (pulse code modulation) signals to 40 discs. x AUDIO (HDMI) Selects the type of audio signal output from the HDMI OUT jack. Note • A loud noise (or no sound...
... different DVD VIDEO/ VIDEO CD discs (page 39). [ON] [OFF] Stores the resume settings in pause mode. [AUTO] [FRAME] The picture, including subjects that is not compatible with no jitter. To use the display, see "Using the Setup Display" (page 75). Converts Dolby Digital, DTS (digital theater system), or 96 kHz/ 24 bit PCM (pulse code modulation) signals to 40 discs. x AUDIO (HDMI) Selects the type of audio signal output from the HDMI OUT jack. Note • A loud noise (or no sound...
Operating Instructions
Page 82
... for video output, changing the [HDMI RESOLUTION] setting in [SCREEN SETUP] may rise considerably inside the car. • After playing, store the disc in the front panel display. Should any problem persist, consult your nearest Sony dealer. This system can view pictures from the center out. • Do not use solvents such as a label or ring. 82US Troubleshooting If you can only play back a standard circular disc. Power The power is not turned on...
... for video output, changing the [HDMI RESOLUTION] setting in [SCREEN SETUP] may rise considerably inside the car. • After playing, store the disc in the front panel display. Should any problem persist, consult your nearest Sony dealer. This system can view pictures from the center out. • Do not use solvents such as a label or ring. 82US Troubleshooting If you can only play back a standard circular disc. Power The power is not turned on...
Operating Instructions
Page 83
..., install the speakers at least 3 meters (10 ft) away from the subwoofer. • Check the speaker connections and settings (page 16). • When the Setup Disc is in pause mode or in [SCREEN SETUP], and switch the TV's input back to the connected video input so that no magnetic object (magnetic latch on the DVD, the output signal may be low. The surround effect is difficult to hear when you connect your system directly...
..., install the speakers at least 3 meters (10 ft) away from the subwoofer. • Check the speaker connections and settings (page 16). • When the Setup Disc is in pause mode or in [SCREEN SETUP], and switch the TV's input back to the connected video input so that no magnetic object (magnetic latch on the DVD, the output signal may be low. The surround effect is difficult to hear when you connect your system directly...

Operating Instructions
Page 84
... remote and the system is too far. • The remote is not pointed at the auto pause signal. Playback stops automatically. • Some discs may not be played. • The DATA CD is not recorded in MP3PRO format. • The [MODE (MP3, JPEG)] setting has been set to cancel these functions before playing a disc. • Resume Play has been selected. Use direct tuning. • No stations have been preset or the preset stations...
... remote and the system is too far. • The remote is not pointed at the auto pause signal. Playback stops automatically. • Some discs may not be played. • The DATA CD is not recorded in MP3PRO format. • The [MODE (MP3, JPEG)] setting has been set to cancel these functions before playing a disc. • Resume Play has been selected. Use direct tuning. • No stations have been preset or the preset stations...

Operating Instructions
Page 98
... Multi-angle function 59, 87 MULTI-DISC RESUME 79 Multilingual function 87 Multiplex broadcast sound 70 Muting 34 N Naming preset stations 71 O On-screen display Control Menu display 10 Setup Display 75 ORIGINAL 44 OSD 76 Other Component Hookup 25 P PARENTAL CONTROL 60, 87 PAUSE MODE 79 PBC Playback 7, 45, 87 PICTURE NAVI 47, 55 PLAY LIST 44 Preset Station 71 Program Play 40 PROGRESSIVE AUTO 22 Progressive format 22, 87 PROGRESSIVE VIDEO 22 Q Quick Setup 29 R Radio 71 Rear Panel 93 Region Code 8, 87 Remote...
... Multi-angle function 59, 87 MULTI-DISC RESUME 79 Multilingual function 87 Multiplex broadcast sound 70 Muting 34 N Naming preset stations 71 O On-screen display Control Menu display 10 Setup Display 75 ORIGINAL 44 OSD 76 Other Component Hookup 25 P PARENTAL CONTROL 60, 87 PAUSE MODE 79 PBC Playback 7, 45, 87 PICTURE NAVI 47, 55 PLAY LIST 44 Preset Station 71 Program Play 40 PROGRESSIVE AUTO 22 Progressive format 22, 87 PROGRESSIVE VIDEO 22 Q Quick Setup 29 R Radio 71 Rear Panel 93 Region Code 8, 87 Remote...


