

Handycam® Handbook
Page 2
... cause a malfunction of "Memory Stick" you set the camcorder onto the Handycam Station or remove the camcorder from it. Read this before operating your camcorder. • Disconnect the AC Adaptor from the Handycam Station holding both the camcorder and the DC plug. • Be sure to turn...Stick PRO Duo" can be used with your camcorder.) "Memory Stick" (You cannot use Your camcorder is supplied with "Memory Stick" compatible equipment 2 Be sure to insert the connector plug in your camcorder" (p. 114). • To prevent the hard disk from being broken or recorded images from being...
... cause a malfunction of "Memory Stick" you set the camcorder onto the Handycam Station or remove the camcorder from it. Read this before operating your camcorder. • Disconnect the AC Adaptor from the Handycam Station holding both the camcorder and the DC plug. • Be sure to turn...Stick PRO Duo" can be used with your camcorder.) "Memory Stick" (You cannot use Your camcorder is supplied with "Memory Stick" compatible equipment 2 Be sure to insert the connector plug in your camcorder" (p. 114). • To prevent the hard disk from being broken or recorded images from being...
Handycam® Handbook
Page 3
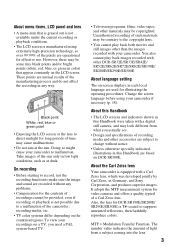
...sun only in each local language are based on DCR-SR300E. Also, the lens for effective use. However...Zeiss lens Your camcorder is manufactured using your camcorder to change without any way....Doing so might cause your camcorder if necessary (p. 18)....camcorder. These points are recorded without notice. • Unless otherwise specially indicated, illustrations in Germany, and Sony ...video tapes, and other accessories are operational for DCR-SR190E/SR200E/ SR290E/SR300E is not possible due ...is T -coated to a malfunction of the camcorder, recording media, etc. • TV color systems...
...sun only in each local language are based on DCR-SR300E. Also, the lens for effective use. However...Zeiss lens Your camcorder is manufactured using your camcorder to change without any way....Doing so might cause your camcorder if necessary (p. 18)....camcorder. These points are recorded without notice. • Unless otherwise specially indicated, illustrations in Germany, and Sony ...video tapes, and other accessories are operational for DCR-SR190E/SR200E/ SR290E/SR300E is not possible due ...is T -coated to a malfunction of the camcorder, recording media, etc. • TV color systems...
Handycam® Handbook
Page 4
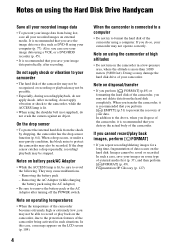
...] (p. 49). If the drop sensor catches a drop repeatedly, recording/ playback may not delete data from the hard disk completely. Removing the battery pack - Also, you destroy the actual body of the camcorder. Notes on using the Hard Disk Drive Handycam Save all your recorded image data • To prevent your image data from being activated in a low...
...] (p. 49). If the drop sensor catches a drop repeatedly, recording/ playback may not delete data from the hard disk completely. Removing the battery pack - Also, you destroy the actual body of the camcorder. Notes on using the Hard Disk Drive Handycam Save all your recorded image data • To prevent your image data from being activated in a low...
Handycam® Handbook
Page 5
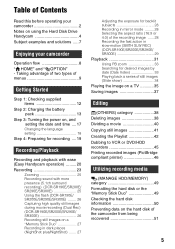
... ratio (16:9 or 4:3) of the recording image ...... 28 Recording the fast action in slow-motion (SMTH SLW REC) (DCR-SR190E/SR200E/SR290E/ SR300E 29 Playback 31 Using PB zoom 33 Searching for desired images by date (Date Index 33 Playing back...MANAGE HDD/MEMORY) category 49 Formatting the hard disk or the "Memory Stick Duo 49 Checking the hard disk information 50 Preventing data on the hard disk of Contents Read this before operating your camcorder 2 Notes on using the Hard Disk Drive Handycam 4 Subject examples and solutions ..... 7 Enjoying your camcorder Operation flow 8 " HOME" and ...
... ratio (16:9 or 4:3) of the recording image ...... 28 Recording the fast action in slow-motion (SMTH SLW REC) (DCR-SR190E/SR200E/SR290E/ SR300E 29 Playback 31 Using PB zoom 33 Searching for desired images by date (Date Index 33 Playing back...MANAGE HDD/MEMORY) category 49 Formatting the hard disk or the "Memory Stick Duo 49 Checking the hard disk information 50 Preventing data on the hard disk of Contents Read this before operating your camcorder 2 Notes on using the Hard Disk Drive Handycam 4 Subject examples and solutions ..... 7 Enjoying your camcorder Operation flow 8 " HOME" and ...
Handycam® Handbook
Page 6
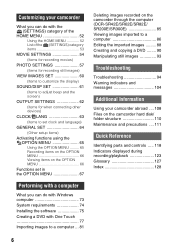
Customizing your camcorder What you can do with the (SETTINGS) category of the HOME MENU 52 Using the HOME MENU 52 List of the (SETTINGS) category items 53 ... recorded on the camcorder through the computer (DCR-SR42E/SR62E/SR82E/ SR200E/SR300E 85 Viewing images imported to a computer 86 Editing the imported images ......... 88 Creating and copying a DVD ........ 90 Manipulating still images 93 Troubleshooting Troubleshooting 94 Warning indicators and messages 104 Additional Information Using your camcorder abroad .... 108 Files on the camcorder hard disk/ folder structure...
Customizing your camcorder What you can do with the (SETTINGS) category of the HOME MENU 52 Using the HOME MENU 52 List of the (SETTINGS) category items 53 ... recorded on the camcorder through the computer (DCR-SR42E/SR62E/SR82E/ SR200E/SR300E 85 Viewing images imported to a computer 86 Editing the imported images ......... 88 Creating and copying a DVD ........ 90 Manipulating still images 93 Troubleshooting Troubleshooting 94 Warning indicators and messages 104 Additional Information Using your camcorder abroad .... 108 Files on the camcorder hard disk/ folder structure...

Handycam® Handbook
Page 8
... image data that has been saved on either the hard disk or a "Memory Stick Duo." Movies are recorded on the hard disk, and still images are recorded on your camcorder (p. 23). x Saving images on the free hard disk space again. B Play back the images. If the hard disk of your camcorder (p. 31) x Viewing on the TV connected to a computer (p. 81...
... image data that has been saved on either the hard disk or a "Memory Stick Duo." Movies are recorded on the hard disk, and still images are recorded on your camcorder (p. 23). x Saving images on the free hard disk space again. B Play back the images. If the hard disk of your camcorder (p. 31) x Viewing on the TV connected to a computer (p. 81...

Handycam® Handbook
Page 9
... B Categories and items of menus " HOME MENU" - " HOME" and " Enjoying your camcorder (p. 52)*. * You can also set these items during Easy Handycam operation (p. 20). Taking advantage of two types of the HOME MENU (CAMERA) category Item MOVIE* PHOTO* SMTH SLW REC** (VIEW IMAGES) category Item VISUAL INDEX* ... 42 Page 38 40, 41 42 46 73 (MANAGE HDD/MEMORY) category Item Page FORMAT* 49 FORMAT* 50 INFO 50 (SETTINGS) category To customize your camcorder OPTION" - For the items available in the (SETTINGS) category, see page 53...
... B Categories and items of menus " HOME MENU" - " HOME" and " Enjoying your camcorder (p. 52)*. * You can also set these items during Easy Handycam operation (p. 20). Taking advantage of two types of the HOME MENU (CAMERA) category Item MOVIE* PHOTO* SMTH SLW REC** (VIEW IMAGES) category Item VISUAL INDEX* ... 42 Page 38 40, 41 42 46 73 (MANAGE HDD/MEMORY) category Item Page FORMAT* 49 FORMAT* 50 INFO 50 (SETTINGS) category To customize your camcorder OPTION" - For the items available in the (SETTINGS) category, see page 53...

Handycam® Handbook
Page 11
To deactivate the HELP Touch (HELP) again in step 2. Enjoying your camcorder 3 Touch the item you touch an item, its explanation appears on the screen during shooting or playback displays the functions available at that moment. To apply the option, touch [YES], otherwise, touch [NO]. See page 65 for further details. (OPTION) 11 When you want to make various settings. Using the OPTION MENU Just a touch on the screen. You will find it easy to know the content.
To deactivate the HELP Touch (HELP) again in step 2. Enjoying your camcorder 3 Touch the item you touch an item, its explanation appears on the screen during shooting or playback displays the functions available at that moment. To apply the option, touch [YES], otherwise, touch [NO]. See page 65 for further details. (OPTION) 11 When you want to make various settings. Using the OPTION MENU Just a touch on the screen. You will find it easy to know the content.

Handycam® Handbook
Page 12
..., 78, 81) 21-pin adaptor (p. 36) For the model with your camcorder. Picture Motion Browser (Software) - mark printed on their CD-ROM "Handycam Application Software" (1) (p. 73) - AC Adaptor (1) (p. 13) Mains lead (1) (p. 13) Wireless Remote Commander (1) (p. 122) (except for DCR-SR32E/SR33E/SR42E) A button-type lithium battery is already installed. Getting Started Step 1: Checking supplied...
..., 78, 81) 21-pin adaptor (p. 36) For the model with your camcorder. Picture Motion Browser (Software) - mark printed on their CD-ROM "Handycam Application Software" (1) (p. 73) - AC Adaptor (1) (p. 13) Mains lead (1) (p. 13) Wireless Remote Commander (1) (p. 122) (except for DCR-SR32E/SR33E/SR42E) A button-type lithium battery is already installed. Getting Started Step 1: Checking supplied...

Handycam® Handbook
Page 13
...direction of the arrow to OFF (CHG) (The default setting). 4 Connect the mains lead to the AC Adaptor and the wall socket. 5 Set the camcorder onto the Handycam Station securely. Step 2: Charging the battery pack Getting Started 2 1 Battery 5 DC IN jack POWER switch 5 CHG 3 (charge) lamp DC plug AC... pack (H series) (p. 112) after attaching it clicks. 2 Turn the POWER switch in the direction of the arrow until it to your camcorder. Be sure that the v mark on the Handycam Station. The CHG (charge) lamp turns off when the battery pack is fully charged. • When setting the...
...direction of the arrow to OFF (CHG) (The default setting). 4 Connect the mains lead to the AC Adaptor and the wall socket. 5 Set the camcorder onto the Handycam Station securely. Step 2: Charging the battery pack Getting Started 2 1 Battery 5 DC IN jack POWER switch 5 CHG 3 (charge) lamp DC plug AC... pack (H series) (p. 112) after attaching it clicks. 2 Turn the POWER switch in the direction of the arrow until it to your camcorder. Be sure that the v mark on the Handycam Station. The CHG (charge) lamp turns off when the battery pack is fully charged. • When setting the...

Handycam® Handbook
Page 14
...the AC Adaptor, make sure that the (Movie) lamp/ (Still) lamp (p. 23) is displayed. POWER switch DC IN jack To remove your camcorder from the Handycam Station holding both . Slide the BATT (battery) release lever and remove the battery pack. b Notes • When you do when charging the... the POWER switch to 20 seconds by pressing DISP/BATT INFO again while the information is turned off the power, then remove the camcorder from the Handycam Station Turn off . 14 After a while, the approximate recordable time and battery information appear for about 7 seconds. The battery pack...
...the AC Adaptor, make sure that the (Movie) lamp/ (Still) lamp (p. 23) is displayed. POWER switch DC IN jack To remove your camcorder from the Handycam Station holding both . Slide the BATT (battery) release lever and remove the battery pack. b Notes • When you do when charging the... the POWER switch to 20 seconds by pressing DISP/BATT INFO again while the information is turned off the power, then remove the camcorder from the Handycam Station Turn off . 14 After a while, the approximate recordable time and battery information appear for about 7 seconds. The battery pack...
Handycam® Handbook
Page 16
... Info (p. 14) will not be supplied from the battery as long as the AC Adaptor is connected to the DC IN jack of your camcorder or the Handycam Station, even when the mains lead is disconnected from the wall socket. • When attaching an optional video light, it is worn-out (For... be shorter depending on /off and zooming. On the battery pack • Before changing the battery pack, turn off (except for DCR-SR32E/SR33E/ SR42E). • We do not recommend using the camcorder at 25 °C (77 °F) (10 °C to 30 °C (50 °F to OFF (CHG) and turn the POWER switch...
... Info (p. 14) will not be supplied from the battery as long as the AC Adaptor is connected to the DC IN jack of your camcorder or the Handycam Station, even when the mains lead is disconnected from the wall socket. • When attaching an optional video light, it is worn-out (For... be shorter depending on /off and zooming. On the battery pack • Before changing the battery pack, turn off (except for DCR-SR32E/SR33E/ SR42E). • We do not recommend using the camcorder at 25 °C (77 °F) (10 °C to 30 °C (50 °F to OFF (CHG) and turn the POWER switch...

Handycam® Handbook
Page 17
... record movies (Still): To record still images The [CLOCK SET] screen appears. 2 Select the desired geographical area with any malfunction occurs while using your camcorder. • Do not use the AC Adaptor placed in the direction of the AC Adaptor or battery terminal with v/V, then touch [NEXT]. 17 This ...may cause a malfunction. • Even if your camcorder or change the POWER switch position. Step 3: Turning the power on, and setting the date and time Set the date and time when using the...
... record movies (Still): To record still images The [CLOCK SET] screen appears. 2 Select the desired geographical area with any malfunction occurs while using your camcorder. • Do not use the AC Adaptor placed in the direction of the AC Adaptor or battery terminal with v/V, then touch [NEXT]. 17 This ...may cause a malfunction. • Even if your camcorder or change the POWER switch position. Step 3: Turning the power on, and setting the date and time Set the date and time when using the...

Handycam® Handbook
Page 18
... (DCR-SR190E/SR200E/ SR290E/SR300E). Touch (HOME) t (SETTINGS) t [CLOCK/ LANG] t [ LANGUAGE SET], then select the desired language. b Notes • If you leave your camcorder for approximately 5 minutes, to page 109 for your camcorder during recording, but they are automatically recorded on the hard disk, ... date and time does not appear during this time. • The lens cover opens automatically when the power is turned on . You cannot operate your camcorder to OFF (CHG). 3 Set [SUMMERTIME], then touch [NEXT]. 4 Set [Y] (year) with v/V. 5 Select [M] with b/B, then set the month ...
... (DCR-SR190E/SR200E/ SR290E/SR300E). Touch (HOME) t (SETTINGS) t [CLOCK/ LANG] t [ LANGUAGE SET], then select the desired language. b Notes • If you leave your camcorder for approximately 5 minutes, to page 109 for your camcorder during recording, but they are automatically recorded on the hard disk, ... date and time does not appear during this time. • The lens cover opens automatically when the power is turned on . You cannot operate your camcorder to OFF (CHG). 3 Set [SUMMERTIME], then touch [NEXT]. 4 Set [Y] (year) with v/V. 5 Select [M] with b/B, then set the month ...

Handycam® Handbook
Page 19
...turn off the LCD backlight to open or adjust the LCD panel. z Tips • If you open the LCD panel 90 degrees to the camcorder, then rotate it to the best angle to record or play (2). 290 degrees (max.) DISP/BATT INFO This setting is displayed or hidden ...opens and closes automatically. Getting Started Step 4: Preparing for recording Opening the lens cover manually (DCR-SR32E/SR33E/ SR42E/SR52E/SR62E/SR72E/ SR82E) Slide the lens cover switch to make the battery last longer (except for DCR-SR32E/SR33E/SR42E) Press and hold DISP/BATT INFO for a few seconds until disappears.
...turn off the LCD backlight to open or adjust the LCD panel. z Tips • If you open the LCD panel 90 degrees to the camcorder, then rotate it to the best angle to record or play (2). 290 degrees (max.) DISP/BATT INFO This setting is displayed or hidden ...opens and closes automatically. Getting Started Step 4: Preparing for recording Opening the lens cover manually (DCR-SR32E/SR33E/ SR42E/SR52E/SR62E/SR72E/ SR82E) Slide the lens cover switch to make the battery last longer (except for DCR-SR32E/SR33E/SR42E) Press and hold DISP/BATT INFO for a few seconds until disappears.

Handycam® Handbook
Page 21
.../ recorded (B for images by date (p. 33) Recording/Playback Next 6 images Returns to the recording screen 1 :Displays movies. 2 :Displays still images on the hard disk. 3 :Displays still images on a "Memory Stick Duo." 3 Start playback. Movies: Touch the tab and the movie to be played back. Next movie The... recording date/time* Reverse/ Forward 21 Playing back recorded movies/still images 1 Turn the POWER switch G to turn on your camcorder. 2 Press (VIEW IMAGES) I (or D) button The VISUAL INDEX screen appears on the LCD screen. (It may take some time to display ...
.../ recorded (B for images by date (p. 33) Recording/Playback Next 6 images Returns to the recording screen 1 :Displays movies. 2 :Displays still images on the hard disk. 3 :Displays still images on a "Memory Stick Duo." 3 Start playback. Movies: Touch the tab and the movie to be played back. Next movie The... recording date/time* Reverse/ Forward 21 Playing back recorded movies/still images 1 Turn the POWER switch G to turn on your camcorder. 2 Press (VIEW IMAGES) I (or D) button The VISUAL INDEX screen appears on the LCD screen. (It may take some time to display ...

Handycam® Handbook
Page 23
z Tips • You can check the free hard disk space by touching (HOME) t (MANAGE HDD/MEMORY) t [ INFO] (p. 50). 23 Do not apply shock or vibration to your camcorder, and do not remove the battery or AC Adaptor. • The maximum continuous recordable time is approximately 13 hours... START/STOP C (HOME) E Lens cover Open the lens cover before PHOTO F recording (DCR-SR32E/ SR33E/SR42E/SR52E/ SR62E/SR72E/SR82E) (p. 19) Recording/Playback (Movie) lamp / (Still) lamp POWER switch A ACCESS lamp (Hard disk) START/STOP B b Notes • If the ACCESS lamp is lit or flashing after ...
z Tips • You can check the free hard disk space by touching (HOME) t (MANAGE HDD/MEMORY) t [ INFO] (p. 50). 23 Do not apply shock or vibration to your camcorder, and do not remove the battery or AC Adaptor. • The maximum continuous recordable time is approximately 13 hours... START/STOP C (HOME) E Lens cover Open the lens cover before PHOTO F recording (DCR-SR32E/ SR33E/SR42E/SR52E/ SR62E/SR72E/SR82E) (p. 19) Recording/Playback (Movie) lamp / (Still) lamp POWER switch A ACCESS lamp (Hard disk) START/STOP B b Notes • If the ACCESS lamp is lit or flashing after ...
Handycam® Handbook
Page 24
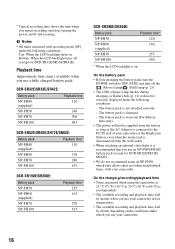
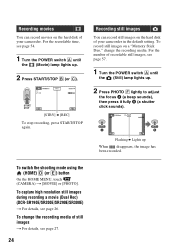
Recording movies You can record still images on the hard disk of still images t For details, see page 27. 24 For the number of your camcorder in the default setting. To capture high resolution still images during recording a movie (Dual Rec) (DCR-SR190E/SR200E/SR290E/SR300E) t For details, see page 54. 1 Turn the POWER switch...
Recording movies You can record still images on the hard disk of still images t For details, see page 27. 24 For the number of your camcorder in the default setting. To capture high resolution still images during recording a movie (Dual Rec) (DCR-SR190E/SR200E/SR290E/SR300E) t For details, see page 54. 1 Turn the POWER switch...

Handycam® Handbook
Page 25
... T (Telephoto) side (except for telephoto. Your camcorder has Dolby Digital 5.1 Creator installed for a faster zoom. Recording/Playback Recording/Playback Zooming You can zoom in up to the magnifications shown in the following table. (optical zoom) DCR-SR32E/SR33E/SR42E 40 × DCR-SR52E/SR62E/SR72E/SR82E 25 × DCR-SR190E/SR200E/SR290E/SR300E 10 ×...
... T (Telephoto) side (except for telephoto. Your camcorder has Dolby Digital 5.1 Creator installed for a faster zoom. Recording/Playback Recording/Playback Zooming You can zoom in up to the magnifications shown in the following table. (optical zoom) DCR-SR32E/SR33E/SR42E 40 × DCR-SR52E/SR62E/SR72E/SR82E 25 × DCR-SR190E/SR200E/SR290E/SR300E 10 ×...

Handycam® Handbook
Page 26
...8226; If you can capture high quality still images while recording a movie on the hard disk. When capturing is insufficient ambient light. Captured still images appear one by one, and...record still images on it . When disappears, the image has been recorded. Using the flash (DCR-SR190E/ SR200E/SR290E/SR300E) Flash charge lamp Flash Capturing high quality still images during Dual Rec...STOP to 8 feet). • Remove any dust from the surface of still images from your camcorder, the flash light does not emit light. No indication (Auto flash): Automatically flashes when there ...
...8226; If you can capture high quality still images while recording a movie on the hard disk. When capturing is insufficient ambient light. Captured still images appear one by one, and...record still images on it . When disappears, the image has been recorded. Using the flash (DCR-SR190E/ SR200E/SR290E/SR300E) Flash charge lamp Flash Capturing high quality still images during Dual Rec...STOP to 8 feet). • Remove any dust from the surface of still images from your camcorder, the flash light does not emit light. No indication (Auto flash): Automatically flashes when there ...


