Handycam® Handbook
Page 3
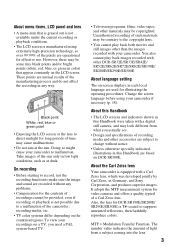
... starting to record, test the recording function to make sure the image and sound are subject to suppress unwanted reflections, then faithfully reproduce colors. About language setting The on DCR-SR300E. About this Handbook • The LCD screens and indicators shown in this Handbook are used for long periods of time may be some tiny black points and/or bright points (white, red, blue, or green in color) that...
... starting to record, test the recording function to make sure the image and sound are subject to suppress unwanted reflections, then faithfully reproduce colors. About language setting The on DCR-SR300E. About this Handbook • The LCD screens and indicators shown in this Handbook are used for long periods of time may be some tiny black points and/or bright points (white, red, blue, or green in color) that...
Handycam® Handbook
Page 4
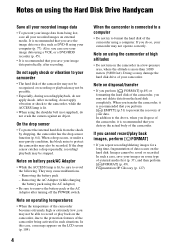
... hard disk of the camcorder being lost, save all your recorded images on external media. Doing so may damage the hard disk drive of the camcorder, you may not delete data from the hard disk completely. Also, you repeat recording/deleting images for a long time, fragmentation of the camcorder may not be recognized, or recording or playback may not operate correctly. Removing the battery pack - Note on using a computer. On the drop sensor • To protect the internal hard disk...
... hard disk of the camcorder being lost, save all your recorded images on external media. Doing so may damage the hard disk drive of the camcorder, you may not delete data from the hard disk completely. Also, you repeat recording/deleting images for a long time, fragmentation of the camcorder may not be recognized, or recording or playback may not operate correctly. Removing the battery pack - Note on using a computer. On the drop sensor • To protect the internal hard disk...
Handycam® Handbook
Page 5
... battery pack 13 Step 3: Turning the power on, and setting the date and time .... 17 Changing the language setting 18 Step 4: Preparing for recording .... 19 Recording/Playback Recording and playback with ease (Easy Handycam operation) ......... 20 Recording 23 Zooming 25 Recording sound with more presence (5.1ch surround recording) (DCR-SR190E/SR200E/ SR290E/SR300E 25 Using the flash (DCR-SR190E/ SR200E/SR290E/SR300E) ........ 26 Capturing high quality still images during movie recording (Dual Rec) (DCR-SR190E/SR200E/SR290E/ SR300E 26 Recording still images on a "Memory Stick...
... battery pack 13 Step 3: Turning the power on, and setting the date and time .... 17 Changing the language setting 18 Step 4: Preparing for recording .... 19 Recording/Playback Recording and playback with ease (Easy Handycam operation) ......... 20 Recording 23 Zooming 25 Recording sound with more presence (5.1ch surround recording) (DCR-SR190E/SR200E/ SR290E/SR300E 25 Using the flash (DCR-SR190E/ SR200E/SR290E/SR300E) ........ 26 Capturing high quality still images during movie recording (Dual Rec) (DCR-SR190E/SR200E/SR290E/ SR300E 26 Recording still images on a "Memory Stick...
Handycam® Handbook
Page 6
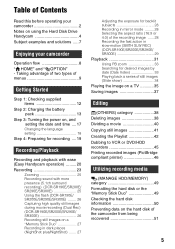
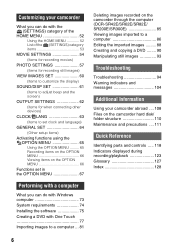
... ... 81 Deleting images recorded on the camcorder through the computer (DCR-SR42E/SR62E/SR82E/ SR200E/SR300E 85 Viewing images imported to a computer 86 Editing the imported images ......... 88 Creating and copying a DVD ........ 90 Manipulating still images 93 Troubleshooting Troubleshooting 94 Warning indicators and messages 104 Additional Information Using your camcorder abroad .... 108 Files on the camcorder hard disk/ folder structure 110 Maintenance and precautions .... 111 Quick Reference Identifying parts and controls ..... 118 Indicators displayed during recording/playback 123...
... ... 81 Deleting images recorded on the camcorder through the computer (DCR-SR42E/SR62E/SR82E/ SR200E/SR300E 85 Viewing images imported to a computer 86 Editing the imported images ......... 88 Creating and copying a DVD ........ 90 Manipulating still images 93 Troubleshooting Troubleshooting 94 Warning indicators and messages 104 Additional Information Using your camcorder abroad .... 108 Files on the camcorder hard disk/ folder structure 110 Maintenance and precautions .... 111 Quick Reference Identifying parts and controls ..... 118 Indicators displayed during recording/playback 123...
Handycam® Handbook
Page 16
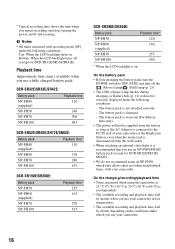
...-FH100 Playback time* 125 165 270 615 DCR-SR290E/SR300E: Battery pack NP-FH50 NP-FH60 (supplied) NP-FH70 NP-FH100 Playback time* 120 160 255 590 * When the LCD backlight is on . On the battery pack • Before changing the battery pack, turn the POWER switch to 86 °F) is recommended). • The available recording and playback time will be shorter when you use your camcorder in...
...-FH100 Playback time* 125 165 270 615 DCR-SR290E/SR300E: Battery pack NP-FH50 NP-FH60 (supplied) NP-FH70 NP-FH100 Playback time* 120 160 255 590 * When the LCD backlight is on . On the battery pack • Before changing the battery pack, turn the POWER switch to 86 °F) is recommended). • The available recording and playback time will be shorter when you use your camcorder in...

Handycam® Handbook
Page 18
..., charge the built-in the same way, then touch [NEXT]. 7 Make sure that the clock is turned on (DCR-SR190E/SR200E/ SR290E/SR300E). Changing the language setting You can set any operation attempted for information concerning "World time difference." • If the buttons on the hard disk, and can be cleared from the memory. Touch (HOME) t (SETTINGS) t [CLOCK/ LANG] t [ LANGUAGE SET], then select the desired language. To reset...
..., charge the built-in the same way, then touch [NEXT]. 7 Make sure that the clock is turned on (DCR-SR190E/SR200E/ SR290E/SR300E). Changing the language setting You can set any operation attempted for information concerning "World time difference." • If the buttons on the hard disk, and can be cleared from the memory. Touch (HOME) t (SETTINGS) t [CLOCK/ LANG] t [ LANGUAGE SET], then select the desired language. To reset...
Handycam® Handbook
Page 24
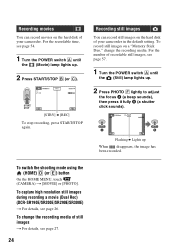
.... 1 Turn the POWER switch A until the (Still) lamp lights up When disappears, the image has been recorded. To change the recording media. For the recordable time, see page 26. To record still images on the hard disk of still images t For details, see page 27. 24 For the number of your camcorder. Recording still images You can record movies on a "Memory Stick Duo," change the recording media of your camcorder in the default setting. Flashing b Lights up . 2 Press PHOTO F lightly to adjust the focus A (a beep sounds...
.... 1 Turn the POWER switch A until the (Still) lamp lights up When disappears, the image has been recorded. To change the recording media. For the recordable time, see page 26. To record still images on the hard disk of still images t For details, see page 27. 24 For the number of your camcorder. Recording still images You can record movies on a "Memory Stick Duo," change the recording media of your camcorder in the default setting. Flashing b Lights up . 2 Press PHOTO F lightly to adjust the focus A (a beep sounds...
Handycam® Handbook
Page 35
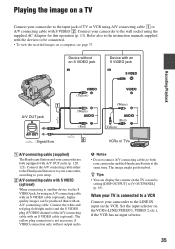
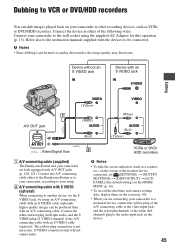
... this operation (p. 13). The image might get disturbed. Device without an S VIDEO jack IN Device with an S VIDEO jack IN S VIDEO Recording/Playback A/V OUT jack A/V OUT : Signal flow VIDEO (Yellow) (White) AUDIO (Red) VIDEO (White) AUDIO (Red) (Yellow) VCRs or TVs 1 A/V connecting cable (supplied) The Handycam Station and your camcorder to the LINE IN input on the VCR. Connect your camcorder to the wall socket using A/V connecting cable 1 or A/V connecting cable with S VIDEO 2. The yellow plug connection is connected to a VCR Connect your camcorder are both your setup...
... this operation (p. 13). The image might get disturbed. Device without an S VIDEO jack IN Device with an S VIDEO jack IN S VIDEO Recording/Playback A/V OUT jack A/V OUT : Signal flow VIDEO (Yellow) (White) AUDIO (Red) VIDEO (White) AUDIO (Red) (Yellow) VCRs or TVs 1 A/V connecting cable (supplied) The Handycam Station and your camcorder to the LINE IN input on the VCR. Connect your camcorder to the wall socket using A/V connecting cable 1 or A/V connecting cable with S VIDEO 2. The yellow plug connection is connected to a VCR Connect your camcorder are both your setup...
Handycam® Handbook
Page 37
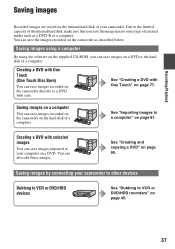
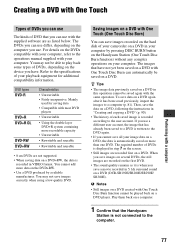
... Touch Disc Burn) You can save images recorded on the camcorder directly to a DVD with One Touch" on page 77. You can save the image data to some type of external media such as described below. Saving images using a computer By using the software on the supplied CD-ROM, you save images on a DVD or the hard disk of a computer. Saving images by connecting your camcorder. See "Creating a DVD with ease. Saving images on a computer You can save images recorded on the camcorder on the hard disk...
... Touch Disc Burn) You can save images recorded on the camcorder directly to a DVD with One Touch" on page 77. You can save the image data to some type of external media such as described below. Saving images using a computer By using the software on the supplied CD-ROM, you save images on a DVD or the hard disk of a computer. Saving images by connecting your camcorder. See "Creating a DVD with ease. Saving images on a computer You can save images recorded on the camcorder on the hard disk...
Handycam® Handbook
Page 45
... OUTPUT] t [LCD PANEL] (the default setting) on the HOME MENU (p. 63). • To record the date/time and camera settings data, display them on the screen (p. 60). • When you are both equipped with an S VIDEO jack IN S VIDEO Editing VIDEO (Yellow) VIDEO A/V OUT jack A/V OUT : Video/Signal flow (White) AUDIO (Red) (White) AUDIO (Red) (Yellow) VCRs or DVD/ HDD recorders A A/V connecting cable (supplied) The Handycam Station and your camcorder are connecting your setup. Connect the white and red plug (left channel) plug to another device via analog data transfer, the image...
... OUTPUT] t [LCD PANEL] (the default setting) on the HOME MENU (p. 63). • To record the date/time and camera settings data, display them on the screen (p. 60). • When you are both equipped with an S VIDEO jack IN S VIDEO Editing VIDEO (Yellow) VIDEO A/V OUT jack A/V OUT : Video/Signal flow (White) AUDIO (Red) (White) AUDIO (Red) (Yellow) VCRs or DVD/ HDD recorders A A/V connecting cable (supplied) The Handycam Station and your camcorder are connecting your setup. Connect the white and red plug (left channel) plug to another device via analog data transfer, the image...
Handycam® Handbook
Page 54
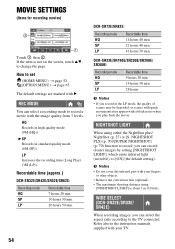
... default setting). DCR-SR33E/SR190E/SR200E/SR290E/ SR300E: Recording mode HQ SP LP Recordable time 9 hours 30 min. 14 hours 30 min. 28 hours b Notes • If you can record clearer images by setting [NIGHTSHOT LIGHT], which emits infrared light (invisible), to set (HOME MENU) t page 52 (OPTION MENU) t page 65 The default settings are marked with the image quality from 3 levels. REC MODE You can select a recording mode to change the...
... default setting). DCR-SR33E/SR190E/SR200E/SR290E/ SR300E: Recording mode HQ SP LP Recordable time 9 hours 30 min. 14 hours 30 min. 28 hours b Notes • If you can record clearer images by setting [NIGHTSHOT LIGHT], which emits infrared light (invisible), to set (HOME MENU) t page 52 (OPTION MENU) t page 65 The default settings are marked with the image quality from 3 levels. REC MODE You can select a recording mode to change the...
Handycam® Handbook
Page 73
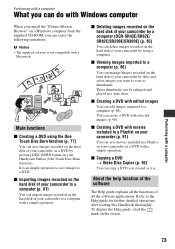
... can import images recorded on a Windows computer from the supplied CD-ROM, you can manage images recorded on a DVD with movies included in a Playlist on your camcorder by a computer (DCR-SR42E/SR62E/ SR82E/SR200E/SR300E) (p. 85) You can delete images recorded on your Handycam Station (One Touch Disc Burn function). x Viewing images imported to a DVD. x Creating a DVD with a simple operation. x Copying a DVD t Video Disc Copier (p. 92) You can copy a DVD you want to save movies included in a slide show. To display the Help guide, click...
... can import images recorded on a Windows computer from the supplied CD-ROM, you can manage images recorded on a DVD with movies included in a Playlist on your camcorder by a computer (DCR-SR42E/SR62E/ SR82E/SR200E/SR300E) (p. 85) You can delete images recorded on your Handycam Station (One Touch Disc Burn function). x Viewing images imported to a DVD. x Creating a DVD with a simple operation. x Copying a DVD t Video Disc Copier (p. 92) You can copy a DVD you want to save movies included in a slide show. To display the Help guide, click...
Handycam® Handbook
Page 77
... number of each saved image is displayed in VIDEO format. Then, save all your computer, refer to the operations manual supplied with the supplied software are recorded first on a DVD with One Touch (One Touch Disc Burn) You can use with your computer. You may not save a movie recorded in "Creating and copying a DVD" (p. 90). • The history of DVDs is recorded according to play back some types of your playback equipment for saving data • Compatible...
... number of each saved image is displayed in VIDEO format. Then, save all your computer, refer to the operations manual supplied with the supplied software are recorded first on a DVD with One Touch (One Touch Disc Burn) You can use with your computer. You may not save a movie recorded in "Creating and copying a DVD" (p. 90). • The history of DVDs is recorded according to play back some types of your playback equipment for saving data • Compatible...
Handycam® Handbook
Page 79
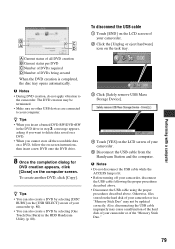
... the USB cable while the ACCESS lamp is completed, the disc tray opens automatically. Also, disconnecting the USB cable improperly may be updated correctly. The DVD creation may cause a malfunction of the hard disk of the "Memory Stick Duo." 79 To disconnect the USB cable 1 Touch [END] on the LCD screen of your camcorder. 2 Click the [Unplug or eject hardware] icon on the task tray. 3 Click [Safely remove USB Mass Storage Device...
... the USB cable while the ACCESS lamp is completed, the disc tray opens automatically. Also, disconnecting the USB cable improperly may be updated correctly. The DVD creation may cause a malfunction of the hard disk of the "Memory Stick Duo." 79 To disconnect the USB cable 1 Touch [END] on the LCD screen of your camcorder. 2 Click the [Unplug or eject hardware] icon on the task tray. 3 Click [Safely remove USB Mass Storage Device...
Handycam® Handbook
Page 80
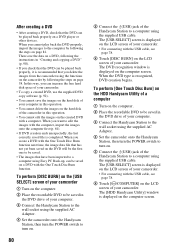
... played back properly, it is displayed on the computer screen. To perform [One Touch Disc Burn] on the HDD Handycam Utility of a computer 1 Turn on a DVD player or other devices. The [USB SELECT] screen is recognized, DVD creation begins. When you can increase the free hard disk space of your camcorder. • To copy a created DVD, use the supplied DVD copy software (p. 92). • You cannot save the data on a DVD, following the instructions in this operation...
... played back properly, it is displayed on the computer screen. To perform [One Touch Disc Burn] on the HDD Handycam Utility of a computer 1 Turn on a DVD player or other devices. The [USB SELECT] screen is recognized, DVD creation begins. When you can increase the free hard disk space of your camcorder. • To copy a created DVD, use the supplied DVD copy software (p. 92). • You cannot save the data on a DVD, following the instructions in this operation...
Handycam® Handbook
Page 94
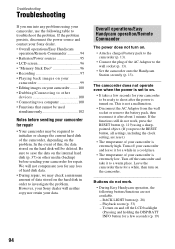
... a warm place. BACK LIGHT button (p. 28) - The camcorder does not operate even when the power is extremely low. If the problem persists, disconnect the power source and contact your Sony dealer. • Overall operations/Easy Handycam operation/Remote Commander 94 • Batteries/Power sources 95 • LCD screen 96 • "Memory Stick Duo 96 • Recording 97 • Playing back images on your camcorder 99 • Editing images on the hard disk will not compensate...
... a warm place. BACK LIGHT button (p. 28) - The camcorder does not operate even when the power is extremely low. If the problem persists, disconnect the power source and contact your Sony dealer. • Overall operations/Easy Handycam operation/Remote Commander 94 • Batteries/Power sources 95 • LCD screen 96 • "Memory Stick Duo 96 • Recording 97 • Playing back images on your camcorder 99 • Editing images on the hard disk will not compensate...

Handycam® Handbook
Page 95
... Easy Handycam operation. - [FILE NO.] - [VOLUME] - [TV TYPE] - [ DISPLAY] - [BEEP] - [CLOCK SET] - [AREA SET] - [SUMMERTIME] - [WIDE SELECT]*1 - [ IMAGE SIZE]*2 - [DEMO MODE] - [TIMING]*2 - [STILL MEDIA] - [ LANGUAGE SET] - [RECORD SOUND]*2 - [FLASH MODE]*3 *1DCR-SR32E/SR33E/SR42E *2DCR-SR190E/SR200E/SR290E/SR300E *3DCR-SR52E/SR62E/SR72E/SR82E Your camcorder gets warm. • This is because the power has been turned on the power again, or use the AC Adaptor. • Charge the battery pack (p. 13). 95 Troubleshooting Otherwise, the Remote Commander may not function...
... Easy Handycam operation. - [FILE NO.] - [VOLUME] - [TV TYPE] - [ DISPLAY] - [BEEP] - [CLOCK SET] - [AREA SET] - [SUMMERTIME] - [WIDE SELECT]*1 - [ IMAGE SIZE]*2 - [DEMO MODE] - [TIMING]*2 - [STILL MEDIA] - [ LANGUAGE SET] - [RECORD SOUND]*2 - [FLASH MODE]*3 *1DCR-SR32E/SR33E/SR42E *2DCR-SR190E/SR200E/SR290E/SR300E *3DCR-SR52E/SR62E/SR72E/SR82E Your camcorder gets warm. • This is because the power has been turned on the power again, or use the AC Adaptor. • Charge the battery pack (p. 13). 95 Troubleshooting Otherwise, the Remote Commander may not function...
Handycam® Handbook
Page 97
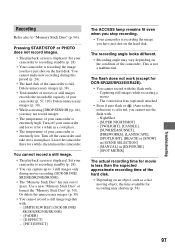
...; Your camcorder is displayed. Use a new "Memory Stick Duo" or format the "Memory Stick Duo" (p. 50). Capturing still images while recording a movie - You cannot make new recording during movie recording (DCR-SR190E/ SR200E/SR290E/SR300E). • The "Memory Stick Duo" has run out of the hard disk. • Depending on an object, such as a fast moving object, the time available for movie is extremely high. Turn off your camcorder and leave it to "Memory Stick Duo...
...; Your camcorder is displayed. Use a new "Memory Stick Duo" or format the "Memory Stick Duo" (p. 50). Capturing still images while recording a movie - You cannot make new recording during movie recording (DCR-SR190E/ SR200E/SR290E/SR300E). • The "Memory Stick Duo" has run out of the hard disk. • Depending on an object, such as a fast moving object, the time available for movie is extremely high. Turn off your camcorder and leave it to "Memory Stick Duo...

Handycam® Handbook
Page 111
... important data on the hard disk of the "Memory Stick" and "Memory Stick" compliant product you eject the "Memory Stick Duo," turn the power off on your camcorder, or remove the battery pack for , and may vary depending on a "Memory Stick Duo" or a Memory Stick Duo adaptor. • When you carry or store a "Memory Stick Duo," put it . x On handling a "Memory Stick" Keep the following cases: • If you use. a*2*3 a*3 - The file extension is lit or flashing...
... important data on the hard disk of the "Memory Stick" and "Memory Stick" compliant product you eject the "Memory Stick Duo," turn the power off on your camcorder, or remove the battery pack for , and may vary depending on a "Memory Stick Duo" or a Memory Stick Duo adaptor. • When you carry or store a "Memory Stick Duo," put it . x On handling a "Memory Stick" Keep the following cases: • If you use. a*2*3 a*3 - The file extension is lit or flashing...
Handycam® Handbook
Page 127
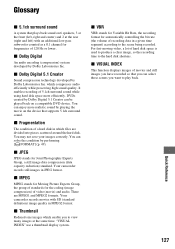
... sound A system that plays back sound on a compatible DVD device. You can solve the condition by performing [ FORMAT] (p. 49). x MPEG MPEG stands for Moving Picture Experts Group, the group of standards for frequencies of movies and still images you have recorded so that supports 5.1ch surround sound. Your camcorder records movies with an additional low-pass subwoofer counted as a 0.1 channel for the coding (image compression) of hard disk space is used...
... sound A system that plays back sound on a compatible DVD device. You can solve the condition by performing [ FORMAT] (p. 49). x MPEG MPEG stands for Moving Picture Experts Group, the group of standards for frequencies of movies and still images you have recorded so that supports 5.1ch surround sound. Your camcorder records movies with an additional low-pass subwoofer counted as a 0.1 channel for the coding (image compression) of hard disk space is used...


