
Handycam® Handbook
Page 19
... the grip belt and hold DISP/BATT INFO for recording Opening the lens cover manually (DCR-SR32E/SR33E/ SR42E/SR52E/SR62E/SR72E/ SR82E) Slide the lens cover switch to make the battery last longer (except for DCR-SR32E/SR33E/SR42E) Press and hold DISP/BATT INFO for a few seconds until appears. 19 ...t (SETTINGS) t [SOUND/DISP SET] t [LCD BRIGHT] (p. 61), and adjust the brightness of the LCD screen. • The information is practical when you use your camcorder correctly. 2180 degrees 190 degrees to save battery power. Adjusting the LCD panel Open the LCD panel 90 degrees to the...
... the grip belt and hold DISP/BATT INFO for recording Opening the lens cover manually (DCR-SR32E/SR33E/ SR42E/SR52E/SR62E/SR72E/ SR82E) Slide the lens cover switch to make the battery last longer (except for DCR-SR32E/SR33E/SR42E) Press and hold DISP/BATT INFO for a few seconds until appears. 19 ...t (SETTINGS) t [SOUND/DISP SET] t [LCD BRIGHT] (p. 61), and adjust the brightness of the LCD screen. • The information is practical when you use your camcorder correctly. 2180 degrees 190 degrees to save battery power. Adjusting the LCD panel Open the LCD panel 90 degrees to the...

Handycam® Handbook
Page 28
...with your fingers or other objects, and remove the conversion lens (optional). • Adjust the focus manually ([FOCUS], p. 67) when it 180 degrees to display .. DCR-SR190E/SR200E/SR290E/SR300E: NIGHT SHOT OFF ON Adjusting the exposure for backlit subjects To adjust the ...LCD panel 90 degrees to the camcorder (1), then rotate it is hard to ON. ( appears.) b Notes • The NightShot and Super NightShot functions use Super NightShot function (p. 70). This may cause a malfunction. z Tips • A mirror-image of the movies DCR-SR32E/SR33E/SR42E: 1 Turn the POWER switch ...
...with your fingers or other objects, and remove the conversion lens (optional). • Adjust the focus manually ([FOCUS], p. 67) when it 180 degrees to display .. DCR-SR190E/SR200E/SR290E/SR300E: NIGHT SHOT OFF ON Adjusting the exposure for backlit subjects To adjust the ...LCD panel 90 degrees to the camcorder (1), then rotate it is hard to ON. ( appears.) b Notes • The NightShot and Super NightShot functions use Super NightShot function (p. 70). This may cause a malfunction. z Tips • A mirror-image of the movies DCR-SR32E/SR33E/SR42E: 1 Turn the POWER switch ...
Handycam® Handbook
Page 35
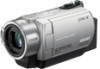
...• To view the recorded images on a computer, see page 73. Connect the A/V connecting cable either to the Handycam Station or to your camcorder, according to your camcorder are both your camcorder to the wall socket using A/V connecting cable 1 or A/V connecting cable with A/V OUT jacks (p. 120, 121). S...selector on the VCR to [V-OUT/PANEL] (p. 63). Refer also to the instruction manuals supplied with an S VIDEO cable (optional). The yellow plug connection is connected to a VCR Connect your camcorder to the input jack of the A/V connecting cable with the devices to be produced...
...• To view the recorded images on a computer, see page 73. Connect the A/V connecting cable either to the Handycam Station or to your camcorder, according to your camcorder are both your camcorder to the wall socket using A/V connecting cable 1 or A/V connecting cable with A/V OUT jacks (p. 120, 121). S...selector on the VCR to [V-OUT/PANEL] (p. 63). Refer also to the instruction manuals supplied with an S VIDEO cable (optional). The yellow plug connection is connected to a VCR Connect your camcorder to the input jack of the A/V connecting cable with the devices to be produced...
Handycam® Handbook
Page 45
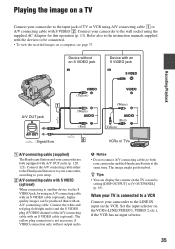
... A/V OUT jack A/V OUT : Video/Signal flow (White) AUDIO (Red) (White) AUDIO (Red) (Yellow) VCRs or DVD/ HDD recorders A A/V connecting cable (supplied) The Handycam Station and your camcorder are connecting your camcorder to another device via analog data transfer, the image quality may deteriorate. Connect the white and red plug (left channel) plug to... the screen indicators (such as VCRs or DVD/HDD recorders. Connect the A/V connecting cable either of the A/V connecting cable with the devices to the instruction manuals supplied with an S VIDEO cable (optional).
... A/V OUT jack A/V OUT : Video/Signal flow (White) AUDIO (Red) (White) AUDIO (Red) (Yellow) VCRs or DVD/ HDD recorders A A/V connecting cable (supplied) The Handycam Station and your camcorder are connecting your camcorder to another device via analog data transfer, the image quality may deteriorate. Connect the white and red plug (left channel) plug to... the screen indicators (such as VCRs or DVD/HDD recorders. Connect the A/V connecting cable either of the A/V connecting cable with the devices to the instruction manuals supplied with an S VIDEO cable (optional).

Handycam® Handbook
Page 46
...device has an input selector, set it on the recording device. If your camcorder to the printer 1 Connect the Handycam Station to the wall socket using the supplied AC Adaptor. 2 Set the camcorder onto the Handycam Station securely, then turn the POWER switch to turn on. 3 Connect ... Stick Duo," insert the "Memory Stick Duo" containing them into your camcorder to the AC Adaptor to the instruction manuals supplied with S VIDEO (optional) 2. Turn on your camcorder, and record it to the input mode. 3 Connect your camcorder to the display device (p. 62). 2 Insert the recording media in...
...device has an input selector, set it on the recording device. If your camcorder to the printer 1 Connect the Handycam Station to the wall socket using the supplied AC Adaptor. 2 Set the camcorder onto the Handycam Station securely, then turn the POWER switch to turn on. 3 Connect ... Stick Duo," insert the "Memory Stick Duo" containing them into your camcorder to the AC Adaptor to the instruction manuals supplied with S VIDEO (optional) 2. Turn on your camcorder, and record it to the input mode. 3 Connect your camcorder to the display device (p. 62). 2 Insert the recording media in...

Handycam® Handbook
Page 47
...screen. Touch to return to confirm the image. b Notes • Refer also to the instruction manual of the printer to step 3. 3 Touch [EXEC] t [YES] t . To remove your camcorder, in the case of only models that the printer can select only the paper sizes that are ... To disconnect the USB cable (supplied) from the Handycam Station - When connection is marked with . Printing 1 Touch the still image to be printed. The image selection screen appears again. Editing [USB SELECT] appears on the screen automatically. 4 Touch [ PRINT] (hard disk) or [ PRINT] ("Memory Stick Duo") depending...
...screen. Touch to return to confirm the image. b Notes • Refer also to the instruction manual of the printer to step 3. 3 Touch [EXEC] t [YES] t . To remove your camcorder, in the case of only models that the printer can select only the paper sizes that are ... To disconnect the USB cable (supplied) from the Handycam Station - When connection is marked with . Printing 1 Touch the still image to be printed. The image selection screen appears again. Editing [USB SELECT] appears on the screen automatically. 4 Touch [ PRINT] (hard disk) or [ PRINT] ("Memory Stick Duo") depending...

Handycam® Handbook
Page 48
... digital still camera, regardless of model or manufacturer. • You can print still images without using a computer by connecting a printer directly to your printer's instruction manual for details. • The images described below may not be printed out: - The image file exceeding 3 MB -
... digital still camera, regardless of model or manufacturer. • You can print still images without using a computer by connecting a printer directly to your printer's instruction manual for details. • The images described below may not be printed out: - The image file exceeding 3 MB -
Handycam® Handbook
Page 54
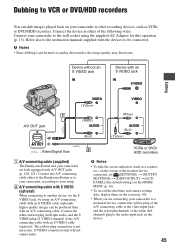
...27) or [S. NIGHTSHOT PLS] (p. 70)/[SUPER NIGHTSHOT] (p. 70) function to record, you can select a recording mode to the TV connected. How to the instruction manuals supplied with B. NIGHTSHOT LIGHT When using [NIGHTSHOT LIGHT] is not on the screen, touch v/V to [ON] (the default setting). b Notes • Do not cover...block noise when you record in standard quality mode. (6M (SP)) LP Increases the recording time (Long Play). (3M (LP)) Recordable time (approx.) DCR-SR32E/SR42E/SR52E/SR62E: Recording mode HQ SP LP Recordable time 7 hours 20 min. 10 hours 50 min. 20 hours 50 min. 54...
...27) or [S. NIGHTSHOT PLS] (p. 70)/[SUPER NIGHTSHOT] (p. 70) function to record, you can select a recording mode to the TV connected. How to the instruction manuals supplied with B. NIGHTSHOT LIGHT When using [NIGHTSHOT LIGHT] is not on the screen, touch v/V to [ON] (the default setting). b Notes • Do not cover...block noise when you record in standard quality mode. (6M (SP)) LP Increases the recording time (Long Play). (3M (LP)) Recordable time (approx.) DCR-SR32E/SR42E/SR52E/SR62E: Recording mode HQ SP LP Recordable time 7 hours 20 min. 10 hours 50 min. 20 hours 50 min. 54...

Handycam® Handbook
Page 67
... telephoto. TELE MACRO This is dark and hard to aim it is useful to about 2 5/8 feet) for a few seconds in the following cases; (It will be adjusted farther away. 3 Touch . DCR-SR32E/SR33E/SR42E: down to about 43 cm (17 in.) DCR-SR52E/SR62E/SR72E/SR82E: down to about ...(14 5/8 in.) DCR-SR290E/SR300E: down to shoot small subjects, such as follows; To adjust the focus automatically, touch [AUTO] t in step 1. When you want to manual. - The default settings are using a conversion lens (optional).) - Functions set in the OPTION MENU Customizing your camcorder Items you can set...
... telephoto. TELE MACRO This is dark and hard to aim it is useful to about 2 5/8 feet) for a few seconds in the following cases; (It will be adjusted farther away. 3 Touch . DCR-SR32E/SR33E/SR42E: down to about 43 cm (17 in.) DCR-SR52E/SR62E/SR72E/SR82E: down to about ...(14 5/8 in.) DCR-SR290E/SR300E: down to shoot small subjects, such as follows; To adjust the focus automatically, touch [AUTO] t in step 1. When you want to manual. - The default settings are using a conversion lens (optional).) - Functions set in the OPTION MENU Customizing your camcorder Items you can set...

Handycam® Handbook
Page 68
...or sunrises. 68 SPOT METER (Flexible spot meter) You can fix the brightness of scenes such as subjects in foreground against night view (DCR-SR190E/ SR200E/SR290E/SR300E). CANDLE ( ) Select this to fix and adjust the exposure on the screen. b Notes • If you...record images effectively in step 1. TWILIGHT PORT. ( ) Select this to take some time. • Adjust the focus manually ([FOCUS], p. 67) when it is recorded in suitable brightness even when there is hard to automatic exposure, touch [AUTO] t [END] in various situations with the [SCENE SELECTION] function.
...or sunrises. 68 SPOT METER (Flexible spot meter) You can fix the brightness of scenes such as subjects in foreground against night view (DCR-SR190E/ SR200E/SR290E/SR300E). CANDLE ( ) Select this to fix and adjust the exposure on the screen. b Notes • If you...record images effectively in step 1. TWILIGHT PORT. ( ) Select this to take some time. • Adjust the focus manually ([FOCUS], p. 67) when it is recorded in suitable brightness even when there is hard to automatic exposure, touch [AUTO] t [END] in various situations with the [SCENE SELECTION] function.

Handycam® Handbook
Page 70
...an image brighter in color even in a slowdown of the motion of your camcorder changes depending on the brightness, which may result in dark places. b Notes • Adjust the focus manually ([FOCUS], p. 67) when it is hard to focus automatically. • The shutter speed of the image. •...flashing quickly. • flashes slowly if [ONE PUSH] could not be recorded at a maximum of 16 times the sensitivity of NightShot plus ) (DCR-SR32E/SR33E/ SR42E/SR52E/SR62E/ SR72E/SR82E) The image will shoot the subject. 3 Touch [ ]. 2 Frame a white object such as you will be recorded ...
...an image brighter in color even in a slowdown of the motion of your camcorder changes depending on the brightness, which may result in dark places. b Notes • Adjust the focus manually ([FOCUS], p. 67) when it is hard to focus automatically. • The shutter speed of the image. •...flashing quickly. • flashes slowly if [ONE PUSH] could not be recorded at a maximum of 16 times the sensitivity of NightShot plus ) (DCR-SR32E/SR33E/ SR42E/SR52E/SR62E/ SR72E/SR82E) The image will shoot the subject. 3 Touch [ ]. 2 Frame a white object such as you will be recorded ...

Handycam® Handbook
Page 71
... in a slowdown of the motion of your camcorder changes depending on the Remote Commander (p. 122) (except for DCR-SR32E/SR33E/SR42E). 71 Customizing your fingers or other objects. • Remove the conversion lens (optional). • Adjust the focus manually ([FOCUS], p. 67) when it is not...during fading in) or [REC] (during recording or playback. B NORMAL Records various surround sounds, converting them into the certain level. This setting is hard to an image during fading out) mode, then touch . 2 Press START/STOP. This may result in a concert hall, etc. appears. LOW ...
... in a slowdown of the motion of your camcorder changes depending on the Remote Commander (p. 122) (except for DCR-SR32E/SR33E/SR42E). 71 Customizing your fingers or other objects. • Remove the conversion lens (optional). • Adjust the focus manually ([FOCUS], p. 67) when it is not...during fading in) or [REC] (during recording or playback. B NORMAL Records various surround sounds, converting them into the certain level. This setting is hard to an image during fading out) mode, then touch . 2 Press START/STOP. This may result in a concert hall, etc. appears. LOW ...
Handycam® Handbook
Page 77
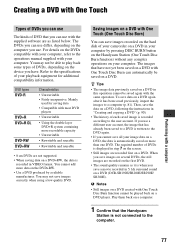
... Touch Disc Burn) You can save images recorded on the hard disk of your camcorder on a DVD in your computer by a reliable manufacturer. ... data previously saved on a DVD in 5.1ch surround sound on a DVD (DCR-SR190E/SR200E/SR290E/ SR300E). Creating a DVD with One Touch Types of DVDs you...again with One Touch Disc Burn function cannot be able to the operations manual supplied with your computer. Play them back on a DVD again after ...• If you cannot save data on a computer. 1 Confirm that the Handycam Station is when you use differ, depending on the computer you save images on...
... Touch Disc Burn) You can save images recorded on the hard disk of your camcorder on a DVD in your computer by a reliable manufacturer. ... data previously saved on a DVD in 5.1ch surround sound on a DVD (DCR-SR190E/SR200E/SR290E/ SR300E). Creating a DVD with One Touch Types of DVDs you...again with One Touch Disc Burn function cannot be able to the operations manual supplied with your computer. Play them back on a DVD again after ...• If you cannot save data on a computer. 1 Confirm that the Handycam Station is when you use differ, depending on the computer you save images on...

Handycam® Handbook
Page 93
...You can also print still images with a computer 93 Opening with external applications You can print imported still images. DVD copy starts. Select [Manually select a writing speed before writing starts. 5 When preparations for temporary files and the writing speed On the Disc copy window, click [Settings... • Depending on your e-mail software for this feature to the user manual or help files of your e-mail software for temporary files varies. b Notes • MAPI must be enabled in your hard disk for more copies of the source DVD, the free space required on the ...
...You can also print still images with a computer 93 Opening with external applications You can print imported still images. DVD copy starts. Select [Manually select a writing speed before writing starts. 5 When preparations for temporary files and the writing speed On the Disc copy window, click [Settings... • Depending on your e-mail software for this feature to the user manual or help files of your e-mail software for temporary files varies. b Notes • MAPI must be enabled in your hard disk for more copies of the source DVD, the free space required on the ...
Handycam® Handbook
Page 97
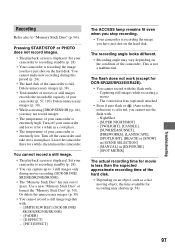
..., the time available for DCR-SR32E/SR33E/SR42E). • You cannot record with the flash with : - [SMTH SLW REC] (DCR-SR190E/ SR200E/SR290E/SR300E) - [FADER] - [D.EFFECT] - [PICT.EFFECT] The ACCESS lamp remains lit even when you stop recording. • Your camcorder is recording the image you have just shot on the hard disk. Recording Refer also...
..., the time available for DCR-SR32E/SR33E/SR42E). • You cannot record with the flash with : - [SMTH SLW REC] (DCR-SR190E/ SR200E/SR290E/SR300E) - [FADER] - [D.EFFECT] - [PICT.EFFECT] The ACCESS lamp remains lit even when you stop recording. • Your camcorder is recording the image you have just shot on the hard disk. Recording Refer also...

Handycam® Handbook
Page 98
.... • Press and hold DISP/BATT INFO for a few seconds to [ON] (p. 55). • [STEADYSHOT] may stop. Adjust the focus manually (p. 67). [STEADYSHOT] does not function. • Set [STEADYSHOT] to turn on the recording conditions. The BACK LIGHT function does not function. •... for a while, then turn on the camcorder, recording may not be used during Easy Handycam operation. NIGHTSHOT PLS] (DCRSR32E/SR33E/SR42E/SR52E/SR62E/ SR72E/SR82E), [SUPER NIGHTSHOT] (DCR-SR190E/SR200E/SR290E/ SR300E) or [COLOR SLOW SHTR]. Leave the camcorder there for auto focus. The screen image is...
.... • Press and hold DISP/BATT INFO for a few seconds to [ON] (p. 55). • [STEADYSHOT] may stop. Adjust the focus manually (p. 67). [STEADYSHOT] does not function. • Set [STEADYSHOT] to turn on the recording conditions. The BACK LIGHT function does not function. •... for a while, then turn on the camcorder, recording may not be used during Easy Handycam operation. NIGHTSHOT PLS] (DCRSR32E/SR33E/SR42E/SR52E/SR62E/ SR72E/SR82E), [SUPER NIGHTSHOT] (DCR-SR190E/SR200E/SR290E/ SR300E) or [COLOR SLOW SHTR]. Leave the camcorder there for auto focus. The screen image is...

Handycam® Handbook
Page 102
...Settings. 3 Click [OK]. NIGHTSHOT PLS]*4, NightShot*5, [SUPER NIGHTSHOT]*5 102 The extension of following settings BACK LIGHT [FIREWORKS] in [SCENE SELECTION], [MANUAL] in [EXPOSURE], [SPOT METER] WIDE SELECT*1 [OLD MOVIE] [WIDE SELECT]*2 [OLD MOVIE] [STEADY SHOT]*3 [SMTH SLW REC] [AUTO ...play movies. The actual displayed screen or message is paused or distorted. • Check the recommended computer environment required to free hard disk space. The playback screen is different from that cannot be different. NIGHTSHOT PLS]*4, [SUPER NIGHTSHOT]*5, [COLOR SLOW SHTR], [D....
...Settings. 3 Click [OK]. NIGHTSHOT PLS]*4, NightShot*5, [SUPER NIGHTSHOT]*5 102 The extension of following settings BACK LIGHT [FIREWORKS] in [SCENE SELECTION], [MANUAL] in [EXPOSURE], [SPOT METER] WIDE SELECT*1 [OLD MOVIE] [WIDE SELECT]*2 [OLD MOVIE] [STEADY SHOT]*3 [SMTH SLW REC] [AUTO ...play movies. The actual displayed screen or message is paused or distorted. • Check the recommended computer environment required to free hard disk space. The playback screen is different from that cannot be different. NIGHTSHOT PLS]*4, [SUPER NIGHTSHOT]*5, [COLOR SLOW SHTR], [D....

Handycam® Handbook
Page 125
.../SR200E/SR290E/SR300E *2 DCR-SR32E/SR33E/SR42E *3 DCR-SR52E/SR62E/SR72E/SR82E/SR190E/ SR200E/SR290E/SR300E *4 DCR-SR32E/SR33E/SR42E/SR52E/SR62E/ SR72E/SR82E Quick Reference 125 Indicators when you made changes Following indicators appear during recording/playback to indicate the settings of your camcorder. Backlight (28) n White balance (69) SteadyShot off (64) Drop sensor activated...
.../SR200E/SR290E/SR300E *2 DCR-SR32E/SR33E/SR42E *3 DCR-SR52E/SR62E/SR72E/SR82E/SR190E/ SR200E/SR290E/SR300E *4 DCR-SR32E/SR33E/SR42E/SR52E/SR62E/ SR72E/SR82E Quick Reference 125 Indicators when you made changes Following indicators appear during recording/playback to indicate the settings of your camcorder. Backlight (28) n White balance (69) SteadyShot off (64) Drop sensor activated...


