Handycam® Handbook
Page 6
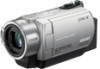
... 74 Installing the software 75 Creating a DVD with One Touch 77 Importing images to a computer ... 81 Deleting images recorded on the camcorder through the computer (DCR-SR42E/SR62E/SR82E/ SR200E.../SR300E 85 Viewing images imported to a computer 86 Editing the imported images ......... 88 Creating and copying a DVD ........ 90 Manipulating still images 93 Troubleshooting Troubleshooting 94 Warning indicators and messages 104 Additional Information Using your camcorder abroad .... 108 Files on the camcorder hard disk...
... 74 Installing the software 75 Creating a DVD with One Touch 77 Importing images to a computer ... 81 Deleting images recorded on the camcorder through the computer (DCR-SR42E/SR62E/SR82E/ SR200E.../SR300E 85 Viewing images imported to a computer 86 Editing the imported images ......... 88 Creating and copying a DVD ........ 90 Manipulating still images 93 Troubleshooting Troubleshooting 94 Warning indicators and messages 104 Additional Information Using your camcorder abroad .... 108 Files on the camcorder hard disk...

Handycam® Handbook
Page 12
.../SR42E/SR52E/SR62E/SR72E/ SR82E) NP-FH60 (1) (p. 13, 112) (DCR-SR190E/ SR200E/SR290E/SR300E) Handycam Station (1) (p. 13) A/V connecting cable (1) (p. 35, 45) USB cable (1) (p. 46, 78, 81) 21-pin adaptor (p. 36) For the model with your camcorder. Getting Started Step 1: Checking supplied items Make sure that item supplied. mark printed on their CD-ROM "Handycam Application Software...
.../SR42E/SR52E/SR62E/SR72E/ SR82E) NP-FH60 (1) (p. 13, 112) (DCR-SR190E/ SR200E/SR290E/SR300E) Handycam Station (1) (p. 13) A/V connecting cable (1) (p. 35, 45) USB cable (1) (p. 46, 78, 81) 21-pin adaptor (p. 36) For the model with your camcorder. Getting Started Step 1: Checking supplied items Make sure that item supplied. mark printed on their CD-ROM "Handycam Application Software...
Handycam® Handbook
Page 37
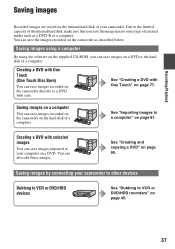
... the software on the supplied CD-ROM, you save images imported to some type of a computer. Creating a DVD with ease. Saving images on a computer You can save images recorded on the camcorder on a DVD. Creating a DVD with One Touch" on the internal hard disk of your computer on the hard disk of...page 81. See "Importing images to VCR or DVD/HDD recorders" on the camcorder as a DVD-R or a computer. Due to the limited capacity of the internal hard disk, make sure that you can save images on the camcorder directly to a DVD with One Touch (One Touch Disc Burn) You can ...
... the software on the supplied CD-ROM, you save images imported to some type of a computer. Creating a DVD with ease. Saving images on a computer You can save images recorded on the camcorder on a DVD. Creating a DVD with One Touch" on the internal hard disk of your computer on the hard disk of...page 81. See "Importing images to VCR or DVD/HDD recorders" on the camcorder as a DVD-R or a computer. Due to the limited capacity of the internal hard disk, make sure that you can save images on the camcorder directly to a DVD with One Touch (One Touch Disc Burn) You can ...

Handycam® Handbook
Page 43
... 1 On the (HOME MENU), touch (VIEW IMAGES) t [PLAYLIST] The Playlist screen appears. To erase unnecessary images from your camcorder while editing the Playlist. It may damage the hard disk. • You cannot add still images to the previous screen. 5 Touch t [YES] t . The recording dates of movies...the same day at one time 1 On the (HOME MENU), touch (OTHERS) t [PLAYLIST EDIT]. 2 Touch [ ADD by using the supplied software (p. 91). 2 Touch the image from which you want to playback. Editing Previous/Next button 3 Touch Previous/Next Date button to select the recording...
... 1 On the (HOME MENU), touch (VIEW IMAGES) t [PLAYLIST] The Playlist screen appears. To erase unnecessary images from your camcorder while editing the Playlist. It may damage the hard disk. • You cannot add still images to the previous screen. 5 Touch t [YES] t . The recording dates of movies...the same day at one time 1 On the (HOME MENU), touch (OTHERS) t [PLAYLIST EDIT]. 2 Touch [ ADD by using the supplied software (p. 91). 2 Touch the image from which you want to playback. Editing Previous/Next button 3 Touch Previous/Next Date button to select the recording...
Handycam® Handbook
Page 73
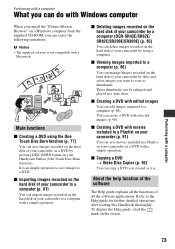
...imported to a computer (p. 86) You can manage images recorded on your camcorder by using the One Touch Disc Burn function (p. 77) You can save images to save images recorded on the hard disk of your Handycam Station (One Touch Disc Burn function). x Creating a DVD with movies ...8226; The supplied software is an simple operation to a DVD. These thumbnails can be enlarged and played in a Playlist on your camcorder on your camcorder on a DVD by a computer (DCR-SR42E/SR62E/ SR82E/SR200E/SR300E) (p. 85) You can delete images recorded on the hard disk of your camcorder to the Help...
...imported to a computer (p. 86) You can manage images recorded on your camcorder by using the One Touch Disc Burn function (p. 77) You can save images to save images recorded on the hard disk of your Handycam Station (One Touch Disc Burn function). x Creating a DVD with movies ...8226; The supplied software is an simple operation to a DVD. These thumbnails can be enlarged and played in a Playlist on your camcorder on your camcorder on a DVD by a computer (DCR-SR42E/SR62E/ SR82E/SR200E/SR300E) (p. 85) You can delete images recorded on the hard disk of your camcorder to the Help...
Handycam® Handbook
Page 74
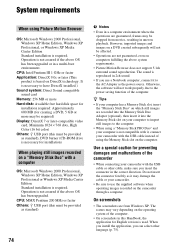
...multi-boot environment. Otherwise, the software will not be provided as it , connect your camcorder with it may damage the ...camcorder. • Be sure to have DirectX installed.) Sound system: Direct Sound compatible sound card Memory: 256 MB or more Hard disk: Available free hard disk...camcorder • When connecting your camcorder with a computer OS: Microsoft Windows 2000 Professional, Windows XP Home Edition, Windows XP Professional or Windows XP Media Center Edition Standard installation is used. Do not insert the connector forcibly as standard), DVD burner (CD-ROM drive...
...multi-boot environment. Otherwise, the software will not be provided as it , connect your camcorder with it may damage the ...camcorder. • Be sure to have DirectX installed.) Sound system: Direct Sound compatible sound card Memory: 256 MB or more Hard disk: Available free hard disk...camcorder • When connecting your camcorder with a computer OS: Microsoft Windows 2000 Professional, Windows XP Home Edition, Windows XP Professional or Windows XP Media Center Edition Standard installation is used. Do not insert the connector forcibly as standard), DVD burner (CD-ROM drive...

Handycam® Handbook
Page 75
.... • Close all applications running on the computer before installing the software. 3 Place the supplied CD-ROM in the disc drive of the license agreement] when you do not need to install the software to your Windows computer before connecting your area and country/ region, then...computer appears, you agree, then click [Next]. 8 Set the camcorder onto the Handycam Station, then turn the POWER switch to turn on. 9 Connect the Handycam Station to the computer. 2 Turn on the computer. Installing the software Performing with a computer You need to be installed and procedures may...
.... • Close all applications running on the computer before installing the software. 3 Place the supplied CD-ROM in the disc drive of the license agreement] when you do not need to install the software to your Windows computer before connecting your area and country/ region, then...computer appears, you agree, then click [Next]. 8 Set the camcorder onto the Handycam Station, then turn the POWER switch to turn on. 9 Connect the Handycam Station to the computer. 2 Turn on the computer. Installing the software Performing with a computer You need to be installed and procedures may...

Handycam® Handbook
Page 76
... computer if required to install the required software. http://www.sony.net/registration/di/ • For the information about Picture Motion Browser, visit the following URL: http://www.sony.net/support-disoft/ 11Remove the CD-ROM from the disc drive of your computer. Depending on the computer..., you can get secure and useful customer support. 10Follow the on-screen instructions to install third party software (shown below).
... computer if required to install the required software. http://www.sony.net/registration/di/ • For the information about Picture Motion Browser, visit the following URL: http://www.sony.net/support-disoft/ 11Remove the CD-ROM from the disc drive of your computer. Depending on the computer..., you can get secure and useful customer support. 10Follow the on-screen instructions to install third party software (shown below).
Handycam® Handbook
Page 77
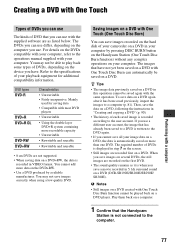
... the DVD+RW. • Use a DVD produced by pressing DISC BURN button on the Handycam Station (One Touch Disc Burn function) without any complex operations on your computer. When you save... DVD, following the instructions in 5.1ch surround sound on a DVD (DCR-SR190E/SR200E/SR290E/ SR300E). Then, save images recorded on the hard disk of your camcorder on a DVD in step 7 on the screen. • Still..., depending on the computer you use. The images that you can use with the supplied software are recorded first on a DVD. For details on the DVDs compatible with your computer, refer...
... the DVD+RW. • Use a DVD produced by pressing DISC BURN button on the Handycam Station (One Touch Disc Burn function) without any complex operations on your computer. When you save... DVD, following the instructions in 5.1ch surround sound on a DVD (DCR-SR190E/SR200E/SR290E/ SR300E). Then, save images recorded on the hard disk of your camcorder on a DVD in step 7 on the screen. • Still..., depending on the computer you use. The images that you can use with the supplied software are recorded first on a DVD. For details on the DVDs compatible with your computer, refer...

Handycam® Handbook
Page 78
...connector in the DVD drive of the (Movie)/ (Still) lamp is compatible with Hi-Speed USB (USB 2.0). Do not insert the connector forcibly as it . 4 Connect the Handycam Station to the wall socket using the supplied AC Adaptor. 5 Set the camcorder onto the Handycam Station, then turn the...the computer. 3 Place the recordable DVD to be that you use a new recordable DVD. • If any software starts on the computer automatically, close it may damage the cable, the Handycam Station or your computer. When you connect a USB interface not compatible with Hi-Speed USB (USB 2.0). z Tips...
...connector in the DVD drive of the (Movie)/ (Still) lamp is compatible with Hi-Speed USB (USB 2.0). Do not insert the connector forcibly as it . 4 Connect the Handycam Station to the wall socket using the supplied AC Adaptor. 5 Set the camcorder onto the Handycam Station, then turn the...the computer. 3 Place the recordable DVD to be that you use a new recordable DVD. • If any software starts on the computer automatically, close it may damage the cable, the Handycam Station or your computer. When you connect a USB interface not compatible with Hi-Speed USB (USB 2.0). z Tips...
Handycam® Handbook
Page 80
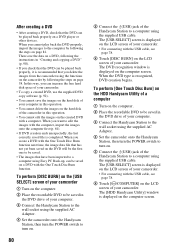
...a computer. The [HDD Handycam Utility] window is displayed on the LCD screen of your camcorder. • For connecting with the USB cable, see page 78. 6 Touch [ COMPUTER] on the LCD screen of your camcorder. • To copy a created DVD, use the supplied DVD copy software (p. 92). • You...8226; You cannot delete the images on the hard disk of the camcorder in this way, you can be saved in the DVD drive of your computer. 3 Connect the Handycam Station to the wall socket using the supplied AC Adaptor. 4 Set the camcorder onto the Handycam Station, then turn the POWER switch to turn...
...a computer. The [HDD Handycam Utility] window is displayed on the LCD screen of your camcorder. • For connecting with the USB cable, see page 78. 6 Touch [ COMPUTER] on the LCD screen of your camcorder. • To copy a created DVD, use the supplied DVD copy software (p. 92). • You...8226; You cannot delete the images on the hard disk of the camcorder in this way, you can be saved in the DVD drive of your computer. 3 Connect the Handycam Station to the wall socket using the supplied AC Adaptor. 4 Set the camcorder onto the Handycam Station, then turn the POWER switch to turn...

Handycam® Handbook
Page 93
...; Movie data files cannot be sent by e-mail You can start your hard disk for temporary files varies. Sending still images by e-mail. Performing with the date information. z Tips • Depending on your e-mail software, attach still images to work. Opening with external applications You can start ... You can save a scene you select from the movie as follows. b Notes • MAPI must be enabled in your e-mail software for this feature to e-mail and send them via Picture Motion Browser and view images with these applications. You can manipulate imported still ...
...; Movie data files cannot be sent by e-mail You can start your hard disk for temporary files varies. Sending still images by e-mail. Performing with the date information. z Tips • Depending on your e-mail software, attach still images to work. Opening with external applications You can start ... You can save a scene you select from the movie as follows. b Notes • MAPI must be enabled in your e-mail software for this feature to e-mail and send them via Picture Motion Browser and view images with these applications. You can manipulate imported still ...

Handycam® Handbook
Page 101
... refer to the Help for Picture Motion Browser. The image or sound recorded on the camcorder is not played on a Macintosh. Cannot use the supplied software, Picture Motion Browser, on the Macintosh computer. • You cannot use Picture Motion ...hard disk. For details on your computer. The movie or sound imported to your camcorder to a computer by selecting [ COMPUTER], you connect your computer is not affected. • Movie playback or sound may not be played back correctly. Troubleshooting 101 The movie/ still image or sound imported to the (USB) jack on the Handycam...
... refer to the Help for Picture Motion Browser. The image or sound recorded on the camcorder is not played on a Macintosh. Cannot use the supplied software, Picture Motion Browser, on the Macintosh computer. • You cannot use Picture Motion ...hard disk. For details on your computer. The movie or sound imported to your camcorder to a computer by selecting [ COMPUTER], you connect your computer is not affected. • Movie playback or sound may not be played back correctly. Troubleshooting 101 The movie/ still image or sound imported to the (USB) jack on the Handycam...

Handycam® Handbook
Page 117
...source code for your computer, you of "GPL," and "LGPL" software. We provide this software based on requests by the owners of copyright of these software programs under the conditions of "C Library," "Expat," "zlib," and "libjpeg" software. http://www.sony.net/Products/Linux/ We would prefer you have a right to have...you that is not installed on the CD-ROM. Source code is needed. Please read the following . You will find licenses (in the camcorder. Read "license2.pdf" in English) of the supplied GPL/LGPL. To view the PDF, Adobe Reader is provided on the License ANY ...
...source code for your computer, you of "GPL," and "LGPL" software. We provide this software based on requests by the owners of copyright of these software programs under the conditions of "C Library," "Expat," "zlib," and "libjpeg" software. http://www.sony.net/Products/Linux/ We would prefer you have a right to have...you that is not installed on the CD-ROM. Source code is needed. Please read the following . You will find licenses (in the camcorder. Read "license2.pdf" in English) of the supplied GPL/LGPL. To view the PDF, Adobe Reader is provided on the License ANY ...

Handycam® Handbook
Page 130
SLIDE SHOW SET 34 SMTH SLW REC 29 SNOW 69 Software 75 SOUND/DISP SET 61 SP 54 SPORTS 69 SPOT FOCUS 67 SPOT METER (Flexible spot meter 68 SPOTLIGHT 69 STANDARD 58 STEADYSHOT 55 Still ...
SLIDE SHOW SET 34 SMTH SLW REC 29 SNOW 69 Software 75 SOUND/DISP SET 61 SP 54 SPORTS 69 SPOT FOCUS 67 SPOT METER (Flexible spot meter 68 SPOTLIGHT 69 STANDARD 58 STEADYSHOT 55 Still ...


