
Operating Guide
Page 8
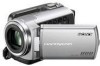
... the ACCESS/access lamp (p. 13, 39) are the supplied quantity. AC Adaptor (1) Power cord (Mains lead) (1) A/V connecting cable (1) USB cable (1) Rechargeable battery pack Only for DCR-SR47/SR48/SR67: NP-FH30 (1) Only for DCR-SR87: NP-FH50 (1) CD-ROM "Handycam Application Software" (1) (p. 25) "PMB" (software) including "PMB Guide" "Handycam Handbook" (PDF) "Operating Guide" (This manual) (1) See page 39 for "Memory Stick" media you may...
... the ACCESS/access lamp (p. 13, 39) are the supplied quantity. AC Adaptor (1) Power cord (Mains lead) (1) A/V connecting cable (1) USB cable (1) Rechargeable battery pack Only for DCR-SR47/SR48/SR67: NP-FH30 (1) Only for DCR-SR87: NP-FH50 (1) CD-ROM "Handycam Application Software" (1) (p. 25) "PMB" (software) including "PMB Guide" "Handycam Handbook" (PDF) "Operating Guide" (This manual) (1) See page 39 for "Memory Stick" media you may...

Operating Guide
Page 9
... changing the language setting The on-screen displays in each local language are from the actual images of the LCD screen. In this Operating Guide, the hard disk of the camcorder and "Memory Stick PRO Duo" media are called "recording media." In this Operating Guide, both "Memory Stick PRO Duo" media and "Memory Stick PRO-HG Duo" media are referred as a DVD-R using your computer. However, there may be some type of external media first, and then perform [MEDIA FORMAT] (p. 37). The LCD screen is...
... changing the language setting The on-screen displays in each local language are from the actual images of the LCD screen. In this Operating Guide, the hard disk of the camcorder and "Memory Stick PRO Duo" media are called "recording media." In this Operating Guide, both "Memory Stick PRO Duo" media and "Memory Stick PRO-HG Duo" media are referred as a DVD-R using your computer. However, there may be some type of external media first, and then perform [MEDIA FORMAT] (p. 37). The LCD screen is...

Operating Guide
Page 10
... settings, movies and photos are recorded on other media, from the internal hard disk. Deleting movies and photos (p. 37) You can free up recording space by connecting the dedicated DVD writer, DVDirect Express (sold separately) to your camcorder (p. 21) Playing movies and photos on a connected TV (p. 24) Saving movies and photos on a disc Saving movies and photos with a computer (p. 25) Creating a disc with a DVD writer or recorder (p. 31) Operating by the camcorder screen, you have saved on the internal hard disk. You can create a disc...
... settings, movies and photos are recorded on other media, from the internal hard disk. Deleting movies and photos (p. 37) You can free up recording space by connecting the dedicated DVD writer, DVDirect Express (sold separately) to your camcorder (p. 21) Playing movies and photos on a connected TV (p. 24) Saving movies and photos on a disc Saving movies and photos with a computer (p. 25) Creating a disc with a DVD writer or recorder (p. 31) Operating by the camcorder screen, you have saved on the internal hard disk. You can create a disc...

Operating Guide
Page 11
... contents IMPORTANT SAFETY INSTRUCTIONS 3 Read this before operating your camcorder 6 Operation flow 10 Getting started Step 1: Charging the battery pack 13 Charging the battery pack abroad 14 Step 2: Turning the power on, and setting the date and time 15 Changing the language setting 16 Recording Recording 17 Recording and playing movies and photos easily (Easy Handycam operation 20 Playback Playback on the camcorder 21 Playing images on a TV 24 Saving movies and photos with a computer Preparing a computer (Windows 25 When using a Macintosh 25 Creating a disc with...
... contents IMPORTANT SAFETY INSTRUCTIONS 3 Read this before operating your camcorder 6 Operation flow 10 Getting started Step 1: Charging the battery pack 13 Charging the battery pack abroad 14 Step 2: Turning the power on, and setting the date and time 15 Changing the language setting 16 Recording Recording 17 Recording and playing movies and photos easily (Easy Handycam operation 20 Playback Playback on the camcorder 21 Playing images on a TV 24 Saving movies and photos with a computer Preparing a computer (Windows 25 When using a Macintosh 25 Creating a disc with...

Operating Guide
Page 13
... (charge) lamp turns off your camcorder by closing the LCD screen. 2 Attach the battery pack by sliding it clicks. 3 Connect the AC Adaptor and the power cord (mains lead) to your camcorder. See page 52 on the DC plug is facing down. Getting started Step 1: Charging the battery pack CHG (charge) lamp ACCESS lamp (Hard disk) Getting started Battery pack DC plug DC IN jack AC Adaptor Power cord (Mains...
... (charge) lamp turns off your camcorder by closing the LCD screen. 2 Attach the battery pack by sliding it clicks. 3 Connect the AC Adaptor and the power cord (mains lead) to your camcorder. See page 52 on the DC plug is facing down. Getting started Step 1: Charging the battery pack CHG (charge) lamp ACCESS lamp (Hard disk) Getting started Battery pack DC plug DC IN jack AC Adaptor Power cord (Mains...

Operating Guide
Page 15
... date and time 1 Open the LCD screen of your camcorder when the LCD screen is not on the screen, touch / until the item appears. 3 Set [DST SET] or [SUMMERTIME], date and time, then touch . When an item is open, press POWER. POWER button (Movie): To record movies (Photo): To record photos 2 Select the desired geographical area with / , then touch [NEXT]. Your camcorder is turned on. To turn off the operation beeps by touching (HOME) (SETTINGS) [SOUND...
... date and time 1 Open the LCD screen of your camcorder when the LCD screen is not on the screen, touch / until the item appears. 3 Set [DST SET] or [SUMMERTIME], date and time, then touch . When an item is open, press POWER. POWER button (Movie): To record movies (Photo): To record photos 2 Select the desired geographical area with / , then touch [NEXT]. Your camcorder is turned on. To turn off the operation beeps by touching (HOME) (SETTINGS) [SOUND...

Operating Guide
Page 24
...). Playing images on your camcorder will not output audio. Connect your camcorder to the connected TV (wide/4:3) by using the supplied AC Adaptor for this operation (p. 14). Refer also to the instruction manuals supplied with the devices to be connected. A/V connecting cable (supplied) Connecting to another device via the A/V jack using the A/V connecting cable or an A/V connecting cable with an A/V connecting cable. Connect the white and red plugs (left/right audio) and the S VIDEO plug (S VIDEO channel) of a TV or VCR using an A/V connecting cable...
...). Playing images on your camcorder will not output audio. Connect your camcorder to the connected TV (wide/4:3) by using the supplied AC Adaptor for this operation (p. 14). Refer also to the instruction manuals supplied with the devices to be connected. A/V connecting cable (supplied) Connecting to another device via the A/V jack using the A/V connecting cable or an A/V connecting cable with an A/V connecting cable. Connect the white and red plugs (left/right audio) and the S VIDEO plug (S VIDEO channel) of a TV or VCR using an A/V connecting cable...

Operating Guide
Page 25
...-Speed USB (USB 2.0 compatible)), DVD burner (CD-ROM drive is necessary for OS should be necessary when creating DVD discs. To process photos using a Macintosh computer connected to your camcorder, see the following operations using "PMB (Picture Motion Browser)." Importing images to a computer Viewing and editing imported images Creating a disc Uploading movies and photos to websites To save movies and photos using a computer, install "PMB" from the supplied CD-ROM beforehand. Do not format the hard disk of your camcorder to...
...-Speed USB (USB 2.0 compatible)), DVD burner (CD-ROM drive is necessary for OS should be necessary when creating DVD discs. To process photos using a Macintosh computer connected to your camcorder, see the following operations using "PMB (Picture Motion Browser)." Importing images to a computer Viewing and editing imported images Creating a disc Uploading movies and photos to websites To save movies and photos using a computer, install "PMB" from the supplied CD-ROM beforehand. Do not format the hard disk of your camcorder to...

Operating Guide
Page 28
...) Movies and photos recorded on the camcorder screen. 2 Touch [ USB CONNECT] to import images from the internal hard disk, or [ USB CONNECT] to a computer automatically. Turn on the computer beforehand. Connect your camcorder to the wall outlet (wall socket) using the supplied AC Adaptor for this operation (p. 14). 1 Turn on your camcorder that have not yet been saved with Easy PC Back-up can be imported to import images from the "Memory Stick PRO Duo" media. The [Handycam Utility] window...
...) Movies and photos recorded on the camcorder screen. 2 Touch [ USB CONNECT] to import images from the internal hard disk, or [ USB CONNECT] to a computer automatically. Turn on the computer beforehand. Connect your camcorder to the wall outlet (wall socket) using the supplied AC Adaptor for this operation (p. 14). 1 Turn on your camcorder that have not yet been saved with Easy PC Back-up can be imported to import images from the "Memory Stick PRO Duo" media. The [Handycam Utility] window...

Operating Guide
Page 30
..., shut it as a photo file. Capturing photos from a movie and save a frame of a movie as another disc using "Video Disc Copier." Editing movies You can cut out only necessary parts from a movie You can copy a recorded disc to another file. On the movie playback window of "PMB," click to start the software. Click US 30 See "PMB Guide" on the operation (p. 29). The window used to select movies and photos appears. To add movies and photos to the previously...
..., shut it as a photo file. Capturing photos from a movie and save a frame of a movie as another disc using "Video Disc Copier." Editing movies You can cut out only necessary parts from a movie You can copy a recorded disc to another file. On the movie playback window of "PMB," click to start the software. Click US 30 See "PMB Guide" on the operation (p. 29). The window used to select movies and photos appears. To add movies and photos to the previously...

Operating Guide
Page 31
... the camcorder screen. Refer also to a disc when using battery power, the DVD writer does not work. 2 Insert an unused disc into the DVD writer, and close the disc tray. 3 Press (DISC BURN) on the DVD writer, and disconnect the USB cable. Saving images with a DVD writer, recorder Creating a disc with a DVD writer, recorder US 31 Operating by the camcorder screen, you can remove the disc. You can also play back these images on your camcorder with the DVD writer...
... the camcorder screen. Refer also to a disc when using battery power, the DVD writer does not work. 2 Insert an unused disc into the DVD writer, and close the disc tray. 3 Press (DISC BURN) on the DVD writer, and disconnect the USB cable. Saving images with a DVD writer, recorder Creating a disc with a DVD writer, recorder US 31 Operating by the camcorder screen, you can remove the disc. You can also play back these images on your camcorder with the DVD writer...

Operating Guide
Page 34
... the camcorder screen. 2 Touch [ USB CONNECT] when movies are recorded on the internal hard disk, or [ USB CONNECT] when movies are recorded on "Memory Stick PRO Duo" media on the camcorder screen. 5 Disconnect the USB cable. US 34 Refer also to the instruction manuals supplied with the device to be connected. 4 After the operation is completed, touch [END] [YES] on the camcorder screen. Creating a disc with a DVD writer, etc., other than DVDirect Express You can save movies on a disc by connecting your camcorder to a Sony DVD...
... the camcorder screen. 2 Touch [ USB CONNECT] when movies are recorded on the internal hard disk, or [ USB CONNECT] when movies are recorded on "Memory Stick PRO Duo" media on the camcorder screen. 5 Disconnect the USB cable. US 34 Refer also to the instruction manuals supplied with the device to be connected. 4 After the operation is completed, touch [END] [YES] on the camcorder screen. Creating a disc with a DVD writer, etc., other than DVDirect Express You can save movies on a disc by connecting your camcorder to a Sony DVD...

Operating Guide
Page 43
REMAINING SET........ FACE SET Sets to vertical ratio when recording movies. PHOTO SETTINGS IMAGE SIZE Sets the photo size. GUIDEFRAME Displays the frame to make sure the subject is recommended. LCD COLOR Adjusts the color intensity of the LCD screen. OUTPUT SETTINGS TV TYPE p. 24 DISP OUTPUT Sets whether the on-screen displays appear on and off when you open and close the LCD screen. CLOCK/ LANG CLOCK SET p. 15 AREA SET p. 15 DST SET/ SUMMERTIME p. 15 LANGUAGE SET......... AUDIO MODE Sets the sound format (5.1ch surround/2ch stereo). AUTO SLW...
REMAINING SET........ FACE SET Sets to vertical ratio when recording movies. PHOTO SETTINGS IMAGE SIZE Sets the photo size. GUIDEFRAME Displays the frame to make sure the subject is recommended. LCD COLOR Adjusts the color intensity of the LCD screen. OUTPUT SETTINGS TV TYPE p. 24 DISP OUTPUT Sets whether the on-screen displays appear on and off when you open and close the LCD screen. CLOCK/ LANG CLOCK SET p. 15 AREA SET p. 15 DST SET/ SUMMERTIME p. 15 LANGUAGE SET......... AUDIO MODE Sets the sound format (5.1ch surround/2ch stereo). AUTO SLW...

Operating Guide
Page 46
... camcorder, depending on the hard disk in order to troubleshoot the problem. Delete unnecessary images (p. 37). The total number of movie scenes or photos has exceeded the recordable capacity of data stored on the problem. This is recording the image you for a while in a cool/warm place. We will neither copy nor retain your camcorder is turned on the symptoms of your data. See the "Handycam Handbook" (p. 45) for repair...
... camcorder, depending on the hard disk in order to troubleshoot the problem. Delete unnecessary images (p. 37). The total number of movie scenes or photos has exceeded the recordable capacity of data stored on the problem. This is recording the image you for a while in a cool/warm place. We will neither copy nor retain your camcorder is turned on the symptoms of your data. See the "Handycam Handbook" (p. 45) for repair...

Operating Guide
Page 49
... use a soft cloth to record properly. Near AM receivers and video equipment. The camcorder may malfunction or become deformed. Near strong magnetic fields or mechanical vibration. Sometimes this malfunction cannot be repaired. Near windows or outdoors, where the LCD screen or the lens may have it checked by the plug and not the cord. Do not damage the power cord...
... use a soft cloth to record properly. Near AM receivers and video equipment. The camcorder may malfunction or become deformed. Near strong magnetic fields or mechanical vibration. Sometimes this malfunction cannot be repaired. Near windows or outdoors, where the LCD screen or the lens may have it checked by the plug and not the cord. Do not damage the power cord...

Operating Guide
Page 51
...V (AC Adaptor) Average power consumption: During camera recording, using LCD screen at normal brightness: DCR-SR47/SR48/SR67 Internal hard disc: 2.2 W "Memory Stick PRO Duo" media: 2.1 W DCR-SR87 Internal hard disc: 2.5 W "Memory Stick PRO Duo" media: 2.3 W Operating temperature: 0 C to 40 C (32 °F to 104 °F) US 51 Additional information Input/Output connectors A/V Remote Connector: Video/audio output jack USB jack: mini-AB LCD screen Picture: 6.7 cm (2.7 type, aspect ratio 16:9) Total number of which is set to [ON], shutter speed 1/30 second) DCR-SR87 8 lx (lux...
...V (AC Adaptor) Average power consumption: During camera recording, using LCD screen at normal brightness: DCR-SR47/SR48/SR67 Internal hard disc: 2.2 W "Memory Stick PRO Duo" media: 2.1 W DCR-SR87 Internal hard disc: 2.5 W "Memory Stick PRO Duo" media: 2.3 W Operating temperature: 0 C to 40 C (32 °F to 104 °F) US 51 Additional information Input/Output connectors A/V Remote Connector: Video/audio output jack USB jack: mini-AB LCD screen Picture: 6.7 cm (2.7 type, aspect ratio 16:9) Total number of which is set to [ON], shutter speed 1/30 second) DCR-SR87 8 lx (lux...

Operating Guide
Page 52
...-FH30*2 NP-FH50*3 Recording media "Memory "Memory Hard disk Stick PRO Duo" Hard disk Stick PRO Duo" media media Charging time (full charge) 115 135 Continuous recording time 90 95 130 140 Typical recording time 45 45 65 65 Playback time 105 120 170 195 *2 DCR-SR47/SR48/SR67 *3 DCR-SR87 The recordable time may vary depending on the recording and subject conditions, [REC MODE], and the type of movies in .) (w/h/d) excluding the projecting parts Mass (approx.): 170 g (6.0 oz) excluding the power cord (mains lead...
...-FH30*2 NP-FH50*3 Recording media "Memory "Memory Hard disk Stick PRO Duo" Hard disk Stick PRO Duo" media media Charging time (full charge) 115 135 Continuous recording time 90 95 130 140 Typical recording time 45 45 65 65 Playback time 105 120 170 195 *2 DCR-SR47/SR48/SR67 *3 DCR-SR87 The recordable time may vary depending on the recording and subject conditions, [REC MODE], and the type of movies in .) (w/h/d) excluding the projecting parts Mass (approx.): 170 g (6.0 oz) excluding the power cord (mains lead...

Operating Guide
Page 53
...; [MOVIE SETTINGS] [AUDIO MODE]. For DCR-SR47/SR48: Sound is recorded in 2ch stereo. The number in ( ) is the minimum recordable time. A Sony "Memory Stick PRO Duo" media is recommended) The recording and playback time will be shorter in minute 55 (50) 80 (50) 160 (105) 170 (110) ** DCR-SR67/SR87 For DCR-SR67/SR87: You can select the audio recording format of "Memory Stick" media used. On charging/recording/playback time Measured when using the camcorder...
...; [MOVIE SETTINGS] [AUDIO MODE]. For DCR-SR47/SR48: Sound is recorded in 2ch stereo. The number in ( ) is the minimum recordable time. A Sony "Memory Stick PRO Duo" media is recommended) The recording and playback time will be shorter in minute 55 (50) 80 (50) 160 (105) 170 (110) ** DCR-SR67/SR87 For DCR-SR67/SR87: You can select the audio recording format of "Memory Stick" media used. On charging/recording/playback time Measured when using the camcorder...

Operating Guide
Page 56
... zoom in or out. START/STOP button* (18) *DCR-SR48/SR67/SR87 Power zoom lever (18, 20) PHOTO button (20) CHG (charge) lamp (13) ACCESS lamp (Hard disk) (13) While the lamp is lit or flashing, the camcorder is reading or writing data. US 56 POWER button (15) DISP (display) button (22) EASY button (20) This is convenient during playback operations. (HOME) button* (41) Zoom buttons...
... zoom in or out. START/STOP button* (18) *DCR-SR48/SR67/SR87 Power zoom lever (18, 20) PHOTO button (20) CHG (charge) lamp (13) ACCESS lamp (Hard disk) (13) While the lamp is lit or flashing, the camcorder is reading or writing data. US 56 POWER button (15) DISP (display) button (22) EASY button (20) This is convenient during playback operations. (HOME) button* (41) Zoom buttons...

Operating Guide
Page 58
... "Memory Stick PRO Duo" media 39 Menus 41 Movies 17, 21 O One Touch Disc Burn 27 Operation beeps 15 Operation flow 10 OPTION MENU 41, 44 P Parts and controls 56 Photos 19, 22 Playback 21 PMB (Picture Motion Browser)....25, 29 PMB Guide 29 R Recording 17 Recording and playback time....52 Recording media 38 Repair 46 RESET 57 S Screen indicators 55 Self-diagnosis display 47 Setting the date and time...........15 Software 25 Specifications 51 Supplied items 8 T Tripod 38 Troubleshooting 46 Turning the power...
... "Memory Stick PRO Duo" media 39 Menus 41 Movies 17, 21 O One Touch Disc Burn 27 Operation beeps 15 Operation flow 10 OPTION MENU 41, 44 P Parts and controls 56 Photos 19, 22 Playback 21 PMB (Picture Motion Browser)....25, 29 PMB Guide 29 R Recording 17 Recording and playback time....52 Recording media 38 Repair 46 RESET 57 S Screen indicators 55 Self-diagnosis display 47 Setting the date and time...........15 Software 25 Specifications 51 Supplied items 8 T Tripod 38 Troubleshooting 46 Turning the power...


