
Operating Instructions
Page 1
Model No. DCR-TRV520 DCR-TRV520/TRV525 ©2000 Sony Corporation Refer to these numbers whenever you call upon your Sony dealer regarding this manual thoroughly, and retain it for future reference. AC- Serial No. Serial No. DCR-TRV Model No. 3-059-561-11 (2) Digital Video Camera Recorder Operating Instructions Before operating the unit, please read this product. Owner's Record The model and serial numbers are located on the bottom. Record the serial number in the space provided below.
Model No. DCR-TRV520 DCR-TRV520/TRV525 ©2000 Sony Corporation Refer to these numbers whenever you call upon your Sony dealer regarding this manual thoroughly, and retain it for future reference. AC- Serial No. Serial No. DCR-TRV Model No. 3-059-561-11 (2) Digital Video Camera Recorder Operating Instructions Before operating the unit, please read this product. Owner's Record The model and serial numbers are located on the bottom. Record the serial number in the space provided below.
Operating Instructions
Page 8
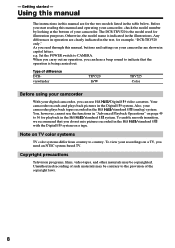
... recording of such materials may be contrary to the provision of your digital camcorder, you can use the functions in "Advanced Playback Operations" on TV... video cassettes. Getting started - The DCR-TRV520 is indicated in the Hi8 /standard 8 (analog) system. Using this manual The instructions in this manual and operating your camcorder plays...CAMERA. Type of difference DCRviewfinder TRV520 B/W TRV525 Color Before using your camcorder With your camcorder. To enable smooth transition, we recommend that the operation is being carried out. Also, your camcorder...
... recording of such materials may be contrary to the provision of your digital camcorder, you can use the functions in "Advanced Playback Operations" on TV... video cassettes. Getting started - The DCR-TRV520 is indicated in the Hi8 /standard 8 (analog) system. Using this manual The instructions in this manual and operating your camcorder plays...CAMERA. Type of difference DCRviewfinder TRV520 B/W TRV525 Color Before using your camcorder With your camcorder. To enable smooth transition, we recommend that the operation is being carried out. Also, your camcorder...

Operating Instructions
Page 24
... the power source and insert the recorded tape. (2) Set the POWER switch to the camcorder body with your camcorder is silent when the LCD panel is closed. 2 VTR 4 REW OFF CAMERA MEMORY 5 PLAY VOLUME 6 3 1 To stop playback Press x. Playback - Playing back a tape You can ...control playback using the Remote Commander supplied with the LCD screen facing out. 24 The video control buttons ...
... the power source and insert the recorded tape. (2) Set the POWER switch to the camcorder body with your camcorder is silent when the LCD panel is closed. 2 VTR 4 REW OFF CAMERA MEMORY 5 PLAY VOLUME 6 3 1 To stop playback Press x. Playback - Playing back a tape You can ...control playback using the Remote Commander supplied with the LCD screen facing out. 24 The video control buttons ...

Operating Instructions
Page 29
... viewfinder is set or in the SP mode. while the digital effect function is recorded for about seven seconds, and your camcorder returns to the standby mode. Advanced Recording Operations - Advanced ...This mode is then recorded for 60 minutes in use tape photo recording function using a video printer (not supplied). You can record about 510 images in the SP mode and about... image, do not shake your camcorder can record a still image like a photograph. while the fader function is in the Remote Commander. The sound during normal CAMERA recording You cannot check an image...
... viewfinder is set or in the SP mode. while the digital effect function is recorded for about seven seconds, and your camcorder returns to the standby mode. Advanced Recording Operations - Advanced ...This mode is then recorded for 60 minutes in use tape photo recording function using a video printer (not supplied). You can record about 510 images in the SP mode and about... image, do not shake your camcorder can record a still image like a photograph. while the fader function is in the Remote Commander. The sound during normal CAMERA recording You cannot check an image...

Operating Instructions
Page 69
... when using the super laser link function To switch the video input on the LCD screen or in the viewfinder and you have set the POWER switch to ON, the "NIGHTSHOT" indicator appears on a Sony TV when using the super laser link function (p. 28) - Changing ...demonstration appear To cancel the demonstration mode POWER switch CAMERA MEMORY VTR CAMERA MEMORY VTR CAMERA MEMORY VTR CAMERA MEMORY CAMERA Notes on DEMO MODE •You cannot select DEMO MODE when a cassette is set to CAMERA without a cassette inserted. Customizing Your Camcorder 69 To display selected menu items in normal ...
... when using the super laser link function To switch the video input on the LCD screen or in the viewfinder and you have set the POWER switch to ON, the "NIGHTSHOT" indicator appears on a Sony TV when using the super laser link function (p. 28) - Changing ...demonstration appear To cancel the demonstration mode POWER switch CAMERA MEMORY VTR CAMERA MEMORY VTR CAMERA MEMORY VTR CAMERA MEMORY CAMERA Notes on DEMO MODE •You cannot select DEMO MODE when a cassette is set to CAMERA without a cassette inserted. Customizing Your Camcorder 69 To display selected menu items in normal ...

Operating Instructions
Page 92
..."Memory Stick"s and record them to playback pause mode. (3) Press z REC and the button on its right simultaneously on your camcorder. (1) Set the POWER switch to VTR. (2) Using the video control buttons, search a point where you want to copy (p. 89). (5) Press X to start recording and press X again ...to stop. (6) If you want to copy, repeat steps 4 and 5. 2 4 1 PLAY VTR 3 REC 5 PAUSE OFF (CHARGE) MEMORY CAMERA To stop copying in the middle...
..."Memory Stick"s and record them to playback pause mode. (3) Press z REC and the button on its right simultaneously on your camcorder. (1) Set the POWER switch to VTR. (2) Using the video control buttons, search a point where you want to copy (p. 89). (5) Press X to start recording and press X again ...to stop. (6) If you want to copy, repeat steps 4 and 5. 2 4 1 PLAY VTR 3 REC 5 PAUSE OFF (CHARGE) MEMORY CAMERA To stop copying in the middle...

Operating Instructions
Page 102
...before the tape is a trademark. Your camcorder does not record copyright control signals on other VCRs (including other video camera recorder, you cannnot record on Hi8 (...on the LCD screen, in the Hi8 /standard 8 system, digital signals are output as the image signals from Hi8 /standard 8 ...video cassette. * The recording time when you use standard 8 tape, be sure to play back the tape on this camcorder. is the "Digital8 system"? During switching of tapes recorded in the viewfinder or on the TV screen if you use your camcorder. 102 When you play back Using any other DCR-TRV520...
...before the tape is a trademark. Your camcorder does not record copyright control signals on other VCRs (including other video camera recorder, you cannnot record on Hi8 (...on the LCD screen, in the Hi8 /standard 8 system, digital signals are output as the image signals from Hi8 /standard 8 ...video cassette. * The recording time when you use standard 8 tape, be sure to play back the tape on this camcorder. is the "Digital8 system"? During switching of tapes recorded in the viewfinder or on the TV screen if you use your camcorder. 102 When you play back Using any other DCR-TRV520...

Operating Instructions
Page 109
... not appear on the LCD screen or in the viewfinder. c Clean the heads using the Sony V8-25CLD cleaning cassette (not supplied). (p. 118) No sound or only a low sound is...Information In the playback mode Symptom Cause and/or Corrective Actions The tape does not move when a video control button is pressed. • The POWER switch is activated. A horizontal black band appears ...low lux or Super NightShot mode is set to CAMERA, MEMORY or OFF (CHARGE). c Set it to OFF in the menu settings without a cassette inserted, your camcorder automatically starts the demonstration. c Set it to ...
... not appear on the LCD screen or in the viewfinder. c Clean the heads using the Sony V8-25CLD cleaning cassette (not supplied). (p. 118) No sound or only a low sound is...Information In the playback mode Symptom Cause and/or Corrective Actions The tape does not move when a video control button is pressed. • The POWER switch is activated. A horizontal black band appears ...low lux or Super NightShot mode is set to CAMERA, MEMORY or OFF (CHARGE). c Set it to OFF in the menu settings without a cassette inserted, your camcorder automatically starts the demonstration. c Set it to ...
Operating Instructions
Page 122
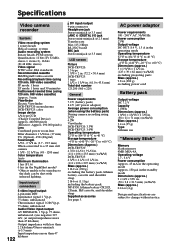
...unbalanced Audio/Video input/output AV MINIJACK, 1 Vp-p, 75 ohms, unbalanced, sync negative 327 mV, (at output impedance more than 47 kilohms) Output impedance with infrared lighting. Viewfinder Electric Viewfinder DCR-TRV520: monochrome DCR-TRV525: color... Image device 1/4 type CCD (Charge Coupled Device) Approx. 460,000 pixels (Effective: Approx. 290,000 pixels) Lens Combined power zoom lens Filter diameter 1 7/16 in. (37 mm) 25× (Optical), 450× (Digital) Focal length 5/32 - 2 7/8 in. (3.7 - 92.5 mm) When converted to a 35 mm still camera...
...unbalanced Audio/Video input/output AV MINIJACK, 1 Vp-p, 75 ohms, unbalanced, sync negative 327 mV, (at output impedance more than 47 kilohms) Output impedance with infrared lighting. Viewfinder Electric Viewfinder DCR-TRV520: monochrome DCR-TRV525: color... Image device 1/4 type CCD (Charge Coupled Device) Approx. 460,000 pixels (Effective: Approx. 290,000 pixels) Lens Combined power zoom lens Filter diameter 1 7/16 in. (37 mm) 25× (Optical), 450× (Digital) Focal length 5/32 - 2 7/8 in. (3.7 - 92.5 mm) When converted to a 35 mm still camera...

Operating Instructions
Page 124
...ql qf w; The super laser link system sends and receives pictures and sound between video equipment having the super laser link mark by using infrared rays. 124 wa Remote sensor... EDITSEARCH buttons (p. 23) qa S.LASER LINK button (p. 28) qs Focus ring (p. 43) qd Microphone qf Camera recording lamp (p. 16) qg Infrared rays emitter (p. 20, 28) qh SUPER NIGHTSHOT button (p. 20) qj ...NIGHTSHOT switch (p. 20) qk Display window (p. 129) ql FOCUS switch (p. 43) w; qg wa 9 Video control buttons (p. 24, 26) x STOP (stop) m REW (rewind) N PLAY (playback) M FF (fastforward) X PAUSE ...
...ql qf w; The super laser link system sends and receives pictures and sound between video equipment having the super laser link mark by using infrared rays. 124 wa Remote sensor... EDITSEARCH buttons (p. 23) qa S.LASER LINK button (p. 28) qs Focus ring (p. 43) qd Microphone qf Camera recording lamp (p. 16) qg Infrared rays emitter (p. 20, 28) qh SUPER NIGHTSHOT button (p. 20) qj ...NIGHTSHOT switch (p. 20) qk Display window (p. 129) ql FOCUS switch (p. 43) w; qg wa 9 Video control buttons (p. 24, 26) x STOP (stop) m REW (rewind) N PLAY (playback) M FF (fastforward) X PAUSE ...
Operating Instructions
Page 131
... 27, 31, 57, 86 BACK LIGHT 20 Battery pack 10 BEEP 70 BOUNCE 33 C, D Camera chromakey 82 Charging battery 11 Clock set 71 Connection (viewing on TV 27 (dubbing a tape 57... Connection to your PC .......... 59 Data code 25 Date search 53 DEMO 69 DIGITAL EFFECT 37, 50 Digital 8 system 102 DIGITAL I/O 127 DISPLAY 25 DOT 33 Dual sound track tape .......... 103 Dubbing a tape 57 ... Stereo tape 103 STILL 37 Sub sound 66 SUPER LASER LINK ..... 28, 124 SUPER NIGHTSHOT 21 S video jack 27 T, U, V Tape counter 19 Tape photo recording 29 Telephote 18 Time code 19 Title 44...
... 27, 31, 57, 86 BACK LIGHT 20 Battery pack 10 BEEP 70 BOUNCE 33 C, D Camera chromakey 82 Charging battery 11 Clock set 71 Connection (viewing on TV 27 (dubbing a tape 57... Connection to your PC .......... 59 Data code 25 Date search 53 DEMO 69 DIGITAL EFFECT 37, 50 Digital 8 system 102 DIGITAL I/O 127 DISPLAY 25 DOT 33 Dual sound track tape .......... 103 Dubbing a tape 57 ... Stereo tape 103 STILL 37 Sub sound 66 SUPER LASER LINK ..... 28, 124 SUPER NIGHTSHOT 21 S video jack 27 T, U, V Tape counter 19 Tape photo recording 29 Telephote 18 Time code 19 Title 44...


