
Operating Instructions
Page 1
Serial No. DHC-MD515 ©1997 by Sony Corporation Record the serial number in the space provided below. Model No. Refer to them whenever you call upon your Sony dealer regarding this product. 3-861-229-13(1) Mini Hi-Fi Component System Operating Instructions Owner's Record The model and serial numbers are located on the rear panel of the unit.
Serial No. DHC-MD515 ©1997 by Sony Corporation Record the serial number in the space provided below. Model No. Refer to them whenever you call upon your Sony dealer regarding this product. 3-861-229-13(1) Mini Hi-Fi Component System Operating Instructions Owner's Record The model and serial numbers are located on the rear panel of the unit.
Operating Instructions
Page 2
... the user to which can radiate radio frequency energy and, if not installed and used in accordance with the limits for proper grounding and, in particular, specifies that the cable ground shall be connected to the grounding system of optical instruments with this equipment does cause harmful interference to radio or television reception, which the receiver is provided to call CATV system installer...
... the user to which can radiate radio frequency energy and, if not installed and used in accordance with the limits for proper grounding and, in particular, specifies that the cable ground shall be connected to the grounding system of optical instruments with this equipment does cause harmful interference to radio or television reception, which the receiver is provided to call CATV system installer...
Operating Instructions
Page 3
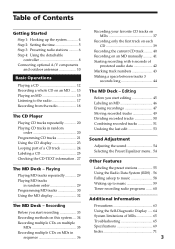
... 51 Undoing the last edit 53 Sound Adjustment Adjusting the sound 54 Selecting the Preset Equalizer menu . 54 Other Features Labeling the preset stations 55 Using the Radio Data System (RDS) . 56 Falling asleep to music 58 Waking up the system 4 Step 2: Setting the time 5 Step 3: Presetting radio stations .......... 6 Step 4: Using the detachable controller 8 Connecting optional A/V components and outdoor antennas 10 Basic Operations Playing a CD 12 Recording a whole CD on an MD manually .......... 41 Starting recording with 6 seconds...
... 51 Undoing the last edit 53 Sound Adjustment Adjusting the sound 54 Selecting the Preset Equalizer menu . 54 Other Features Labeling the preset stations 55 Using the Radio Data System (RDS) . 56 Falling asleep to music 58 Waking up the system 4 Step 2: Setting the time 5 Step 3: Presetting radio stations .......... 6 Step 4: Using the detachable controller 8 Connecting optional A/V components and outdoor antennas 10 Basic Operations Playing a CD 12 Recording a whole CD on an MD manually .......... 41 Starting recording with 6 seconds...

Operating Instructions
Page 4
... antenna horizontally. Right speaker FM antenna AM loop antenna Left speaker DHC-MD515 rear panel 1 Connect the speakers. Keep the speaker cords away from the antennas to SPEAKER terminals of the same color. Getting Started Step 1: Hooking up the system Follow steps 1 and 2 to hook up the AM loop antenna, then connect it. Solid (') RL + + _ _ Stripe (') Insert this portion. 4 2 Connect the FM/AM antennas. Connect the speaker cords to prevent noise. Set up your system using the supplied cords...
... antenna horizontally. Right speaker FM antenna AM loop antenna Left speaker DHC-MD515 rear panel 1 Connect the speakers. Keep the speaker cords away from the antennas to SPEAKER terminals of the same color. Getting Started Step 1: Hooking up the system Follow steps 1 and 2 to hook up the AM loop antenna, then connect it. Solid (') RL + + _ _ Stripe (') Insert this portion. 4 2 Connect the FM/AM antennas. Connect the speaker cords to prevent noise. Set up your system using the supplied cords...
Operating Instructions
Page 7
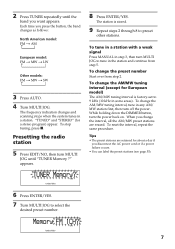
... AUTO. 4 Turn MULTI JOG. The frequency indication changes and scanning stops when the system tunes in some areas). appears. The station is factory-set to select the desired preset number. To change the preset number Start over from step 5. To stop tuning, press p. AUTO TUNED STEREO 8 Press ENTER/YES. To reset the interval, repeat the same procedure. Memory FM 1CH? To tune in a station with a weak signal Press MANUAL in step 3, then turn the power back on. AUTO TUNED STEREO 7 "TUNED...
... AUTO. 4 Turn MULTI JOG. The frequency indication changes and scanning stops when the system tunes in some areas). appears. The station is factory-set to select the desired preset number. To change the preset number Start over from step 5. To stop tuning, press p. AUTO TUNED STEREO 8 Press ENTER/YES. To reset the interval, repeat the same procedure. Memory FM 1CH? To tune in a station with a weak signal Press MANUAL in step 3, then turn the power back on. AUTO TUNED STEREO 7 "TUNED...
Operating Instructions
Page 10
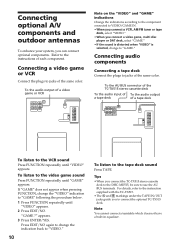
... the instructions of each component. Refer to the video game sound Press FUNCTION repeatedly until "VIDEO" appears. "GAME ?" Note You cannot connect a turntable which does not have a built-in equalizer. Tips • When you can connect optional components. Connecting audio components Connecting a tape deck Connect the plugs to use the AU BUS terminals. Connecting optional A/V components and outdoor antennas To enhance your system, you connect the TC-TX515 stereo cassette deck to the DHC-MD515, be sure to jacks...
... the instructions of each component. Refer to the video game sound Press FUNCTION repeatedly until "VIDEO" appears. "GAME ?" Note You cannot connect a turntable which does not have a built-in equalizer. Tips • When you can connect optional components. Connecting audio components Connecting a tape deck Connect the plugs to use the AU BUS terminals. Connecting optional A/V components and outdoor antennas To enhance your system, you connect the TC-TX515 stereo cassette deck to the DHC-MD515, be sure to jacks...
Operating Instructions
Page 17
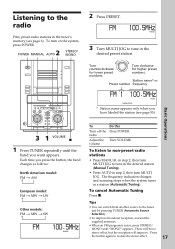
... Source Selection). • To improve broadcast reception, reorient the supplied antennas. • When an FM program is noisy, press STEREO/ MONO until the band you press the button, the band changes as follows: North American model: FM n AM European model: FM n MW n LW Other models: FM n MW n SW FM 1OO.5MHz MANUAL To Turn off the radio Adjust the volume Do this Press POWER. Station name* or Preset number frequency...
... Source Selection). • To improve broadcast reception, reorient the supplied antennas. • When an FM program is noisy, press STEREO/ MONO until the band you press the button, the band changes as follows: North American model: FM n AM European model: FM n MW n LW Other models: FM n MW n SW FM 1OO.5MHz MANUAL To Turn off the radio Adjust the volume Do this Press POWER. Station name* or Preset number frequency...
Operating Instructions
Page 18
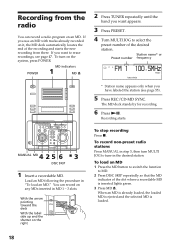
... an MD." POWER MD indicators 1 MD 6 2 Press TUNER repeatedly until the band you want appears. 3 Press PRESET. 4 Turn MULTI JOG to tune in MD 1 - 3 slots. Recording from there. To load an MD 1 Press the MD button to switch the function to erase recordings, see page 55). 5 Press REC/CD-MD SYNC. If you want to MD. 2 Press DISC SKIP repeatedly so...
... an MD." POWER MD indicators 1 MD 6 2 Press TUNER repeatedly until the band you want appears. 3 Press PRESET. 4 Turn MULTI JOG to tune in MD 1 - 3 slots. Recording from there. To load an MD 1 Press the MD button to switch the function to erase recordings, see page 55). 5 Press REC/CD-MD SYNC. If you want to MD. 2 Press DISC SKIP repeatedly so...
Operating Instructions
Page 21
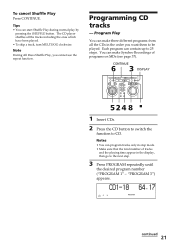
... 6 3 DISPLAY TAPE 524 8 p 1 Insert CDs. 2 Press the CD button to switch the function to be played. To cancel Shuffle Play Press CONTINUE. "PROGRAM 3") appears. The CD player shuffles all the CDs in the display, then go to 25 steps. Program Play You can make Synchro Recordings of tracks and the playing time appear in the order you cannot use the repeat function. Note During All Discs Shuffle Play...
... 6 3 DISPLAY TAPE 524 8 p 1 Insert CDs. 2 Press the CD button to switch the function to be played. To cancel Shuffle Play Press CONTINUE. "PROGRAM 3") appears. The CD player shuffles all the CDs in the display, then go to 25 steps. Program Play You can make Synchro Recordings of tracks and the playing time appear in the order you cannot use the repeat function. Note During All Discs Shuffle Play...
Operating Instructions
Page 33
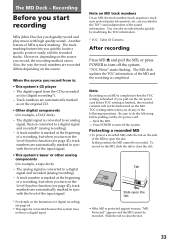
... AC power cord. - The analog signal is (digital recording1)). - Note Recording on the original CD. • Other digital components (for example, a tape deck) - In this system does not have a digital input. When the source you turn on the Level Synchro function (see page 64. 2) This signal is track marking. Track numbers are automatically marked as it is converted to close the slot. 33 "TOC Write" starts flashing. If you turn...
... AC power cord. - The analog signal is (digital recording1)). - Note Recording on the original CD. • Other digital components (for example, a tape deck) - In this system does not have a digital input. When the source you turn on the Level Synchro function (see page 64. 2) This signal is track marking. Track numbers are automatically marked as it is converted to close the slot. 33 "TOC Write" starts flashing. If you turn...
Operating Instructions
Page 39
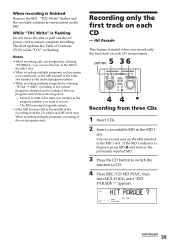
... MD 1 indicator is useful when you want to CD. 4 Press REC/CD-MD SYNC, then turn MULTI JOG until "HIT PARADE ?" appears. 1 HIT PARADE ? Hit Parade This feature is lit green, press MD 6 and remove the previously inserted MD. 3 Press the CD button to switch the function to record. - ALL DISCS 1 2 3 SYNC LEVEL-SYNC continued 39 "TOC Write" flashes and the recorded...
... MD 1 indicator is useful when you want to CD. 4 Press REC/CD-MD SYNC, then turn MULTI JOG until "HIT PARADE ?" appears. 1 HIT PARADE ? Hit Parade This feature is lit green, press MD 6 and remove the previously inserted MD. 3 Press the CD button to switch the function to record. - ALL DISCS 1 2 3 SYNC LEVEL-SYNC continued 39 "TOC Write" flashes and the recorded...
Operating Instructions
Page 43
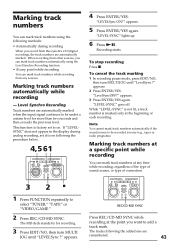
... the beginning of connection. 3 2p 1 Press FUNCTION repeatedly to select "TUNER," "TAPE" or "VIDEO/GAME." 2 Press REC/CD-MD SYNC. appears. 5 Press ENTER/YES again. appears. 2 Press ENTER/YES. Level Synchro Recording Track numbers are automatically marked when the input signal continues to be recorded is noisy (e.g., tapes or radio programs). This function is marked only at the point you record from any time while recording...
... the beginning of connection. 3 2p 1 Press FUNCTION repeatedly to select "TUNER," "TAPE" or "VIDEO/GAME." 2 Press REC/CD-MD SYNC. appears. 5 Press ENTER/YES again. appears. 2 Press ENTER/YES. Level Synchro Recording Track numbers are automatically marked when the input signal continues to be recorded is noisy (e.g., tapes or radio programs). This function is marked only at the point you record from any time while recording...
Operating Instructions
Page 56
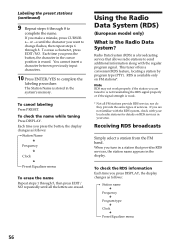
... you press the button, the display changes as follows: n Station name µ Frequency µ Program type µ Clock µ Preset Equalizer menu 56 Each time you want to change flashes, then repeat steps 6 through 8 to complete the labeling procedure. The Station Name is the Radio Data System? Using the Radio Data System (RDS) (European model only) What is stored in your area. Receiving RDS broadcasts Simply select a station from the FM band...
... you press the button, the display changes as follows: n Station name µ Frequency µ Program type µ Clock µ Preset Equalizer menu 56 Each time you want to change flashes, then repeat steps 6 through 8 to complete the labeling procedure. The Station Name is the Radio Data System? Using the Radio Data System (RDS) (European model only) What is stored in your area. Receiving RDS broadcasts Simply select a station from the FM band...
Operating Instructions
Page 59
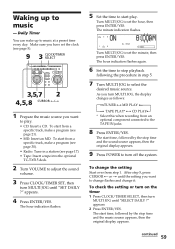
... a specific track, make a program (see page 30). • Radio: Tune in step 5. 7 Turn MULTI JOG to adjust the sound volume. 3 Press CLOCK/TIMER SET, then turn MULTI JOG, the display changes as follows: nTUNER ˜ MD PLAY N n TAPE PLAY* ˜ CD PLAYN * Select this when recording from step 1. As you want to the TAPE IN jacks. 8 Press ENTER/YES. continued 59 The start time, followed by the stop time and the music source appears...
... a specific track, make a program (see page 30). • Radio: Tune in step 5. 7 Turn MULTI JOG to adjust the sound volume. 3 Press CLOCK/TIMER SET, then turn MULTI JOG, the display changes as follows: nTUNER ˜ MD PLAY N n TAPE PLAY* ˜ CD PLAYN * Select this when recording from step 1. As you want to the TAPE IN jacks. 8 Press ENTER/YES. continued 59 The start time, followed by the stop time and the music source appears...
Operating Instructions
Page 60
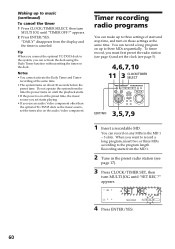
.../TIMER SELECT TAPE EDIT/NO 3,5,7,9 1 Insert a recordable MD. PRESET TUNED STEREO REC 4 Press ENTER/YES. 60 You can make up to three settings of start and stop time, and turn on any MDs in the preset radio station (see page 17). 3 Press CLOCK/TIMER SET, then turn MULTI JOG until "TIMER OFF ?" Timer recording radio programs You can record on those settings at the preset time, the music source you set starts playing...
.../TIMER SELECT TAPE EDIT/NO 3,5,7,9 1 Insert a recordable MD. PRESET TUNED STEREO REC 4 Press ENTER/YES. 60 You can make up to three settings of start and stop time, and turn on any MDs in the preset radio station (see page 17). 3 Press CLOCK/TIMER SET, then turn MULTI JOG until "TIMER OFF ?" Timer recording radio programs You can record on those settings at the preset time, the music source you set starts playing...

Operating Instructions
Page 63
.... •Do not expose the CD to direct sunlight or heat sources such as it is connected to direct sunlight. • The system has a radiator at a qualified service shop. To disconnect the AC power cord, pull it may damage the player. • Do not use a CD with tape, seals, or paste on some TV sets becomes magnetically distorted. Subject to the wall...
.... •Do not expose the CD to direct sunlight or heat sources such as it is connected to direct sunlight. • The system has a radiator at a qualified service shop. To disconnect the AC power cord, pull it may damage the player. • Do not use a CD with tape, seals, or paste on some TV sets becomes magnetically distorted. Subject to the wall...

Operating Instructions
Page 65
... system. Troubleshooting If you don't mind erasing all the recorded contents of the display. Should any problem persist, consult your nearest Sony dealer. 1 MD1 C11 ALL DISCS 2 PRESET Protected C11/MD Protected The MD is protected against erasure. Insert the plugs firmly. There is scratched./The MD does not meet the standards. The display is connected firmly and the speakers are connected. •Connect the cords and cables...
... system. Troubleshooting If you don't mind erasing all the recorded contents of the display. Should any problem persist, consult your nearest Sony dealer. 1 MD1 C11 ALL DISCS 2 PRESET Protected C11/MD Protected The MD is protected against erasure. Insert the plugs firmly. There is scratched./The MD does not meet the standards. The display is connected firmly and the speakers are connected. •Connect the cords and cables...
Operating Instructions
Page 66
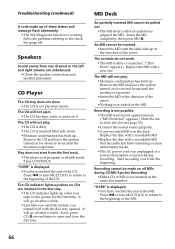
...;Check the speaker connections and speaker placement. Replace the disc with a recordable MD. •Replace the disc with a new one channel or the left and right volume are inserted in the same disc number. Solve the problem referring to close the disc tray. Play does not start from the first track. •The player is in the direction of the arrow. •Nothing is displayed. •You...
...;Check the speaker connections and speaker placement. Replace the disc with a recordable MD. •Replace the disc with a new one channel or the left and right volume are inserted in the same disc number. Solve the problem referring to close the disc tray. Play does not start from the first track. •The player is in the direction of the arrow. •Nothing is displayed. •You...

Operating Instructions
Page 69
... models: DIN Power output (Rated) 30 + 30 watts (60 ohms at 1 kHz, DIN, 120/240 V) Continuous RMS power output (Reference) 40 + 40 watts (6 ohms at 1 kHz, 10% THD) Peak music power output (Reference) 700 watts Inputs VIDEO/GAME IN (phono jacks) (switchable) GAME IN: voltage 450 mV, impedance 47 kilohms VIDEO IN: voltage 250 mV, impedance 47 kilohms TAPE IN (phono jacks): voltage 250 mV, impedance 47 kilohms Outputs TAPE OUT (phono jacks): voltage 250 mV impedance 1 kilohm PHONES (stereo mini jack...
... models: DIN Power output (Rated) 30 + 30 watts (60 ohms at 1 kHz, DIN, 120/240 V) Continuous RMS power output (Reference) 40 + 40 watts (6 ohms at 1 kHz, 10% THD) Peak music power output (Reference) 700 watts Inputs VIDEO/GAME IN (phono jacks) (switchable) GAME IN: voltage 450 mV, impedance 47 kilohms VIDEO IN: voltage 250 mV, impedance 47 kilohms TAPE IN (phono jacks): voltage 250 mV, impedance 47 kilohms Outputs TAPE OUT (phono jacks): voltage 250 mV impedance 1 kilohm PHONES (stereo mini jack...
Operating Instructions
Page 71
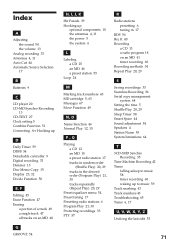
... 55 System limitations 64 T 3CD-3MD Synchro Recording 35 Time Machine Recording 42 Timer falling asleep to music 58 timer recording 60 waking up to music 59 Track marking 43 Track numbers 43 Troubleshooting 65 Tuner 6, 17 U, V, W, X, Y, Z Undoing the last edit 53 71 Index A Adjusting the sound 54 the volume 13 Analog recording 33 Antennas 4, 11 Auto Cut 44 Automatic Source Selection 17 B Batteries 9 C CD player...
... 55 System limitations 64 T 3CD-3MD Synchro Recording 35 Time Machine Recording 42 Timer falling asleep to music 58 timer recording 60 waking up to music 59 Track marking 43 Track numbers 43 Troubleshooting 65 Tuner 6, 17 U, V, W, X, Y, Z Undoing the last edit 53 71 Index A Adjusting the sound 54 the volume 13 Analog recording 33 Antennas 4, 11 Auto Cut 44 Automatic Source Selection 17 B Batteries 9 C CD player...


