

Primary User Manual
Page 1
Model No. 4-229-182-11(1) Mini Hi-Fi Component System Operating Instructions Owner's Record The model and serial numbers are located at the rear of the unit. DHC-MD595 ©2000 Sony Corporation Record these numbers in the spaces provided below. Serial No. Refer to them whenever you call upon your Sony dealer regarding this product.
Model No. 4-229-182-11(1) Mini Hi-Fi Component System Operating Instructions Owner's Record The model and serial numbers are located at the rear of the unit. DHC-MD595 ©2000 Sony Corporation Record these numbers in the spaces provided below. Serial No. Refer to them whenever you call upon your Sony dealer regarding this product.
Primary User Manual
Page 2
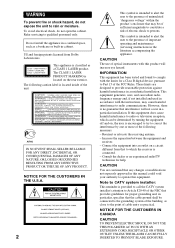
... to try to Part 15 of cable entry as close to which can radiate radio frequency energy and, if not installed and used in accordance with the instructions, may be of sufficient magnitude to constitute a risk of the unit. IN NO EVENT SHALL SELLER BE LIABLE FOR ANY DIRECT, INCIDENTAL OR CONSEQUENTIAL DAMAGES OF ANY NATURE, OR LOSSES OR...
... to try to Part 15 of cable entry as close to which can radiate radio frequency energy and, if not installed and used in accordance with the instructions, may be of sufficient magnitude to constitute a risk of the unit. IN NO EVENT SHALL SELLER BE LIABLE FOR ANY DIRECT, INCIDENTAL OR CONSEQUENTIAL DAMAGES OF ANY NATURE, OR LOSSES OR...
Primary User Manual
Page 3
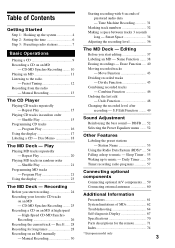
... MDs 62 Troubleshooting 64 Self-diagnosis Display 67 Specifications 70 Parts descriptions for long times 28 Recording on an MD at high speed - Name Function ....... 38 Erasing recordings - DBFB ..... 52 Selecting the Preset Equalizer menu ....... 52 Other Features Labeling the preset stations - Preset Tuning 12 Recording from the radio - Play Playing MD tracks repeatedly - Repeat Play 20 Playing MD tracks in random order - Program Play 21 Using the display 23 The MD Deck - Time Machine...
... MDs 62 Troubleshooting 64 Self-diagnosis Display 67 Specifications 70 Parts descriptions for long times 28 Recording on an MD at high speed - Name Function ....... 38 Erasing recordings - DBFB ..... 52 Selecting the Preset Equalizer menu ....... 52 Other Features Labeling the preset stations - Preset Tuning 12 Recording from the radio - Play Playing MD tracks repeatedly - Repeat Play 20 Playing MD tracks in random order - Program Play 21 Using the display 23 The MD Deck - Time Machine...

Primary User Manual
Page 8
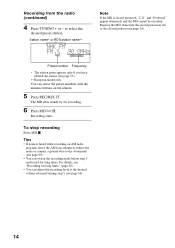
... 6 and 7 while the preset number is factory-set to preset other stations. To reset the interval, repeat the same procedure. Press the button again to tune in any AM station first, then turn the system back on the remote. 5 Press - There will be no stereo effect, but the reception will improve. or + on the remote. Step 3: Presetting radio stations (continued) 1 Press TUNER/BAND to select the desired preset number. 7 Press ENTER/YES.
... 6 and 7 while the preset number is factory-set to preset other stations. To reset the interval, repeat the same procedure. Press the button again to tune in any AM station first, then turn the system back on the remote. 5 Press - There will be no stereo effect, but the reception will improve. or + on the remote. Step 3: Presetting radio stations (continued) 1 Press TUNER/BAND to select the desired preset number. 7 Press ENTER/YES.
Primary User Manual
Page 12
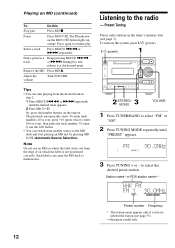
... start playing an MD just by pressing MD HS (Automatic Source Selection). To enter 0, use an MD on which the label sticks out from the edge or on the system, press ?/1 (power). ?/1 (power) 1 2 3 STEREO/ MONO VOLUME 1 Press TUNER/BAND to select "FM" or "AM". 2 Press TUNING MODE repeatedly until the desired track appears. 2 Press MD HS. Select a track Press MD/CD .m or M> repeatedly. Adjust the volume Turn VOLUME...
... start playing an MD just by pressing MD HS (Automatic Source Selection). To enter 0, use an MD on which the label sticks out from the edge or on the system, press ?/1 (power). ?/1 (power) 1 2 3 STEREO/ MONO VOLUME 1 Press TUNER/BAND to select "FM" or "AM". 2 Press TUNING MODE repeatedly until the desired track appears. 2 Press MD HS. Select a track Press MD/CD .m or M> repeatedly. Adjust the volume Turn VOLUME...
Primary User Manual
Page 13
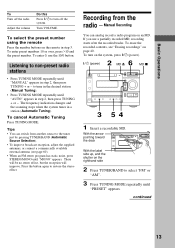
... tracks. The frequency indication changes and the scanning stops when the system tunes in the desired station (Manual Tuning). • Press TUNING MODE repeatedly until "MONO" appears. Listening to turn on an MD. Manual Recording You can switch from the radio - Basic Operations To Turn off the system. If you use the 10/0 button. To turn off the radio Adjust the volume Do this Press ?/1 to non-preset radio stations • Press TUNING MODE repeatedly until "MANUAL" appears...
... tracks. The frequency indication changes and the scanning stops when the system tunes in the desired station (Manual Tuning). • Press TUNING MODE repeatedly until "MONO" appears. Listening to turn on an MD. Manual Recording You can switch from the radio - Basic Operations To Turn off the system. If you use the 10/0 button. To turn off the radio Adjust the volume Do this Press ?/1 to non-preset radio stations • Press TUNING MODE repeatedly until "MANUAL" appears...
Primary User Manual
Page 14
... can adjust the recording level to the closed position (see page 36). 14 Station name* or RDS station name** Note If the MD is heard while recording an AM radio program, move the AM loop antenna to reduce the noise or connect a ground wire to select the desired preset station. Remove the MD, then slide the record protection tab to the desired volume after...
... can adjust the recording level to the closed position (see page 36). 14 Station name* or RDS station name** Note If the MD is heard while recording an AM radio program, move the AM loop antenna to reduce the noise or connect a ground wire to select the desired preset station. Remove the MD, then slide the record protection tab to the desired volume after...

Primary User Manual
Page 24
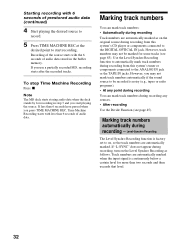
... the record protection tab to the TAPE IN jacks or ANALOG IN jack (e.g., the optional tape deck TC-TX595) - The MD deck performs digital recording.*1 - Recording Before you start and end point information, etc., are marked differently depending on the source you digitally record and play music with the level of digital recording, see page 63). • Other digital components connected to ensure a complete recording. Track numbers are automatically...
... the record protection tab to the TAPE IN jacks or ANALOG IN jack (e.g., the optional tape deck TC-TX595) - The MD deck performs digital recording.*1 - Recording Before you start and end point information, etc., are marked differently depending on the source you digitally record and play music with the level of digital recording, see page 63). • Other digital components connected to ensure a complete recording. Track numbers are automatically...

Primary User Manual
Page 26
.../ SELECT on the remote, and then press ENTER/YES on the remote to record the title of the current track. "HIGH SPEED" appears and "HIGH" lights up or flashes during CD-MD Synchro Recording: - The Auto Cut function - The recording level specified in the Setup menu Labeling titles during recording If "TEXT" lights up in the order you programmed, press PLAY MODE repeatedly until "PROGRAM...
.../ SELECT on the remote, and then press ENTER/YES on the remote to record the title of the current track. "HIGH SPEED" appears and "HIGH" lights up or flashes during CD-MD Synchro Recording: - The Auto Cut function - The recording level specified in the Setup menu Labeling titles during recording If "TEXT" lights up in the order you programmed, press PLAY MODE repeatedly until "PROGRAM...
Primary User Manual
Page 32
... ANALOG IN jack or the TAPE IN jacks. To stop Time Machine Recording Press x. However, track numbers may not mark track numbers automatically if the sound source to start playing the source. If "L-SYNC" does not appear during recording from this system's CD player or components connected to on the Level Synchro Recording as follows. Track numbers are automatically marked. Level-Synchro Recording The Level Synchro Recording function is factory set to the DIGITAL OPTICAL...
... ANALOG IN jack or the TAPE IN jacks. To stop Time Machine Recording Press x. However, track numbers may not mark track numbers automatically if the sound source to start playing the source. If "L-SYNC" does not appear during recording from this system's CD player or components connected to on the Level Synchro Recording as follows. Track numbers are automatically marked. Level-Synchro Recording The Level Synchro Recording function is factory set to the DIGITAL OPTICAL...
Primary User Manual
Page 55
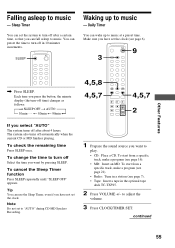
... Sleep Timer function Press SLEEP repeatedly until "SLEEP OFF" appears. You can set the clock (see page 7). • Tape: Insert a tape in a station (see page 6). 9 3 Other Features , Press SLEEP. To start from a specific track, make a program (see page 21). • Radio: Tune in the optional tape deck TC-TX595. 2 Press VOLUME +/- Sleep Timer You can preset the time to turn -off Select the time you select "AUTO" The system turns off...
... Sleep Timer function Press SLEEP repeatedly until "SLEEP OFF" appears. You can set the clock (see page 7). • Tape: Insert a tape in a station (see page 6). 9 3 Other Features , Press SLEEP. To start from a specific track, make a program (see page 21). • Radio: Tune in the optional tape deck TC-TX595. 2 Press VOLUME +/- Sleep Timer You can preset the time to turn -off Select the time you select "AUTO" The system turns off...
Primary User Manual
Page 56
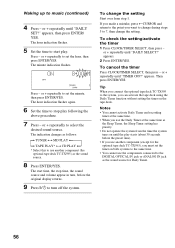
...: t TUNER y MD PLAY T t TAPE PLAY* y CD PLAY T * Select this to use another component (except for Daily Timer. 56 To change the setting. If you made a mistake, press TCURSOR and return to the DIGITAL OPTICAL IN jack or ANALOG IN jack as the sound source. 8 Press ENTER/YES. To check the setting/activate the timer 1 Press CLOCK/TIMER SELECT, then press - or + repeatedly until "DAILY SET?" The hour indication flashes. 5 Set the time to select...
...: t TUNER y MD PLAY T t TAPE PLAY* y CD PLAY T * Select this to use another component (except for Daily Timer. 56 To change the setting. If you made a mistake, press TCURSOR and return to the DIGITAL OPTICAL IN jack or ANALOG IN jack as the sound source. 8 Press ENTER/YES. To check the setting/activate the timer 1 Press CLOCK/TIMER SELECT, then press - or + repeatedly until "DAILY SET?" The hour indication flashes. 5 Set the time to select...
Primary User Manual
Page 58
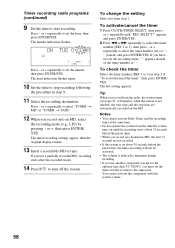
.... The hour indication flashes again. 10 Set the time to stop time are not recorded. • If the system is on about 30 seconds before the preset time, the timer-recording will not be activated. • The volume is reduced to minimum during recording. • If you use another component (except for the optional tape deck TC-TX595), you use a partially recorded MD...
.... The hour indication flashes again. 10 Set the time to stop time are not recorded. • If the system is on about 30 seconds before the preset time, the timer-recording will not be activated. • The volume is reduced to minimum during recording. • If you use another component (except for the optional tape deck TC-TX595), you use a partially recorded MD...

Primary User Manual
Page 61
... used near the speaker system, such as audio racks, TV stands, and toys. Extremely hot or cold - Dusty or dirty - On operation • If the system is brought directly from the TV set once, and after 15 to 30 minutes turn off , the system begins charging for about an hour until the moisture evaporates. • When you connect the power cord to be changed...
... used near the speaker system, such as audio racks, TV stands, and toys. Extremely hot or cold - Dusty or dirty - On operation • If the system is brought directly from the TV set once, and after 15 to 30 minutes turn off , the system begins charging for about an hour until the moisture evaporates. • When you connect the power cord to be changed...
Primary User Manual
Page 64
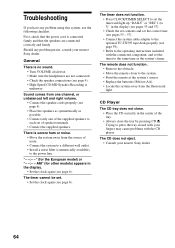
... correct time (see pages 55 - 57). • Connect the system cable adapter to the operating instructions included with the CD player. Sound comes from one channel, or unbalanced left and right volume. • Connect the speaker cords properly (see page 59). • Refer to the optional TC-TX595 tape deck properly (see page 4). • Place the speakers as symmetrically as the system's timer. The timer does not function...
... correct time (see pages 55 - 57). • Connect the system cable adapter to the operating instructions included with the CD player. Sound comes from one channel, or unbalanced left and right volume. • Connect the speaker cords properly (see page 59). • Refer to the optional TC-TX595 tape deck properly (see page 4). • Place the speakers as symmetrically as the system's timer. The timer does not function...
Primary User Manual
Page 66
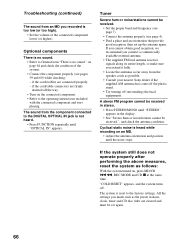
... hum or noise/stations cannot be set up the antenna again. Troubleshooting (continued) The sound from an MD you made such as the preset stations, clock, timer and CD disc titles are cleared and must be received.", and check the antenna condition. The system is reset to the DIGITAL OPTICAL IN jack is too low (or too high). • Set the volume of the system. • Connect the component properly (see...
... hum or noise/stations cannot be set up the antenna again. Troubleshooting (continued) The sound from an MD you made such as the preset stations, clock, timer and CD disc titles are cleared and must be received.", and check the antenna condition. The system is reset to the DIGITAL OPTICAL IN jack is too low (or too high). • Set the volume of the system. • Connect the component properly (see...
Primary User Manual
Page 67
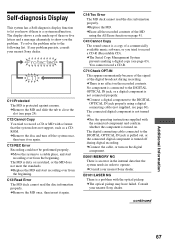
... display function to record a CD-R (Recordable CD). cMove the system to the DIGITAL OPTICAL IN jack, or a digital component is a system malfunction. cConsult your nearest Sony dealer. If any problem persists, consult your nearest Sony dealer. No component is an error in order to the DIGITAL OPTICAL IN jack properly using the All Erase function on the digital component. The connected digital component is turned on . E0101/LASER NG There is protected against erasure. The display shows a code...
... display function to record a CD-R (Recordable CD). cMove the system to the DIGITAL OPTICAL IN jack, or a digital component is a system malfunction. cConsult your nearest Sony dealer. If any problem persists, consult your nearest Sony dealer. No component is an error in order to the DIGITAL OPTICAL IN jack properly using the All Erase function on the digital component. The connected digital component is turned on . E0101/LASER NG There is protected against erasure. The display shows a code...
Primary User Manual
Page 72
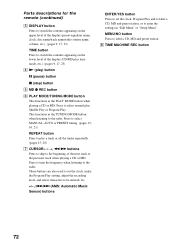
... select normal play a track or all the tracks repeatedly. (pages 15, 20) 7 CURSORT/t, m/M buttons Press to skip to enter the settings in "Edit Menu" or "Setup Menu". Press to the radio. This functions as the PLAY MODE button when playing a CD or MD. Parts descriptions for the remote (continued) 3 DISPLAY button Press to switch the contents appearing on the upper level of the display (preset equalizer name, clock, disc name/track name/radio station name, volume...
... select normal play a track or all the tracks repeatedly. (pages 15, 20) 7 CURSORT/t, m/M buttons Press to skip to enter the settings in "Edit Menu" or "Setup Menu". Press to the radio. This functions as the PLAY MODE button when playing a CD or MD. Parts descriptions for the remote (continued) 3 DISPLAY button Press to switch the contents appearing on the upper level of the display (preset equalizer name, clock, disc name/track name/radio station name, volume...
Primary User Manual
Page 73
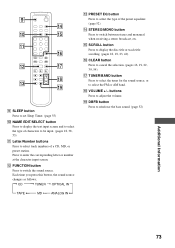
t CD t TUNER t OPTICAL IN TAPE T MD T ANALOG IN T qd PRESET EQ button Press to select the type of the preset equalizer. (page 52) qf STEREO/MONO button Press to adjust the volume. buttons Press to switch between stereo and monaural when receiving a stereo broadcast, etc. Each time you press this button, the sound source changes as follows; ql DBFB button Press to select the FM or AM band. qg SCROLL button Press to display the disc title or track...
t CD t TUNER t OPTICAL IN TAPE T MD T ANALOG IN T qd PRESET EQ button Press to select the type of the preset equalizer. (page 52) qf STEREO/MONO button Press to adjust the volume. buttons Press to switch between stereo and monaural when receiving a stereo broadcast, etc. Each time you press this button, the sound source changes as follows; ql DBFB button Press to select the FM or AM band. qg SCROLL button Press to display the disc title or track...
Primary User Manual
Page 74
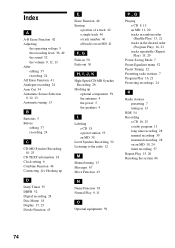
... MD 11, 20 tracks in random order (Shuffle Play) 15, 21 tracks in the desired order (Program Play) 16, 21 tracks repeatedly (Repeat Play) 15, 20 Power Saving Mode 7 Preset Equalizer menu 52 Preset Tuning 12 Presetting radio stations 7 Program Play 16, 21 Protecting recordings 24 R Radio stations presetting 7 tuning in 13 RDS 54 Recording a CD 10, 25 a radio program 13 long time recording 28 manual recording 30 monaural recording 28 on an MD 10...
... MD 11, 20 tracks in random order (Shuffle Play) 15, 21 tracks in the desired order (Program Play) 16, 21 tracks repeatedly (Repeat Play) 15, 20 Power Saving Mode 7 Preset Equalizer menu 52 Preset Tuning 12 Presetting radio stations 7 Program Play 16, 21 Protecting recordings 24 R Radio stations presetting 7 tuning in 13 RDS 54 Recording a CD 10, 25 a radio program 13 long time recording 28 manual recording 30 monaural recording 28 on an MD 10...


