
Primary User Manual
Page 2
... appliance. Do not install the appliance in a confined space, such as a CLASS 1 LASER product. If this equipment. Note to CATV system installer: This reminder is intended to alert the user to radio communications. WARNING To prevent fire or shock hazard, do not open the cabinet... grounding and, in particular, specifies that to which can radiate radio frequency energy and, if not installed and used in this manual could void your authority to operate this equipment does cause harmful interference to radio or television reception, which the receiver is intended ...
... appliance. Do not install the appliance in a confined space, such as a CLASS 1 LASER product. If this equipment. Note to CATV system installer: This reminder is intended to alert the user to radio communications. WARNING To prevent fire or shock hazard, do not open the cabinet... grounding and, in particular, specifies that to which can radiate radio frequency energy and, if not installed and used in this manual could void your authority to operate this equipment does cause harmful interference to radio or television reception, which the receiver is intended ...
Primary User Manual
Page 3
...repeatedly - Daily Timer ....... 55 Timer recording radio programs 57 Connecting optional components Connecting optional A/V components .... 59 Connecting external antennas 60 Additional Information Precautions 61 System limitations of MDs 62 Troubleshooting 64 Self-diagnosis Display 67 Specifications 70 ...Parts descriptions for long times 28 Recording on an MD at high speed - Manual Recording...
...repeatedly - Daily Timer ....... 55 Timer recording radio programs 57 Connecting optional components Connecting optional A/V components .... 59 Connecting external antennas 60 Additional Information Precautions 61 System limitations of MDs 62 Troubleshooting 64 Self-diagnosis Display 67 Specifications 70 ...Parts descriptions for long times 28 Recording on an MD at high speed - Manual Recording...

Primary User Manual
Page 8
...FM program has static noise, press STEREO/MONO until "MANUAL" appears in any AM station first, then turn the system back on the remote. 5 Press - The frequency indication changes and the scanning stops when the system tunes in the station manually. "TUNED" and "STEREO" (for the European model...3 Press TUNING + or -. There will be no stereo effect, but the reception will improve. While holding down the FUNCTION, turn off the system. The preset number starts flashing. Tips • The preset stations are erased. or + on the remote. To change the preset number Start ...
...FM program has static noise, press STEREO/MONO until "MANUAL" appears in any AM station first, then turn the system back on the remote. 5 Press - The frequency indication changes and the scanning stops when the system tunes in the station manually. "TUNED" and "STEREO" (for the European model...3 Press TUNING + or -. There will be no stereo effect, but the reception will improve. While holding down the FUNCTION, turn off the system. The preset number starts flashing. Tips • The preset stations are erased. or + on the remote. To change the preset number Start ...
Primary User Manual
Page 13
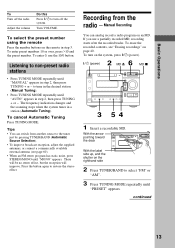
... shutter on the remote in step 2, then press TUNING + or -. To turn off the radio Adjust the volume Do this Press ?/1 to turn on the system, press ?/1 (power). 2 6 ?/1 (power) MD Z MD x 3 54 1 Insert a recordable MD. continued 13 To enter 0, use a partially recorded MD, recording starts after the... side 2 Press TUNER/BAND to restore the stereo effect. There will be no stereo effect, but the reception will improve. Turn VOLUME. Manual Recording You can switch from the radio - To enter preset numbers 10 or over, press >10 and the preset number. Listening to tune...
... shutter on the remote in step 2, then press TUNING + or -. To turn off the radio Adjust the volume Do this Press ?/1 to turn on the system, press ?/1 (power). 2 6 ?/1 (power) MD Z MD x 3 54 1 Insert a recordable MD. continued 13 To enter 0, use a partially recorded MD, recording starts after the... side 2 Press TUNER/BAND to restore the stereo effect. There will be no stereo effect, but the reception will improve. Turn VOLUME. Manual Recording You can switch from the radio - To enter preset numbers 10 or over, press >10 and the preset number. Listening to tune...

Primary User Manual
Page 26
..." appears and "HIGH" lights up or flashes during recording, you have not made a program, see page 24). • The following items are automatically recorded. • Manually during recording When "TEXT" flashes, press NAME EDIT/ SELECT on the remote, and then press ENTER/YES on an MD (continued) Notes • If the...
..." appears and "HIGH" lights up or flashes during recording, you have not made a program, see page 24). • The following items are automatically recorded. • Manually during recording When "TEXT" flashes, press NAME EDIT/ SELECT on the remote, and then press ENTER/YES on an MD (continued) Notes • If the...

Primary User Manual
Page 30
Manual Recording If you use a partially recorded MD, recording starts after performing step 3 (see page 36). • You can check the remaining recordable time on the MD during recording from this system's CD player, the track numbers are automatically marked. Recording starts. 5 Start playing the desired source (CD, ...during recording by for recording. 4 Press MD HS. Recording on the remote. The MD deck stands by pressing TIME on an MD manually - If you pause recording during recording to mark the track numbers at that the tracks might be recorded as the same single track...
Manual Recording If you use a partially recorded MD, recording starts after performing step 3 (see page 36). • You can check the remaining recordable time on the MD during recording from this system's CD player, the track numbers are automatically marked. Recording starts. 5 Start playing the desired source (CD, ...during recording by for recording. 4 Press MD HS. Recording on the remote. The MD deck stands by pressing TIME on an MD manually - If you pause recording during recording to mark the track numbers at that the tracks might be recorded as the same single track...
Primary User Manual
Page 72
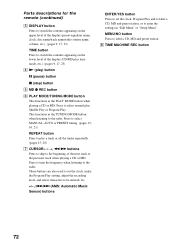
... x (stop) button 5 MD z REC button 6 PLAY MODE/TUNING MODE button This functions as the TUNING MODE button when listening to the radio. Press to select MANUAL, AUTO or PRESET tuning. (pages 15, 16, 21) REPEAT button Press to play a track or all the tracks repeatedly. (pages 15, 20) 7 CURSORT/t, m/M buttons Press...
... x (stop) button 5 MD z REC button 6 PLAY MODE/TUNING MODE button This functions as the TUNING MODE button when listening to the radio. Press to select MANUAL, AUTO or PRESET tuning. (pages 15, 16, 21) REPEAT button Press to play a track or all the tracks repeatedly. (pages 15, 20) 7 CURSORT/t, m/M buttons Press...
Primary User Manual
Page 74
... a track number 46 all tracks on an MD 41 F, G Fade-in 50 Fade-out 50 H, I, J, K High-Speed CD-MD Synchro Recording 26 Hooking up optional components 59 the antennas 4 the power 5 the speakers 4 L Labeling a CD 18 a preset station 53 an MD 38 Level Synchro Recording 32 Listening to the radio 12... 7 tuning in 13 RDS 54 Recording a CD 10, 25 a radio program 13 long time recording 28 manual recording 30 monaural recording 28 on an MD 10, 24 timer recording 57 Repeat Play 15, 20 Resetting the system 66 74 Index A A-B Erase Function 42 Adjusting the operating voltage 5 the recording level 36, 49...
... a track number 46 all tracks on an MD 41 F, G Fade-in 50 Fade-out 50 H, I, J, K High-Speed CD-MD Synchro Recording 26 Hooking up optional components 59 the antennas 4 the power 5 the speakers 4 L Labeling a CD 18 a preset station 53 an MD 38 Level Synchro Recording 32 Listening to the radio 12... 7 tuning in 13 RDS 54 Recording a CD 10, 25 a radio program 13 long time recording 28 manual recording 30 monaural recording 28 on an MD 10, 24 timer recording 57 Repeat Play 15, 20 Resetting the system 66 74 Index A A-B Erase Function 42 Adjusting the operating voltage 5 the recording level 36, 49...

