
Primary User Manual
Page 3
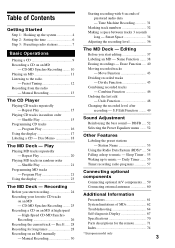
...13 The CD Player Playing CD tracks repeatedly - Disc Memo 18 The MD Deck - Rec It ..... 28 Recording for the remote 71 Index 74 * European model only 3 Manual Recording 30 Starting recording with 6 seconds of MDs 62 Troubleshooting 64 Self-diagnosis... an MD at high speed - Daily Timer ....... 55 Timer recording radio programs 57 Connecting optional components Connecting optional A/V components .... 59 Connecting external antennas 60 Additional Information Precautions 61 System limitations of prestored audio data - Smart Space 34 Adjusting the recording level 36 The MD Deck ...
...13 The CD Player Playing CD tracks repeatedly - Disc Memo 18 The MD Deck - Rec It ..... 28 Recording for the remote 71 Index 74 * European model only 3 Manual Recording 30 Starting recording with 6 seconds of MDs 62 Troubleshooting 64 Self-diagnosis... an MD at high speed - Daily Timer ....... 55 Timer recording radio programs 57 Connecting optional components Connecting optional A/V components .... 59 Connecting external antennas 60 Additional Information Precautions 61 System limitations of prestored audio data - Smart Space 34 Adjusting the recording level 36 The MD Deck ...
Primary User Manual
Page 5
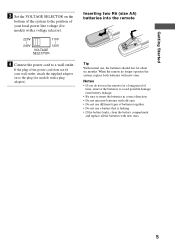
When the remote no longer operates the system, replace both batteries with old ones. • Do not use different types of batteries together. • Do not use the remote for about six months. Notes • If you do not use a battery that is leaking. • If the battery leaks, clean...of your wall outlet, attach the supplied adaptor on to the plug (for models with a plug adaptor). Inserting two R6 (size AA) batteries into the remote e E E e Tip With normal use, the batteries should last for a long period of time, remove the batteries to avoid possible damage from battery ...
When the remote no longer operates the system, replace both batteries with old ones. • Do not use different types of batteries together. • Do not use the remote for about six months. Notes • If you do not use a battery that is leaking. • If the battery leaks, clean...of your wall outlet, attach the supplied adaptor on to the plug (for models with a plug adaptor). Inserting two R6 (size AA) batteries into the remote e E E e Tip With normal use, the batteries should last for a long period of time, remove the batteries to avoid possible damage from battery ...

Primary User Manual
Page 8
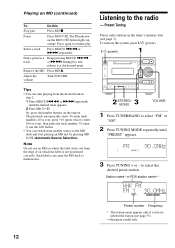
The frequency indication changes and the scanning stops when the system tunes in any AM station first, then turn the system back on the remote. or + on the remote. 5 Press - The preset number starts flashing. To change the AM tuning interval (except for the European model) The AM tuning ... on . While holding down the FUNCTION, turn off the system. To tune in a station with a weak signal Press TUNING MODE repeatedly until "AUTO" appears. 3 Press TUNING + or -. "Complete!" To stop scanning Press TUNING MODE on the remote repeatedly to select "FM" or "AM". 2 Press TUNING...
The frequency indication changes and the scanning stops when the system tunes in any AM station first, then turn the system back on the remote. or + on the remote. 5 Press - The preset number starts flashing. To change the AM tuning interval (except for the European model) The AM tuning ... on . While holding down the FUNCTION, turn off the system. To tune in a station with a weak signal Press TUNING MODE repeatedly until "AUTO" appears. 3 Press TUNING + or -. "Complete!" To stop scanning Press TUNING MODE on the remote repeatedly to select "FM" or "AM". 2 Press TUNING...

Primary User Manual
Page 9
... tape, seals or paste on the inner circle of the CD. With the label side up. Adjust the volume Turn VOLUME. The H indicator on the remote. Remove the CD Press CD Z. Press CD Z to close the disc tray. • If you switch the function to close the disc tray, press CD... Z again. 2 Press CD HS. To turn on the system, press ?/1 (power). ?/1 (power) MD/CD .m/M> VOLUME FUNCTION 1 2 CD x 1 Press CD Z and place a CD on the CD HS button lights orange. Pause Press CD HS. "-OVER...
... tape, seals or paste on the inner circle of the CD. With the label side up. Adjust the volume Turn VOLUME. The H indicator on the remote. Remove the CD Press CD Z. Press CD Z to close the disc tray. • If you switch the function to close the disc tray, press CD... Z again. 2 Press CD HS. To turn on the system, press ?/1 (power). ?/1 (power) MD/CD .m/M> VOLUME FUNCTION 1 2 CD x 1 Press CD Z and place a CD on the CD HS button lights orange. Pause Press CD HS. "-OVER...

Primary User Manual
Page 11
... slide the record protection tab to the closed position (see page 24). • If "Retry" flashes in the display, a reading failure has occurred, and the system is trying to record the title of the current track. (If "TEXT" is lit, it is automatically recorded.) • You can play at step 4. •... on the disc, CD TEXT information may also be recorded. If "TEXT" flashes during recording, press NAME EDIT/SELECT on the remote, and then press ENTER/YES on the remote to read the data again (see "Recording for long times. With the arrow pointing toward the deck With the label side up...
... slide the record protection tab to the closed position (see page 24). • If "Retry" flashes in the display, a reading failure has occurred, and the system is trying to record the title of the current track. (If "TEXT" is lit, it is automatically recorded.) • You can play at step 4. •... on the disc, CD TEXT information may also be recorded. If "TEXT" flashes during recording, press NAME EDIT/SELECT on the remote, and then press ENTER/YES on the remote to read the data again (see "Recording for long times. With the arrow pointing toward the deck With the label side up...
Primary User Manual
Page 12
... not use the 10/0 button. • You can switch from another source to the MD deck and start playing from the edge or on the system, press ?/1 (power). ?/1 (power) 1 2 3 STEREO/ MONO VOLUME 1 Press TUNER/BAND to the radio - To turn on which the label is not positioned correctly. Press again to... playing an MD just by pressing MD HS (Automatic Source Selection). to enter 100 or over), then press the track number. The S indicator on the remote. Tips • You can cause the MD deck to resume play and release it at the desired point. To enter track numbers 10 or over...
... not use the 10/0 button. • You can switch from another source to the MD deck and start playing from the edge or on the system, press ?/1 (power). ?/1 (power) 1 2 3 STEREO/ MONO VOLUME 1 Press TUNER/BAND to the radio - To turn on which the label is not positioned correctly. Press again to... playing an MD just by pressing MD HS (Automatic Source Selection). to enter 100 or over), then press the track number. The S indicator on the remote. Tips • You can cause the MD deck to resume play and release it at the desired point. To enter track numbers 10 or over...
Primary User Manual
Page 13
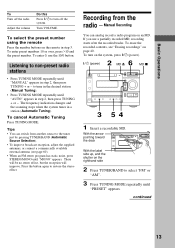
...the 10/0 button. With the arrow pointing toward the deck With the label side up, and the shutter on the remote in a station (Automatic Tuning). To select the preset number using the remote Press the number buttons on the righthand side 2 Press TUNER/BAND to select "FM" or "AM". 3 Press... TUNING MODE repeatedly until "MONO" appears. The frequency indication changes and the scanning stops when the system tunes in step 3. There will be no ...
...the 10/0 button. With the arrow pointing toward the deck With the label side up, and the shutter on the remote in a station (Automatic Tuning). To select the preset number using the remote Press the number buttons on the righthand side 2 Press TUNER/BAND to select "FM" or "AM". 3 Press... TUNING MODE repeatedly until "MONO" appears. The frequency indication changes and the scanning stops when the system tunes in step 3. There will be no ...
Primary User Manual
Page 14
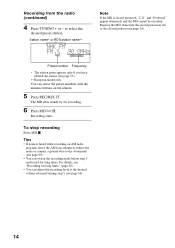
..., then slide the record protection tab to the U terminal (see page 60). • You can select the preset numbers with the numeric buttons on the remote. 5 Press REC/REC IT. Recording starts. You can switch the recording mode before step 5 and record for long times. For details, see page 36). 14...
..., then slide the record protection tab to the U terminal (see page 60). • You can select the preset numbers with the numeric buttons on the remote. 5 Press REC/REC IT. Recording starts. You can switch the recording mode before step 5 and record for long times. For details, see page 36). 14...
Primary User Manual
Page 18
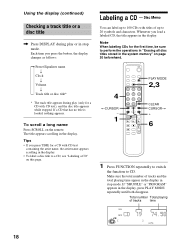
... track title appears during play (only for the first time, be sure to perform the operations in "Erasing all disc titles stored in the system memory" on the remote. Tips • If you press TIME for a CD with CD text), and the disc title appears while stopped. Note When labeling CDs for...
... track title appears during play (only for the first time, be sure to perform the operations in "Erasing all disc titles stored in the system memory" on the remote. Tips • If you press TIME for a CD with CD text), and the disc title appears while stopped. Note When labeling CDs for...

Primary User Manual
Page 23
... check the disc title or a track title of tracks and total playing time Y Remaining recordable time* on the MD * The remaining recordable time on the remote.
... check the disc title or a track title of tracks and total playing time Y Remaining recordable time* on the MD * The remaining recordable time on the remote.

Primary User Manual
Page 25
.... 8 Press MD HS. If the MD becomes full during recording, the MD deck and the CD player automatically stop recording Press MD x. Recording on the remote. The CD player and the MD deck stop mode. 3 Press MD/CD .mor M> repeatedly until "PROGRAM" appears in the programmed sequence.
.... 8 Press MD HS. If the MD becomes full during recording, the MD deck and the CD player automatically stop recording Press MD x. Recording on the remote. The CD player and the MD deck stop mode. 3 Press MD/CD .mor M> repeatedly until "PROGRAM" appears in the programmed sequence.

Primary User Manual
Page 26
... 24). • The following items are automatically recorded. • Manually during recording When "TEXT" flashes, press NAME EDIT/ SELECT on the remote, and then press ENTER/YES on the remote to record the title of the current track. To record tracks in the order you programmed, press PLAY MODE repeatedly until "PROGRAM...
... 24). • The following items are automatically recorded. • Manually during recording When "TEXT" flashes, press NAME EDIT/ SELECT on the remote, and then press ENTER/YES on the remote to record the title of the current track. To record tracks in the order you programmed, press PLAY MODE repeatedly until "PROGRAM...
Primary User Manual
Page 29
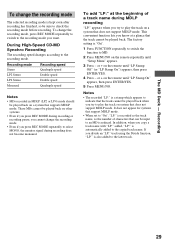
... if you press REC MODE during recording does not become monaural. Recording 29 These MDs cannot be played back. or + on a system that the track cannot be played back on the remote until "LP Stamp Off" (or "LP Stamp On") appears, then press ENTER/YES. 4 Press - In addition, when you copy a ..."LP:" track using the Divide function, "LP:" is reduced. The MD Deck - or + on the remote until "LP Stamp On" appears, then press ENTER/YES. 5 Press MENU/NO. If you try to play the track on system that can be sure to check the recording mode before recording. It does not appear...
... if you press REC MODE during recording does not become monaural. Recording 29 These MDs cannot be played back. or + on a system that the track cannot be played back on the remote until "LP Stamp Off" (or "LP Stamp On") appears, then press ENTER/YES. 4 Press - In addition, when you copy a ..."LP:" track using the Divide function, "LP:" is reduced. The MD Deck - or + on the remote until "LP Stamp On" appears, then press ENTER/YES. 5 Press MENU/NO. If you try to play the track on system that can be sure to check the recording mode before recording. It does not appear...

Primary User Manual
Page 30
... when the same single track of the same CD is recorded at the desired point. Manual Recording If you pause recording during recording from this system's CD player, the track numbers are automatically marked. Press REC/REC IT during recording by for recording. 4 Press MD HS. Tips • You can adjust... page 32. To stop recording Press MD x. Note If you use a partially recorded MD, recording starts after performing step 3 (see "Marking track numbers" on the remote.
... when the same single track of the same CD is recorded at the desired point. Manual Recording If you pause recording during recording from this system's CD player, the track numbers are automatically marked. Press REC/REC IT during recording by for recording. 4 Press MD HS. Tips • You can adjust... page 32. To stop recording Press MD x. Note If you use a partially recorded MD, recording starts after performing step 3 (see "Marking track numbers" on the remote.

Primary User Manual
Page 53
...BAND to select "FM" or "AM". 2 Press TUNING MODE repeatedly until the desired preset station to label appears. 5 Press NAME EDIT/SELECT on the remote. or + repeatedly. 2 Press CURSORt. The text input screen appears, and the cursor flashes. Each time you tune in the display, press - Or,...or + repeatedly to display the following symbols In addition, when the symbols above appear in the station. 4 Press NAME EDIT/SELECT on the remote repeatedly to the right. The number is entered and the cursor shifts to select the desired type of character. continued 53 If you 've...
...BAND to select "FM" or "AM". 2 Press TUNING MODE repeatedly until the desired preset station to label appears. 5 Press NAME EDIT/SELECT on the remote. or + repeatedly. 2 Press CURSORt. The text input screen appears, and the cursor flashes. Each time you tune in the display, press - Or,...or + repeatedly to display the following symbols In addition, when the symbols above appear in the station. 4 Press NAME EDIT/SELECT on the remote repeatedly to the right. The number is entered and the cursor shifts to select the desired type of character. continued 53 If you 've...

Primary User Manual
Page 61
...locate the speaker system further away from the wall outlet (mains) if it any questions or problems concerning your system, please consult your nearest Sony dealer. If... not disconnected from a cold to direct sunlight. Place the system in direct sunlight. continued Connecting optional components/ Additional Information 61 On safety • The unit is ...remote and timer functions. Should this is off the power of the TV set . Remove the CD or MD and leave the system turned on top of the system. • Place the system in a location with the voltage of your system...
...locate the speaker system further away from the wall outlet (mains) if it any questions or problems concerning your system, please consult your nearest Sony dealer. If... not disconnected from a cold to direct sunlight. Place the system in direct sunlight. continued Connecting optional components/ Additional Information 61 On safety • The unit is ...remote and timer functions. Should this is off the power of the TV set . Remove the CD or MD and leave the system turned on top of the system. • Place the system in a location with the voltage of your system...
Primary User Manual
Page 64
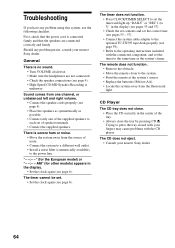
... problem persist, consult your nearest Sony dealer. 64 General There is severe hum or noise. • Move the system away from the source of noise. • Connect the system to a different wall outlet. • Install a noise filter (commercially available) to the system. • Point the remote at the system's sensor. • Replace the... supplied speakers to each set the timer to press the tray closed with your fingers may cause problems with the connected component, and set of the tray. • Always close the tray by pressing CD Z. Sound comes from the fluorescent light.
... problem persist, consult your nearest Sony dealer. 64 General There is severe hum or noise. • Move the system away from the source of noise. • Connect the system to a different wall outlet. • Install a noise filter (commercially available) to the system. • Point the remote at the system's sensor. • Replace the... supplied speakers to each set the timer to press the tray closed with your fingers may cause problems with the connected component, and set of the tray. • Always close the tray by pressing CD Z. Sound comes from the fluorescent light.
Primary User Manual
Page 71
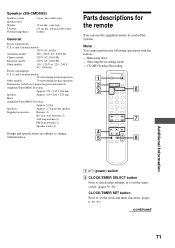
... batteries (2) AM loop antenna (1) FM lead antenna (1) Speaker cords (2) Design and specifications are subject to control the system. Selecting the recording mode - Parts descriptions for the remote You can use the supplied remote to change without notice. Removing discs - CD-MD Synchro Recording 1 2 3 6 7 4 5 8 Additional Information...Press to set the clock and timer functions. (pages 6, 55, 57) continued 71 Note You cannot perform the following operations with the remote; - and Canadian models: 120 V AC, 60 Hz Australian model: 220 - 240 V AC, 50/60 Hz Chinese model: ...
... batteries (2) AM loop antenna (1) FM lead antenna (1) Speaker cords (2) Design and specifications are subject to control the system. Selecting the recording mode - Parts descriptions for the remote You can use the supplied remote to change without notice. Removing discs - CD-MD Synchro Recording 1 2 3 6 7 4 5 8 Additional Information...Press to set the clock and timer functions. (pages 6, 55, 57) continued 71 Note You cannot perform the following operations with the remote; - and Canadian models: 120 V AC, 60 Hz Australian model: 220 - 240 V AC, 50/60 Hz Chinese model: ...
Primary User Manual
Page 72
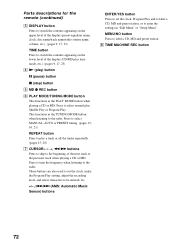
... to the beginning of the display (CD/MD play time mode, etc.). (pages 9, 17, 23) 4 N (play , Shuffle Play or Program Play. Parts descriptions for the remote (continued) 3 DISPLAY button Press to switch the contents appearing on the upper level of the display (preset equalizer name, clock, disc name/track name/radio...
... to the beginning of the display (CD/MD play time mode, etc.). (pages 9, 17, 23) 4 N (play , Shuffle Play or Program Play. Parts descriptions for the remote (continued) 3 DISPLAY button Press to switch the contents appearing on the upper level of the display (preset equalizer name, clock, disc name/track name/radio...


