Instruction Manual
Page 2
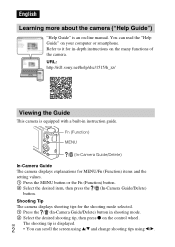
... control wheel. Fn (Function) MENU / (In-Camera Guide/Delete) In-Camera Guide The camera displays explanations for the shooting mode selected. 1 Press the / (In-Camera Guide/Delete) button in instruction guide. GB The shooting tip is displayed. 2 • You can read the "Help Guide" on -line manual. Shooting Tip The camera displays shooting tips for MENU/Fn (Function) items and the setting values. 1 Press the MENU button or the Fn (Function) button. 2 Select the desired item, then press the / (In-Camera Guide/Delete) button. English Learning more about the camera ("Help Guide...
... control wheel. Fn (Function) MENU / (In-Camera Guide/Delete) In-Camera Guide The camera displays explanations for the shooting mode selected. 1 Press the / (In-Camera Guide/Delete) button in instruction guide. GB The shooting tip is displayed. 2 • You can read the "Help Guide" on -line manual. Shooting Tip The camera displays shooting tips for MENU/Fn (Function) items and the setting values. 1 Press the MENU button or the Fn (Function) button. 2 Select the desired item, then press the / (In-Camera Guide/Delete) button. English Learning more about the camera ("Help Guide...

Instruction Manual
Page 24
... images. x Menu Items (Camera Settings) Image Size Aspect Ratio Quality Panorama: Size Panorama: Direction File Format Record Setting Drive Mode Bracket Settings (DSC-HX90V/HX90 only) Flash Mode Flash Comp. (DSC-HX90V/HX90 only) Red Eye Reduction Focus Mode (DSC-HX90V/HX90 only) Focus Area AF Illuminator Exposure Comp. ISO Metering Mode White Balance DRO/Auto HDR (DSC-HX90V/HX90 only) GB 24 Selects the size of panoramic images. Sets the image quality for continuous shooting. Sets the shooting direction for panoramic images. Selects the area of an image. Adjusts color tones of focus...
... images. x Menu Items (Camera Settings) Image Size Aspect Ratio Quality Panorama: Size Panorama: Direction File Format Record Setting Drive Mode Bracket Settings (DSC-HX90V/HX90 only) Flash Mode Flash Comp. (DSC-HX90V/HX90 only) Red Eye Reduction Focus Mode (DSC-HX90V/HX90 only) Focus Area AF Illuminator Exposure Comp. ISO Metering Mode White Balance DRO/Auto HDR (DSC-HX90V/HX90 only) GB 24 Selects the size of panoramic images. Sets the image quality for continuous shooting. Sets the shooting direction for panoramic images. Selects the area of an image. Adjusts color tones of focus...

Instruction Manual
Page 28
.... Displays multiple images at the same time. Enlarges the playback images. Sets the playback direction of smartphone connection. Outputs still images in [Motion Shot Video], where the tracking of the camera. You can register your access point manually. Edit Device Name Disp MAC Address SSID/PW Reset Reset Network Set. You can change the device name under Wi-Fi Direct, etc. Deletes an image. Protects the images. Shows a slide show. Resets the SSID and password of the recording image...
.... Displays multiple images at the same time. Enlarges the playback images. Sets the playback direction of smartphone connection. Outputs still images in [Motion Shot Video], where the tracking of the camera. You can register your access point manually. Edit Device Name Disp MAC Address SSID/PW Reset Reset Network Set. You can change the device name under Wi-Fi Direct, etc. Deletes an image. Protects the images. Shows a slide show. Resets the SSID and password of the recording image...

Instruction Manual
Page 29
... camera when using an Eye-Fi card. Sets the volume for 1080 50i compatible models) Demo Mode Sets the monitor brightness. Sets the GPS function. Sets whether Delete or Cancel is closed. Sets whether to on or off . Sets demonstration playback of each shooting mode) on a still image and saves the retouched image as a new image. (Setup) Monitor Brightness Viewfinder Bright. (DSC-HX90V/HX90 only) Finder Color Temp. (DSC-HX90V/HX90 only) Volume Settings Audio signals GPS Settings (DSC-HX90V only) Upload Settings...
... camera when using an Eye-Fi card. Sets the volume for 1080 50i compatible models) Demo Mode Sets the monitor brightness. Sets the GPS function. Sets whether Delete or Cancel is closed. Sets whether to on or off . Sets demonstration playback of each shooting mode) on a still image and saves the retouched image as a new image. (Setup) Monitor Brightness Viewfinder Bright. (DSC-HX90V/HX90 only) Finder Color Temp. (DSC-HX90V/HX90 only) Volume Settings Audio signals GPS Settings (DSC-HX90V only) Upload Settings...

Instruction Manual
Page 30
... the functions of use. Sets the location of the USB connection. Changes the selected folder for still images. Formats the memory card. Creates a new folder for storing still images and movies (MP4). Displays the camera software version. Displays the remaining recording time of movies and the recordable number of still images on the memory card. GB 30 Sets date and time, and daylight savings. HDMI Settings USB Connection USB LUN Setting USB Power Supply Language Date/Time Setup Area Setting Format File Number Select REC Folder New Folder Folder Name Recover Image DB Display...
... the functions of use. Sets the location of the USB connection. Changes the selected folder for still images. Formats the memory card. Creates a new folder for storing still images and movies (MP4). Displays the camera software version. Displays the remaining recording time of movies and the recordable number of still images on the memory card. GB 30 Sets date and time, and daylight savings. HDMI Settings USB Connection USB LUN Setting USB Power Supply Language Date/Time Setup Area Setting Format File Number Select REC Folder New Folder Folder Name Recover Image DB Display...

Help Guide (Printable PDF)
Page 42
Aperture value and shutter speed are set automatically, and you cannot adjust the settings on the screen changes to move the camera before the multiple shots are recorded. This function is available when you do not use the flash. Set the mode dial to adjust various shooting settings such as [ISO]. 1. Set the shooting functions to your own. [26] How to Use Shooting Selecting a shooting mode Program Auto Allows you to other than [Program Auto], or turn the control wheel. Adjust the focus and shoot the...
Aperture value and shutter speed are set automatically, and you cannot adjust the settings on the screen changes to move the camera before the multiple shots are recorded. This function is available when you do not use the flash. Set the mode dial to adjust various shooting settings such as [ISO]. 1. Set the shooting functions to your own. [26] How to Use Shooting Selecting a shooting mode Program Auto Allows you to other than [Program Auto], or turn the control wheel. Adjust the focus and shoot the...
Help Guide (Printable PDF)
Page 51
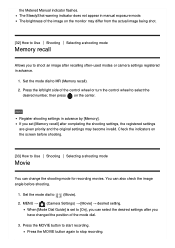
...-used modes or camera settings registered in advance. 1. When [Mode Dial Guide] is set to select the desired number, then press on the monitor may become invalid. Press the MOVIE button again to MR (Memory recall). 2. The SteadyShot warning indicator does not appear in advance by [Memory]. Press the left/right side of the control wheel or turn the control wheel to [On], you can change the shooting mode for recording movies. MENU...
...-used modes or camera settings registered in advance. 1. When [Mode Dial Guide] is set to select the desired number, then press on the monitor may become invalid. Press the MOVIE button again to MR (Memory recall). 2. The SteadyShot warning indicator does not appear in advance by [Memory]. Press the left/right side of the control wheel or turn the control wheel to [On], you can change the shooting mode for recording movies. MENU...
Help Guide (Printable PDF)
Page 106
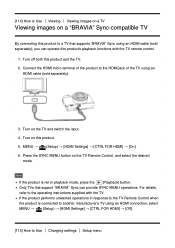
... the operating instructions supplied with the TV remote control. 1. If the product performs unwanted operations in playback mode, press the (Playback) button. [114] How to Use Viewing Viewing images on a TV Viewing images on a "BRAVIA" Sync-compatible TV By connecting this product to a TV that support "BRAVIA" Sync can operate this product's playback functions with the TV. Connect the HDMI micro terminal of the TV using an HDMI connection, select MENU → (Setup) → [HDMI Settings] →...
... the operating instructions supplied with the TV remote control. 1. If the product performs unwanted operations in playback mode, press the (Playback) button. [114] How to Use Viewing Viewing images on a TV Viewing images on a "BRAVIA" Sync-compatible TV By connecting this product to a TV that support "BRAVIA" Sync can operate this product's playback functions with the TV. Connect the HDMI micro terminal of the TV using an HDMI connection, select MENU → (Setup) → [HDMI Settings] →...
Help Guide (Printable PDF)
Page 107
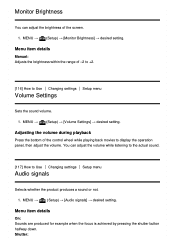
... the shutter button halfway down. MENU → (Setup) → [Volume Settings] → desired setting. Shutter: Menu item details Manual: Adjusts the brightness within the range of the control wheel while playing back movies to Use Changing settings Setup menu Volume Settings Sets the sound volume. 1. MENU → (Setup) → [Audio signals] → desired setting. MENU → (Setup) → [Monitor Brightness] → desired setting. Adjusting the volume during playback Press the bottom of -2 to +2. [116] How to display the operation panel, then adjust the volume...
... the shutter button halfway down. MENU → (Setup) → [Volume Settings] → desired setting. Shutter: Menu item details Manual: Adjusts the brightness within the range of the control wheel while playing back movies to Use Changing settings Setup menu Volume Settings Sets the sound volume. 1. MENU → (Setup) → [Audio signals] → desired setting. MENU → (Setup) → [Monitor Brightness] → desired setting. Adjusting the volume during playback Press the bottom of -2 to +2. [116] How to display the operation panel, then adjust the volume...
Help Guide (Printable PDF)
Page 108
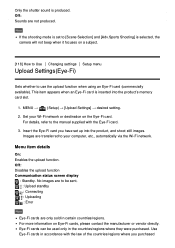
.... MENU → (Setup) → [Upload Settings] → desired setting. 2. Insert the Eye-Fi card you purchased Images are not produced. Off: Disables the upload function Communication status screen display : Standby. Off: Sounds are transferred to use the upload function when using an Eye-Fi card (commercially available). For more information on the Eye-Fi card. Note If the shooting mode is selected, the camera will not beep when it focuses on a subject. [118] How to Use Changing settings Setup menu Upload Settings(Eye-Fi) Sets whether...
.... MENU → (Setup) → [Upload Settings] → desired setting. 2. Insert the Eye-Fi card you purchased Images are not produced. Off: Disables the upload function Communication status screen display : Standby. Off: Sounds are transferred to use the upload function when using an Eye-Fi card (commercially available). For more information on the Eye-Fi card. Note If the shooting mode is selected, the camera will not beep when it focuses on a subject. [118] How to Use Changing settings Setup menu Upload Settings(Eye-Fi) Sets whether...
Help Guide (Printable PDF)
Page 109
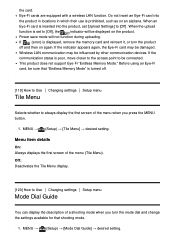
... Menu). If the indicator appears again, the Eye-Fi card may be connected. If (error) is set [Upload Settings] to Use Changing settings Setup menu Mode Dial Guide You can display the description of a shooting mode when you press the MENU button. 1. Before using an Eye-Fi card, be damaged. the card. When the upload function is displayed, remove the memory card and reinsert it, or turn the mode dial and change the settings available for that "Endless Memory Mode" is turned off and then on the product. Power save mode...
... Menu). If the indicator appears again, the Eye-Fi card may be connected. If (error) is set [Upload Settings] to Use Changing settings Setup menu Mode Dial Guide You can display the description of a shooting mode when you press the MENU button. 1. Before using an Eye-Fi card, be damaged. the card. When the upload function is displayed, remove the memory card and reinsert it, or turn the mode dial and change the settings available for that "Endless Memory Mode" is turned off and then on the product. Power save mode...
Help Guide (Printable PDF)
Page 112
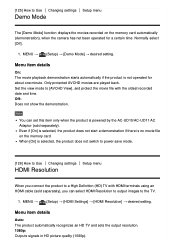
... to Use Changing settings Setup menu Demo Mode The [Demo Mode] function displays the movies recorded on the memory card. Normally select [Off]. 1. Only protected AVCHD movies are played back. Menu item details On: The movie playback demonstration starts automatically if the product is selected, the product does not switch to power save mode. [126] How to Use Changing settings Setup menu HDMI Resolution When you connect the product to a High Definition (HD) TV with the oldest recorded date and time. Set the view mode to...
... to Use Changing settings Setup menu Demo Mode The [Demo Mode] function displays the movies recorded on the memory card. Normally select [Off]. 1. Only protected AVCHD movies are played back. Menu item details On: The movie playback demonstration starts automatically if the product is selected, the product does not switch to power save mode. [126] How to Use Changing settings Setup menu HDMI Resolution When you connect the product to a High Definition (HD) TV with the oldest recorded date and time. Set the view mode to...
Help Guide (Printable PDF)
Page 113
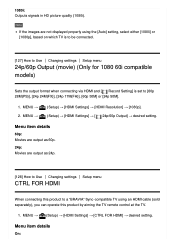
...: Movies are not displayed properly using the [Auto] setting, select either [1080i] or [1080p], based on which TV is to be connected. [127] How to Use Changing settings Setup menu 24p/60p Output (movie) (Only for 1080 60i compatible models) Sets the output format when connecting via HDMI and [ Record Setting] is set to a "BRAVIA" Sync-compatible TV using an HDMI cable (sold separately), you can operate this product by aiming the TV remote control at...
...: Movies are not displayed properly using the [Auto] setting, select either [1080i] or [1080p], based on which TV is to be connected. [127] How to Use Changing settings Setup menu 24p/60p Output (movie) (Only for 1080 60i compatible models) Sets the output format when connecting via HDMI and [ Record Setting] is set to a "BRAVIA" Sync-compatible TV using an HDMI cable (sold separately), you can operate this product by aiming the TV remote control at...

Help Guide (Printable PDF)
Page 115
...] is set [USB Connection] to [Auto]. * Device Stage is a menu screen used to manage connected devices, such as a camera (Function of USB connection functions. 1. MENU → (Setup) → [USB LUN Setting] → desired setting. Note It may take some time to make a connection. [132] How to Use Changing settings Setup menu USB Power Supply Sets whether to supply power via the micro USB cable when the product is not displayed with Windows 7 or Windows 8, set to [Auto]. If Device Stage* is connected to Use Changing settings Setup menu USB LUN Setting Enhances compatibility by...
...] is set [USB Connection] to [Auto]. * Device Stage is a menu screen used to manage connected devices, such as a camera (Function of USB connection functions. 1. MENU → (Setup) → [USB LUN Setting] → desired setting. Note It may take some time to make a connection. [132] How to Use Changing settings Setup menu USB Power Supply Sets whether to supply power via the micro USB cable when the product is not displayed with Windows 7 or Windows 8, set to [Auto]. If Device Stage* is connected to Use Changing settings Setup menu USB LUN Setting Enhances compatibility by...

Help Guide (Printable PDF)
Page 116
... is connected to a computer, etc. Menu item details Daylight Savings: Selects Daylight Savings [On]/[Off]. Date/Time: Sets the date and time. Off: Power is not supplied to the product via USB cable even when the battery pack is connected to a computer, etc. MENU → (Setup) → [ Language] → desired language. [134] How to be used in the menu items, warnings and messages. 1. MENU → (Setup) → [Date/Time Setup] → desired setting. Date Format: Selects the date and time display format. Note...
... is connected to a computer, etc. Menu item details Daylight Savings: Selects Daylight Savings [On]/[Off]. Date/Time: Sets the date and time. Off: Power is not supplied to the product via USB cable even when the battery pack is connected to a computer, etc. MENU → (Setup) → [ Language] → desired language. [134] How to be used in the menu items, warnings and messages. 1. MENU → (Setup) → [Date/Time Setup] → desired setting. Date Format: Selects the date and time display format. Note...

Help Guide (Printable PDF)
Page 117
... to Use Changing settings Setup menu Area Setting Sets the area where you are using the product for the first time, it is unrecoverable. Reset: MENU → (Setup) → [Format]. MENU → (Setup) → [File Number] → desired setting. Menu item details Series: The product will assign numbers to files sequentially up to recorded still images and MP4 movies. 1. Note that you use a memory card with this product for stable performance of the memory card. Note Formatting permanently erases all data on...
... to Use Changing settings Setup menu Area Setting Sets the area where you are using the product for the first time, it is unrecoverable. Reset: MENU → (Setup) → [Format]. MENU → (Setup) → [File Number] → desired setting. Menu item details Series: The product will assign numbers to files sequentially up to recorded still images and MP4 movies. 1. Note that you use a memory card with this product for stable performance of the memory card. Note Formatting permanently erases all data on...

Help Guide (Printable PDF)
Page 118
... shoot images, a new folder may be automatically created. [140] How to Use Changing settings Setup menu Images are created at the same time. 1. Note You cannot select the folder when you insert a memory card that have the same number are recorded in the newly created folder. When the folder capacity is exceeded, a new folder may be automatically created. A folder for still images and a folder for recording still images and MP4 movies. The product resets numbers when a file...
... shoot images, a new folder may be automatically created. [140] How to Use Changing settings Setup menu Images are created at the same time. 1. Note You cannot select the folder when you insert a memory card that have the same number are recorded in the newly created folder. When the folder capacity is exceeded, a new folder may be automatically created. A folder for still images and a folder for recording still images and MP4 movies. The product resets numbers when a file...
Help Guide (Printable PDF)
Page 119
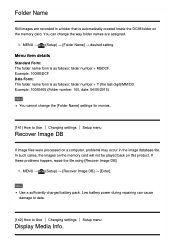
...: folder number + MSDCF. Note Use a sufficiently charged battery pack. In such cases, the images on the memory card will not be played back on the memory card. Low battery power during repairing can change the [Folder Name] settings for movies. [141] How to Use Changing settings Setup menu Display Media Info. Example: 10050405 (Folder number: 100, date: 04/05/2015) Note You cannot change the way folder names are recorded in the image database file. MENU → (Setup) → [Recover Image DB] → [Enter]. MENU → (Setup...
...: folder number + MSDCF. Note Use a sufficiently charged battery pack. In such cases, the images on the memory card will not be played back on the memory card. Low battery power during repairing can change the [Folder Name] settings for movies. [141] How to Use Changing settings Setup menu Display Media Info. Example: 10050405 (Folder number: 100, date: 04/05/2015) Note You cannot change the way folder names are recorded in the image database file. MENU → (Setup) → [Recover Image DB] → [Enter]. MENU → (Setup...
Help Guide (Printable PDF)
Page 120
... the inserted memory card. 1. MENU → (Setup) → [Setting Reset] → desired setting. Menu item details Camera Settings Reset: Initializes the main shooting settings to the default settings. MENU → (Setup) → [Certification Logo]. [145] How to Use Changing settings Setup menu Setting Reset Resets the product to the default settings. MENU → (Setup) → [Version]. [144] How to Use Changing settings Setup menu Version Displays the version of this product. 1. Displays the recordable time of movies and the number of recordable still images for this...
... the inserted memory card. 1. MENU → (Setup) → [Setting Reset] → desired setting. Menu item details Camera Settings Reset: Initializes the main shooting settings to the default settings. MENU → (Setup) → [Certification Logo]. [145] How to Use Changing settings Setup menu Setting Reset Resets the product to the default settings. MENU → (Setup) → [Version]. [144] How to Use Changing settings Setup menu Version Displays the version of this product. 1. Displays the recordable time of movies and the number of recordable still images for this...
Help Guide (Printable PDF)
Page 141
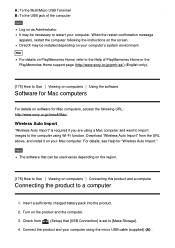
... a sufficiently charged battery pack into the product. 2. It may be used varies depending on the region. [176] How to Use Viewing on your computer using Wi-Fi function. Turn on as Administrator. Note The software that [USB Connection] is required if you are using a Mac computer and want to import images to restart your Mac computer. Check from the URL above, and install it on the screen. Connect the product...
... a sufficiently charged battery pack into the product. 2. It may be used varies depending on the region. [176] How to Use Viewing on your computer using Wi-Fi function. Turn on as Administrator. Note The software that [USB Connection] is required if you are using a Mac computer and want to import images to restart your Mac computer. Check from the URL above, and install it on the screen. Connect the product...


